Table of Contents

Related Manuals for Honeywell HRGX45


Summary of Contents for Honeywell HRGX45
-
Page 1: Contents
HRGX Performance Series 4/8/16-Channel Embedded DVR HRGX45 HRGX85 HRGX161 HRGX45X HRGX85X HRGX161X HRGX41 HRGX81 HRGX162 HRGX41X HRGX81X HRGX162X HRGX82 HRGX164 HRGX82X HRGX164X Getting Started Guide Document 800-16693 – Rev A – 04/2014... - Page 2 Revisions Issue Date Revisions 04/2014 New document.
-
Page 3: Table Of Contents
Contents | 3 Contents Cautions and Warnings ......... . . Regulatory Statements . - Page 4 4 | HRGX DVR Getting Started Guide www.honeywell.com/security...
-
Page 5: Cautions And Warnings
Cautions and Warnings WARNING Risk of explosion if battery is replaced by an incorrect type. Dispose of used batteries in accordance with local laws. CAUTION Use only with supplied power adapter. THIS SYMBOL INDICATES THAT DANGEROUS VOLTAGE CONSTITUTING A RISK OF RISK OF ELECTRIC SHOCK ELECTRIC SHOCK IS PRESENT DO NOT OPEN... -
Page 6: Safety Instructions
10. REPLACEMENT PARTS - When replacement parts are required, be sure the service technician has used replacement parts specified by the manufacturer or have the same characteristics as the original part. Unauthorized substitutions may result in fire, electric shock or other hazards. www.honeywell.com/security... -
Page 7: Introducing The Hrgx Dvr
Remote Control Operation, page 14 About This Manual This manual introduces the Honeywell HRGX Performance Series DVR and describes basic installation and setup procedures. It is primarily intended for system integrators and installers. For information about configuring and operating the DVR, and to learn about accessing the DVR remotely, visit the product webpage. -
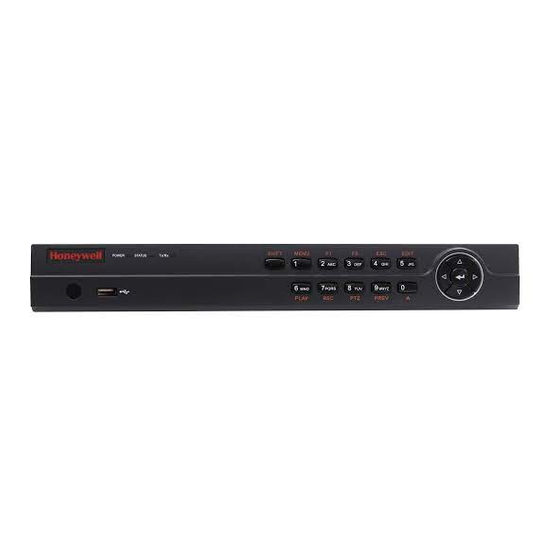
Page 8: Front Panel Layout
POWER: Lights green when DVR is receiving power. STATUS: Lights red when DVR hard drive is reading/writing. Tx/Rx: Flashes green when network connection is active. USB Port Connects USB device (such as a flash drive for saving video clips). www.honeywell.com/security... - Page 9 Introducing the HRGX DVR | 9 The following illustration shows the front panel of the 8/16-channel HRGX DVR. Figure 1-2 HRGX8/HRGX16 Front Panel No. Name Function Alphanumeric Buttons SHIFT: Switches between number/letter input and function input. MENU/1: Enters 1; MENU accesses the main menu interface. 2ABC/F1: Enters 2/A/B/C;...
-
Page 10: Rear Panel Layout
Connects RS-485 devices. Connect D+ and D– terminals to R+ and R– terminals of PTZ receiver. 12 V DC power input Power Switch Switch for turning DVR on/off Ground terminal (needs to be connected before DVR is turned on) www.honeywell.com/security... - Page 11 Introducing the HRGX DVR | 11 The following illustration shows the rear panel of the 8-channel HRGX DVR. Figure 1-4 HRGX8 Rear Panel 10 11 No. Name Description Video In BNC connectors for analog video input Video Out BNC connectors for analog video output USB Port Connects USB device (such as a USB mouse) HDMI...
- Page 12 Connects RS-485 devices. Connect D+ and D– terminals to R+ and R– terminals of PTZ receiver. 12 V DC power input Power Switch Switch for turning DVR on/off Ground terminal (needs to be connected before DVR is turned on) www.honeywell.com/security...
-
Page 13: Mouse Operation
To use the mouse, connect the mouse cable to the USB port at the rear of the DVR. The mouse should be detected automatically. Note If you prefer, you can use your own mouse instead of the supplied mouse. Ask your Honeywell dealer for a list of compatible mice. The following table describes basic mouse operations: Name Action Description Live view: Select channel and display quick set menu. -
Page 14: Remote Control Operation
30 s. Enters PTZ control mode. Returns to previous menu. RESERVED Reserved PTZ Controls Control iris, focus, and zoom of PTZ camera. Selects all items in a list. Cycles through tabbed pages. www.honeywell.com/security... -
Page 15: Pairing The Remote Control With The Dvr
Check that the batteries are properly installed. Ensure that the polarities are not reversed. Check that the IR receiver on the DVR front panel is not obstructed. Aim the remote control at the IR receiver. If the problem persists, contact your Honeywell dealer for a replacement. 800-16693 - A - 04/2014... -
Page 16: Menu Structure
Maintenance Normal Record General Schedule General System Info Lock Event Alarm Advanced Encoding Image Network Log Search Shutdown HDD Detect Advanced Alarm Configuration Reboot Holiday Motion Display Upgrade Default Privacy Mask Exceptions Video User Net Detect Tampering Video Loss www.honeywell.com/security... -
Page 17: Installing The Dvr
Installing the DVR | 17 Installing the DVR This chapter contains the following sections: • Installation Precautions, page 17 • Connecting External Devices, page 18 • Starting Up and Shutting Down the DVR, page 21 • Using the Setup Wizard, page 22 •... -
Page 18: Connecting External Devices
Connecting Alarm Devices Connect alarm devices to the Alarm In/Out interface. Press and hold the orange part of the terminal block, insert the wire, then release the orange part to lock the wire in place. www.honeywell.com/security... -
Page 19: Connecting Power
Installing the DVR | 19 Alarm Input The alarm input should be an open/closed dry contact relay. If an open/closed relay is not used, connect the alarm input as follows: Alarm Output The alarm output relay supports connections to AC/DC loads. DC loads must be within the limit of 12 V DC / 1 A. -
Page 20: Typical Installation
The following diagram shows a typical HRGX DVR installation: Alarm Sensor Alarm Out IR Remote Control Web Browser Multi-Site Software Alarm Input/Output Internet Cameras Mobile Device Video In USB Mouse Microphone Support For backing up video clips Video Out Main Monitor Spot Monitor (BNC) www.honeywell.com/security... -
Page 21: Starting Up And Shutting Down The Dvr
Installing the DVR | 21 Starting Up and Shutting Down the DVR Following correct startup and shutdown procedures will help to prolong the life of your DVR. Before you begin, ensure that all extension cords, surge protectors, and uninterruptible power supplies used with the device are rated to handle the device’s electrical requirements, and that the device is properly grounded. -
Page 22: Using The Setup Wizard
DVR, clear the check box. Click Next to continue to the next screen. Click the Admin Password field to display the on-screen numerical keypad, enter your DVR’s admin password (the default admin password is 12345), and then click Enter. www.honeywell.com/security... - Page 23 Installing the DVR | 23 If you want to create a new password, select the New Admin Password check box, enter a new password in the New Password field, and then re-enter the new password in the Confirm field. Click Next to continue to the next screen. Specify your DVR’s network settings.
- Page 24 10. Click Next to continue to the next screen. 11. Motion detection is disabled for all channels by default. Click the channel(s) that you want to enable motion detection for, or click Analog to select all channels, and then click OK. www.honeywell.com/security...
-
Page 25: Accessing The Main Menu
Installing the DVR | 25 Accessing the Main Menu Use the following procedure to access the main menu. To access the main menu: In live view mode, right-click anywhere on the main monitor screen to display the shortcut menu, and then click Menu. If prompted, enter the DVR’s admin password, and then click OK. -
Page 26: Setting The System Date And Time
Select MM-DD-YYYY, YYYY-MM-DD, or DD-MM-YYYY. • System Date Click the calendar icon to display the on-screen calendar, and then select the current date. • System Time Click the clock icon, and then enter the current time (hh:mm:ss). Click Apply to save your settings. www.honeywell.com/security... -
Page 27: Upgrading The Firmware
Installing the DVR | 27 Upgrading the Firmware To obtain the latest firmware for your HRGX DVR, contact your Honeywell dealer. The firmware can be upgraded locally (by connecting a USB flash drive or other device containing the firmware file to the DVR) or remotely (via FTP server). -
Page 28: Hdd Storage Calculation
HDD Storage Calculation The following table estimates storage space usage based on recording one channel for hour at a fixed bit rate. Actual usage will vary. Bit Rate (Kbps) Storage Used (MB) 1024 1280 1536 1792 2048 3072 1350 www.honeywell.com/security... -
Page 29: Operating The Dvr
Operating the DVR | 29 Operating the DVR This chapters contains the following sections: • Using Live View, page 29 • Playing Back Video, page 31 • Exporting Video, page 33 Using Live View Live view mode is the DVR’s default mode. When you start the DVR, live video from the connected cameras displays automatically on the monitor. -
Page 30: Shortcut Menu
Double-click the mouse wheel again to continue, or click Cancel to cancel the operation. To switch back to the main HDMI/VGA output, right-click on the screen in live view mode to display the shortcut menu, and then click Main Monitor. www.honeywell.com/security... -
Page 31: Playing Back Video
Operating the DVR | 31 Playing Back Video Use the following procedures to play back recorded video. To play back the last five minutes of video: Click a channel in live view mode to display the quick setting toolbar. On the toolbar, click the Instant Playback button . - Page 32 Add customized tag Pause/Play Tag management 30s reverse 30s forward * To show the control Slow down panel again, right-click on Speed up the screen to display the Previous day shortcut menu, and then Next day click Control Panel. www.honeywell.com/security...
-
Page 33: Exporting Video
Operating the DVR | 33 Exporting Video Use the following procedures to export recorded video files and customized video clips. To export recorded video files: Insert a USB flash drive or other external storage device into the USB port on the front of the DVR. - Page 34 Do you want to save them now?" Click Yes. The Export window opens. If you have not already done so, insert your USB storage device into the USB port on the DVR, and then click Refresh. Click Export to save the video clip to your USB storage device. www.honeywell.com/security...
- Page 36 Document 800-16693 – Rev A – 04/2014 © 2014 Honeywell International Inc. All rights reserved. No part of this publication may be reproduced by any means without written permission from Honeywells. The information in this publication is believed to be accurate in all respects. However, Honeywell cannot assume responsibility for any consequences resulting from the use thereof.