Philips Streamium WACS7500 User Manual
Wireless music center & station
Hide thumbs
Also See for Streamium WACS7500:
- User manual (104 pages) ,
- Specifications (3 pages) ,
- Manual de usuario (100 pages)

Related Manuals for Philips Streamium WACS7500


Summary of Contents for Philips Streamium WACS7500
- Page 1 Register your product and get support at www.philips.com/welcome WACS7500 WAS7500 EN User manual Contact information Downloaded From Disc-Player.com Philips Manuals...
-
Page 2: Ec Declaration Of Conformity
(Year in which the CE mark is affixed / Année au cours de laquelle le marquage CE a été apposé) EC DECLARATION OF CONFORMITY (DECLARATION DE CONFORMITE CE) We / Nous, PHILIPS CONSUMER LIFESTYLE B.V. (Name / Nom de l’entreprise) TUSSENDIEPEN 4, 9206 AD DRACHTEN, THE NETHERLANDS (address / adresse) Declare under our responsibility that the electrical product(s): (Déclarons sous notre propre responsabilité... - Page 3 Wireless Music Center + Station Downloaded From Disc-Player.com Philips Manuals...
-
Page 4: Laser Product
Copyright in the U.K. Recording and playback of any materials may require consent. See Copyright Act 1956 and The Performerb’s Protection Acts 1958 to 1972. Downloaded From Disc-Player.com Philips Manuals... -
Page 5: Table Of Contents
Remote control and Station 4.2.1 Remote control battery installation 6.9.1 MUSIC FOLLOWS ME 4.2.2 Remote control, 2-way 6.9.2 MUSIC BROADCAST Navigation controls 6.10 View system information Alphanumeric keys 6.11 Edit track information Downloaded From Disc-Player.com Philips Manuals Table of contents... - Page 6 11.1 Add Stations to Wi-Fi network of Center 18.1.2 What else you’ll need 18.1.3 Preparation 11.1.1 Delete a Station 18.1.4 Mounting Station Internet radio requires broadband Internet access and a wireless router. Downloaded From Disc-Player.com Philips Manuals Table of contents...
-
Page 7: Important
• Modification of the product can result in hazardous EMC radiation or other unsafe operations. This product complies with the radio interference requirements of the European Community. Philips Electronics, BG Entertainment Solutions, hereby declare that this product WACS7500 is in compliance with the essential requirements and other relevant provisions of the Directive 1999/5/EC. -
Page 8: Gpl Package Written Offer
This product contains Linux 2.4.27-vrsl that is made available under the GNU GPL license version 2 (hereafter called ‘the Program’). Philips Electronics Hong Kong Ltd. hereby offers to deliver or make available, upon request, for a charge no more than the cost of physically performing source distribution, a complete machine- readable copy of the corresponding source code of the Program on a medium customarily used for software interchange. -
Page 9: Disposal Of Your Old Product
The HD is not recommended for permanent storage of recorded contents. Before creating your music library, create a back up of the music on your PC. If necessary, you can later restore your system with these backup files. Downloaded From Disc-Player.com Philips Manuals Important... -
Page 10: Hearing Safety
Important (for models supplied with headphones): Philips guarantees compliance with the maximum sound power of its audio players as determined by relevant regulatory bodies only with the original model of provided headphones. In case this one needs replacement, we recommend that you contact your retailer to order a model identical to that of the original, provided by Philips. -
Page 11: Register Your Product
• Firmware upgrade files for WACS7500 online • Interactive troubleshooting If you register your product at www.club.philips.com, we will be able to inform you as soon as new and free upgrades are available. Enjoy your Wireless Music Center & Station! Downloaded From Disc-Player.com Philips Manuals... -
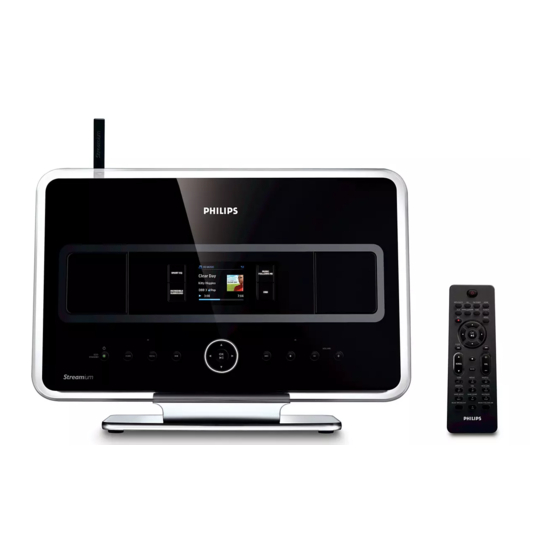
Page 12: Your Wireless Music Center & Station
Your Wireless Music Center & Station Congratulations on your purchase and welcome to Philips! With the Wireless Music Center & Station you can: • Stream music from your PC • Dock your iPod • Plug & play from USB devices •... - Page 13 Remote control, 2-way, incl. 4x Remote control, 1-way, incl. 2x Power cable, 2x AAA batteries AAA batteries PC Suite CD, 1x Mounting kit, 1x (for Station) FM wire antenna, 2x Downloaded From Disc-Player.com Philips Manuals Your wireless music centre and station...
-
Page 14: Overview Wireless Music Center & Station
HD: moves music playback between Center to fast forward and Station (Dynamic Bass Boost) Confirms selection Toggles the bass enhancement between on Starts or pauses playback (DBB1, DBB2, DBB3) and off Downloaded From Disc-Player.com Philips Manuals Your wireless music centre and station... - Page 15 ON and Eco Standby (power- saving mode). Green indicator light = the set is switched ON. Red indicator light = the set is switched to Standby or Eco Standby. Downloaded From Disc-Player.com Philips Manuals Your wireless music centre and station...
-
Page 16: Overview Remote Controls
Press & hold to switch the set to Eco Standby (power-saving mode) Confirms selection Radio: enters the list of preset stations HOME Text entry: confirms input and moves the Selects cursor forward HD Music Downloaded From Disc-Player.com Philips Manuals Your wireless music centre and station... - Page 17 Synchronizes the displays of the set and the record (press & hold to select/deselect ALL remote control tracks) MUSIC FOLLOWS ME HD: moves music playback between Center and Station Downloaded From Disc-Player.com Philips Manuals Your wireless music centre and station...
-
Page 18: 1-Way Remote Control
AUX (separately connected device) In Standby mode: switches the set ON and selects HD Music Stops playback or recording Radio UPnP Adjusts the volume level up or down Portable , or Downloaded From Disc-Player.com Philips Manuals Your wireless music centre and station... - Page 19 SMART EQ (4 ghi) HD: toggles between sound settings for the current Genre on or off SLEEP (1 .,?!’@-_:;/) Adjusts, displays or switches off the sleep timer Downloaded From Disc-Player.com Philips Manuals Your wireless music centre and station...
-
Page 20: Overview Display
Music broadcast Aux mode Music follows me CD mode Mute HD mode Radio mode Sleep Record (rip) mode Smart EQ Transfer mode Wi-Fi connected USB mode Wi-Fi and Ethernet connected Downloaded From Disc-Player.com Philips Manuals Your wireless music centre and station... -
Page 21: Installation
Use the free standing. For the we have enclosed a wall mounting kit. (free standing) (wall mounted) To learn more about wall mounting, see 18 Appendix on How to mount Station to a wall. Downloaded From Disc-Player.com Philips Manuals Installation... -
Page 22: Connect Ac Power
For better Wi-Fi reception, rotate the Wi-Fi antenna or adjust the location of Rear connections Note • Never connect or disconnect power cables when the mains supply is switched on. • Install within easy reach of suitable AC power outlets. Downloaded From Disc-Player.com Philips Manuals Installation... -
Page 23: Connect Antennas
For portable devices with USB cable: 1 Insert one end of the USB cable (not supplied) into the socket 2 Insert the other end of the USB cable into the USB output terminal of the portable device. Downloaded From Disc-Player.com Philips Manuals Installation... -
Page 24: Connect Your Ipod (Optional)
You can connect your iPod (not supplied) to using Philips docking cradle and data/audio cable (Philips docking cradle for iPod, model DC1050 sold separately). Now you can enjoy the music library in your iPod via the sophisticated speaker system of the set.You can even charge your iPod at the same time. -
Page 25: Connect Additional Appliances
LINE OUT On the additional device 2 Connect the other end of the audio cable to the AUX IN terminals. 3 Select AUX mode on the connected additional device. Downloaded From Disc-Player.com Philips Manuals Installation... -
Page 26: Prepare
If you have preset RDS radio stations, you can synchronize the clock with one of the RDS stations. 1 Press MENU to enter the menu screen. 2 Use to select Settings followed by Time. 3 Use to select Auto Time Sync. Downloaded From Disc-Player.com Philips Manuals Prepare... - Page 27 2 Use to select Settings followed by Time. 3 Use 3, 4, or the numeric keypad (0-9), and to select Set Time. > The display shows current clock setting (00:00 by default) Downloaded From Disc-Player.com Philips Manuals Prepare...
-
Page 28: View The Clock
• In Standby mode, you can briefly press VIEW to turn on the LCD backlights and view clock more clearly. • If you disconnect the power supply (pull the mains plug), the clock will be reset (settings will not be saved). Downloaded From Disc-Player.com Philips Manuals Prepare... -
Page 29: Remote Control
• Always remove the batteries, if the remote control will not be used for a longer period of time. To avoid batteries being accidentally swallowed: • Always keep them out of reach of children and pets. (Consult a physician immediately, if a battery has been swallowed!) Downloaded From Disc-Player.com Philips Manuals Prepare... - Page 30 You - as the user - are legally obliged to dispose of all batteries in accordance with your local regulations or to return them to the shop where you purchased the batteries. Thus, you fulfill your legal obligations and contribute to environmental protection! Downloaded From Disc-Player.com Philips Manuals Prepare...
-
Page 31: Remote Control, 2-Way
2-way remote control, so it is easier to operate the remote control. • To synchronize the remote control display after activating the button on the set, press REFRESH on the remote control of Center. Downloaded From Disc-Player.com Philips Manuals Prepare... -
Page 32: Navigation Controls
Note You will enter the previous / next option list if the cursor reaches the beginning or the end of the text box. Downloaded From Disc-Player.com Philips Manuals Prepare... -
Page 33: Basic Functions
The button light changes from green to red. : The screen dims. The display shows connected (or last connected) : The screen dims. The display shows the connected (or screen will remain blank if no is found Downloaded From Disc-Player.com Philips Manuals Basic functions... - Page 34 (CD/MP3-CD (only ), HD, or HOME on remote control). • CD/MP3-CD source is only available on • FM TUNER and AUX source buttons are only available on the 1-way remote control. Downloaded From Disc-Player.com Philips Manuals Basic functions...
-
Page 35: Eco Standby (Power-Saving Mode)
Standby mode in order to save power. Volume control 1 Check that playback has started. 2 Adjust the volume with VOL +/- buttons. > Display shows a horizontal bar indicating the volume level. Downloaded From Disc-Player.com Philips Manuals Basic functions... -
Page 36: Mute
Set Treble or Bass: 1 Press MENU to enter the menu screen. 2 Use to select Settings, followed by Treble or Bass. 3 Navigate to highlight your option: Treble (+3 to -3), Bass (+3 to -3) Downloaded From Disc-Player.com Philips Manuals Basic functions... -
Page 37: Dbb (Dynamic Bass Boost)
1 Press to select On or Off. Contrast: 1 Press to increase or reduce the contrast. Note You can also toggle the Backlight On and Off by pressing DIM on the 1-way remote control. Downloaded From Disc-Player.com Philips Manuals Basic functions... -
Page 38: Selecting Languages
When the selected sleep time expires, automatically switches to Standby mode. 4 To deactivate the sleep timer before the sleep time expires, press SLEEP repeatedly until SLEEP OFF is selected. > The icon disappears. Downloaded From Disc-Player.com Philips Manuals Basic functions... -
Page 39: Alarm
2. 5 Confirm the alarm time with 6 Use to select repeat mode Once or Daily. > The screen briefly shows Alarm On and appears in the display. Downloaded From Disc-Player.com Philips Manuals Basic functions... -
Page 40: Hd (Hard Disk)
find all the items beginning with the keyword you entered (note that this feature is case sensitive). 1 Navigate to enter desired option list of tracks, albums or playlists. 2 On remote control, press SEARCH > Display: text box appears Downloaded From Disc-Player.com Philips Manuals Hard Disk... -
Page 41: Select Track Of Same Artist
> Playback of found tracks of same genre as current track continues after current track. Not all tracks have an automatic genre tag, so you may have to manually assign a genre for your tracks when loading them to the HD of Downloaded From Disc-Player.com Philips Manuals Hard Disk... -
Page 42: Find Track In Current Album
2 To return to normal playback, press REPEAT or / and SHUFFLE repeatedly until the various mode icons disappear from the display. Note is active, it will be deactivated when pressing SHUFFLE.To activate press first SHUFFLE, then REPEAT Downloaded From Disc-Player.com Philips Manuals Hard Disk... -
Page 43: Build Music Library On Center
(for example, under artist, albums, genres or all tracks) and also to be merged with the existing tracks in the HD.To update your Gracenote® Media Database, see the section 12 Connect to your PC in this manual. Downloaded From Disc-Player.com Philips Manuals Hard Disk... - Page 44 Rip from a CD at high speed: (Audio CD, MP3/WMA CD) 1 Insert CD with printed side facing you: For MP3/WMA CD, press on a highlighted file folder to enter the track list. Downloaded From Disc-Player.com Philips Manuals Hard Disk...
-
Page 45: Import From Your Pc
The Wireless Audio Device Manager (WADM) in the supplied PC installer helps you organize music files on your PC and import them into . For details, see the section 12 Connect to your PC in this manual. Downloaded From Disc-Player.com Philips Manuals Hard Disk... -
Page 46: Record From Radio Or External Source
4 Use to display the selection of playlists. 5 Use to select the desired playlist. > Display shows all added tracks in playlist. 6 Repeat steps to select and store all desired tracks. Downloaded From Disc-Player.com Philips Manuals Hard Disk... -
Page 47: Delete A Playlist, Album Or Track
The feature View track information is only available in mode HD Music. 1 Use the VIEW button on the remote control to toggle the display between the HD playback screen and the track list screen. Downloaded From Disc-Player.com Philips Manuals Hard Disk... -
Page 48: Backup To Pc
, and the music will start to play. Simultaneously, the music (audio output) of the source unit is stopped. Any selected play modes (e.g. ) will be retained on the destination unit (see 6.3 Play modes REPEAT, SHUFFLE). Downloaded From Disc-Player.com Philips Manuals Hard Disk... -
Page 49: Music Broadcast
, and then start playback again and activate MUSIC BROADCAST on again. • MUSIC BROADCAST will also stop when: is switched to Standby mode or Eco Standby mode - the selected album or list (Playlist, Artist, Genre,…) has reached the end Downloaded From Disc-Player.com Philips Manuals Hard Disk... -
Page 50: View System Information
> List of available information items (e.g. SSID,Wireless Mode,WEP Key, MAC Address, Subnet mask, IP Address, and IP Mode) is shown on the display: to select Wired. > List of available information (e.g. Subnet mask, IP Address, and IP mode) are shown on the display: Downloaded From Disc-Player.com Philips Manuals Hard Disk... -
Page 51: Edit Track Information
Press briefly to skip to previous character, Press & hold to fast scroll through the character list Press briefly to skip to next character, Press & hold to fast scroll through the character list. Downloaded From Disc-Player.com Philips Manuals Hard Disk... -
Page 52: Cd (Center Only)
files end on extension .m4a or .m4b. • To burn/convert DRM protected WMA files use Windows Media Player 10 (or later.Visit www. microsoft.com for details about Windows Media Player and WM DRM (Windows Media Digital Rights Management). Downloaded From Disc-Player.com Philips Manuals... -
Page 53: Play Discs
On All tracks, to start playback of all tracks on disc. a To temporarily pause playback, press 2;. b To resume playback, press button again. 5 To stop playback, press STOP 6 To remove disc, press EJECT on Center. Downloaded From Disc-Player.com Philips Manuals... -
Page 54: Search By Keywords
The option list automatically shows the closest match in the alphabet if no match is found. Display: Searching… disappears. The search will also stop when: • you select another source • you switch off the set Downloaded From Disc-Player.com Philips Manuals... -
Page 55: Find Track In Current Album (During Playback)
1 During playback press REPEAT or / and SHUFFLE once or more times to select play mode. 2 To return to normal playback, press REPEAT or / and SHUFFLE repeatedly until the various modes are no longer displayed. Downloaded From Disc-Player.com Philips Manuals... -
Page 56: Fm Radio
6 To tune to a weak station, press briefly and repeatedly until you have established optimum reception. Store preset radio stations You can store up to 60 radio stations in the preset memory. Downloaded From Disc-Player.com Philips Manuals FM radio... -
Page 57: Autostore: Automatic Preset Program
> Current radio station is stored under selected preset number. 8.2.3 Listen to preset station 1 In FM radio mode, press to access the list of preset stations. 2 Use to select the preset station. Downloaded From Disc-Player.com Philips Manuals FM radio... -
Page 58: Rds News
2 To deactivate NEWS, press RDS/NEWS again. > Icon disappears and NEWS OFF is briefly displayed. Ensure that you have stored RDS stations in the first 10 preset locations (see 8.2.1 Autostore: Automatic preset program). Downloaded From Disc-Player.com Philips Manuals FM radio... -
Page 59: Internet Radio
For first time use of the Internet radio you must register with Philips. To register you need a valid email address. Note If you enter an email address that is already registered with Philips, the display asks for your password. Enter your password and enjoy Internet radio! Internet radio registration process:... -
Page 60: Regular Use
On your PC: 1 Check the inbox of the email address you entered and look for a message from ‘ConsumerCare@Philips.com‘ with the subject: Your Streamium Registration…. 2 Read and follow the instructions given in the email to complete your registration process on the Philips website. -
Page 61: Add Internet Radio Stations And Bookmark Your Favorites
On your PC 1 Log in with your registered email address at www.philips.com/welcome. 2 Select Streamium Management on the left hand side of the window. 3 Choose radio stations from the list. -
Page 62: Upnp
, check that UPnP server software is properly installed and enabled on the device (e.g.Windows Media Player supplied PC Suite CD,Windows Media Player 11 or Philips Multimedia Manager). For more help refer to Windows Media Player. 3 To play the music library of on the UPnP device, check with the user manual of your UPnP device to make sure it is able to receive music from other UPnP enabled devices. -
Page 63: Connect To The Upnp Device
For more information on the connection, see 11.2 Network settings: Connect to Wi-Fi enabled or wired home network. Connecting other UPnP clients to Philips Wireless Music Center may take longer than connecting a Philips Wireless Music Station to Center. UPnP playback Note •... -
Page 64: Play Music From Center
> The music library of appears on the UPnP enabled device as it does on 3 Use the function keys on the UPnP device to play the music library of Downloaded From Disc-Player.com Philips Manuals Universal Plug and Play... -
Page 65: External Sources
You can easily transfer your favorite music from your PC to a USB mass storage device by drag & drop. You can use the music management software of your flash device for the music transfer. Downloaded From Disc-Player.com Philips Manuals External sources... -
Page 66: 10.1.2 Play Music From Usb Device
3 Play audio files on the USB as you do with the albums/tracks on a HD (see 6 HD). Due to compatibility reasons, the album/track information may differ from what is displayed through the music management software of the flash device. Downloaded From Disc-Player.com Philips Manuals External sources... -
Page 67: 10.1.3 Transfer Music To Usb Device
4 In the track list screen, press RECORD (REC on remote control) > The list of tracks appears. 5 Press MARK/UNMARK to select or deselect the tracks to be recorded. > To select/deselect all tracks, Press & hold MARK/UNMARK. Downloaded From Disc-Player.com Philips Manuals External sources... - Page 68 Music\Genre\Artist\Album, and are named as XX-trackname.mp3. Play the transferred tracks on another music player You can play the transferred tracks on music players supporting USB playback. On different players, the files/folders may be browsed in different ways. Downloaded From Disc-Player.com Philips Manuals External sources...
-
Page 69: Play Your Ipod Music
10.2 Play your iPod music You can enjoy the music library on your iPod player through the speaker system of the WACS7500. This feature requires a Dock.The designated Philips Docking Cradle, Model DC1050 is sold separately. 1 Check that is switched on or in standby mode. -
Page 70: Network Settings
first and then add the new 1 To enter Installation Mode • On a new Station that is still unassociated with the Center: a Power up new Station. b Select language. > Station enters automatic installation mode. Downloaded From Disc-Player.com Philips Manuals Network settings... -
Page 71: 11.1.1 Delete A Station
Station Management (Mgnt) menu. 4 Press to select Delete Station. > The list of connected will be displayed on 5 Use to select you wish to delete. 6 Press to select YES. Downloaded From Disc-Player.com Philips Manuals Network settings... -
Page 72: Connect To Wi-Fi (Wireless) Enabled Home Network
Wi-Fi network: to enter the WEP or WPA key. confirm. If there is no WEP/WPA key for the Press to skip. Wi-Fi network: 6 In screen Set IP Mode, select Automatic Downloaded From Disc-Player.com Philips Manuals Network settings... -
Page 73: Set Network On Station
> Display: Searching for Networks… List of networks appears. (Network Not Found appears if no network is found.) 4 Select the Wi-Fi network where your desired UPnP device is located. 5 Press to continue. Downloaded From Disc-Player.com Philips Manuals Network settings... -
Page 74: Connect To Wired Home Network
2 Connect an Ethernet cable (not supplied) to Ethernet ports on network device and 3 Press MENU to enter the menu screen. 4 Use to enter Settings followed by Network, then Wired. 5 Press to continue. Downloaded From Disc-Player.com Philips Manuals Network settings... -
Page 75: 11.3.2 Set Network On Station
You can connect directly to your PC using an Ethernet cable (not supplied) and the Wireless Audio Device Manager (WADM) in the supplied PC Suite CD. For details, see section 12 Connect to your PC. Downloaded From Disc-Player.com Philips Manuals Network settings... -
Page 76: Connect To Two Different Home Networks
3 Use to enter Station Management (Mgnt) menu. 4 Use to select Station Status. > A list of connected or previously connected is displayed on the 5 Press to view the connection information. Downloaded From Disc-Player.com Philips Manuals Network settings... -
Page 77: 11.5.2 Viewing The Connection With Home Network
Settings followed by Network. 3 Select Wired or Wireless. 4 Use to select Automatic (DHCP). DHCP stands for Dynamic Host Configuration Protocol. It is a protocol for assigning dynamic IP addresses to devices on a network. Downloaded From Disc-Player.com Philips Manuals Network settings... - Page 78 1 If you are using a proxy server to visit websites, enable Proxy and proceed with the proxy setting as prompted, then press to confirm Otherwise, press to skip. 2 Choose to apply the settings as prompted. > Settings will change. Connection to station could be lost appears. Downloaded From Disc-Player.com Philips Manuals Network settings...
-
Page 79: Connect To Your Pc
• Wireless network adapter 802.11 b/g (for wireless connection) • 500MB free hard disk space Install WADM (Philips Wireless Audio Device Manager, see 17 FAQ) 1 Insert the PC Suite CD into the PC. 2 Follow the instructions on the PC to install WADM. - Page 80 Enable your wireless Access Point or Wireless Router. Configure Network from Center: Select Menu > Settings > Network > Wireless (select desired Network) > (enter encryption key) > Automatic > Apply Settings > Yes Router Wireless Downloaded From Disc-Player.com Philips Manuals Connect to your PC...
- Page 81 Center as prompted. Press MENU and select Information > Wired to check IP configuration. • When WADM is running, Internet access of your PC may be disabled. Close WADM to restore access. Downloaded From Disc-Player.com Philips Manuals Connect to your PC...
-
Page 82: Gracenote® Cd Information
13.1.1 Update Gracenote® music recognition database Use your PC to register your product on www.club.philips.com and go to ‘Show Upgrades & Support’ page to download Gracenote® Music recognition database update. Note that the updates are posted quarterly and new updates are independent from old updates, i.e. a new update can be installed, even without the previous update. -
Page 83: 13.2.1 Look Up Cd Track Information
If the internet query failed due to a disruption in the internet connection, the error message ‘Check the internet setup for CD Database on-line’ will appear. Check if your internet connection is correct (see 11.6 Connect to Internet). Downloaded From Disc-Player.com Philips Manuals Gracenote® CD Information... -
Page 84: Firmware Upgrade
• Never interrupt the firmware upgrading before its completion. • Never operate other functions before finishing the installation. 1 Register your Philips Wireless Music Center with www.club.philips.com. 2 Download the firmware upgrade files and store them on your PC. 3 Place side by side on a level and sturdy surface. -
Page 85: Restore Previous Firmware
Installation Mode and Select Server. 3 Use to enter Installation Mode. > Stations start to connect to STOP 9 4 Press when all are found. Downloaded From Disc-Player.com Philips Manuals Reset... -
Page 86: Reset
STOP 9 2 Press when all are found. • Restoring to default settings does not delete any stored music tracks. • After restoration to default settings, the network mode will return to ad-hoc mode. Downloaded From Disc-Player.com Philips Manuals Reset... -
Page 87: Technical Data
16-150 Ω (Ohms) 12Mb/s,V1.1 (support MP3,WMA and Input sensitivity M4A files) AUX IN 500mV USB class MSC, MTP Number of tracks/titles maximum 9999 Specifications and external appearance are subject to change without notice. Downloaded From Disc-Player.com Philips Manuals Technical data... -
Page 88: Station
Headphones Impedance 16-150 Ω (Ohms) Input sensitivity AUX IN 500mV Wireless Wireless standard 802.11g, backwards compatible to 802.11b Wireless security WEP (64 or 128 bit),WPA/WPA2 (8-63 characters) Frequency range 2412-2462MHz (CH1- CH11) Downloaded From Disc-Player.com Philips Manuals Technical data... -
Page 89: Frequently Asked Questions
• If a fault occurs, first check the points listed below before taking the system for repair. If you are unable to resolve a problem by following these hints, consult your dealer or Philips for help. - Page 90 WEP/WPA key, connect to your PC using cordless phones,Wi-Fi compatible Philips Wireless Audio Device Manager (WADM) in printers, PDAs.These devices can the supplied PC Suite CD. In the WADM device interfere with the Wi-Fi link between configuration, enter the Wireless Network submenu,...
- Page 91 Sound skips during MP3/WMA • The MP3/WMA file may be made at a compression playback. level exceeding 320kbps. Use a lower compression level to rip audio CD tracks. • Replace or clean disc. Downloaded From Disc-Player.com Philips Manuals Frequently asked questions...
- Page 92 file, please use WADM to manage. If the backup file is accidentally deleted, please find the file named YOURMAC.inx by using your Explorer search tool and then delete it. Only after that you can do backups again. Downloaded From Disc-Player.com Philips Manuals Frequently asked questions...
- Page 93 PC via an Ethernet cable (not supplied) and power on the Station. 2 Download the firmware upgrade file specified for 3 Launch WADM and click Firmware upgrade. 4 Follow the on-screen information to complete the remaining steps. Downloaded From Disc-Player.com Philips Manuals Frequently asked questions...
- Page 94 • There is a chance that you are already successfully connected to Gracenote® online, but your CD is not in their database. Downloaded From Disc-Player.com Philips Manuals Frequently asked questions...
-
Page 95: Appendix
1 x mounting bracket for 2 x screws 18.1.2 What else you’ll need • Suitable screws and wall anchors for each of the holes in the provided mounting bracket. • Electric drill • Screwdriver Downloaded From Disc-Player.com Philips Manuals Appendix... -
Page 96: 18.1.3 Preparation
3 Fix the bracket to the wall using suitable screws (not provided) and wall anchors (not provided) for all the holes provided in the wall mounting bracket. 4 Use a screwdriver and fasten the supplied screws to as shown. 5 Hook / mount in place as shown. Downloaded From Disc-Player.com Philips Manuals Appendix... - Page 97 RESULTS THAT WILL BE OBTAINED BY YOUR USE OF THE GRACENOTE SOFTWARE OR ANY GRACENOTE SERVER. IN NO CASE WILL GRACENOTE BE LIABLE FOR ANY CONSEQUENTIAL OR INCIDENTAL DAMAGES OR FOR ANY LOST PROFITS OR LOST REVENUES. © Gracenote 2006 Version 2.2 Downloaded From Disc-Player.com Philips Manuals...
-
Page 98: Contact Information
852-2619 9663 Hungary 680018189 India 1860-180-1111 Ireland 16011777 Israel 9600900-09 Italy 800088774 Japan 0570-07-6666 Korea 080-600-6600 Latvia 80002794 Luxembourg 4066615644 Malaysia 1800 880 180 Mexico 01 800 504 6200 Netherlands 8000230076 New Zealand 0800 658 224 Downloaded From Disc-Player.com Philips Manuals... - Page 99 Program and the GNU LGPL license version 2.1 (hereafter called the Library. Philips Electronics Hong Kong Ltd. Hereby offers to deliver or make available, upon request, for a charge no more than the cost of physically performing source distribution, a complete machine-readable copy of the corresponding source code of the Program or Library on a medium customary used for software interchange.
- Page 100 Section 1 above, provided that you also meet all of these conditions: a) You must cause the modified files to carry prominent notices stating that you changed the files and the date of any change. Downloaded From Disc-Player.com Philips Manuals...
- Page 101 For an executable work, complete source code means all the source code for all modules it contains, plus any associated interface definition files, plus the scripts used to control compilation and installation of the executable. However, as a Downloaded From Disc-Player.com Philips Manuals...
- Page 102 Downloaded From Disc-Player.com Philips Manuals...
- Page 103 OUT OF THE USE OR INABILITY TO USE THE PROGRAM (INCLUDING BUT NOT LIMITED TO LOSS OF DATA OR DATA BEING RENDERED INACCURATE OR LOSSES SUSTAINED BY YOU OR THIRD PARTIES OR A FAILURE OF THE PROGRAM TO OPERATE WITH ANY Downloaded From Disc-Player.com Philips Manuals...
- Page 104 Here is a sample; alter the names: Yoyodyne, Inc., hereby disclaims all copyright interest in the program `Gnomovision' (which makes passes at compilers) written by James Hacker. <signature of Ty Coon>, 1 April 1989 Downloaded From Disc-Player.com Philips Manuals...
- Page 105 You must make sure that they, too, receive or can get the source code. If you link other code with the library, you must provide complete object files to the recipients, so that they can relink them Downloaded From Disc-Player.com Philips Manuals...
- Page 106 Although the Lesser General Public License is Less protective of the users' freedom, it does ensure that the user of a program that is linked with the Library has the freedom and the wherewithal to run that program using a modified version of the Library. Downloaded From Disc-Player.com Philips Manuals...
- Page 107 The modified work must itself be a software library. b) You must cause the files modified to carry prominent notices stating that you changed the files and the date of any change. Downloaded From Disc-Player.com Philips Manuals...
- Page 108 Sections 1 and 2 above on a medium customarily used for software interchange. If distribution of object code is made by offering access to copy Downloaded From Disc-Player.com Philips Manuals...
- Page 109 Library will not necessarily be able to recompile the application to use the modified definitions.) b) Use a suitable shared library mechanism for linking with the Downloaded From Disc-Player.com Philips Manuals...
- Page 110 License. Therefore, by modifying or distributing the Library (or any work based on the Library), you indicate your acceptance of this License to do so, and Downloaded From Disc-Player.com Philips Manuals...
- Page 111 "any later version", you have the option of following the terms and conditions either of that version or of any later version published by the Free Software Foundation. If the Library does not specify a Downloaded From Disc-Player.com Philips Manuals...
- Page 112 GNU Lesser General Public License as published by the Free Software Foundation; either version 2.1 of the License, or (at your option) any later version. This library is distributed in the hope that it will be useful, Downloaded From Disc-Player.com Philips Manuals...
- Page 113 3. This notice may not be removed or altered from any source distribution. Jean-loup Gailly jloup@gzip.org Mark Adler madler@alumni.caltech.edu ===== SQLLite(source code) public domain All of the deliverable code in SQLite has been dedicated to the public Downloaded From Disc-Player.com Philips Manuals...
- Page 114 THIS SOFTWARE, EVEN IF ADVISED OF THE POSSIBILITY OF SUCH DAMAGE. $Id: COPYRIGHT,v 1.3 2002/03/31 18:43:00 wichert Exp $ ===== dropbear Dropbear contains a number of components from different sources, hence there are a few licenses and authors involved. All licenses are fairly non-restrictive. Downloaded From Disc-Player.com Philips Manuals...
- Page 115 RFC file, it must be called by a name other than "ssh" or "Secure Shell". " ---- loginrec.c loginrec.h atomicio.h atomicio.c and strlcat() (included in util.c) are from OpenSSH 3.6.1p2, and are licensed under the 2 point BSD license. Downloaded From Disc-Player.com Philips Manuals...
- Page 116 "Software"), to deal in the Software without restriction, including without limitation the rights to use, copy, modify, merge, publish, distribute, distribute with modifications, sublicense, and/or sell copies of the Software, and to permit persons to whom the Software is Downloaded From Disc-Player.com Philips Manuals...
- Page 117 # WITHOUT ANY WARRANTY; without even the implied warranty of # MERCHANTABILITY or FITNESS FOR A PARTICULAR PURPOSE. See the GNU # General Public License for more details. # You should have received a copy of the GNU General Public License Downloaded From Disc-Player.com Philips Manuals...
- Page 118 Copyright(C)1995 by Jef Poskanzer <jef@mail.acme.com>. thttpd-2.25b/tdate_parse.h: Copyright(C)1995 by Jef Poskanzer <jef@mail.acme.com>. thttpd-2.25b/thttpd.8:Copyright(C)1995,1998,1999,2000 by Jef Poskanzer <jef@mail.acme.com>. thttpd-2.25b/thttpd.c: Copyright(C)1995,1998,1999,2000,2001 by Jef Poskanzer <jef@mail.acme.com>. thttpd-2.25b/timers.c: Copyright(C)1995,1998,2000 by Jef Poskanzer <jef@mail.acme.com>. thttpd-2.25b/timers.h: Copyright(C)1995,1998,1999,2000 by Jef Poskanzer <jef@mail.acme.com>. Downloaded From Disc-Player.com Philips Manuals...
- Page 119 # Permission to use, copy, modify, distribute, and sell this software and its # documentation for any purpose is hereby granted without fee, provided that # the above copyright notice appear in all copies and that both that Downloaded From Disc-Player.com Philips Manuals...
- Page 120 * from this software without specific prior written permission. * THIS SOFTWARE IS PROVIDED ``AS IS'' AND WITHOUT ANY EXPRESS OR * IMPLIED WARRANTIES, INCLUDING, WITHOUT LIMITATION, THE IMPLIED * WARRANTIES OF MERCHANTIBILITY AND FITNESS FOR A PARTICULAR PURPOSE. ===== Downloaded From Disc-Player.com Philips Manuals...
- Page 121 Specifications are subject to change without notice. Trademarks are the property of Koninklijke Philips Electronics N.V. or their respective owners Printed in China © 2009 Koninklijke Philips Electronics N.V. All rights reserved. WACS7500_00_UM_V2.2 www.philips.com wk10031 Downloaded From Disc-Player.com Philips Manuals...