Table of Contents
Advertisement
Advertisement
Table of Contents

Related Manuals for Akai MPC Essentials


Summary of Contents for Akai MPC Essentials
- Page 1 User Guide English Manual Version 1.0...
-
Page 2: Table Of Contents
Table of Contents Welcome to the MPC ..........................5 System Requirements and Product Support ..................5 About This Manual ..........................6 Important Notes............................. 7 Installation ............................. 7 MPC Hardware Overview ........................... 9 MPC Element ............................9 Top Panel ............................9 Quick Start .............................. - Page 3 Program Edit Mode ..........................58 Master Section ..........................59 Simultaneous Play Section (Drum Programs Only) ................. 59 Mute Target Section (Drum Programs Only) ................... 60 Keygroup Play Modes Section (Keygroup Programs Only) ............. 60 Key Group Section (Keygroup Program Only) ................61 Edit Layers Section ..........................
- Page 4 Pad Section ........................... 101 MIDI Control Mode ..........................102 Effects ..............................105 Operation (Plugin) ..........................106 Differences Between the MPC Essentials Plugin and Standalone Application ......106 Appendix ..............................108 Keyboard Shortcuts .......................... 108 Effects and Parameters ........................110 Glossary ............................. 142...
-
Page 5: Welcome To The Mpc
You get cutting-edge features, including MPC Note Repeat and Swing, along with the all-new MPC Essentials software. With the included 1GB sound library, MPC Essentials empowers you with the essential sounds of modern music production, and you can easily import your own sound samples. -
Page 6: About This Manual
About This Manual This manual was written to help you get familiar with the MPC Element hardware and MPC Essentials software. To avoid confusion, the terminology in this manual is based on the MPC parameter names. You will find the various terms explained in the Glossary at the end of this manual. -
Page 7: Important Notes
Open the folder where the downloaded .zip file is located. Double-click the file to extract it. Double-click the MPC Essentials installer icon. This launches a special installation program. Follow the on-screen instructions. Important: After installing the MPC software, you need to unlock the program on your computer. - Page 8 Unlocking MPC Essentials Follow these steps to unlock the MPC software before using it. Connect your MPC hardware to a USB port on your computer. Power on the MPC hardware. Open the MPC software. In the dialogue box that appears, click Unlock Now.
-
Page 9: Mpc Hardware Overview
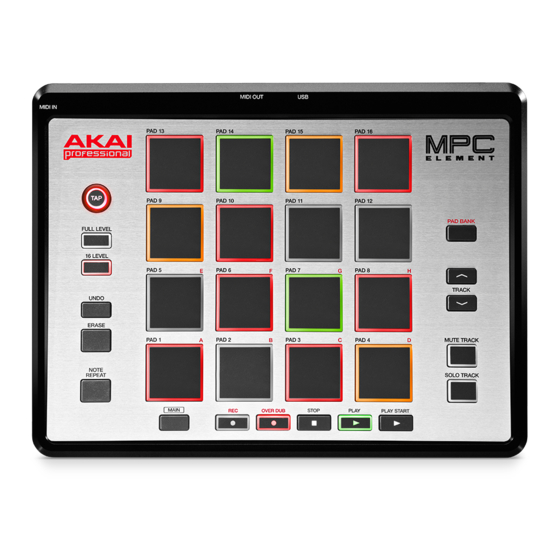
MPC Hardware Overview This chapter explains the features and functions of your MPC Element. MPC Element Top Panel... - Page 10 USB Port: Use the included USB cable to connect this USB port to an available USB port on your computer. This connection allows MPC Element to send/receive MIDI data to/from the software. MIDI In: Use the included 1/8"-MIDI adapter and a five-pin MIDI cable to connect the MIDI Out of an optional external MIDI device to the MIDI In of MPC Element.
- Page 11 14. 16 Level: Press this button to activate/deactivate 16 Level. When activated, the last pad that was hit will be temporarily copied to all 16 pads. The pads will now output the same note number as the initial pad, but a selectable parameter will be fixed at values that increase as the pad numbers increase (e.g., Pad 1 is the minimum, Pad 16 is the maximum), regardless of how hard you hit them.
-
Page 12: Quick Start
Make sure the Sequence Section in the lower half of the window shows the Program Type as Drum and the Program as Program 001 (this is the default when you open MPC Essentials). In the Project Information Section on the right, right-click the new Program (Program 001) and enter a name (e.g., Drums). - Page 13 Let's record a drum Sequence: Click the Rec button to activate Record Mode. To start the actual recording, click Play. The pre-count will count one measure before the software starts to record. We recommend recording only one sound (pad) at a time, especially if you aren't familiar with playing on the pads.
-
Page 14: Organizing Samples And Editing Note Events
Organizing Samples and Editing Note Events We recommend doing some naming and editing before recording further. Let's use the software, which is easier for editing. The collection of drum samples you loaded earlier (and their respective pad assignments) are arranged in a Program: •... -
Page 15: Recording A Bass Sequence
Recording a Bass Sequence Recording a melodic instrument like piano or bass works differently in the software from recording drums. Unlike a drum kit, it's important to be able to play and record a bass sound chromatically, so this will be slightly different than setting up the drum kit. - Page 16 Let's add a second layer and set the Layers' velocity ranges so our bass sounds different when played at a higher velocity (as a real bass would): Go back to the File Browser and select a different bass sample that sounds similar but a little bit brighter.
-
Page 17: Creating A Song
Creating a Song This section explains how to make a Song out of your Sequences. Before starting, make sure that you have recorded some Sequences (which we described earlier in this chapter)! Click the Song tab to open Song Mode. Each of the Sequences you've created in this Project is assigned to a pad. -
Page 18: Operation (Software)
This chapter explains the complete features and functions of the MPC Essentials software. Important: When using the MPC Essentials software as a plugin, its features and functions are very similar to how it's described in this chapter but with some notable differences, discussed in the Operation (Plugin) chapter. -
Page 19: General Features
General Features Adjusting the Controls Tip: If you use a computer mouse with scroll wheel, you can use it to affect some of these controls: move your mouse pointer over the control and use the scroll wheel to change it. If you hold down your keyboard's Shift key while doing this, you can increase the resolution. - Page 20 Switches Switches are represented by "LEDs." If a function is active, its LED will be lit red. To activate a function, click it. Any other LEDs in its set will be automatically deactivated. Buttons Click a button to activate or deactivate its function. Buttons are red when they are activated.
-
Page 21: Program Types
Program Types About Programs A Program is a file that contains (1) a list of all samples used and (2) the settings for each sample (i.e., pad assignments, loop points, pitch tuning, effects, etc.) Program Edit Mode lets you edit and assign samples. A single Project can hold a total of 128 Programs. - Page 22 To load samples into a Drum Program, click and drag a sample onto the desired pad (in the pad display or its row in the grid) from one of the following locations: • the File Browser • the Project Information panel •...
- Page 23 To load samples into a Keygroup Program: In the File Browser, double-click the desired sample. The sample is now loaded in the current Project. Click the Program Edit tab. Click Layer 1's Sample drop-down menu to select and assign a sample to the Keygroup Program. The loaded sample can now be played chromatically with the pads or a connected MIDI keyboard.
- Page 24 MIDI Program To create a MIDI Program: Click the Main Mode tab to enter Main Mode. In the Sequence Section, click the Type drop-down menu and select Midi. If the Project does not contain a MIDI Program yet, a new MIDI Program will automatically be added to the Project.
- Page 25 Plugin Program A Plugin Program lets you send your Sequences' MIDI data through a loaded plugin. To turn a Program into a Plugin Program: In the software, click the Main Mode tab. In the Sequence section, click the Type drop-down menu, and select Plugin.
-
Page 26: File Browser
File Browser The File Browser lets you navigate through your computer's internal and external hard disks to load samples, Sequences, Songs, etc. Using filter buttons and user-definable folders, you can easily adapt the File Browser to your preferred workflow. You can also preview (audition) your samples before loading them. - Page 27 To load a Project, double-click its corresponding .xpj file in the File Browser. If your Project was created on the full version of the MPC software and uses multiple Tracks, you will be prompted to select which Track you want to load. To load a single sample or multiple samples into a Project, click and drag the files onto the Pad Bank Section, the grid, or the Project Information section.
-
Page 28: Mode Tab Section
Mode Tab Section The Mode Tab Section contains tabs that let you switch between the software modes as well as further control for selecting Programs, Sequences, Songs, etc. depending on the selected mode tab on the left. This section is always visible. The different modes are described in detail in the following sections of this chapter. - Page 29 Depending on the selected mode, some Mode Tab Section menus and functions can change, described here: Click the Program drop-down menu to select one of your Programs in the currently loaded Project. A Project can hold up to 128 Programs. The Program drop-down menu is available only when Program Edit or Program Mixer tab is selected.
-
Page 30: Transport Section
Transport Section The Transport Section contains various transport controls (for playback and recording) as well as bar and tempo displays, the master level, and a CPU meter. This section is always visible. The CPU meter shows the computer CPU usage of the actual project. Keep in mind that an excessive use of synthesis functions such as filter and effects will increase the CPU usage. - Page 31 Note: The transport controls can be found on the MPC hardware as well as in the software, so the descriptions below apply to both. Click the Rec button to put the software in Record Mode. The button's LED will light up red indicate the Record process is armed.
-
Page 32: The Grid
The Grid The grid is where you record, program, and edit your Sequences and arrange your Songs. The grid is visible in Main Mode, Program Edit Mode, Program Mixer Mode, Pad Mute Mode, and Step Sequencer Mode. Furthermore, the grid has two different appearances, depending on the selected Program type; Drum Programs appear one way while Keygroup Programs, MIDI Programs, and Plugin Programs appear another way. - Page 33 In the top-left corner of the grid are two buttons to switch between Draw Mode and Select Mode: • By default, Draw Mode is active, indicated by the Pencil Tool icon. You can draw notes by clicking the corresponding position in the grid. You can also use it to draw automation curves in the velocity/automation lane underneath the grid.
- Page 34 Across the top of the grid is a blue strip that indicates where you are in the Sequence: • The number in the upper half is the bar number. • The number in the lower half (of the first beat of the first bar) is the time signature. To change the time signature, double-click in the measure bar and enter the desired signature in the drop-down window.
- Page 35 Grid for Keygroup Programs, MIDI Programs, and Plugin Programs When a Keygroup Progam, MIDI Program, or Plugin Program is selected, the grid looks like this: The only difference from the Drum Program view is the vertical miniature keyboard ("piano roll") in the left grid window section.
- Page 36 Entering and Editing Note Events You can easily insert note events and data with your computer mouse. Hardware: Press the Rec button to record-arm the software, and press the Play or Play Start button when you're ready to record. The metronome will pre-count one measure before the recording starts. Hit the pads to record note events in the Sequence.
- Page 37 • Click and drag a note event to move it to another position (when multiple note events are selected, you can move them all simultaneously). You can position note events only on quantization values defined by the set Time Correct value (indicated by vertical lines in the grid), but if you hold down your keyboard's Shift key while moving a note event, you can drag it to any position you like, regardless of the selected Time Correct value.
-
Page 38: Software Menus
Entering and Editing Automation In the software, follow these steps to enter and edit automation data: To the left of the velocity lane, next to Automation, click the arrow ( ) and select the recorded Real Time parameter (e.g., RT Filter resonance). Use the Pencil Tool (Draw Mode) to draw an automation curve. - Page 39 Load Recent provides shortcuts to the last five files you have been recently working with. The list is chronological with the most recent file at the top. Save Project saves the current Project. In the window that appears, name your Project and select a save location.
- Page 40 • As Audio Mixdown exports the Sequence as an audio file. In the window that appears, you can set the audio file's format: o Audio Length lets you define the length of your audio file with the Start bar and End bar, allowing you to export a certain number of measures only.
- Page 41 Edit Menu Undo undoes the last action you performed. When there are no actions left to undo, the Undo command will be unavailable and appear grayed out. Redo undoes the Undo command. You can continue redoing actions until there are no items left to redo, in which case, the Redo command will be unavailable and appear grayed out.
- Page 42 Preferences opens the Preferences window, which contains many customizable elements of the software. Click the corresponding tab on the left to select it (e.g., MIDI or Sequencer). Click the OK button to close the Preferences window. Preferences will be automatically saved. Mac OS X users: Preferences is located in the MPC menu.
- Page 43 • Preferences: MIDI Tab o Active Midi Inputs: These checkboxes represent the active installed MIDI inputs on your computer system. Hardware: When the MPC hardware is connected and powered on, the available ports as well as the MPC public port are displayed.
- Page 44 • Preferences: Auto Load/Save Tab o Template File: Click the … button to select a Sequence template to load automatically anytime you create a new Sequence. o Auto Save: Click the Enabled box to turn Auto-Save on or off. Auto-Save sets the software to save your Project at regular intervals.
- Page 45 • Preferences: Hardware Tab Here, you can set additional parameters affecting the behavior of your MPC hardware. o Pad Threshold: Click this drop-down menu to select a threshold that must be exceeded to trigger the pad. o Pad Sensitivity: Click this drop-down menu to set how sensitively your MPC hardware's pads respond to your touch.
- Page 46 • Preferences: Sync Tab Here, you can set various parameters related to the software's synchronization: o Receive: Click this drop-down menu to select whether or not the software receives MIDI Clock or MIDI Time Code (MTC) from the host software (when MPC is used as a plugin) or from an external device (connected to the MIDI In port of the MPC hardware).
- Page 47 • Preferences: Other Tab Here, you can set various other MIDI and audio parameters. o Tap Tempo: Click this drop-down menu to set how many times you have to press your MPC hardware's Tap Tempo button until the new tempo is recognized. o Filter 'All Notes Off' CC: Check this box to filter out All Notes Off data.
- Page 48 Rate lets you to select the metronome click's time division: 1/4, 1/4T, 1/8, 1/8T, 1/16, 1/16T, 1/32 or 1/32T ("T" stands for "triplet"). Sound lets you to select the sound that you want to hear for the metronome: Sidestick1, Sidestick2, Clap, Metroclick, Shake, Tambourine, or MpcClick.
- Page 49 • Strength: Click and drag this field up or down to set how strictly notes will be quantized (i.e., shifted toward the quantize value). Lower values move notes a little bit towards the closest quantize value, resulting in a less mechanical feel than a strict quantization (a higher value). •...
-
Page 50: Main Mode
Main Mode Main Mode gives you an overview of the most-used functions. To enter Main Mode, click the Main Mode tab in the Mode Tab Section of the software window. Hardware: Press the Main button. Q-Link Section Here, you can set the functionality of the Q-Link Knobs. The Q-Link section can work in two modes: Program Mode (Pgm) and FX Mode. - Page 51 Program Mode Click the Prg button to activate the Q-Link Knobs' Program Mode. To assign a parameter to a Q-Link Knob in the software: Click a Q-Link Knob and move the mouse to select it for assigning. The Qlink field will show the number of the selected knob.
-
Page 52: Pad Bank Section
If Midi is selected in the Instrument Section, The Q-Link Knobs' Program Mode will look slightly different. To control a desired parameter of an external sound generator by MIDI, you can define a MIDI CC (MIDI Control Change). This can be any MIDI Control Change from 1 to 128 for every Q-Link Knob. -
Page 53: Sequence Section
Sequence Section This section gives you an overview of parameters relevant to the current Sequence. In the software, click the Sequence drop-down menu and select a Sequence or click the icon in the lower-right corner of the drop-down menu and select an unused Sequence from the list that appears. Click the Loop button to switch the Sequence's loop function On or Off. - Page 54 Click the Program drop-down menu to select a Program of the Type you selected above. Click the + button to add a new Program of that Type to the Project. For Drum Programs and Keygroup Programs Click the Program drop-down menu to select which Program you want to use. To create a new Program, click the + icon next to the drop-down menu.
- Page 55 For Plugin Programs When the Program Type is set to Plugin, the Sequence Section will look slightly different from other Programs: If your Project already contains the desired plugin, click the Program drop-down menu to select it. In the window that appears, you can click checkboxes to re-order your list of plugins: Sort by type or Sort by manufacturer.
-
Page 56: Project Information Section
Project Information Section The Project Information section shows the Project name as well as all Programs and samples loaded into the software's current project. You can simply drag and drop a sample from the Project Information section onto any pad to assign it. How a sample can be played and edited depends on the Program. - Page 57 The Sample column displays the available samples. Select All Samples to view all samples in the Project, or select a Program or Sequence below to view the samples in that Program or Sequence only. Double-click a sample in the Sample column to load it in Sample Edit Mode. Right-click a Sample to open a menu with the following options: •...
-
Page 58: Program Edit Mode
Program Edit Mode Program Edit Mode contains all parameters for editing your Programs: • For Drum Programs and Keygroup Programs, this mode includes the parameters of each Layer as well as all synthesis parameters and insert effect settings. These two Program types will have different parameters due to how they are set up (Drum Programs have fewer parameters than Keygroup Programs). -
Page 59: Master Section
Master Section In the Master Section, you can set the playback mode and tuning for the overall Program. Mode sets the playback mode for the Program's pads. In Mono Mode, only one pad will sound at a time. If a pad is played while another (or the same one) is still playing its sample(s), the new pad will immediately mute all other currently playing pads in that Program. -
Page 60: Mute Target Section (Drum Programs Only)
Mute Target Section (Drum Programs Only) For the currently selected pad, you can select up to four pads as Mute Targets. When the pad is played, it will immediately silence its Mute Targets. Click each Pad drop-down menu to select the desired Mute Target. -
Page 61: Key Group Section (Keygroup Program Only)
Sample Play determines how much of the sample is played: • One-Shot: The entire sample will play from start to end. Use this when you want to play short sounds. • Note-On: The sample will play only as long as the pad is held. This is better for longer samples so you can control a sound's duration by pressing and holding its corresponding pad. -
Page 62: Edit Layers Section
Note Range lets you restrict the key range used for a sample's playback. Only notes with a key number higher or equal (Lo) or lower and equal (Hi) to the selected value will trigger a sound. The settings for Lo and Hi are also shown in the virtual keyboard in the Edit Layers section. - Page 63 Semi lets you transpose the selected layer 12 up to semitones up or down. Fine provides fine-tuning of each layer by fractions of a semitone. Level lets you adjust the each layer's volume, letting you control the "balance" of the samples assigned to the pad.
- Page 64 No. KG (Number of Keygroups) lets you create up to 128 Keygroups within a Keygroup Program. This is very useful when working with multi-samples. For example, if you want to create a realistic piano, you can use different Keygroups (e.g., 88 for a grand piano) with every Keygroup containing its own sampled note (with up to 4 possible velocity layers).
-
Page 65: Filter Section
Filter Section The Filter Type drop-down menu lets you select a filter for the selected pad. See the Filter definition in the Glossary for an explanation of the available filter types. Cutoff controls the cutoff frequency for low-pass and high-pass filter types or the center frequency for band-pass and band-stop filter types. - Page 66 The Filter Envelope controls affect the filter frequency. The knobs control the envelope shape or time- variant modulation output. Adjust envelope's influence on the filter frequency with the Env knob. See the following Anatomy of an Envelope section below to learn about the envelope parameters. The Amp Envelope controls affect level changes over time.
-
Page 67: Pad Play Modes Section (Drum Programs Only)
Pad Play Modes Section (Drum Programs Only) Here, you can set the behavior for each pad's samples in a Drum Program. Mute Groups let you assign the selected pad to one of the 32 available groups. When pads assigned to the same Mute Group receive MIDI notes, the last pad played will silence all other pads in that Mute Group. -
Page 68: Velocity Sensitivity Section
Velocity Sensitivity Section Here, you can set how much velocity affects various sound parameters: Pitch, Filter Envelope Attack (Atk), Amplifier (Amp) and Panning (Pan). When you hit a pad softly, only minimal modulation is applied. When you hit it harder, the modulation amount also gets stronger depending on the setting of the corresponding dial. -
Page 69: Controller Mod Section (Keygroup Program Only)
Controller Mod Section (Keygroup Program Only) This section determines the influence of additional play controllers on various sound parameters. Important: To use these parameters, make sure that a connected MIDI device can send pitch bend messages as well as aftertouch and modulation wheel data. -
Page 70: Program Edit Mode For Midi Programs And Plugin Programs
Program Edit Mode for MIDI Programs and Plugin Programs For MIDI Programs and Plugin Programs, Program Edit Mode looks a bit different. You will see an overview of all available parameters of your loaded virtual instrument, including a corresponding rotary knob for editing. -
Page 71: Program Mixer Mode
Program Mixer Mode In Program Mixer Mode, you can set the levels, stereo panning, and effects for a Program: • For Drum Programs, this mode shows a channel strip for each individual pad (of 128). • For Keygroup Programs, MIDI Programs, or Plugin Programs, this mode shows a channel strip for one channel only. -
Page 72: Levels
Levels In the software, click the channel fader and drag it up or down to set the level. To view more mixer channels, use the scroll bar under the channel faders at the bottom of the window. Panning In the software, click the channel's Pan knob and drag it up or down to set the position. To view more mixer channels, use the scroll bar under the channel faders at the bottom of the window. -
Page 73: Next Sequence Mode
Next Sequence Mode Next Sequence Mode lets you trigger different Sequences simply by playing the pads. This is useful for live performances, letting you change a Song's structure in real time. In the software, click the Next Seq tab in the Mode Tab Section. Triggering Sequences During playback, select a Sequence to play next simply by hitting the corresponding pad. -
Page 74: Sequence Playlist
Sequence Playlist The Sequence Playlist window in Next Sequence Mode shows a list-style overview of all used Sequences in your Project: • The Sequence column shows the name of the Song's Sequences. • The Length column shows the bar length of a Sequence. -
Page 75: Next Sequence Section
Next Sequence Section During the playback of a Sequence, this section gives you the following options: • Click Next Bar to change the Sequence at the beginning of the next bar. This lets you select the next Sequence without having to hit a pad or button in perfect time. •... -
Page 76: Sample Record Mode
Sample Record Mode Sample Record Mode lets you record audio samples to use in your Sequences. This mode is divided in two main parts: • the Waveform Display (which shows the waveform of a sample after the recording process) • the Record Control section (which includes the controls). -
Page 77: Waveform Display
Waveform Display The Waveform Display shows the entire waveform of your recorded sample with a timeline at the top. While this is just for reference during in Sample Record Mode, it's the focus of Sample Edit Mode. Please see the Sample Edit Mode section to learn about editing your recorded samples. -
Page 78: Record Control Section
Record Control Section The Record Control section offers all the relevant controls for recording. Threshold In Record Mode, the software automatically starts recording when the level of the incoming source exceeds the Threshold (Thresh). If you set the threshold too high, the recording may not start when you play the input source, or the start of the material you wanted to record may be missing. - Page 79 Input Source The Input Source parameter defines whether you are going to record an external audio signal (External) an internal signal from the software (Resample). A Resample recording does not require an audio connection because the source is within the software and is therefore recorded without any loss in audio quality. You can, for example, use Resample to record two or more samples by hitting the corresponding pads simultaneously.
-
Page 80: Project Information Section
Sample Rec and Stop Click Sample Rec to record-arm the software, or click Sample Stop to stop the recording process. After clicking Sample Rec, the recording will start once the incoming audio level exceeds the Threshold parameter. If you do not click Stop, recording will continue to the end of the previously set sample length. When the recording is finished, a small window appears: •... -
Page 81: Sample Edit Mode
Sample Edit Mode Sample Edit Mode lets you edit samples using various functions. In the software, click the Sample Edit tab in the Mode Tab Section. To select a sample to edit, click the Edit Sample drop-down menu in the left section below the waveform display and select a sample from the Project. -
Page 82: Waveform Display
Waveform Display The Waveform Display is divided into two sections: • The top of the display shows an overview of the entire sample waveform. A shaded rectangle outlines the currently shown part of the sample. • The main part of the display shows the "active" section of the sample waveform. Use the scroll bar under the waveform to move through it. -
Page 83: Edit Section
Edit Section This section contains controls to edit samples and to select between Chop Mode or Trim Mode. Most of this chapter describes Trim Mode functions. Please refer to the Chop Mode part of this chapter to see how it differs. In the software, click the Edit Sample drop-down menu and select the desired sample. -
Page 84: Pad Section
Pad Section You can use the pads to play certain parts of the selected sample, regardless of the selected Pad Bank. Trigger the following playback options by hitting the corresponding pad: • Play Loop (Pad 13) plays the sample repeatedly from the loop point to the end point. -
Page 85: Settings Section
Settings Section This section lets you edit various parameters affecting playback and loop functions. In the software, edit the start point (Start), end point (End), or loop point (Loop Start) by double-clicking the number in the field, and use your computer keyboard to enter a value. -
Page 86: Process Section
Process Section The Process section gives you various editing options for the selected sample. In the software, click the desired sample editing option (described below). A new window will open (which may have some additional parameters). To execute a selected option, click Do It, or cancel your changes by clicking Cancel. - Page 87 o Log fades the audio in with a logarithmic curve—quickly rising at the start and flattening out towards the end. o Exp fades the audio in with an exponential curve—slowly rising in the beginning and growing steeper towards the end. •...
-
Page 88: Project Information Section
Project Information Section This section is identical to the Project Information Section in Main Mode. For more information, please see the Project Information Section part of the Main Mode chapter. Newly recorded samples will be shown in the Sample area of Project Information. To use them in your production, you must load them into Programs first. - Page 89 Edit Section in Chop Mode In the software: • Use Q-Link Knobs Q13, Q9, Q5, or Q1 to adjust the start point of the sample. The smaller the Q-Link Knob number, the more precise the adjusting of the start point. •...
- Page 90 Settings in Chop Mode In the software, this section lets you edit various parameters affecting the start point and end point of your sample's slices: • Slice is the number of the currently selected slice. Click a slice in the Waveform Display to select it. (Remember that you have to create slices before one can be selected.) •...
- Page 91 Chop To Section in Chop Mode This section determines the slicing process. You can select between three slicing modes: • Threshold uses an adjustable detection algorithm that derives the number of regions created from the volume levels present in the sample. Click and drag the Threshold field up or down to set the threshold level.
- Page 92 This section contains most of the same functions as it does in Trim Mode: Silence, Extract, Normalize, Reverse, Fade In, Fade Out, Pitch Shift, and Gain Change. See the Process Section earlier in this chapter for more information about these functions. The difference is an additional option which affects the whole sample regardless of the selected slice.
- Page 93 • Assign Slice assigns a single slice to a selected pad. Click Pad and select the desired pad. If Extract Region To New Sample is activated, the slice is also extracted as a new sample. Click Program to specify a Program to which you want to add the assigned slice.
-
Page 94: Song Mode
Song Mode Song Mode lets you arrange Sequences in a specific order and/or repetition to create songs. You can edit the structure of a Song during playback for easy, on-the-fly composing. A Project can contain up to 32 Songs, each consisting of up to 999 "steps," each of which can have an assigned Sequence as well as the number of times that Sequence will repeat. -
Page 95: Sequence Playlist Section
Sequence Playlist Section The Sequence Playlist Section (to the left of the pads in the software) is the list of the steps of a Sequence. Each step in a Song has: • an assigned Sequence • the tempo of the Sequence •... -
Page 96: Pad Bank Section
Pad Bank Section In this section, all Sequences are assigned to a pad. Unused empty Sequences are marked (unused). You can use the Pad Bank buttons to show the Sequences assigned to pads in other banks. You can easily click and drag Sequences from this section and drop them onto the Sequence playlist. -
Page 97: Edit Step Section
Edit Step Section This section contains controls to add or delete steps from the Song. Click Insert Step to insert the selected Sequence (indicated by the lit pad in the Pad Bank section) in the Sequence Playlist. Click Delete Step to delete the selected step from the Sequence Playlist. Step Section This section contains information about the current step in the Sequence Playlist. -
Page 98: Pad Mute Mode
Pad Mute Mode Pad Mute Mode lets you easily mute pads within a Program or set Mute Groups for each pad. In the software, click the Pad Mute tab in the Mode Tab Section. Pad Mute You can mute or unmute individual sounds in real time by hitting the pads. This is useful if you want to hear a Sequence without a particular sound or if you want to isolate specific sounds or combinations of sounds. -
Page 99: Pad Group
Pad Group The Pad Group feature extends the concept of Pad Mutes: you can mute or unmute multiple pads simultaneously by hitting one pad that you have assigned to a Mute Group. This is useful if you want to hear a Sequence without a particular group of sounds or if you want to isolate specific sounds in various combinations. -
Page 100: Step Sequence Mode
Step Sequence Mode Step Sequence Mode lets you create or edit Sequences by using the pads as "step buttons," simulating the experience of a traditional step-sequencer-style drum machine. In your software, click the Step Seq tab in the Mode Tab Section. The upper half of the window contains the grid, showing the note events of the current Sequence. -
Page 101: Pad Section
Pad Section This section lets you quickly create and delete note events as "steps" by using the pads of your MPC hardware or MPC software. Tip: Using Step Sequence Mode is most useful for programming drums, emulating the step recording of drums as it was done with various drum machines from the 1980s. -
Page 102: Midi Control Mode
This custom "control map" will then work whenever you are in MIDI Control Mode. This is useful when using MPC Essentials as a plugin: you can use MIDI Control Mode to use your MPC hardware to control your host software, and then switch back to any other mode to control the MPC Essentials plugin. - Page 103 To edit a control: Select it by doing one of the following: • clicking it in the software • pressing or moving it on your hardware In the Edit panel on the left side of the software window, set that controls' parameters to your preference.
- Page 104 • Aftertouch (pads only): This determines how the pad's aftertouch (pressure applied to the pad after the initial hit) behaves. When set to Off, the pad will not send any aftertouch messages. When set to Channel, if you press multiple pads that have this setting, the aftertouch messages they send will be identical.
-
Page 105: Effects
Effects The MPC software offers various effects for processing samples and sound Programs. These same instructions for loading and editing effects are also described in the Program Mixer Mode chapter, but this section can also help you get a good overall understanding of how you can apply these effects. -
Page 106: Operation (Plugin)
Operation (Plugin) When using the MPC Essentials software as a VST or AU plugin, its features and functions are very similar to its operation as your host software but with some notable differences discussed in this chapter. Important: For information about using the MPC Essentials software as a standalone software program, please see the Operation (Software) chapter. - Page 107 Playback Start and Stop: The start and stop commands are always synchronized to the host application. When the playback of the host application is started, the MPC plugin playback starts simultaneously. Multiple Instances: When using multiple instances of MPC Essentials as a plugin in your host application: •...
-
Page 108: Appendix
Appendix Keyboard Shortcuts You can use the following computer keyboard shortcuts for the MPC software. Cubase users: When running MPC as a plugin in Cubase, all keyboard shortcuts need to be combined with Alt. Control Alt+Control (Windows) (Windows) Function Shift Command Alt+Command (Mac OS X) - Page 109 File Menu Function Control Command (Windows) (Mac OS X) New Project Control + N Command + N New From Template Control + Shift + N Command + Shift + N Control + S Command + S Save Project Control + , Command + , Open Preferences Edit Menu...
-
Page 110: Effects And Parameters
Effects and Parameters This chapter lists the available effects in the software. To learn more about how effects work in the software, please see the Effects chapter. Note: Some of these effects have a "sync" version (e.g., Flanger Sync, Autopan Sync, etc.) whose rates will be affected by the current tempo. - Page 111 Reverb Medium This is a spatial effect, designed to emulate a medium room. Parameter Value Range Default Value Q-Link Knob Number Dry/Wet 0 (dry) – 100 (wet) Pre-Delay 1 – 100 Early Reflection 0 – 100 Density 0 – 100 Diffuse 0 –...
- Page 112 Reverb Large 2 This is a less CPU-intensive spatial effect, emulating the sound of a large hall. Parameter Value Range Default Value Q-Link Knob Number Dry/Wet 0 (dry) – 100 (wet) Pre-Delay 1 – 100 Early Reflection 0 – 100 Density 0 –...
- Page 113 Reverb In Gate This is a hall reverb with an additional control. The reverb effect is cut off when the input drops below the level set in the Gate In parameter. Parameter Value Range Default Value Q-Link Knob Number Dry/Wet 0 (dry) –...
- Page 114 Reverb Out Gate This is a hall reverb that has an additional control. The reverb effect is cut off when the output drops below the level set in the Gate Out parameter. Parameter Value Range Default Value Q-Link Knob Number Dry/Wet 0 (dry) –...
- Page 115 Delays Delays the original signal for a specified period of time and plays it back over an adjustable period of time. Delay Mono Parameter Value Range Default Value Q-Link Knob Number Dry/Wet 0 (dry) – 100 (wet) Time 2 – 2000 ms Feedback 0 –...
- Page 116 Delay Stereo Stereo Delay operates similarly to Mono Delay but in true stereo. Parameter Value Range Default Value Q-Link Knob Number Dry/Wet 0 (dry) – 100 (wet) Time 2 – 2000 ms Feedback 0 – 100 Damping 0 – 100 Delay Sync (Stereo) Stereo Delay operates similarly to Mono Delay but in true stereo.
- Page 117 Delay LP LP Delay is identical to the Mono Delay, but it uses a resonant low-pass filter in the delay line. Parameter Value Range Default Value Q-Link Knob Number Dry/Wet 0 (dry) – 100 (wet) Time 2 – 2000 ms Feedback 0 –...
- Page 118 Delay Analog Analog Delay is similar to Mono Delay, except that it's designed to sound like an analog "Bucket Brigade"- style delay. This delay has a unique character to it that gives a warmer sound by adding subtle inaccuracies in phase and timing. Parameter Value Range Default Value...
- Page 119 Delay Tape Sync Tape Delay emulates a delay system using an analog tape loop and a series of tape heads to produce an echo effect. This delay type yields a very distinct echo sound often heard in reggae and dub-style music. Parameter Value Range Default Value...
- Page 120 Delay Multi-Tap This delay is a mono delay which has three delay generators with independently adjustable delay times and stereo position. Parameter Value Range Default Value Q-Link Knob Number Dry/Wet 0 (dry) – 100 (wet) Time 1 2 – 2000 ms Time 2 2 –...
- Page 121 Flanger A flanger is a modulated delay to emulate the sound created when running two analog tape machines in parallel with a slight time disalignment. Slow Rate settings can produce a "whooshing" jet engine sound, while faster rates result in more of a "warble." Flanger Parameter Value Range...
- Page 122 Chorus A chorus effect uses an LFO to modulate the pitch and a delay of the input signal, which are then added to the dry signal. In small amounts, this creates the illusion of multiple voices playing at once. Turn up the Feedback and Depth for more pronounced "shimmering"...
- Page 123 Autopan This effect uses an LFO to move the incoming signal back and forth across the stereo field, creating a rotary effect. Autopan Parameter Value Range Default Value Q-Link Knob Number Dry/Wet 0 (dry) – 100 (wet) Rate 0 – 100 Autopan Sync Parameter Value Range...
- Page 124 Tremolo This effect uses an LFO to increase and decrease the volume of the signal. Depending on the LFO shape, this can produce a smooth wave effect (sine wave) or a stuttering "on-off" effect (square wave). Tremolo Parameter Value Range Default Value Q-Link Knob Number Dry/Wet...
- Page 125 Phasers The phaser is a classic effect, created by multiple ganged all-pass filters to create "notches," or sharp spikes, in the frequency spectrum. The frequencies of these all-pass filters are usually modulated by an LFO to create a sweeping sound. Phaser 1 Parameter Value Range...
- Page 126 HP Filters HP Filter This effect is a static filter without modulation. Parameter Value Range Default Value Q-Link Knob Number Frequency 10 – 19999 Hz 1500 Resonance 0 – 100 HP Filter Sweep This effect is a high-pass filter with its cutoff frequency modulated by an LFO. Parameter Value Range Default Value...
- Page 127 HP Filter Sync This effect is a high-pass filter with its cutoff frequency modulated by an LFO. Parameter Value Range Default Value Q-Link Knob Number Dry/Wet 0 (dry) – 100 (wet) Low Frequency 0 – 100 High Frequency 0 – 100 Resonance 0 –...
- Page 128 LP Filters LP Filter This effect is a static filter without modulation. Parameter Value Range Default Value Q-Link Knob Number Frequency 10 – 19999 Hz 1500 Resonance 0 – 100 LP Filter Sweep This effect is a low-pass filter with its cutoff frequency modulated by an LFO. Parameter Value Range Default Value...
- Page 129 LP Filter Sync This effect is a low-pass filter with its cutoff frequency modulated by an LFO. Parameter Value Range Default Value Q-Link Knob Number Dry/Wet 0 (dry) – 100 (wet) Low Frequency 0 – 100 High Frequency 0 – 100 Resonance 0 –...
- Page 130 Parametric EQs PEQ 2-Band, 2-Shelf This effect is a combination of one two-band parametric equalizer and two shelving filters. Parameter Value Range Default Value Q-Link Knob Number Low Frequency 22 – 1000 Hz Frequency 1 82 – 3900 Hz Frequency 2 220 –...
- Page 131 PEQ 4-Band This effect is a powerful four-band parametric equalizer with four independent EQ ranges. Parameter Value Range Default Value Q-Link Knob Number Low Frequency 22 – 1000 Hz Frequency 1 82 – 3900 Hz Frequency 2 220 – 10000 Hz 2200 High Frequency 560 –...
- Page 132 Distortions Distortion Amp This effect is designed to reproduce the sound of a tube amplifier at high volumes. Parameter Value Range Default Value Q-Link Knob Number Dry/Wet 0 (dry) – 100 (wet) Drive 0 – 100 Tone 0 – 100 Dynamics 0 –...
- Page 133 Distortion Grimey This is a unique distortion effect that distorts a frequency range in a selectable band. Parameter Value Range Default Value Q-Link Knob Number Dry/Wet 0 (dry) – 100 (wet) Drive 0 – 100 Grime 0 – 100 Center 0 –...
- Page 134 Distortion Custom This effect is a highly customized distortion, capable of a wide range of useable sounds. Parameter Value Range Default Value Q-Link Knob Number Dry/Wet 0 (dry) – 100 (wet) Drive 0 – 100 +Soft 5 – 75 +Clip 5 –...
- Page 135 Compressors A compressor is an effect that changes the dynamic range of a signal by automatically reducing its gain. Compressor Master This is the most transparent compressor, able to perform substantial volume adjustments without artifacts. Parameter Value Range Default Value Q-Link Knob Number Dry/Wet 0 (dry) –...
- Page 136 Compressor Opto The Opto Compressor is modeled after a vintage compressor type using an optical circuit to control the volume reduction of the input signal. These compressors are usually associated with soft and unobtrusive attack and release characteristics. Parameter Value Range Default Value Q-Link Knob Number Dry/Wet...
- Page 137 Compressor VCA This compressor is more modern-sounding, with a slightly more transparent sound. A VCA Compressor tends to have quicker attack and release times than an Opto Compressor. Parameter Value Range Default Value Q-Link Knob Number Dry/Wet 0 (dry) – 100 (wet) Input -6 –...
- Page 138 Compressor Vintage This compressor has a sound similar to classic tube compressors, with their gentle yet pumping response and a dash of tube saturation. Parameter Value Range Default Value Q-Link Knob Number Dry/Wet 0 (dry) – 100 (wet) Input -6 – 18 dB Attack 0 –...
- Page 139 Bit Reducers Decimator Decimator down-samples the incoming signal by removing bits from the digital signal. The difference between decimation and resampling is that Decimator does not use any filtering to mask or correct digital artifacts. The result is an effect ranging from mild to almost completely pure digital distortion, depending on the setting and the source material.
- Page 140 Other Auto Wah This effect is a low-pass filter modulated by an envelope that yields a classic funky "wah-wah"- like sound. The envelope is triggered by the incoming signal's amplitude. The amount of the envelope on the cutoff frequency is user-definable. Parameter Value Range Default Value...
- Page 141 Frequency Shifter A frequency shifter changes the frequencies of an input signal by a fixed amount and alters the relationship of the original harmonics. This can produce a chorus-like effect as well as very crazy artificial timbres. Parameter Value Range Default Value Q-Link Knob Number Dry/Wet...
-
Page 142: Glossary
Glossary A lot of the terms in this manual are based on the MPC parameter names. This glossary briefly explains many of the technical terms used throughout. Aftertouch: The majority of contemporary keyboards are capable of generating aftertouch messages. On this type of keyboard, when you press harder on a key you are already holding down, a MIDI Aftertouch message is generated. - Page 143 Control Change (Controllers): MIDI messages enable you to manipulate the behavior of a sound generator to a significant degree. This message essentially consists of two components: • The controller number, which defines the parameter to be influenced. It can range from 0 to 127. •...
- Page 144 MIDI: MIDI stands for musical instrument digital interface. Developed in the early 1980s, MIDI enables interaction between various types of electronic music instruments from different manufacturers. At the time a communications standard for heterogeneous devices did not exist, so MIDI was a significant advance.
- Page 145 Panning: The process or the result of changing a signal's position within the stereo panorama. Pitchbend: Pitchbend is a MIDI message. Although pitchbend messages are similar in function to control change messages, they are a distinct type of message. The resolution of a pitchbend message is substantially higher than that of a conventional Controller message.
- Page 146 Sample: When you tap the pads on your MPC hardware, you can trigger sounds that we call samples. Samples are digitized snippets of audio that can either be recorded using the recording function of your MPC software or loaded from the File Browser. Once a sample is present in the software, it can be manipulated in different ways.
-
Page 147: Trademarks And Licenses
Trademarks and Licenses Akai Professional and MPC are trademarks of inMusic Brands, Inc., registered in the U.S. and other countries. ASIO, Cubase, and VST are trademarks of Steinberg Media Technologies GmbH. Mac and OS X are trademarks of Apple Inc., registered in the U.S. and other countries. - Page 148 akaiprompc.com...