Akai MPC Studio Quick Start Manual
Hide thumbs
Also See for MPC Studio:
- Quick start manual ,
- User manual (373 pages) ,
- Reference manual (136 pages)
Table of Contents
Advertisement
Available languages
Available languages
Quick Links
Advertisement
Table of Contents

Related Manuals for Akai MPC Studio


Summary of Contents for Akai MPC Studio
- Page 1 Quickstart Guide English ( 3 – 8 ) Guía de inicio rápido Español ( 9 – 14 ) Guide d’utilisation rapide Français ( 15 – 20 ) Guida rapida Italiano ( 21 – 26 ) Schnellstart-Anleitung Deutsch ( 27 – 32 ) Appendix English ( 34 )
-
Page 3: Box Contents
Quickstart Guide Safety & Warranty Manual Important: Visit akaipro.com and find the webpage for MPC Studio mk2 to download the complete User Guide. Support For the latest information about this product (documentation, technical specifications, system requirements, compatibility information, etc.) and product registration, visit akaipro.com. -
Page 4: Getting Started
2. In your Akai Professional account, download the MPC software package. 3. Open the file and double-click the installer application. 4. Follow the on-screen instructions to complete the installation. Note: By default, the MPC software will be installed in [your hard drive]\Program Files\Akai ® ®... -
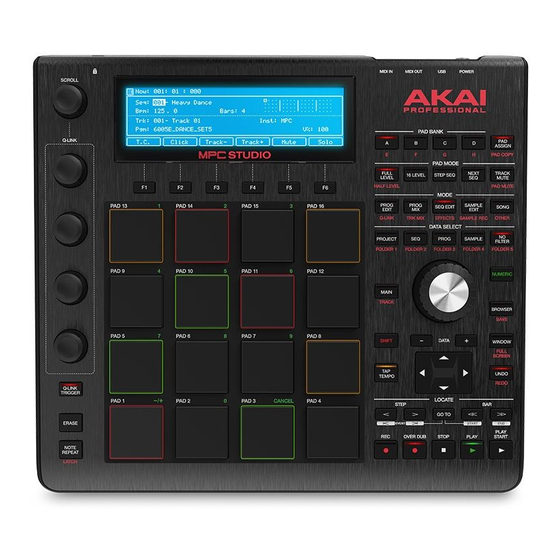
Page 5: Top Panel
Top Panel Navigation & Data Entry Controls 1. Display: This RGB LCD display shows information relevant to MPC Studio’s current operation. Much of this information is also shown in the software. Use the Mode and Select buttons to change what is shown on the display, and use the data dial or -/+ buttons to adjust the currently selected setting/parameter. - Page 6 9. Copy / Delete: Press this button to copy one pad to another. Use the Copy from pad field to select the “source” pad (the pad you want to copy) and use the Copy to pad field to select the “destination”...
- Page 7 20. Sample Start / Loop Start: Press this button and use the data dial or -/+ buttons to change the sample start point for the sample on the selected pad. Press the button again to cycle through Layers 1–4 of the pad. Press and hold Shift, press this button, and use the data dial or -/+ buttons to change the Loop Start point for the sample on the selected pad.
-
Page 8: Rear Panel
Rear Panel 1. USB-B Port: Use the included USB cable to connect this high-retention-force USB port to an available USB port on your computer. This connection allows MPC Studio to send/receive MIDI data to/from the MPC software on your computer. -
Page 9: Guía De Inicio Rápido (Español)
Guía de inicio rápido Manual sobre la seguridad y garantía Importante: Visite en akaipro.com la página correspondiente al MPC Studio mk2 para descargar la guía de usuario complete. Soporte Para obtener la información más reciente acerca de este producto (documentación, especificaciones técnicas, requisitos de sistema, información de compatibilidad, etc.) y registrarlo, visite akaipro.com. -
Page 10: Para Comenzar
Instalación de software MPC 1. Vaya a akaipro.com y registre su producto. Si aún no tiene una cuenta de Akai Professional, se le pedirá que cree una. 2. En su cuenta de Akai Professional, descargue el paquete de software MPC. -
Page 11: Panel Superior
1. Pantalla: Esta pantalla LCD RGB muestra información relacionada con el funcionamiento actual del MPC Studio. Gran parte de esta información también se muestra en el software. Utilice los botones Mode y Select para modificar lo que se muestra en la pantalla, y utilice el cuadrante de datos o los botones -/+para modificar el ajuste/parámetro actualmente seleccionado. - Page 12 9. Copiar / Borrar: Pulse este botón para copiar un pad a otro. Utilice el campo Copy from pad para seleccionar el pad de "fuente" (el pad que desea copiar) y utilice el campo Copy to pad para seleccionar el pad de “destino”. Puede seleccionar múltiples pads destino y puede seleccionar pads en diferentes bancos de pads.
- Page 13 18. Browse / Up (Explorar / Guardar): Pulse este botón para ver el explorador. El explorador le permite navegar los discos rígidos internos y externos de su ordenador para cargar muestras, secuencias, canciones, etc. Mantenga pulsado Shift y pulse este botón para volver a la carpeta anterior mientras utiliza el explorador.
-
Page 14: Panel Trasero
1. Puerto USB-B: Utilice el cable USB incluido para conectar este puerto a un puerto USB de alta retención disponible en su ordenador. Esta conexión permite que el MPC Studio envíe y reciba datos MIDI y de audio hacia y desde el software MPC en su ordenador. -
Page 15: Contenu De La Boîte
Consignes de sécurité et informations concernant la garantie Important : Visitez akaipro.com pour trouver la page Web du MPC Studio mk2 afin de télécharger son guide d’utilisation complet. Assistance Pour les toutes dernières informations concernant la documentation, les spécifications techniques, la configuration requise, la compatibilité... -
Page 16: Schéma De Connexion
). Vous pouvez également créer un raccourci sur votre bureau. Démarrage 1. Tout d'abord, reliez MPC Studio à votre ordinateur en utilisant un câble USB. 2. Sur votre ordinateur, lancez le logiciel MPC. 3. Ensuite, configurez l’audio. Dans le logiciel MPC, ouvrez la fenêtre Preferences : Windows : Cliquez sur l'icône du menu (≡), sélectionnez Edit, puis cliquez sur Preferences. -
Page 17: Caractéristiques
à dynamique et à la pression et donc très réactifs et intuitifs. Ils s’illuminent de couleurs différentes, selon la MPC Studio de frappe que vous utilisez (de jaune à faible dynamique, à rouge à la dynamique élevée). Vous pouvez également personnaliser leurs couleurs. - Page 18 9. Copy/Delete : Cette touche permet de copier les paramètres d’un pad à un autre. Le champ Copy from pad permet de sélectionner le pad « source » (le pad à copier) et le champ Copy to pad permet de sélectionner le pad de « destination ». Il est possible de sélectionner plusieurs pads de destination et de sélectionner des pads de banques différentes.
- Page 19 18. Browse / Up : Cette touche permet d’afficher le navigateur. Le navigateur vous permet de parcourir les disques durs internes et externes de votre ordinateur afin de charger des échantillons, séquences, chansons, etc. Appuyer sur cette touche tout en maintenant la touche Shift enfoncée permet de passer au dossier précédent dans le navigateur.
-
Page 20: Panneau Arrière
être supprimés de la séquence. Panneau arrière 1. Port USB-B : Utilisez le câble USB inclus pour relier ce port à MPC Studio de rétention élevée au port USB d’un ordinateur. Ce raccordement permet au MPC Studio de transmettre/recevoir des données MIDI et audio à/du logiciel MPC sur votre ordinateur. -
Page 21: Guida Rapida (Italiano)
Guida rapida Istruzioni di sicurezza e garanzia Importante: recarsi su akaipro.com e trovare la pagina di MPC Studio mk2 per scaricare la guida per l’uso completa. Assistenza Per le ultime informazioni in merito a questo prodotto (documentazione, specifiche tecniche, requisiti di sistema, informazioni sulla compatibilità, ecc.) e per effettuarne la registrazione, recarsi alla pagina... -
Page 22: Primi Passi
Installazione del software MPC 1. Recarsi su akaipro.com e registrare il prodotto. Se ancora non si dispone di un account Akai Professional, verrà richiesto di crearne uno. 2. Nel proprio account Akai Professional, scaricare il pacchetto software MPC. 3. Aprire il file e fare doppio clic sull'applicazione di installazione. -
Page 23: Pannello Superiore
1. Display: questo display LCD RGB mostra informazioni specifiche sull’operazione corrente dell’MPC Studio. Molte di queste informazioni sono anche illustrate nel software. Servirsi dei tasti Mode e Select per modificare ciò che viene mostrato a display e servirsi della manopola data o dei tasti -/+ per regolare l’impostazione/parametro selezionato correntemente. - Page 24 9. Copy/Delete: premere questo tasto per copiare un pad su un altro. Servirsi del campo Copy from pad per selezionare il pad “fonte” (quello che si desidera copiare) e del campo Copy to pad per selezionare il pad di “destinazione”. Si possono selezionare più pad di destinazione ed è possibile selezionare pad in diversi banchi pad.
- Page 25 19. Sample Select: premere questo tasto e utilizzare la manopola data o i tasti -/+ per cambiare il campione selezionato per il pad corrente. Premere nuovamente il tasto per scorrere tra gli strati 1–4 del pad. 20. Sample Start / Loop Start: premere questo tasto e utilizzare la manopola data o i tasti -/+ per cambiare il punto di inizio del campione sul pad selezionato.
-
Page 26: Pannello Posteriore
1. Porta USB-B: servirsi del cavo USB in dotazione per collegare questa porta USB ad alta forza di ritenzione ad una porta USB libera del computer. Questo collegamento consente all’MPC Studio di inviare e ricevere dati MIDI e audio da/verso il software MPC sul computer. - Page 27 Schnellstart-Anleitung Sicherheitshinweise und Garantieinformationen Wichtig: Besuchen Sie akaipro.com und suchen Sie die Webseite für MPC Studio mk2, um das komplette Benutzerhandbuch herunter zu laden. Kundendienst Für die neuesten Informationen zu diesem Produkt (Dokumentation, technische Daten, Systemanforderungen, Informationen zur Kompatibilität etc.) und zur Produktregistrierung besuchen Sie bitte: akaipro.com.
-
Page 28: Erste Schritte
Verknüpfung auf Ihrem Desktop erstellen. Erste Schritte 1. Schließen Sie zuerst MPC Studio mit einem USB-Kabel an Ihren Computer an. 2. Öffnen Sie die MPC-Software auf Ihrem Computer. 3. Richten Sie zunächst Ihr Audio ein. Öffnen Sie in der MPC-Software die Einstellungen: Windows: Klicken Sie auf das Menüsymbol (≡), wählen Sie Edit und klicken Sie auf... - Page 29 Funktionen Oberseite Navigation & Dateneingabe 1. Display: Diese RGB-LCD-Anzeige zeigt Informationen an, die für den aktuellen Betrieb von MPC Studio relevant sind. Ein großer Teil dieser Informationen wird auch in der Software angezeigt. Verwenden Sie die Tasten Modus und Auswählen, um die Anzeige auf dem Display zu ändern, und passen Sie mit dem Datenrad oder den Tasten -/+ die aktuell ausgewählten Einstellungen/Parameter an.
- Page 30 8. Full Level (Volle Lautstärke) / Half Level (Halbe Lautstärke): Drücken Sie diese Taste, um die volle Lautstärke zu aktivieren/deaktivieren. Ist diese Funktion aktiviert, werden die Pads ihre Samples immer bei maximaler Anschlaggeschwindigkeit (127) triggern und zwar unabhängig davon, wie schnell Sie sie anschlagen. Halten Sie die Umschalttaste und drücken diese Taste zum Aktivieren/Deaktivieren der Funktion „Halbe Lautstärke“.
- Page 31 17. Programm-Auswahl / Track-Typ: Drücken Sie diese Taste und ändern Sie mit dem Datenrad oder den Tasten -/+ das Programm für den ausgewählten Track. Halten Sie Shift gedrückt, drücken Sie diese Taste und ändern Sie den Track-Typ für den ausgewählten Track mit dem Datenrad oder den Tasten -/+. Drum, Keygroup, Plugin, MIDI, Clip oder CV.
- Page 32 1. USB-B-Anschluss: Verwenden Sie das mitgelieferte USB-Kabel, um diesen Anschluss mit hoher Rückhaltekraft an einen freien USB-Anschluss Ihres Computers anzuschließen. Über diese Verbindung kann das MPC Studio MIDI-Daten und Audiodaten mit der MPC-Software auf Ihrem Computer austauschen. 2. MIDI Eingang: Verwenden Sie den mitgelieferten 1/8"-auf-MIDI-Adapter und ein handelsübliches, fünfpoliges MIDI-Kabel (nicht im Lieferumfang enthalten), um diesen Eingang mit dem MIDI-...
-
Page 34: Technical Specifications
Specifications are subject to change without notice. Trademarks & Licenses Akai Professional and MPC are trademarks of inMusic Brands, Inc., registered in the U.S. and other countries. All other product names, company names, trademarks, or trade names are those of their respective owners. - Page 36 Manual Version 1.2...