Table of Contents
Advertisement
Quick Links
Advertisement
Table of Contents

Related Manuals for Elation show designer 3

Summary of Contents for Elation show designer 3
- Page 1 Software Revision 1.12...
-
Page 2: Table Of Contents
OVERVIEW ................................1 REAR PANEL CONNECTIONS ............................1 TOP PANEL ..................................1 MENU AND SETUP FUNCTIONS ....................3 CHOOSE FIXTURES................................3 PATCH FIXTURES ................................4 PATCH CONVENTIONAL DIMMERS..........................4 COPY FIXTURE ...................................5 LOAD FIXTURE PROFILE FROM CF ..........................5 LOAD FIXTURE PROFILE FROM COM PORT ........................5 REMOVE FIXTURE PROFILE............................5 SELECT FLEX FADER MODE ............................6 SELECT PLAYBACK MODES............................6 SELECT HOME SCENE...............................6... - Page 3 PRESETS ..................................18 FACTORY PROGRAMMED PRESETS ..........................18 CREATING AND RECORDING PRESETS ........................18 RECALLING PRESETS..............................19 RECALLING PRESETS WITH PLAYBACK MASTERS....................19 ERASE PRESET..................................19 EDITING PRESETS................................19 COMBINING PRESETS..............................20 CHASES ..................................21 RECORDING CHASES ..............................21 SHAPE CHASE ...................................21 SIMPLE FLASH CHASE ..............................22 COMPLEX FLASH CHASE ...............................23 COMPLEX CHANNEL CHASE ............................23 COLOR CHASE ..................................24 GOBO CHASE ..................................25...
- Page 4 USING THE COMPUTER PORT (RS-232) ..............37 CONFIGURING YOU COMPUTER ..........................37 MEMORY BACKUP USING THE COMPUTER PORT ....................37 MEMORY RESTORE USING THE COMPUTER PORT ....................37 UPDATING THE SOFTWARE ............................37 LOAD FIXTURE PROFILE ..............................38 FIXTURE LIBRARY ..........................39...
-
Page 5: Overview
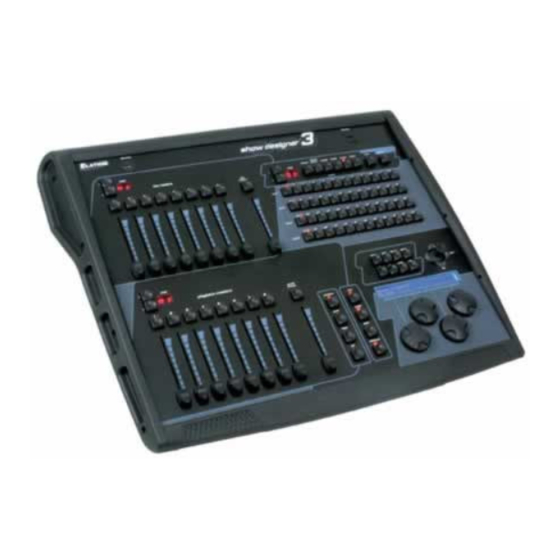
OVERVIEW The Show Designer 3 is a lighting controller based on the successful and simple to use Show Designer 1 and Show Designer 2. The Show Designer 3 expands on the existing features of these controllers and adds many others. The approach of this controller is to simplify the programming process as much as possible while still offering a high level of control at a low cost. - Page 6 The following is a brief summary of the top panel features of the Show Designer 3: Programming and memory switch section featuring 48 multi purpose switches for assigning and recalling memories using the function select switches just above these.
-
Page 7: Menu And Setup Functions
The Show Designer 3 has a built in list of fixtures to choose from. You can also load in “fixture profiles” that contain more detailed information about a particular lighting fixture than what is offered by the built in list. -
Page 8: Patch Fixtures
PATCH CONVENTIONAL DIMMERS The Show Designer 3 supports up to 128 conventional dimmers, these can be dimmer modules that are wired to par cans, house lights or even fog machines. Once patched, conventional dimmers are controlled using the flex faders or by typing values with an external keyboard. -
Page 9: Copy Fixture
LOAD FIXTURE PROFILE FROM COM PORT This menu allows you to load fixture profiles into the Show Designer 3 from a PC using the COM port. When this menu item is selected the message “Ready to receive fixture profile” will appear. You must send the fixture file from your PC to the Show Designer using the “SD backup”... -
Page 10: Select Flex Fader Mode
The channel names will be displayed as “chan 1, 2, 3 etc.” You can also create a fixture profile by downloading the fixture profile editor from the Elation web site. It can be found in the downloads section and is labeled “SD2 Library Creator”. - Page 11 to record the changes you make to each attribute. The message “DONE” will appear in the display when the change has been recorded. The fixture attributes are described in the following paragraphs: NAME is the fixture name that appears whenever you select a moving light fixture. You may want to modify this attribute on each of your fixtures to show fixture purpose or location.
-
Page 12: Multi Fixture
Show Designer 3 supports moving light fixtures that use up to 32 DMX channels. Since many fixtures use fewer than 32 channels, Show Designer 3 will allow you to configure a group of fixtures that are of the same type, under a single fixture number. For example if you have selected a 4 channel scanner for fixture number 1, you can set “multi”... -
Page 13: View Memory Size
SET MIDI CHANNEL This allows you to select the MIDI channel that Show Designer 3 will receive on. Select channels 1-16 using the + or – switches or use data wheel #1 then pre ss “enter”. Read the section on MIDI for more info. -
Page 14: Lock/Unlock Memory (Hidden)
or abort this menu is to turn the power off. You can also call this menu on power up by pressing and holding “menu” and “erase” together while turning on the power. LOCK/UNLOCK MEMORY (hidden) This is one of the hidden menus that can only be selected while holding the “add” switch when cycling through the menu selections. -
Page 15: Controlling Moving Light Fixtures
CONTROLLING MOVING LIGHT FIXTURES The SD3 allows you to take direct control of moving light fixture channels at any time. There is no “edit mode” as with some lighting controllers. In essence you are always in edit mode and can instantly save the current stage settings as a scene. -
Page 16: Using The Data Wheels To Control Fixture Channels
Show Designer 3 will display the channel names for most fixtures that are in the built in library. If a fixture profile has been installed, some channels will also display the names of each step within the channel, like colors and gobos. -
Page 17: Joystick
JOYSTICK The joystick controls pan and tilt on all selected fixtures that have a pan or tilt feature. The joystick is the “return to center” type so it operates by moving it in the desired direction. The greater the joystick angle the faster the pan or tilt movement will be. -
Page 18: Controlling Conventional Dimmers
CONTROLLING CONVENTIONAL DIMMERS The Show Designer 3 allows control of up to 128 conventional dimmers. These can be controlled from the flex faders or by entering percentage values with an external keyboard. Before dimmers can be addressed they must first be patched using the “Patch Conventional Dimmers” menu as explained in the previous menu section. -
Page 19: Working With Memories
WORKING WITH MEMORIES The SD3 provides four types of memories: presets, chases, scenes and shows. Presets and chases are used as building blocks along with static channel levels to create scenes. Shows are simply scene lists. All four memory types can be assigned to playback faders or called up directly by selecting the corresponding memory number switch and page. -
Page 20: Recalling Scenes
To record the scene, select the page and scene number. You can use the page switches to select from pages 1 to 99 and the number switches from 1 to 48 allowing you to store up to 4752 scenes. If you select a scene number that is already lit, a message will appear asking if you want to write over the existing scene. -
Page 21: Turn Off Scene
TURN OFF SCENE You can turn off a scene by pressing its lit LED to toggle it off. Any channels that are included in the scene will return to 0. ERASE SCENE To erase a scene from the memory, press “record” then “scene” then “erase”. As when recording a scene, all number LEDs that contain a scene will light. -
Page 22: Presets
Show Designer 3 allows you to record up to 24 pages of 48 presets for a total of 1152 presets. For your convenience the words “color”, “gobo”, “focus” and “effect” are printed next to the 4 rows of number switches. -
Page 23: Recalling Presets
To save the preset, select the page and number where you want to store it. If you select a number that is already lit, a message will appear asking if you want to write over the existing preset. Press “yes” or “no”. You can use the page switches to select from pages 1 to 24 which will allow you to store up to 1152 presets. -
Page 24: Combining Presets
COMBINING PRESETS You can add existing presets to any preset you are currently working on. While in preset record mode press the “add” switch followed by any preset number that has something recorded on it. The channel settings will be added to the preset you are currently recording. You can add as many presets as you wish. You can use this to mix several smaller presets into a single larger one. -
Page 25: Chases
CHASES The Show Designer 3 uses chases to create movements and special effects. Show Designer 3 allows you to record up to 24 pages of 48 chases for a total of 1152 chases. There are seven different types of chases to choose from;... -
Page 26: Simple Flash Chase
There are a number of parameters that you can adjust for a shape chase. The first field in the display is the shape type, use data wheel #1 to select from the list. The second field in the display is the step time, use data wheel #2 to adjust the speed of the chase. -
Page 27: Complex Flash Chase
Depending on how the chase is programmed either the dimmer or the shutter will be used to flash a fixture. For chases that use a slow fade time the dimmer will be used and the shutter will be opened to full. For quick flashes, the shutter will be used to flash the fixture with the dimmer set to full. -
Page 28: Color Chase
Pressing “enter” when at the last recorded step of the chase will always add an additional step to the end. If you press “enter” while the step number is at a lower step you will advance to the next step number, the same as when you increment data wheel #1. -
Page 29: Gobo Chase
Use wheel #4 to adjust an offset if desired. “Offset” works similar to the shape chase offset in that each fixture will be offset from the next by the number of steps you select. The order of offset across the fixtures will be determined by the order that you select the fixtures for the chase. -
Page 30: Recalling Chases
RECALLING CHASES To run a chase, press the “chase” switch, and then press the desired page and number switch. The chase will begin to run at the speed that was selected when it was recorded. Pressing the same switch again will turn the chase off. -
Page 31: Shows
“go”, “stop” and “back” switches. This is sometimes referred to as a stack by some controllers. Show Designer 3 lets you record up to 24 pages of 48 shows for a total of 1152 shows. Shows are good for running the controller without an operator or for productions that never require changes on the fly. -
Page 32: Erase Show
Press “yes” or “no”. After you have saved the show, Show Designer 3 remains in record mode allowing you to continue to edit the show. To exit record mode, press “record”, the LEDs will stop flashing. - Page 33 running. You can however run more than one show at a time when using the playback faders. The shows that are running on the playbacks will not be shown in the display but you can run up to 16 shows at one time using all the playback faders.
-
Page 34: Performance Controls
PERFORMANCE CONTROLS To the left of the four wheels are eight control buttons that are generally used for live performance. The following is a description of the functions of each of these switches. PREVIEW The “preview” switch is used along with the “go” switch to preview memories before calling them. With the “preview”... -
Page 35: Beat Switch
BEAT SWITCH The beat switch allows you to override the step time or beat of a chase by tapping on the switch in time to any music that is playing. The LED will flash in time to the beat that is tapped in. Any chases that are running will sync to this beat unless the speed has been locked for that chase. -
Page 36: Playback Masters
PLAYBACK MASTERS Scenes, presets, chases and shows can all be assigned to the playback faders. There are 32 pages of 8 faders giving you a total of 256 playback fader memories to work with. In addition you can configure the flex faders as additional playbacks giving you 256 more. -
Page 37: Htp Dimmer Mode
When there is a show assigned to a playback, LTP mode requires a special case. A show is a list of scenes therefore the fader will call the next scene of a show whenever it is moved from the 0 position. The scene will fade in as you move the fader up and then be locked in position when the fader reaches the top. -
Page 38: Midi
MIDI Show Designer 3 allows you to call scenes and blackouts using the MIDI input. The scene page and number can be encoded in a MIDI message that is then sent to the MIDI input by a computer or MIDI sequencer. -
Page 39: Using The Compact Flash Drive
SD3V105.txt). Go to the Show Designer 3 menu function “update software”, and press, “enter”. If the file is found on the disk, the Show Designer 3 will go into update mode and start reading the file. The message “receiving new program” will appear in the display. After the software is... -
Page 40: Install Fixture Profiles
Show Designer 3 will reboot with the new version installed. If there are any errors an error message will appear and you will have to start over. Software updates can be downloaded from the Elation website at www.elationlighting.com. -
Page 41: Using The Computer Port (Rs
Designer 3 labeled “Load memory file from COM port”. Press “enter” and the display will read, “Waiting for file from COM port”. Show Designer 3 is now ready to receive the file from your PC. If you decide to abort the process, the only way to exit this screen is to turn off the SD3. -
Page 42: Load Fixture Profile
LOAD FIXTURE PROFILE Go to the SD3 menu item “Load fixture profile from CF”. The message “Ready to receive fixture profile, press enter to cancel” will appear on the display. Use the “Send File” function on the SD Backup program to send a fixture profile to the SD3. -
Page 43: Fixture Library
American DJ Mega-Strobe/DMX Elation Design LED 36 American DJ P36, P64 Elation Design Spot 250 American DJ Scantron 250/Rollertron 250 Elation Easy Color 7 Channel Mode American DJ Ultra Scan 250 Elation Focus Spot 250 American DJ XP-3 Elation Fog/Haze 1 Channel... - Page 44 Robe Clubscan 150CT Robe Clubscan 250CT Robe Clubspot 250CT Robe Clubwash 250CT Robe Color Mix 150AT Profile Robe Color Mix 150AT Wash Robe Color Mix 240AT Mode 1 Robe Color Mix 250AT Mode 1 Robe Color Mix 550AT Robe Color Mix 575AT Robe Color Spot 170AT Robe Color Spot 250AT Mode 3 Robe Color Spot 575AT Mode 3...