Table of Contents
Advertisement
COMPACT DISC PLAYER
AM/FM STEREO CASSETTE RECORDER
WITH DETACHABLE SPEAKERS
OPERATING INSTRUCTIONS
•
PLAYS MUSIC COMPACT DISCS
•
FULLY PROGRAMMABLE CD PLAYER WITH REPEAT
•
RECEIVES AM/FM STEREO BROADCASTS
•
RECORDS FROM CD, RADIO, OR BUILT-IN MICROPHONE
•
DETACHABLE SPEAKER SYSTEM
•
2 WAY POWER - AC/DC
•
REQUIRES 8 SIZE "C" BATTERIES
MODEL CD-1493
PLEASE READ CAREFULLY BEFORE USE
IB-CD1493(AD-63E)-WM-E-030404
Advertisement
Table of Contents

Related Manuals for Durabrand CD-1493


Summary of Contents for Durabrand CD-1493
-
Page 1: Operating Instructions
FULLY PROGRAMMABLE CD PLAYER WITH REPEAT • RECEIVES AM/FM STEREO BROADCASTS • RECORDS FROM CD, RADIO, OR BUILT-IN MICROPHONE • DETACHABLE SPEAKER SYSTEM • 2 WAY POWER - AC/DC • REQUIRES 8 SIZE “C” BATTERIES PLEASE READ CAREFULLY BEFORE USE MODEL CD-1493 IB-CD1493(AD-63E)-WM-E-030404... -
Page 2: Important Safety Instructions
TO PREVENT FIRE OR SHOCK HAZARD, DO NOT USE THE PLUG WITH AN EXTENSION CORD, RECEPTACLE OR OTHER OUTLET UNLESS THE BLADES CAN BE FULLY INSERTED TO PREVENT BLADE EXPOSURE. TO PREVENT FIRE OR SHOCK HAZARD, DO NOT EXPOSE THIS APPLIANCE TO RAIN OR MOISTURE. RISK OF ELECTRIC SHOCK T h e l i g h t n i n g f l a s h w i t h arrowhead symbol, within an... -
Page 3: Additional Safety Instructions
ADDITIONAL SAFETY INSTRUCTIONS 1. Power Sources - The appliance should be connected to a power supply only of the type described in the operating instructions or as marked on the appliance. 2. Wall or Ceiling Mounting - The appliance should not be mounted to a wall or ceiling. 3. -
Page 4: Battery Safety Instructions
BATTERY SAFETY INSTRUCTIONS CAUTION: TO REDUCE THE RISK OF FIRE OR PERSONAL INJURY OR DAMAGE TO YOUR SET, READ AND FOLLOW THESE INSTRUCTIONS. 1. Use only the type and size of batteries mentioned in the operating instructions booklet (batteries are not included with this set, please buy the proper batteries). 2. -
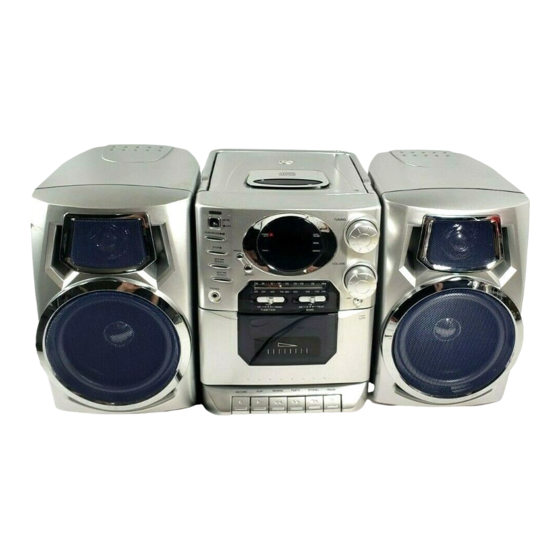
Page 5: Location Of Controls
LOCATION OF CONTROLS 1 . FOLDING HANDLE 2 . CD DOOR 3 . COMPACT DISC DISPLAY 4 . CD DOOR PUSH/OPEN AREA 5 . AM/FM DIAL SCALE 6 . TUNING CONTROL 7 . VOLUME CONTROL 8 . DETACHABLE SPEAKERS 9 . BUILT-IN CONDENSER MICROPHONE 10. -
Page 6: Choosing The Power Sources
CD player. To a wall outlet NOTE: One blade of plug and outlet is wider. -
Page 7: Attaching The Speakers
ATTACHING THE SPEAKERS NOTE: The right and left speakers are NOT interchangeable. The right speaker fits only on the right side (as shown in FIG. 1). The left speaker fits only on the left side. 1.Bring the right speaker to the right side of the set. -
Page 8: Playing A Cd
PLAYING A CD POWER button PLAY/PAUSE button FUNCTION switch Connect the supplied AC power cord or batteries (see page 5). POWER Press the POWER button, the POWER/ BATT. lamp will be steadily on. S li d e th e F U NC TI O N s wi t ch t o C D position, “... - Page 9 USE THESE BUTTONS FOR ADDITIONAL OPERATIONS SKIP/SEARCH BACKWARD SKIP/SEARCH F O R W A R D • When CD play is p au s ed , th e c ur r en t p la y in g Adjust the volume track number will flash and no music Stop playback...
-
Page 10: Playing Cd Tracks Repeatedly
PLAYING CD TRACKS REPEATEDLY (REPEAT PLAY) You can play CD tracks over and over in normal or programmed play mode (see page 10). POWER button PLAY/PAUSE SKIP/SEARCH BACKWARD SKIP/SEARCH F O R W A R D FUNCTION switch 1. Press the POWER button, the POWER/BATT. lamp will be steadily on. 2. -
Page 11: Programmed Play
PLAYING CD TRACKS IN PROGRAMMED OR RANDOM ORDER PLAY/PAUSE BACKWARD FORWARD 1. Programmed Play You can make a program of up to 16 tracks in the order you want them to be played. 1. Slide the FUNCTION switch to CD position. Make sure the CD is stopped. -
Page 12: Listening To The Radio
LISTENING TO THE RADIO Connect the supplied AC power cord or batteries (see page 5). POWER Press the POWER button, the POWER lamp will be steadily on. Slide the FUNCTION switch to RADIO position. Slide the BAND switch to the proper band position (AM, FM or FM STEREO) that you want. - Page 13 USE THESE BUTTONS FOR ADDITIONAL OPERATIONS • If the FM broadcast is noisy, slide the BAND Adjust the volume s wi tc h f r om STEREO to FM. • Next time you want to Turn off the Radio listen to the radio, just slide the FUNCTION s wi t ch R A DI O...
-
Page 14: Playing A Tape
PLAYING A TAPE POWER button FUNCTION switch Connect the supplied AC power cord or batteries (see page 5). POWER Press the POWER button, the POWER/BATT. lamp will be steadily on. Slide the FUNCTION switch to TAPE position. Press the STOP/EJECT button to open the tape compartment and insert a recorded tape. -
Page 15: Recording On A Tape
Select the program source (AM, FM, CD, or built-in STOP/EJ. microphone) you want to record. To record from the CD player. Slide the FUNCTION switch to CD position, and insert a CD, then follow the CD playing steps to play. - Page 16 USE THESE BUTTONS FOR ADDITIONAL OPERATIONS FUNCTION switch RECORD Connect the supplied AC power cord or batteries (refer to page 5). Adjust the volume Stop playback or recording Fast forward or rewind the tape Pause playback or recording Eject the cassette To shut power off VOLUME control PLAY...
-
Page 17: On Power Sources
PRECAUTIONS On Safety • As the laser beam used in the CD player section may be harmful to the eyes, do not attempt to disassemble t he ca bi n et . R e f e r s er v ic in g t o qualified personnel only. -
Page 18: Notes On Cds
PRECAUTIONS (continued) Notes on CDs • Before playing, clean the CD with a cleaning cloth. Wipe the CD from the center out. • Do not use solvents such as benzine, t hi n ne r, co m me r c i al l y cleaners or anti-static spray intended for vinyl LPs. -
Page 19: Maintenance
MAINTENANCE Cleaning the Lens If the lens becomes dirty, it may cause a skipping of sound during CD operation. Clean with a commercially available lens cleaner and blower. Cleaning the Tape Heads Wipe the heads, the pinch roller and the capstan with a cleaning swab slightly moistened with cleaning fluid or alcohol after every 10 hours of operation for optimum playback and recording quality. -
Page 20: Troubleshooting
Check if your batteries are fresh. • It is normal since the radio uses less power than the CD player. • Replace all the batteries with new ones if they are weak, or bring the set near a window, or rotate the set. -
Page 21: Specification
760 - 800 NM 3 - spot error detection Tracking method: Frequency response: 50Hz - 15kHz +1/-2 dB NOTE: This CD player will play NORMAL music CDs (or CD-R CDs). Tape Recorder Section Frequency response: Standard normal bias cassette tape, 70Hz - 10kHz... -
Page 22: Limited Warranty
During the initial 90 day period after original purchase, we will service or exchange, at no charge, the set that is returned to LENOXX ELECTRONICS CORP. After the initial 90 day period expires, and for a period of 12 months from original purchase, we will repair the unit covering any part(s) that need to be replaced at no charge, but will charge for the cost of labor, return postage paid by Lenoxx.