
Related Manuals for ADC 6016


Summary of Contents for ADC 6016
- Page 1 Digital Wrist Blood Pressure Monitor Advanced Wrist Monitor 6016 Instruction Manual PLEASE NOTE: THIS MEDIC L INSTRUMENT MUST BE USED CCORDING TO INSTRUCTIONS TO ENSURE CCUR TE RE DINGS. Questions? Call DC toll free at 1-800-232-2670...
-
Page 2: Table Of Contents
6016 Advanced Wrist Blood Pressure Monitor Table of Contents 1. Introduction 2. Warnings and Precautions 3. About Blood Pressure 3.1 What is Blood Pressure? 3.2 What is a Normal Blood Pressure? 3.3 What Influences Blood Pressure? 3.4 Does Blood Pressure Vary? 3.5 What is Hypertension? - Page 3 6.6. Discontinuing a Measurement 6.7. Memory Storage and Recall of the Measurements 6.8 Clearing the Memory 7. PC Link Software Functions: n Optional ccessory 7.1. Getting Started 7.2. System Requirements 7.3. PC Link Connection 8. Error Messages/Troubleshooting 9. Care, Maintenance, and Recalibration 10.
-
Page 4: Introduction
1. INTRODUCTION 1. Introduction Congratulations on your purchase of the DC ® Dvantage dvanced Wrist Blood Pressure Monitor. In hospitals and physician's offices throughout the world, where accuracy and dependability are critical, DC ® professional diagnostic products are the instruments of choice. Now you, too, can enjoy the benefits of DC ®... - Page 5 • This monitor is intended for use by adults only. Consult with a physician before using this instrument on a child. • In cases of irregular heartbeat ( rrhythmia), measurements made with this instrument should only be evaluated after consultation with your doctor.
-
Page 6: About Blood Pressure
Caution: The standard material used is latex-free. ttention: Self-measurement means control, not diagnosis or treatment. Un- usual values must always be discussed with your doctor. Under no circum- stances should you alter the dosages of any drugs prescribed by your doctor. ttention: The pulse display is not suitable for checking the frequency of heart pacemakers! ttention: In cases of irregular heartbeat, measurements made with this in-... -
Page 7: What Is A Normal Blood Pressure
It is recorded as systolic/diastolic. For example a systolic of 120 and diastolic of 80 would be recorded 120/80. Blood pressure is a dynamic vital sign - one that changes constantly throughout the day. person's "resting" blood pressure is the pressure that exists first thing in the morning while a person is still at rest and before consumption of food or drink. -
Page 8: Does Blood Pressure Vary
Physical activity can have a significant short term impact on blood pressure. Work, exercise, smoking, eating, drinking - even talking, laugh- ing, or crying will all affect a person's blood pressure. Your diet, including beverages containing caffeine or alcohol, may af- fect blood pressure. -
Page 9: What Is Hypertension
3.5. What is Hypertension? Hypertension (high blood pressure) is elevated systolic or diastolic levels. In 90 to 95 percent of the diagnosed cases, the specific causes are unknown, although the condition is often linked with family history, and lifestyle. This is referred to as essential hypertension. In the remaining cases, high blood pressure is a symptom of an underlying, often treatable condition, which if corrected, may normalize blood pressure. -
Page 10: Why Measure Blood Pressure At Home
• Don't smoke • Reduce salt and fat intake • Maintain proper weight • Exercise regularly • Have regular physical checkups 3.7. Why Measure Blood Pressure at Home? Clinical studies have shown improved detection and treatment of hy- pertension when regular home blood pressure monitoring is done in con- sultation with a physician. -
Page 11: How Is Blood Pressure Measured
3.8. How is Blood Pressure Measured? Health care professionals traditionally use a device known as a sphygmo- manometer along with a stethoscope - essentially a professional version of the very same instrument you have purchased. The sphygmo-manometer is a sys- tem consisting of an inflatable bladder contained with-in a cuff, inflation bulb with air control valve, and pressure measuring manometer (gauge). -
Page 12: Components Of Your Blood Pressure Monitor
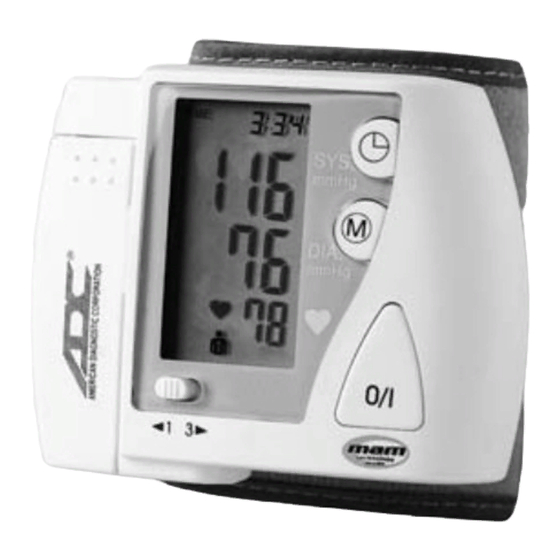
4. COMPONENTS OF YOUR BLOOD PRESSURE MONITOR The illustration below shows your blood pressure monitor (model # 6016), consisting of: Fits wrist sizes 13.5-19.5cm (5.3"-7.7") 5. SETTING UP YOUR BLOOD PRESSURE MONITOR 5.1. -
Page 13: Sleep Mode
Attention! • fter the battery warning appears, the device will not function until the batteries have been replaced. • Use “ ” Long-Life or lkaline 1.5V Batteries. The use of recharge- able batteries is not recommended. • If the blood pressure monitor is left unused for long periods, remove the batteries from the device. -
Page 14: Setting The Date And Time
5.3. Setting the Date and Time This blood pressure monitor incorporates an integrated clock with date display. Each time a measurement is taken, the device will record the blood pressure values along with the exact time and date of the measurement. You must enter the date and current time. (Example: Entering 2002-06-20, 09:30): Use the following steps to set the date and time 1) Press and hold the TIME button for three... - Page 15 5) Press the TIME button again. The last two characters (day) are now blinking 6) The corresponding day can now be entered by pressing the MEMORY button. (Example: 19 presses advances 19 days) 7) Press the TIME button again. The display now switches to the time, with the blinking charac- ter representing the hour.
-
Page 16: User Selection
5.4. User Selection: This advanced blood pressure monitor allows you to track blood pressure readings for 2 individuals independently. a) Before measurement make sure you set the unit for the intended user. The unit can track results for 2 individuals. (User 1, User 2) b) The unit is preset to User 1. -
Page 17: The Measurement Procedure
6. THE MEASUREMENT PROCEDURE 6.1. Before Measuring: • void eating, and smoking as well as all forms of exertion directly be- fore the measurement. ll these factors influence the measurement re- sult. Try and find time to relax by sitting in an armchair in a quiet atmosphere for about ten minutes before the measurement. -
Page 18: Measurement Mode Selection (Single Or Average Mode)
b) The distance between the cuff and the hand should be approx. 10 mm (1/2”). c) Secure the cuff with the hook and loop closure, so that it lies comfortably and not too tight. No space should remain between the cuff and the wrist. d) Lay your arm on a table, with the palm upwards. -
Page 19: Measuring Procedure
6.5. Measuring Procedure a) Once you’ve selected the correct user, and measurement mode you can press the 0/I (ON/OFF) button to begin. fter you press the 0/l button the pump begins to inflate the cuff. Fig. 1 In the display, the increasing cuff pressure is continually displayed.(Fig. -
Page 20: Discontinuing A Measurement
d) When the unit is set to the verage Mode setting, 3 separate measurements will take place in succession followed by a calculation of your detected blood pressure value. There will be 15 seconds of resting time in-between each measurement. countdown indicates the remaining time and a beep will sound 5 seconds before the 2nd and 3rd readings begin. -
Page 21: Clearing The Memory
Further Information When the unit is in verage Mode, the time between measurements is carefully controlled to ensure accuracy. If you take successive measurements when the unit is in the single measurement mode, wait for 5 minutes in a relaxed position before you repeat a measurement. -
Page 22: Getting Started
7. PC Link Software - Optional Accessory Sold Separately This unit can be used in connection with your personal computer (PC) running the PC Link Blood System Requirements for Pressure nalyzer software. Your PC Blood Pressure nalyzer Software will allow a capacity of monitoring •... -
Page 23: Pc Link Connection
7.3. PC Link connection (optional accessory sold separately) Insert the USB connection into the opening provided on the top of the instrument, as shown in the diagram. -
Page 24: Error Messages/Troubleshooting
8. ERROR MESSAGES/TROUBLESHOOTING If an error occurs during a measurement, the measurement is discontinued and a corresponding error code is displayed (Example: Err 2). Error No. Possible cause(s) Err 1 No pulse has been detected. Err 2 Unnatural pressure impulses influenced the measurement result. - Page 25 Other possible malfunctions and their elimination If problems occur when using the device, the following points should be checked and if necessary, the corresponding measures are to be taken: Malfunction Remedy The display remains blank when the 1.Check the polarity of the batteries to ensure instrument is switched on although they are inserted correctly.
-
Page 26: Care, Maintenance, And Recalibration
9. CARE, MAINTENANCE, AND RECALIBRATION a) Do not expose the device to extreme tem- peratures, humidity, dust, or direct sunlight. b) The cuff contains a sensitive air-tight blad- der. Handle this carefully and avoid all types of straining the unit through twisting or buckling c) Clean the device with a soft, dry cloth. -
Page 27: Warranty
Customer Service Department for more details. 10. WARRANTY The blood pressure monitor 6016 is warranted for 5 years from date of purchase. This warranty includes the instrument and the cuff. The war- ranty does not apply to damage caused by improper handling, accidents, improper use, or alterations made to the instrument by third parties. -
Page 28: Technical Specifications
12. TECHNICAL SPECIFICATIONS Weight: .35 lbs. / 148g (with batteries + cuff) Size: 3.75” x 4.25” x 4.25” 85mm x 77mm x 75mm (including cuff) Storage temperature: –5°C to 55°C (23°F - 122°F) Humidity: 15% to 90% relative humidity maximum Operation temperature: 10°C to 40°C (50°F - 104°F) Display:... -
Page 29: How To Contact Us
Inspected in the U.S. . Made in China 55 Commerce Drive tel: 631-273-9600, 1-800-232-2670 Hauppauge, NY 11788 fax: 631-273-9659 U.S. . www. dctod y.com DC (UK) Ltd. em il: info@ dctod y.com Unit 6, PO14 1TH United Kingdom IB p/n 93-6016-00 rev 5 english...