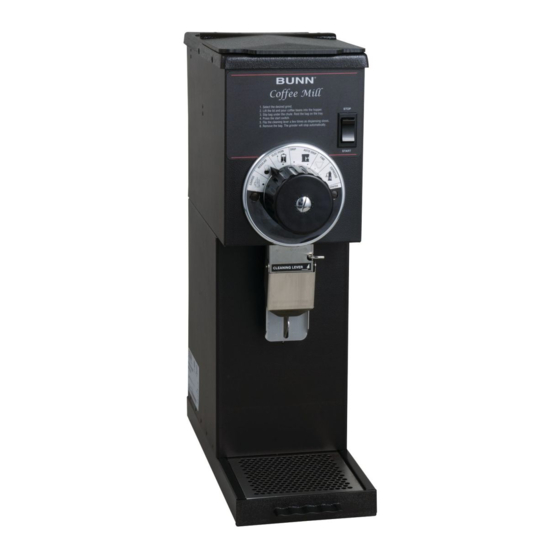
Bunn G1 User Instructions
Hide thumbs
Also See for G1:
- Operating & service manual (23 pages) ,
- Illustrated parts catalog (20 pages) ,
- Installation & operating manual (12 pages)
Advertisement
Quick Links
COFFEE GRINDING
STEP 1
Turn the selector knob to align the
red arrow with the desired grind.
STEP 6
Flip the cleaning lever a few times
as dispensing slows.
STEP 3
WARNING - Prior to cleaning the
grind chamber, unplug the grinder
before removal of any panel or grind
chamber housing parts.
STEP 8
Carefully clean the grind chamber,
dial plate assembly, chute open-
ing and dial plate opening with a
dry stiff non metallic bristle brush.
Wipe with a clean cloth that has
been soaking in a mild solution of
detergent and hot water. Reinstall
the spring and rotor with burr onto
the motor shaft.
39565.0000A 10/06 ©2006 Bunn-O-Matic Corporation
G1, G2 & G3 GRINDERS
USE & CARE INSTRUCTIONS
STEP 2
Raise the top lid and add the whole
bean coffee. Close the top lid.
STEP 7
Remove the bag when ground cof-
fee is no longer dispensed from
the chute. The grinder will stop
automatically when the bag is
removed.
STEP 4
Remove the two screws and remove
the dial plate and selector knob
assembly.
STEP 9
Align the slot in the motor shaft with
the rotor and reinstall shear plate.
Reinstall rotor cup and grind selec-
tor dial plate to the burr housing.
Refer to the Operating and Service
manual for burr adjustments.
STEP 3
Locate the back of a bag behind
the dispense chute. (The grinder
will not operate unless the bag is
behind the chute.) This will activate
the bag switch.
STEP 8
NOTE - The start switch will have
to be pressed again to continue the
cycle if the bag is removed before
grinding is completed. Turn the
ON/OFF/START switch to the OFF
position.
STEP 5
Slide the burr auger rotor/spring
assembly off the motor shaft and
disassemble for cleaning.
STEP 4
Allow the bag to rest on the screen
beneath the chute.
CLEANING
STEP 1
Clean all exterior surfaces using
a damp cloth rinsed in any mild,
nonabrasive, liquid detergent. Care
should be taken not to scratch the
grinder with any abrasive material.
STEP 6
Remove the two screws securing
the stationary burr to the grind
chamber.
STEP 5
Turn the ON/OFF switch to ON and
press the start switch.
STEP 2
Empty all beans from hopper(s).
Plug in the grinder and place an
empty bag behind the dispense
chute. Press and release the
"START" switch. Run a few cycles
until all coffee in the grind chamber
is dispensed and disconnect the
grinder from the power source.
Remove the bag.
STEP 7
Wash all parts in a mild solution of
detergent with hot water and a stiff
non metallic bristle brush. Rinse all
parts thoroughly and allow them to
air dry before reinstalling.
39565 102506
Advertisement

Related Manuals for Bunn G1


Summary of Contents for Bunn G1
- Page 1 G1, G2 & G3 GRINDERS USE & CARE INSTRUCTIONS COFFEE GRINDING STEP 5 STEP 1 STEP 2 STEP 3 STEP 4 Locate the back of a bag behind Turn the selector knob to align the Raise the top lid and add the whole...
-
Page 2: Troubleshooting
TROUBLESHOOTING A troubleshooting guide is provided to suggest probable causes and remedies for the most likely problems encountered. If the problem remains after exhausting the troubleshooting steps, contact the Bunn-O-Matic Technical Service Department. • Inspection, testing, and repair of electrical equipment should be performed only by qualified service personnel.