Silvercrest KH 2029 Operating Instructions Manual
Multi-band radio
Hide thumbs
Also See for SILVERCREST KH 2029:
- User manual ,
- Operating instructions manual (162 pages) ,
- Operating instructions manual (50 pages)

Related Manuals for Silvercrest SILVERCREST KH 2029


Summary of Contents for Silvercrest SILVERCREST KH 2029
- Page 1 MULTI-BAND RADIO KH 2029 Multi-Band Radio Operating instructions KOMPERNASS GMBH BURGSTRASSE 21 · D-44867 BOCHUM www.kompernass.com ID-Nr.: KH2029-11/09-V1...
- Page 2 KH 2029...
-
Page 3: Table Of Contents
Countdown function ........22 Radio operation Setting the station ........25 Fine tuning . -
Page 4: Intended Use
Intended use This device is designed to receive generally approved radio transmissions in all countries (world receiver) and only for domestic use. Utilisation other than as described here is not permitted and it could lead to damages and injuries. - Page 5 The technical features of the device enable the frequency ranges stated above to be set. Various countries may have different national rules on the radio frequency ranges assigned. Please note that you may not sell, transfer to third parties or abuse information received outside the assigned radio frequency ranges.
-
Page 6: Symbols Used
General Memory positions : Headphones Model: Impedance: Wideband characteristic Voltage (WBCV): Headphone socket max. Output voltage: Power transformer Manufacturer: Model: Primary: Secondary: Symbols used These symbols bring to your attention that here a warning notice follows in regard to one of the following matters: - Risk of injury, - Risk of electric shocks, - Risk of fire,... -
Page 7: Safety Information
This symbol warns about submersing the appliance in water or other liquids. This symbol warns you about hearing damage. Note: With this symbol you are given tips about interaction with the appliance. Safety information • This device has not been designed for use by people (including children) with restricted physical, sensory or intellectual abilities or lack of expe- rience and/or knowledge, unless they are supervised by a responsible person (for their own safety) or have received instructions on how to... - Page 8 Risk of electric shock! • Connect the mains-power adapter only to correctly installed and earthed mains sockets. Ensure that the rating of the local power supply tallies completely with the details given on the rating plate of the appliance. • Damaged adapters or mains cables should be exchanged immediately by an authorised technician or the Customer Service in order to avoid risks.
-
Page 9: Mains Power
Risk of injury • Keep children away from the connection cable and device. Children frequently underestimate the danger of electrical devices. • If the device has fallen down or is damaged it must no longer be used. Have the device checked by a qualified specialist and, if necessary, repaired. - Page 10 Notes on handling batteries The device uses batteries. Please note the following on handling batteries: Risk of explosion! Do not throw batteries into a fire. Do not recharge batteries. • Never open, solder or weld batteries. There is a risk of explosion and injury! •...
-
Page 11: Operating Elements
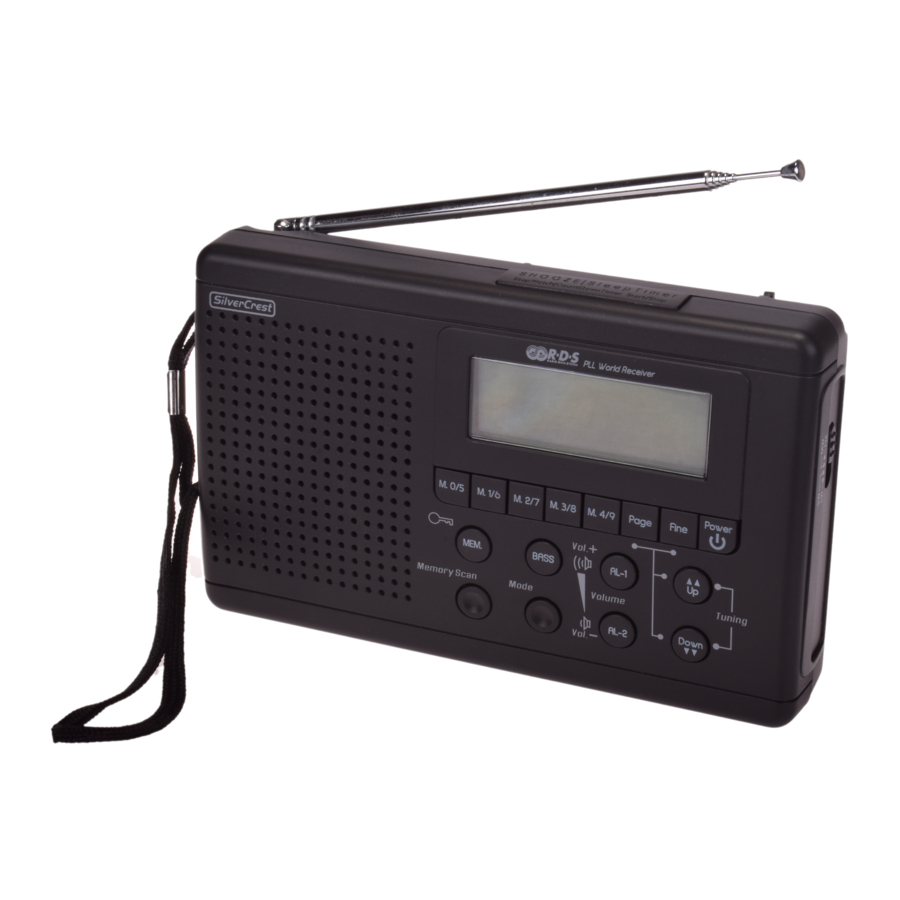
Operating elements Front panel M.0/5 - M.4/9 Save buttons Display SNOOZE Button Waveband selector switch POWER button FINE button PAGE button UP/DOWN buttons VOL+(AL-1)/VOL-(AL-2) MODE button BASS button MEMORY SCAN button button Loudspeakers Back Stand Aerial Carrying strap SW SEN. (DX/LX) switch Headphone output EXT. -
Page 12: Starting Up
• These operating instructions Mains and battery operation When you disconnect the radio from the mains supply, any settings you may have made (time, alarm, stations in memory) will be lost. If you wish to keep these settings, insert batteries (see below) before disconnecting. -
Page 13: Connecting Headphones
Plug the mains adapter into an easily accessible socket. To avoid tripping hazards, please avoid using an extension cable. Connecting headphones On the left side of the radio, you will find the headphone socket. Caution! With this appliance, use only the supplied type E105 headphones. -
Page 14: General Functions
General functions Key lock In order to prevent changing the settings unintentionally by touching the buttons, you can activate the key lock. • Press and hold down the On screen, the message SNOOZE , are now blocked. • Press and hold down the cancel the key lock. -
Page 15: Time, Date, Time Zone And World Time
The time functions can only be set when the radio is switched off. If an RDS signal is not received at the first switch-on, the pre-adjusted time for the multi-band radio begins with "0:00 00". If the device is disconnected from its power supply the settings are lost. -
Page 16: Setting Clock Time
Setting clock time MODE • Press once. The most recently set time flashes on the screen. DOWN • Press the minute intervals. Hold down one of the buttons for a few seconds to move the setting forward or backward quickly at 10 minute intervals. Note: Set the time without summer time offset. - Page 17 Setting the time zone MODE • Press again or three times. The selected time zone flashes on the screen as the abbreviation for the corresponding city (UTC when first switched on); the time disappears. DOWN • Press the The following table summarises the city abbreviations for the time zones and time differences.
- Page 18 Difference from CET Summer time Short code -10:00 -9:00 -8:00 -8:00 -7:00 -6:00 -6:00 -5:00 -5:00 -5:00 -4:00 -3:00 -3:00 UTC* 0:00 0:00 1:00 1:00 1:00 1:00 2:00 2:00 3:00 3:00 4:00 5:00 6:00 7:00 8:00 8:00 8:00 9:00 10:00 11:00 12:00 Town...
- Page 19 *UTC Universal Time Coordinated (UTC). UTC is the reference for the times of the various time zones around the world. Summer time offset Not every time zone around the world differentiates between summer and winter time. To display your timezone correctly you must, subject to the actual time zone, activate or deactivate the Summer Time offset.
- Page 20 Special date alarm MODE • Press the button a fifth time to set the special date alarm. The screen flashes SDA1 and the date in succession. PAGE • Press the button to select one of the ten settable date alarms (SDA1–SDA 10).
-
Page 21: Select Display Mode
• Press the button • Press the button Select display mode You can select which information is shown on the screen when the radio is switched off. The selected mode is indicated by a corresponding symbol on the screen. When the radio is switched off, select the display mode by repeatedly... -
Page 22: Setting The Alarm Time
You can set two alarm times in your world receiver. Alarm function Radio Acoustic signals Switched off • With the radio switched off, press the buttons The screen shows the most recently set alarm time and the symbol for the alarm type. DOWN • Press the at minute intervals. - Page 23 “signal sounds” alarm function has been selected, the signal sound is played for 10 minutes. To switch off press the VOL.–/AL–2 ) button. Note: Please note that a station must be selected for the radio alarm to work. Interrupting the alarm SNOOZE • Press the button to interrupt the alarm for 10 minutes.
-
Page 24: Stop Watch Function
Turning off the alarm function VOL.+/AL–1 • Press the disappear from the screen. Stop watch function The stop watch function is only available when the radio is switched off. • Press and hold down the shows 00.00.0 U. SNOOZE •... - Page 25 DOWN • Press the 5 countdown times are preset on the memory buttons and you can open these directly using the corresponding memory button: M.0/5 Button 10:00 M.1/6 Button 30:00 M.2/7 Button 45:00 M.3/8 Button 60:00 M.4/9 Button 90:00 • Press the button to save the set time, the memory space indicator flashes on the screen.
-
Page 26: Radio Operation
Radio operation Switching on/volume control POWER • Press the button to switch the radio on. ON will appear briefly on the screen, followed by the current frequency and band selection. VOL.+/AL–1 • Press the VOL.–/AL–2 Button VOL.+/AL-1 Button : louder. -
Page 27: Setting The Station
Sleep function You can activate the sleep function via the time of up to 90 minutes in ten-minute steps, after which the radio will auto- matically turn itself off. To do so, first switch the radio off. SNOOZE • Press the button. -
Page 28: Fine Tuning
By pressing the This function is not available for the LW frequency range. Aerial The rotatable telescopic aerial on the radio can be used for the FM and SW bands. • Pull the aerial out fully and arrange it for optimum reception. -
Page 29: Memory Functions
Memory functions Save station The world receiver can save 400 stations in each frequency range. To store a station, proceed as follows: • Set the frequency range with the frequency selection switch and then the station that you want to save. •... - Page 30 Selecting a saved station • In order to select a saved station directly, first use the frequency selection switch to select the frequency range where the station is saved. PAGE • Press the button and then use the memory page (from 00–39). •...
-
Page 31: Cleaning
Cleaning Risk of injury from electric shock: • Disconnect the device from the mains power before cleaning it! • Never immerse the device’s parts into water or other liquids! • Do not allow liquid to penetrate the housing. Cleaning the housing: Clean the housing surface with a slightly damp cloth. -
Page 32: Importer
Disposal of packaging Ensure all packaging materials are disposed in an environmentally friendly manner. Importer KOMPERNASS GMBH BURGSTRASSE 21 D-44867 BOCHUM www.kompernass.com - 30 -... -
Page 33: Warranty & Service
Repairs made after the expiration of the warranty period are subject to payment. DES UK LTD Tel.: 0871 5000 700 e-mail: support.uk@kompernass.com Kompernass Service Ireland Tel: 1850 930 412 (0,082 EUR/Min.) Standard call rates apply. Mobile operators may vary. e-mail: support.ie@kompernass.com (£...