Table of Contents
Advertisement
Advertisement
Table of Contents

Related Manuals for Alcatel XP1050


Summary of Contents for Alcatel XP1050
- Page 1 USER’S GUIDE...
-
Page 2: Table Of Contents
TABLE OF CONTENTS IMPORTANT SAFETY INSTRUCTIONS ........4 Package Contents .................5 Location ..................5 INSTALLING YOUR PHONE ............6 Installing and Charging the Batteries ..........6 Connecting the Base Station ............7 Wall Mounting ................8 Connecting the Charger(s) (for Duo/Trio models) ......10 GETTING TO KNOW YOUR PHONE ........... 11 Handset Overview ..............11 Base Station Overview ...............14 Display Icons and Symbols ............16... - Page 3 Security PIN for Downloaded Phonebook ........34 5.10 Speed Dial ................. 35 PHONE SETTINGS ................36 Set Ringer Volume ..............36 Set Ringer Melody ............... 36 Set Alert Tone ................36 Set Date and Time ..............36 Set the Auto Answer ..............37 Display Alert ................
-
Page 4: Important Safety Instructions
IMPORTANT SAFETY INSTRUCTIONS When using your telephone equipment, basic safety precautions should always be followed to reduce the risk of fire, electric shock and injury, including the following: 1) Read and understand all the instructions. 2) Follow all warnings and instructions marked on the product. 3) Unplug this product from the wall outlet before cleaning. -
Page 5: Package Contents
Package Contents The package contains the following items: • Alcatel XP 1050 handset • Alcatel XP 1050 base unit • AC power adaptor • Telephone line cord • 1 NiMH rechargeable battery pack • Wall mount bracket • 1 User Guide The additional duo and trio package contains the following items: •... -
Page 6: Installing Your Phone
INSTALLING YOUR PHONE Installing and Charging the Batteries Slide down to open the battery compartment cover. Place the 1 supplied rechargeable battery pack as indicated. Pay extra attention to direction of polarity. Slide the battery compartment cover back. Put the handset on the base and charge for 15 hours before using the handset for the first time. -
Page 7: Connecting The Base Station
Connecting the Base Station Plug one end of the telephone line cord into the telephone jack on base bottom. Plug the small end of power adapter into a power jack on base bottom. Plug the large end of power adapter into a wall power outlet. Plug the other end of the telephone line cord in to the telephone jack or micro-filter. -
Page 8: Wall Mounting
WALL MOUNTING Use the provided wall mount bracket to attach to a standard dual-stud telephone wall mounting plate. Tabletop to wall mount installation With the upper tabs (marked A) on top, align the holes of the wall mount bracket with the studs on the standard wall mounting plate and slide the bracket down until it locks securely. - Page 9 Hold the cords to the side of the telephone base. Align the upper slots on the back of the telephone base just above the upper tabs (marked A) of the wall mount bracket. Make sure the lower slots of the telephone base are also aligned above the lower tabs (marked B) of the wall mount bracket.
-
Page 10: Connecting The Charger(S) (For Duo/Trio Models)
Connecting the Charger(s) (for Duo/Trio models) Plug the power adapter into a mains socket. If you have a Broadband line If you connect your telephone to a line with a broadband connection, you will need to insert a micro-filter between the telephone and the telephone line, otherwise you may get interference between the telephone and the broadband, which could cause problems. -
Page 11: Getting To Know Your Phone
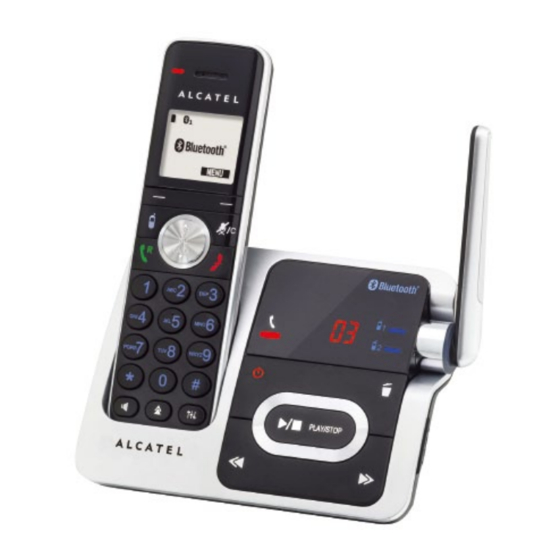
GETTING TO KNOW YOUR PHONE Handset Overview • Press to select a menu item displayed above the key. • While in a menu: Press to select an item or save an entry or setting. • During a call: Press to mute/unmute the microphone. •... - Page 12 • In menu mode: Press to scroll down the menu items. • During a call: Press to decrease the volume. • In idle mode: Press to access the call list. • While entering names or numbers in the phonebook: Press to move the cursor to the right.
- Page 13 • Press to make or answer a mobile call. • During a mobile call: Press to answer an incoming call. • Flashes quickly when there is an incoming mobile call. • Flashes slowly when a mobile call is on hold. •...
-
Page 14: Base Station Overview
Base Station Overview • On when the handset is in use, when the answering machine is answering an incoming call. • Flashes when another telephone is in use on the same line. • Flashes quickly when there is an incoming fixed line call. MESSAGE COUNTER Display Description... - Page 15 • Press to delete the message currently playing. • When the phone is in standby mode, press twice to delete all previously reviewed messages. • Press to play the message. • Press again to stop the message playback. • Press to skip the current message and play the next message. •...
-
Page 16: Display Icons And Symbols
Display Icons and Symbols Display icons Description On steadily when the fixed line is in use or there is an incoming fixed line call. On steadily when a mobile line is in use or there is an incoming mobile call. There are Bluetooth connected devices on the active devices list. -
Page 17: Using Your Phone
USING YOUR PHONE 4.1 Set Date and Time first You should set the correct time and date first so that you know when you received answering machine or call list entries. 1. Press MENU on the handset in idle mode to enter the main menu. 2. -
Page 18: Bluetooth Setup
If a device loses its connection to the telephone base, it must be reconnected before you can use the device with the Alcatel XP 1050. Disconnected - when a device is disconnected,... - Page 19 The corresponding light on the telephone base ) turns on. If you have trouble pairing your mobile or headset, it may not be compatible with your Alcatel XP 1050. Notes: • The pairing process may take up to one minute. If the pairing process fails,...
- Page 20 Mobile Phone A and Headset A are default names used in the user guide. The actual name of paired mobile phone and headset will be displayed instead in the LCD of XP1050. 4.3.3. Device list and connection Up to 4 devices can be paired to the telephone base. All paired devices are shown on the device list.
- Page 21 4.3.4. Download phonebook You can download up to 4 mobile phone phonebooks to Alcatel XP 1050 telephone system via Bluetooth wireless technology. Each downloaded phonebook can store up to 1,500 entries with up to 30 digits for each phone number and 15 characters for each name.
- Page 22 Alcatel XP 1050 before, the handset displays the date of the last download from your mobile phone. The phonebook stored on the Alcatel XP 1050 for that mobile phone will be erased and replaced with the current mobile phone phonebook. If you have edited the downloaded entries, those changes will be lost.
- Page 23 telephone is not in use. 4.3.4.3. Interruption to phonebook download If you are downloading a phonebook from a mobile phone and the phone receives a call, the download process stops and all handsets display Download fail. When you try to view the downloaded phonebook, the handset displays Last Download failed: MM/DD/YY.
-
Page 24: Make A Call
Note: • If you are using a headset for a call which is transferred from Alcatel XP 1050 handset, and you lose the Bluetooth connection or the battery of the headset is depleted, the call is transferred back to the originating handset. -
Page 25: End A Call
is set to ON: • When the phone rings, pick up the handset to answer a call. 4.5.2. Answer a Mobile call while on a fixed line call If you are on a fixed line call and you receive an incoming mobile call, you hear a beep and 1 or 2 displays on the handset you are using. -
Page 26: Mute A Call
If this is a mobile call and the volume is too loud or quiet, try changing the volume on your mobile phone. On some mobile phones, changing the volume on the mobile phone affects your mobile call volume on the Alcatel XP 1050 handset. -
Page 27: Find The Handset
• Mobile • Work • Other 6. Press NEXT. The handset displays ENTER NAME. 7. Press SAVE and then Saved displays. You hear a confirmation tone. 4.10.4. Delete a redial entry 1. Repeat step 1 and 2 in last section. 2. -
Page 28: Call Waiting
If you are on a call using the mobile line, you cannot join the call using your paired mobile phone. However, you can join the call using another Alcatel XP 1050 handset. Your mobile phone is being used for the phone call so only features that are normally available during a call can be used. -
Page 29: Power Fail Back-Up
Notes: • The equalizer feature does not apply to the speakerphone on the telephone base or the connected Bluetooth headset. • The current equalizer setting remains unchanged until a new setting is selected. 4.16. POWER FAIL BACK-UP Lets you make calls during a mains power interruption with your cordless phone. -
Page 30: Registration
• Do not pick up the power supplying handset from base when Power Fail Back-Up mode is activated. • In power failure back-up mode, none of the base functions, including the answering machine and Bluetooth, your cordless phone will operate. •... -
Page 31: Repeater (Optional)
To reset, unplug the power from the telephone base and plug it back in. 4.18. Repeater (optional) Alcatel XP1050 can support Alcatel Repeaters well (XP Repeater or Office Repeater) which are bought separately so that you can extend the coverage of your telephone system in all directions. -
Page 32: Phonebook
PHONEBOOK The fixed line phonebook stores up to 200 entries with up to 30 digits for each phone number and 15 characters for each name. Each of the downloaded phonebooks stores up to 1,500 entries with up to 30 digits for each phone number and 15 characters for each name. •... -
Page 33: Search A Phonebook Entry
OPTION while on call. 2. Press to select Phonebook, then press SELECT. 3. Press to select a phonebook, then press VIEW. 4. Press to browse. Note: You will be requested to enter the PIN code to access the PIN-protected downloaded phonebook. 5.3. -
Page 34: Delete A Phonebook Entry
Type: Press: Home Mob. Work Other Press CLEAR to erase the assigned label. 5.7. Delete a phonebook entry 1. Search for the desired entry in the phonebook. 2. Press . The screen displays Delete contact? and the name of the entry. Press YES to confirm. -
Page 35: Speed Dial
5.10. SPEED DIAL You can assign 10 of your phonebook entries to a speed dial location (0, 1,..9). The speed dial entries are shared by all handsets. 5.10.1. Set a speed dial number 1. Press MENU on handset in idle mode. 2. -
Page 36: Phone Settings
Phone Settings Set Ringer Volume 1. Press MENU on the handset in idle mode. 2. Press to select Ringers, 3. Press SELECT to choose Ringer volume. 4. Press to select All lines, Home, Mobile-D1 or Mobile-D2, then press SELECT. 5. Press to adjust the ringer volume. -
Page 37: Set The Auto Answer
6.4.1. To set the date format: 1. Press MENU on the handset in idle mode. 2. Press to select Settings, then press SELECT. 3. Press to select Date format, then press SELECT. 4. Press to select your desired date format (DD-MM-YY or MM-DD- YY). -
Page 38: Download Fail
You can also press and hold to erase the missed call indicator when the telephone is in idle. 6.7. Rename the Handset 1. Repeat step 1 to 2 in last section. 2. Press to select Rename handset, then press SELECT to edit the name. -
Page 39: Caller Display (Network Dependent)
7 CALLER DISPLAY (Network dependent) This feature is available if you have subscribed the Caller Line Identification service with your telephone service provider. Your phone can store up to 50 received calls with date/time information in the Call List. The number will be shown on the LCD when the phone is ringing. If the number matches with one of the entries in your Private Phonebook, the caller’s name stored in the private phonebook will be displayed with the number. -
Page 40: Delete An Entry In The Call List
• Work • Other 4. Press NEXT. The screen displays EDIT NAME and [*]-Order to edit the name. 5. Press SAVE to confirm and the screen shows Saved. You hear a confirmation tone. Notes: • When you try to save a call list entry without any calling number display information, the handset displays Unable to save. -
Page 41: Voice Mail (Network Dependent)
8. VOICE MAIL (NETWORK DEPENDENT) By subscription to your operator, you can have your calls diverted to a voicemail box when you are absent. For more details, contact your operator. When new messages are received, the New voicemail and an appear on the screen. -
Page 42: Make An Internal Call
9. Make an Internal Call This feature is only applicable where at least two registered handsets. You can buy additional expansion handsets (Alcatel XP50, sold separately). You can register up to 4 handsets to the telephone base. 9.1. Transfer a Call While on an outside call, you can transfer the call from one handset to another. -
Page 43: Answer An Incoming Call During An Intercom
• Press to select a destination handset and then press SELECT. Your handset displays Calling HANDSET X, or Calling all handsets when you choose All handsets. • Press 1-4 for HANDSET 1-4. Your handset displays Calling HANDSET X. The other handset rings and displays HANDSET X is calling. •... - Page 44 The destination handset rings and displays HANDSET X is calling, or HANDSET X is calling all when you choose all handsets. 3. To answer the call on the other handset, press . The outside call is still on hold and both handsets now show Intercom. 4.
-
Page 45: Answering Machine
10. Answering Machine The answering machine can record and store up to 99 messages. Each message can be up to 3 minutes in length depending on the message length set. The total storage capacity for the outgoing message, messages and memos is approximately 30 minutes. - Page 46 Listen new messages through the Handset: 1. Press MENU in idle mode. 2. Press SELECT to select Play messages. • To play new messages, press SELECT to select Play new msgs. • To play old messages, press to select Play old msgs, then press SELECT.
-
Page 47: Delete All Messages In The Answering Machine
10.3. Delete All Messages in the Answering Machine Delete all messages through the Handset: 1. Press MENU on the handset in idle mode. 2. Press to select Answering sys, then press SELECT. 3. Press to select Delete all old, then press SELECT. 4. -
Page 48: Answering Machine Settings
10.5.2. Record your own outgoing message (OGM) 1. Press MENU on the handset in idle mode. 2. Press to select Answering sys, then press SELECT. 3. Press SELECT again to select Outgoing msg. 4. The handset displays OUTGOING MSG and announces “Announcement, press PLAY or press RECORD.”. - Page 49 10.6.2. Recording Time You can set the maximum length of the recording time of the incoming messages. 1. Press MENU on the handset in idle mode. 2. Press to select Answering sys, then press SELECT. 3. Press to select Ans sys setup, then press SELECT. 4.
- Page 50 machine, by calling the answering machine when you are away from home by entering a 2-digit remote access PIN on a tone-dialing phone. To change the remote code: 1. Press MENU on the handset in idle mode. 2. Use to select Answering sys, then press SELECT. 3.
- Page 51 Notes: • Once the new messages have played, the telephone announces the help menu options. If you do not press any key within 20 seconds, the remote access call automatically disconnects. • When your answering machine is turned off, the telephone answers after 10 rings, and announces, “Please enter your remote access code.”...
-
Page 52: Technical Specifications
Technical Specifications Free Field Range Up to 300 metres* Indoor Range Up to 50 metres* Handset Battery Life 12 hours talk time** (average values) 160 hours standby** Number of Handsets Up to 4 Intercom Mode Three-Way Conference (1 outside correspondent + 2 internal correspondents) Electrical Connection/... -
Page 53: Troubleshooting
• Make sure that you set your mobile phone or headset to search for devices. • If Alcatel XP 1050 is in your mobile phone or headset device history list, delete it and try pairing again. • make sure that your mobile phone or headset is not connected to any other Bluetooth device. - Page 54 15 seconds, then plug it back in. • Turn off your mobile phone, then turn it on again. I cannot download contacts from my mobile phone to my Alcatel XP 1050 • Make sure that your mobile phone is paired and connected to the base.
- Page 55 Alcatel XP 1050 mobile line. In order for this to work, the mobile phone must be within 9 metres of the telephone base for optimal performance.
- Page 56 You hear the busy tone when you press • Make sure the handset is in range of the base. • Another handset registered to your Alcatel XP 1050 base may be on the line. Answering machine does not record any messages •...
-
Page 57: Safety
Clean the product with absorbent paper or a dry cloth and contact your reseller for replacement batteries. ATLINKS hereby declares that the following models conform to the essential requirements and other applicable provisions of European directive 1999/5/EC. Alcatel XP1050 / Alcatel XP1050 Duo/Trio... -
Page 58: Environment
ENVIRONMENT This symbol means that your inoperative electronic appliance must be collected separately and not mixed with the household waste. The European Union has implemented a specific collection and recycling system for which producers are responsible. This appliance has been designed and manufactured with high quality materials and components that can be recycled and reused. - Page 59 ALCATEL and ATLINKS are registered trademarks. The Alcatel logo and Alcatel name are trademarks of Alcatel Lucent and used under licence by ATLINKS. The Bluetooth® word mark and logos are owned by Bluetooth SIG, Inc.