
Related Manuals for Black & Decker CM2035B


Summary of Contents for Black & Decker CM2035B
- Page 1 TH ERMA L P RO GRA M M ABLE 1 2 - CU P COFFE E M AKER U se & Ca re Manual C M 2035 B...
-
Page 2: Table Of Contents
CONTEN TS Important Safeguards Getting to know your Cof fee Maker Product Benefits Getting to know your Control Panel Before Brewing 5 - 6 Programming your Cof fee Maker 4 Elements to Brew the Perfect Cup Tips for a Perfect Cup of Cof fee 9 -10 Brewing Cof fee Care and Cleaning... -
Page 3: Important Safeguards
Please Read and Save this Use and Care Book. IMPORTANT SAFEGUARDS. When using electrical appliances, basic safety precautions should always be followed including the following: • Read all instructions. • Keep lid on the carafe when in use. • Do not touch hot surfaces. Use handles or knobs. •... -
Page 4: Getting To Know Your Cof Fee Maker
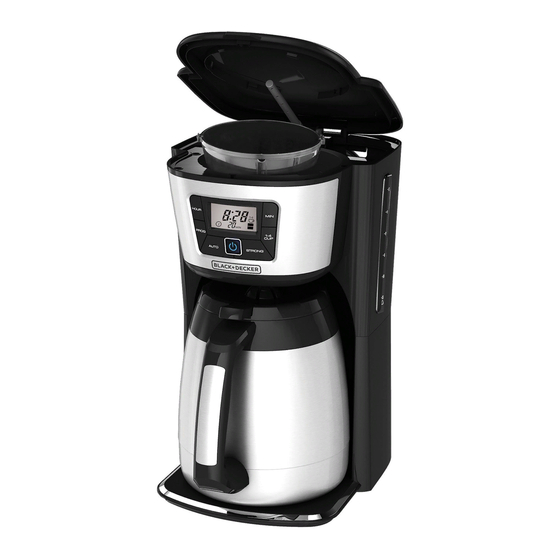
GE T T I NG TO KN OW YO UR CO FFEE MA KER Easy-view water window Evenstream showerhead Control panel Water reservoir Carafe lid (Part # CM2035-03) Washable brew basket 12-cup stainless steel (Part # CM2035-01 ) thermal carafe (Part # CM2035-02) -
Page 5: Product Benefits
PRODU C T B EN EF ITS Sneak-A-Cup™ Feature Fresh Brew Timer After the brew cycle is complete, Can’t wait for the full pot of coffee the time since brewed will be to finish brewing? Use the Sneak-A- displayed in 1-minute increments up Cup™... -
Page 6: Getting To Know Your Control Panel
GE T T I N G TO K NOW YOUR CON TROL PA N EL Indicates the delay start timer is set 1-4 cup brew setting Brew strength settings Fresh Brew Timer indicates time since brewed Digital Clock with LCD Display 1-4 Cup: Use to brew a smaller 1-4 cup batch of coffee without giving Power: Lighted button turns the... -
Page 7: Before Brewing
BE FO R E B R EW IN G To register your product, go to www.prodprotect.com/applica Carefully unpack your coffeemaker, removing all packaging materials, labels, and/or stickers from your coffeemaker. Remove the plastic band around the power plug using scissors Clean your coffeemaker thoroughly before using for the first time. - Page 8 The timer display will flash several times then switch back to the current time of day. Press and release the AUTO button to activate the delay start time that was just programmed. The timer icon ( ) will remain solid, indicating Auto Brew is activated. When the time of day matches the programmed Auto Brew set time, your coffeemaker will activate the brew cycle.
-
Page 9: Elements To Brew The Perfect Cup
4 E L E M EN TS TO B R E W TH E PERFECT CU P Water Coffee Quality Freshness A great cup of coffee starts with A truly fresh cup of coffee only fresh, quality water. Since water comes from freshly ground coffee represents more than 98% of beans. -
Page 10: Tips For A Perfect Cup Of Cof Fee
T I P S FOR A PER F ECT C UP O F CO F F EE • To maximize the freshness • Always store your coffee in a cool, of your coffee, grind dry place. Once coffee has been whole coffee beans just opened, keep it tightly sealed in before brewing. -
Page 11: Brewing Cof Fee
BR EW I NG CO FF EE Note: You don’t need to set the clock to brew coffee right away. 1. Open cover of coffeemaker. Fill water reservoir with cold tap water. Use lines on the easy viewing water window as a guide. Do not fill past 12 MAX line. - Page 12 Press ON/OFF button once to begin brewing. The Sneak-A-Cup™ feature allows you to pour a cup of coffee before the brewing cycle is complete. The carafe must be placed back into the coffeemaker within 20 seconds to prevent overflow. Replacing the carafe will restart the brewing process.
-
Page 13: Care And Cleaning
C AR E AN D C LE A NI NG Cleaning your coffee maker, following the directions below is recommended after every use. This product contains no user serviceable parts. Cleaning Make sure your coffeemaker is unplugged and cool. Open the coffeemaker cover. Remove the brew basket. Throw away the used paper filter and coffee grounds. -
Page 14: Troubleshooting
TR OU B L E SHOOTI N G PROBLEM POSSIBLE CAUSE SOLUTION Coffee maker does Coffee maker is not Make sure appliance not turn on. plugged in. is plugged into a working outlet. Coffee maker Water reservoir may be Make sure water is leaking. -
Page 15: Warranty And Customer
WA RRAN TY AN D C USTO M E R SE RVI CE I N FOR M ATIO N For service, repair or any questions regarding your appliance, call the appropriate 800 number listed within this section. Please DO NOT return the product to the place of purchase. - Page 16 www.BlackAndDeckerAppliances.com © 2014 The Black & Decker Corporation and Spectrum Brands, Inc., Middleton, WI 53562 T22-5001089 2014/7/8/38 Made and Printed in People’s Republic of China BLACK & DECKER and the BLACK & DECKER Logo are registered trademarks of The Black & Decker Corporation, or one of its affiliates, and used under license.