Table of Contents
Advertisement
Advertisement
Table of Contents

Related Manuals for Sonim XP7700


Summary of Contents for Sonim XP7700
- Page 1 USER GUIDE SONIM XP7 English...
- Page 2 Copyright © 2014 Sonim Technologies, Inc. SONIM and the Sonim logo are trademarks of Sonim Technologies, Inc. Other company and product names may be trademarks or registered trade-marks of the respective owners with whom they are associated. Third Party Trademarks Google, Android, Google Calendar, Google Now, Google Play and other marks are trademarks of Google Inc.
- Page 3 Your SIM Card Locking Your Screen Inserting the SIM Card Encrypting Your Phone Data Locking Your SIM Card Your Sonim XP7———————— 17 Device Administrator Settings Switching On the Phone Managing Credential Certificates Setting Up Your Phone Protecting Your Phone from Harmful Applications Need for a Google +™...
- Page 4 Adding a New Contact DTMF Tones View the Contact Details Other Call Settings Sending a Message from Contacts Call Forwarding Dialing a Number from Contacts Call Barring Editing the Contact Details Call Waiting Importing SIM Card Contacts to Phone Caller ID Exporting Phone Contacts to SIM Card Internet Call Settings Exporting Phone Contacts to Storage...
- Page 5 Google Search™ and Google Now™———————— About Google Search™ and Google Now™ Activate Google Now Use Google Now Voice Search and Action Voice Actions End User License Agreement———————— 56 License Comprehensive 3 Year Warranty Warranty Registration Application (Only available on Smart phones) Our Warranty What We Will Do Phone Care...
- Page 6 Please register your phone at www.sonimtech.com/register, to receive product information and updates. Sonim devices are covered by a 3-Year comprehensive warranty. The embedded battery is covered by a 1-Year limited warranty. For more information related to the warranty, please refer to the warranty section...
- Page 7 This user guide covers Sonim XP7 phone with the model out. number XP7700. The model name can be read on the phone label under the battery. PINCH In some applications, you can zoom...
- Page 8 Avoid using the phone in close proximity to personal medical devices, such as pacemakers and hearing aids. Use only Sonim XP7700 approved charging equipment to charge your phone and avoid damage to your phone. The symbol of the crossed-out wheeled bin indicates that this product, and any enhancements marked with this symbol, can not be disposed as unsorted waste but must be taken to separate collection at their end-of-life.
- Page 9 Ensure that only qualified personnel install or repair your phone. The Sonim XP7700 is water-proof and can be submerged to 2 metres for 30 minutes. • Ensure to close the rubber cover of the charging connector and the audio connector properly.
- Page 10 Thus, users of telecoil-equipped hearing aids The highest SAR value for the Sonim XP7700 phones are able to communicate over the telephone without the when tested by Sonim for use: amplification of unwanted background noise.
- Page 11 15 cm (6 inches) is kept between the mobile phone and the pacemaker, the risk of Sonim XP7700 have been tested for hearing aid interference is limited. If you suspect that interference device compatibility and complies with the Federal is taking place, immediately turn off your mobile phone.
- Page 12 Child Safety Do not allow children to play with your mobile phone or its accessories. Keep it out of their reach. They could hurt themselves or others, or could accidentally damage the mobile phone or accessories. Your mobile phone and its accessories may contain small parts, which could be detached and create a choking hazard.
- Page 13 Battery Usage Sonim XP7 phone comes with a built-in battery. For any Charging Animation/Icon battery related queries contact Sonim customer support. • If the battery is being charged when Charging the Battery the phone is switched off, a battery charging animation with charged The battery delivered with your mobile phone is not fully percentage is displayed.
- Page 14 If you stop some apps or services, your device may not work correctly. Extend the Life of Your Battery • Close Maps or Navigation apps to background when you are not using them. They use GPS (and thus more power) only when they’re running. •...
- Page 15 What is in the Box? Feature Description The list of items in the Sonim XP7700 phone box are: Connectivity Charger port name: 5pins water-proof • Sonim XP7 phone with rechargeable built-in battery magnetic USB2.0 3.5mm headphone jack • Quick Start Guide...
- Page 16 Your SIM Card Insert the SIM card in the tray and return the tray Purchase a SIM card from a mobile operator. The SIM into the slot by pushing card associates your network services (for example, it in, making sure the phone number, data services, and so on) with your pinhole is aligned next to phone.
-
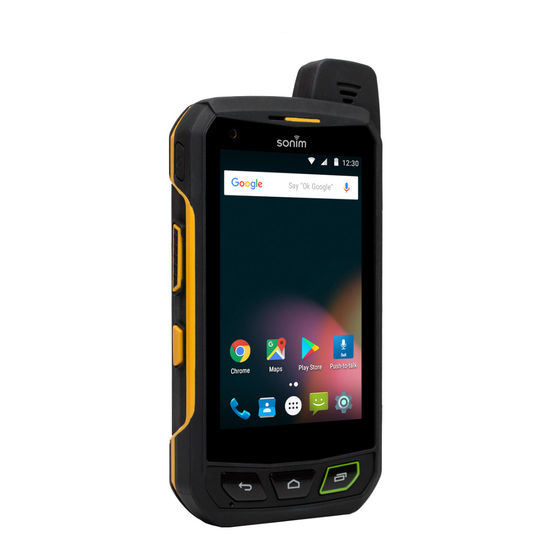
Page 17: Product View
Receiver Front camera Lock/Power ON key Display screen Volume Up Key PTT Key Volume Down Key Sonim Protect ® Alarm Key Camera Key This key will be activated when the service is available Home Return Recent key Single press recent key, displays the... - Page 18 Touch and Type Operations A series of screens takes you through the setup process. Sonim XP7 is a touch phone. You can use your fingers If you already have Gmail account, use your Gmail to manipulate icons, buttons, menus, and other items address and password use the same else, please create on the touchscreen.
- Page 19 For Message/Alerts example, you can drag to reposition shortcuts on Notification Your Sonim XP7 home screen. Service Indicator • Swipe or slide: Quickly move your finger across the and Signal Strength surface of the screen (so you don’t drag something instead).
- Page 20 Adding an Application Icon to Home Screen Keys Description On the home screen, tap on All apps ( Recent - Short Press: Swipe left or right to locate the application for which Displays the thumbnails of the applications you require a shortcut on the home screen. that you have worked on recently.
- Page 21 Drag the icon and position it on ( ) till the Icons Description it turns red. Signal strength Drop the icon and it will be deleted from the home screen. Deleting an application icon from the home No SIM card screen will not delete the application.
-
Page 22: Setting Up And Using Lock Screen
View and Modify the Settings Icons Description You can perform the following operations without Missed call inserting a SIM card in your phone.`View and modify all settings except Data usage and mobile network related settings. New SMS or MMS • Activate and share files through Bluetooth. -
Page 23: Changing Wallpaper
• Password: Provide your password to setup the collections: password lock when the screen is locked with • Gallery: includes photos and screenshots password. Provide your correct password to taken using the phone’s camera. unlock the screen. • Live Wallpapers: includes animated wall •... - Page 24 Time and Date Settings Language Settings You can set and display the date and time on the phone. You can change the phone’s interaction language by You can also select the display format. selecting your preferred language. From the Home or All apps screen, tap on Settings Select Settings ( ) >...
- Page 25 • Tap on Speech rate to set the Speech input rate to • Photos: includes photos taken from the phone a comfortable speed. camera. • Tap on Listen to an example to verify the set • Wallpapers: includes images that are pre- speech rate.
- Page 26 The green LED light on the top of the When the phone is connected to the computer phone blinks for all the notifications. as a media device, you can access File Explorer in the phone. Connecting to a PC Through USB Viewing Device Details When the phone is connected to the computer via an To view the device details such as system updates,...
- Page 27 • All: Displays all applications that are pre- If Torch is turned ON from Home screen, bundled with Android and downloaded from it can be turned OFF from Lock screen Google Play Store or other sources. by tapping on Torch icon present in lock screen and vice versa.
- Page 28 Enable Advanced Settings to set the Proxy details Connecting to Wi-Fi Network and IP settings. Wi-Fi is a wireless network technology that can provide Editing a Network Internet access at distance upto 100 feet, depending on the Wi-Fi router and surroundings. Tap and hold the connected network.
- Page 29 Enable Bluetooth, located under Wireless & Tap on Rename to rename the display of the device Networking settings. name. Tap on XP7700 name to make the device visible to Tap on Unpair to remove the device from your all nearby Bluetooth devices. paired list.
- Page 30 From the Home or All apps screen, tap on Settings Setting Up Tethering & Portable Hotspot Using tethering and portable hotspot you can share your Enable Data Usage , located under Data usage device’s network connection with a computer or with up settings ( to other devices, via USB, Wi-Fi, or Bluetooth.
- Page 31 Tap on More located under Wireless & Networks Enter the following details: settings. • Name: VPN connection name. Tap on Tethering & Portable hotspot. • Type: Select the connection type. Enable Portable Wi-Fi hotspot. • Server address: Address of the secure server for connection.
- Page 32 Touch and hold the VPN profile to be deleted from From the Home or All apps screen, tap on Settings the list of VPN networks configured. Tap on More located under Wireless & Networks Tap on Delete profile. settings. Tap on Cell Broadcasts. The broadcast message Managing Mobile Network types such as Alert reminder, Vibrate, Speak Alert Message, Extreme threats, Severe threats and...
- Page 33 Managing Security Settings When the phone is locked, you can answer an You can activate and protect your phone from incoming call, without unlocking the phone. unauthorized by configuring the security settings. Touch the center phone icon ( ) and slide over From the Home or All apps screen, tap on Settings one of these icons: Tap on Security located under Personal settings.
- Page 34 Encrypting Your Phone Data Device Administrator Settings You can encrypt your accounts, phone settings, To activate device administrator, tap on Device Administrator > enable Launcher. downloaded applications, contacts, messages data and media files. You can enable device administrators and allow the App •...
- Page 35 Location Access Apps Accessing Your Location If you enable Location services, your location is displayed You can view and force stop the apps that are accessing in all your accounts. or have recently accessed your location. From the Home or All Applications screen, tap on In the Location screen, view the list of applications Settings ( that are accessing or recently accessed the Location...
- Page 36 page > Accounts > Google > Accounts > Select If you do not have a backup account on your the account to be deleted. device, you can touch Backup account to add an account. Tap on Menu > Remove account. To remove any other type of account, tap Settings >...
- Page 37 If your account is set to auto-sync, you can check or uncheck items as needed. If auto-sync is off, touch an item to manually sync its data. Sync a Google Account Manually Go to Settings > Accounts > Google. Tap on the account whose data has to be synced. Tap on Menu >...
- Page 38 You can use the phonebook to maintain phone numbers contact, then tap on the Message icon ( ), to of your contacts. This feature enables you to add, delete, open the message screen. dial phone numbers, send SMS and MMS messages. Type the message and tap on Send ( To access the contacts, Sending MMS...
- Page 39 Tap on Manage SIM card contacts. Sharing Contacts Via MMS, Bluetooth, Drive and E-mail The list of contacts stored in your SIM card is You can send contact information by MMS, e-mail or displayed. Bluetooth. Tap on the contact to be moved to the phone. From Home or All apps screen tap on People ( The contact is imported to the phone address Tap on Option and select Import/Export.
- Page 40 Scroll to the required contact and tap the contact, tap the contact to view the contact details. All the contacts containing the searched text are displayed. Tap on Options and select one of the following options: Deleting a Contact • Set ringtone to set a specific ringtone for that From Home or All apps screen tap on People ( contact.
- Page 41 icon and slide over one of these icons: Making a Call From Home or All apps screen tap on Phone ( Icons Description The Phone screen with last dialled number, Answer the call. frequently called contacts, call history ( ), dial pad ( ) and call options ( ) is displayed.
- Page 42 Settings ( Tap the call History icon ( Tap on Sound located under Device settings. Tap All to view all the incoming, outgoing, and missed calls. Tap on Volumes to set the master volume separately for music, ringtones & notifications, and alarms. Tap Missed to view only the missed calls.
-
Page 43: Screening Incoming Calls
• Vibrate: Enable this option to receive an calls only to the fixed dialing numbers (FDN) that you vibrating alert for voicemail messages. save on the phone’s SIM card. The device can be set to restrict outgoing calls only Dial Pad Touch Tones to numbers with specified prefixes. -
Page 44: Screening Outgoing Calls
• Block black list: Blocks calls from contacts Turn on Proximity Sensor added to the black list. You can save battery power by switching off the display • Allow white list: Allows calls from contacts when you are in a call. Enable Turn on proximity sensor to added to the white list. - Page 45 Other Call Settings Forward when Forward calls when you do not unanswered answer incoming calls. From the Home or All Applications screen, tap on Phone( ) icon. Forward when Forward calls when your phone is Open the contact list and press Options button. unreachable switched off or is out of coverage Tap Settings.
- Page 46 Scroll down to select SIP Accounts located under To activate call waiting, in the call settings screen, tap on GSM call settings. Tap Additional settings. Enable Call Internet call Settings. waiting. Tap Add Account to create a new SIP account. Enter the required information and tap Save to Caller ID create a new account.
- Page 47 SMS and MMS are convenient and inexpensive means of communication. You can send a text message to When you add an attachment, the message is other people via SMS service. MMS allows you to send automatically converted to a multimedia message. messages by including multimedia content such as MMS charges will apply, based on the operator.
- Page 48 Managing Message Settings Read reports Enable this option to request a read report for each sent message. You can customize the way you want to view and filter the messages. You can also set the default messaging Auto retrieve Enable this option to download the application.
- Page 49 following are the options: Cell Broadcast Messages Use the E-mail application to send or view e-mail messages. Option Description Attach Attach a photo from the phone Setting Up E-mail Accounts picture memory. You have to configure and create an e-mail account to Attach video Attach a video from the phone memory.
- Page 50 Enter and Edit Text Keyboard Dictionaries You can use the virtual Keyboard to enter text quickly To manage keyboard dictionaries, and easily. Type faster and more accurately on your From the Home or All Applications screen, tap on device with Keyboard’s word recognition and next-word predictions.
- Page 51 Sonim supports Virtual Pre-Load (VPL) mechanism which is also known as Stub to install the TELUS Link application. Installing and Using TELUS Link Go to Google Playstore and download TELUS Link application installer. It is represented by the TELUS Link icon ( The TELUS Link application starts downloading from Google Play™...
- Page 52 From the Download apps, Camera Touch an item to open it. The Sonim XP7700 has front camera with 5MP (mega pixel) auto focus and a back camera with 1MP (mega Touch headings for earlier downloads to view them. pixel) fixed focus for taking pictures. These pictures are Check items you want to share.
- Page 53 To change the calendar view, choose Day, Week, • Video ( ): To shoot a video, tap the Record Month, Agenda from the top of the screen in a icon ( ) to shoot the video. Tap the Stop icon drop-down list.
- Page 54 To set a reoccuring alarm, enable the checbox To enter the numbers, tap the numeric keys. Repeat. Select each day in a week by tapping that To use mathematical operators, touch the respective particular day. operation keys on the keypad. To set the alarm tone, select the type of alarm from After performing the calculations, tap = for the final the Ringtone list.
- Page 55 About Google Search™ and Google Now™ and hold the Home button. Google Now gives the right information at the right time. Voice Search and Action Google now does not require any elaborate setting. The information is on your fingertips. You can speak to your phone to search, get directions, send messages and perform other tasks.
- Page 56 • Once all the mandatory details are submitted, an in and to the Software. Sonim, and, to the extent that the e-mail confirmation will be sent Software contains material or code of a third party, such •...
- Page 57 Conditions at the sole discretion of Sonim, with the same or better model in the same or better condition. The warranty is valid whether or not the product has Sonim and its service partners reserve the right to charge been registered.
- Page 58 All device batteries both embedded and removable are peripheral devices which are not Sonim-branded warrantied for a period of one (1) year under Sonim’s original accessories intended for use with the 1-Year limited warranty.
- Page 59 IMPLIED WARRANTIES, INCLUDING WITHOUT accessory (hereinafter referred to as “Product”). Subject LIMITATION THE IMPLIED WARRANTIES OF to the conditions of this limited 1-year Warranty Sonim MERCHANTABILITY OR FITNESS FOR A warrants this product to be free from major defects in...
- Page 60 WARNING: Changes or modifications made to circuit different from that to which the receiver this equipment not expressly approved by Sonim is connected. Technologies, Inc. for compliance could void the user’s • Consult the dealer or an experienced radio/TV authority to operate the equipment.
- Page 61 • The device for operation in the band 5150- FOR MOBILE DEVICE USAGE (>20cm/low power) 5250 MHz is only for indoor use to reduce the Radiation Exposure Statement: potential for harmful interference to co-channel mobile satellite systems; This equipment complies with IC radiation exposure limits •...
- Page 62 Adding a New Contact 38 Data Usage 29 Internet Call Settings SIP Account 46 Airplane Mode 30 Deleting a Contact 38 Alarm 53 Device Administrator 34 Android Applications Display Settings 25 Keyboard Dictionaries 50 Camera 52 DTMF Tones 44 Auto Retry 44 Language Settings Spell checker Encrypt 34...
- Page 63 Wall paper 23 Sound Recorder White List 44 Audio Playback 54 Wi-Fi 30 Taking a Screenshot 23 XP7700 10 TELUS Link 51 Tethering & Portable Hotspot 30 Time and Date Settings 24 Your SIM Card 16 Touch and Type 18...