Nissin i40 Instruction Manual
For four thirds/ micro four thirds
Hide thumbs
Also See for i40:
- Instruction manual (24 pages) ,
- Quick manual (1 page) ,
- Instruction manual (23 pages)
Table of Contents
Advertisement
Advertisement
Table of Contents

Related Manuals for Nissin i40


Summary of Contents for Nissin i40
- Page 1 for Four Thirds/ Micro Four Thirds INSTRUCTION MANUAL...
- Page 2 Nissin i40 Four Thirds/ Micro Four Thirds version has been developed for digital (Micro) Four Thirds system cameras with hotshoe and the latest TTL flash control technolgy. Please note that i40 Four Thirds/ Micro Four Thirds is not usable with other branded cameras for TTL operation.
- Page 3 SAFETY INSTRUCTIONS These safety instructions refer to important information on how to use this product safely and properly. Please read the following instructions before using the product. WARNING This symbol refers to the possibility of personal injury, death or property damage if not followed as described.
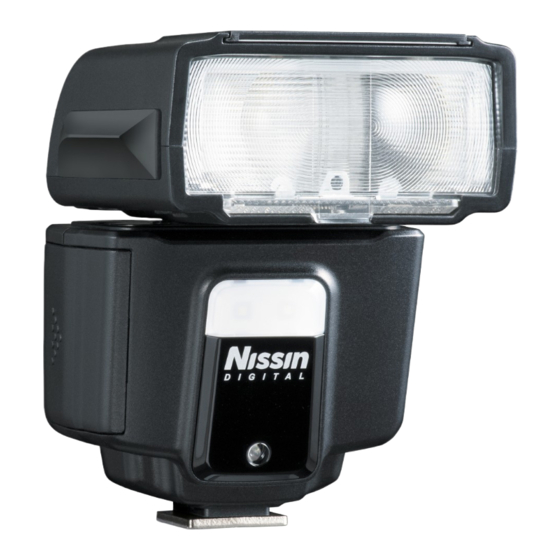
- Page 4 Names of the Components 1 Fill-in reflector 2 Flash head 3 Light diffusing panel 4 Video light 5 Remote/ Slave sensor 6 AF-assist light 7 Mounting foot 8 Hotshoe contacts 9 On/ Off switch 10 Pilot button (Test flash button) 11 Function dial Flash stand Carabiner...
-
Page 5: Inserting Batteries
Basic Operation Inserting batteries Usable batteries - Alkaline batteries, Lithium batteries or NiMH batteries. 1. Open the battery compartment door and insert 4 x size AA batteries as shown by the picture. 2. Make sure the + and - battery contacts are correctly inserted at the battery compartment. - Page 6 In case i40 is not in use for over 60 minutes, the unit is completely turned off. To turn on i40 again, take the first step of turning the flash unit on.
- Page 7 Make sure that the mounting foot will lock (with a “click”) when it has been inserted completely. Removing i40 from the camera Press the unlock button and slide the mounting foot of i40 off the hotshoe of the camera.
- Page 8 Indicator Lamp A on. In a few seconds, the Pilot button turns green. The i40 is ready to shoot. For a test flash, press the Pilot button. To turn off the flash unit manually, press the On/ Off switch for 1 second.
- Page 9 Video Light Set i40 to the camera’s hotshoe and press the on/ off switch to power on. Indicator Lamp A on. Rotate the Function dial to mode. Indicator Lamp C on in blue colour. 9 steps of output level You can select the power by rotating the Power dial, can be adjusted .
- Page 10 (Aperture priority), (Shutter priority) or (Manual); In all of the camera's shooting modes listed above, i40 will fully work in TTL automatic-flash system. Set i40 to the camera’s hotshoe and press the on/ off switch to power on. Indicator Lamp A on.
- Page 11 Set the camera’s shooting mode, select focal length and take pictures with i40 on your camera. i40 is a supplement to help you in taking a creative and live picture. Almost all tasks are automatically done by the camera and you just control the camera only.
- Page 12 When setting the TTL flash power compensation on your camera, any compensation which is also set on the i40 will be counted in addition to the compensation you selected in the camera’s menu mode. ( i.e. Having a +1 compensation set on the flash and a +1.3 compensation set in the camera would...
- Page 13 You can set i40 for non-automatic flash mode, and select the desired flash power from 9 different levels Set i40 to the camera’s hotshoe and press the on/ off switch to power on. Indicator Lamp A on. Rotate the Function dial to “M” mode.
- Page 14 Wireless Slave Flash i40 has a wireless remote flash system as a slave unit. You can enjoy creative flash photography with multiple lightings from the various directions. 3 slave modes are provided, Slave Digital (SD) for digital pre-flash system; Slave Film (SF) for analogue flash system and Wireless TTL slave for wireless remote.
- Page 15 Setting slave flash i40 Switch i40 on and while the ready lamp is on, rotate the Function dial to select desired mode. When flash is set to SD or SF mode, rotate the Power dial to select different flash power levels of 1/256 – 1/128 – 1/64 – 1/32 – 1/16 – 1/8 – 1/4 – 1/2 – 1/1 (Full) power.
- Page 16 FP High-Speed Sync i40 supports shutter speeds up to 1/8,000 second. FP High-Speed Sync: In A, M, TTL and Wireless mode (A, M, TTL) Press and hold Pilot button in 3 seconds. Indicator A starts blinking. Press and hold Pilot button in 3 seconds to cancel the setting .
- Page 17 Or mixing it upward/ sideways, you can set it in multiple directions as shown. When the flash head stays at turning or tilting position, the zoom setting position of i40 is automatically set at the position for a 50mm (25mm) focal length lens.
- Page 18 For Olympus only Following functions are available on Olympus cameras. Refer to camera owner's manual for details. Slow synchronization The flash is controlled at a slow shutter speed to the correct exposure for both the main subject and back ground in low light conditions or at night.
- Page 19 For Panasonic only Following functions are available on Panasonic cameras. Refer to camera owner's manual for details. Slow synchronization When taking pictures against a dark background landscape, this feature will slow the shutter speed when the flash is activated. Dark background landscape will appear brighter. Slow synchronization (2nd curtain) When taking pictures against a dark background landscape, this feature will slow the shutter speed when the flash is...
- Page 20 Specifications Type For Four Thirds/ Micro Four Thirds Guide no. (at ISO 100 in m) GN40 (at 105mm (53mm) zoom head position) GN27 (at 35mm (18mm) zoom head position) Focal length coverage 24mm (12mm) - 105mm (53mm) [16mm (8mm) when using built-in wide panel] Power Source Four size- AA batteries...
- Page 21 Guide Number table Guide No. at manual exposure mode (ISO 100 in meters) Flash Power Level Zooming Position Full 1/16 1/32 1/64 1/128 1/256 24mm (12mm) 28mm (14mm) 35mm (18mm) 50mm (25mm) 70mm (35mm) 85mm (43mm) 105mm (53mm) Trouble Shooting The flash unit does not start charging.
- Page 22 Warranty In case of the following reason of the defect, it may void the warranty. Please refer the respective warranty condition for details which depends on the country of purchase. 1. The product is not used in accordance with the instruction of the owner’s manual. 2.
- Page 23 Nissin Japan Ltd., Tokyo http://www.nissin-japan.com Nissin Marketing Ltd., Hong Kong http://www.nissindigital.com Design and Specifications are subject to change without prior notice. FT40.Rev.0614.2.0...