
Related Manuals for Sapido RB-1830


Summary of Contents for Sapido RB-1830
- Page 1 Dual-Band Wireless Router Smart 300Mbps Dual -band Router RB-1830 Networking User Manual...
-
Page 2: Table Of Contents
System and Network Setup..................10 Build Network Connection ..................10 2.1.1 Router Mode......................10 2.1.2 AP Mode ......................11 2.1.3 Wi-Fi AP Mode....................11 Connecting RB-1830 ....................11 Network setup ......................12 2.3.1 Windows 2000....................13 2.3.2 Windows XP ......................13 2.3.3 Windows Vista / Windows 7 ................14 Router IP Address Lookup..................16... - Page 3 Walk on LAN Schedule ..................69 6.3.3 Change Password ....................70 6.3.4 Firmware Upgrade....................70 6.3.5 Profile Save .......................71 6.3.6 Time Zone Setting ....................74 6.3.7 UPnP Setting.....................75 6.3.8 VPN Passthrough Setting................75 6.3.9 Language Setting .....................76 6.3.10 Routing Setup ....................77 User Manual v1.0.0 http://www.sapido.com.tw/...
- Page 4 Log & Status ......................79 6.4.1 Network Config....................79 6.4.2 Event Log ......................80 Logout ........................82 Chapter 7 Samba Server ......................83 How to use RB-1830 as a Samba server..............83 Chapter 8 DDNS Service Application..................84 Chapter 9 Q & A ..........................89 Installation .........................89 LED ..........................89 IP Address........................89 OS Setting........................90...
-
Page 5: Fcc Statement
IMPORTANT NOTE FCC Radiation Exposure Statement: This equipment complies with FCC radiation exposure limits set forth for an uncontrolled environment. This equipment should be installed and operated with minimum distance20cm between the radiator & your body. User Manual v1.0.0 http://www.sapido.com.tw/... - Page 6 "Council Directive on the Approximation of the Laws of the Member Sates relating to Electromagnetic Compatibility" (89/336/EEC; 92/31/EEC; 93/68/EEC). The Declaration of Conformity can be found at the Sapido regional website. www.sapidotech.de CE Information of Disposal The electric and electronic equipment or unit which is labeled with crossed-out wheeled bin may not be disposed of with household waste.
-
Page 7: Chapter 1 Introduction
Chapter 1 Introduction Hardware Features User Manual v1.0.0 http://www.sapido.com.tw/... -
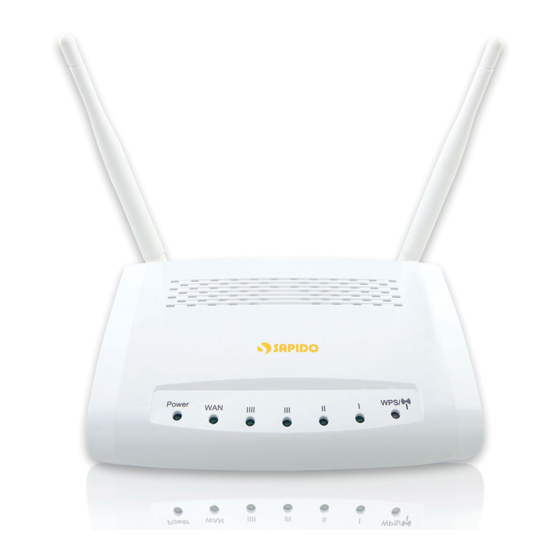
Page 8: Product Appearance
Product Appearance User Manual v1.0.0 http://www.sapido.com.tw/... - Page 9 LED Indicator Status Description: User Manual v1.0.0 http://www.sapido.com.tw/...
-
Page 10: Chapter 2 System And Network Setup
Chapter 2 System and Network Setup The RB-1830 is an easy to setup and wireless device for various application and environment, especially for large installs such as hotels, offices space, warehouses, hot-spots and more. To begin with RB-1830, you must have the following minimum system requirements. If your system can’t correspond to the following requirements, you might get some unknown troubles... -
Page 11: Ap Mode
2.1.3 Wi-Fi AP Mode Switch to WiFi AP Mode when you connect to the internet wirelessly through PC and wireless device without wireless LAN function equipped. Connecting RB-1830 Prepare the followings before the connection: PC or Notebook for setup ... -
Page 12: Network Setup
Make sure you are under “Router Mode”. Connect RB-1830 to xDSL/ Cable modem with the Ethernet cable, WAN to LAN. Turn on your Computer. Network setup After the network connection is built, the next step is setup the router with proper network parameters, so it can work properly in your network environment. -
Page 13: Windows 2000
Protocol (TCP/IP)”, then click “Properties”. Select “Obtain an IP address automatically” and “Obtain DNS server address automatically”, then click “OK”. 2.3.2 Windows XP Click “Start” button (it should be located at lower-left corner of your computer), then User Manual v1.0.0 http://www.sapido.com.tw/... -
Page 14: Windows Vista / Windows 7
Connections, then double-click Local Area Connection, Local Area Connection Status window will appear, and then click “Properties”. Select “Obtain an IP address automatically” and “Obtain DNS server address automatically”, then click “OK”. 2.3.3 Windows Vista / Windows 7 User Manual v1.0.0 http://www.sapido.com.tw/... - Page 15 Connections. Right-click Local Area Network, then select “Properties”. Local Area Connection Properties window will appear, select “Internet Protocol Version 4 (TCP / IPv4)”, and then click “Properties”. Select “Obtain an IP address automatically” and “Obtain DNS server address automatically”, then click “OK”. User Manual v1.0.0 http://www.sapido.com.tw/...
-
Page 16: Router Ip Address Lookup
Input “cmd”, and then click “OK”. Input “ipconfig”, then press “Enter” key. Please check the IP address followed by “Default Gateway” (In this example, the gateway IP address of router is 192.168.1.1) User Manual v1.0.0 http://www.sapido.com.tw/... -
Page 17: Log Into Web Gui
IP address of the wireless router in address bar, and the following message should be shown. Please click “admin” to login the RB-1830. Enter the User name and Password in to the blank and then Click Login. The default values for User Name and Password are admin (all in lowercase letters). - Page 18 User Manual v1.0.0 http://www.sapido.com.tw/...
-
Page 19: Chapter 3 Internet Connection
Chapter 3 Internet Connection This Chapter describes how to setup RB-1830 to the internet. The RB-1830 is delivered with the following factory default parameters. Default IP address: 192.168.1.1 (Router Mode) 192.168.1.254 (AP Mode) 192.168.1.254 (WiFi AP Mode) Default IP subnet mask: 255.255.255.0... -
Page 20: Router Mode- Using As A Broadband Router
2. Google Android Phone: please turn on "USB modem mode” when connecting router. 3. Window Mobile Phone: please enable “USB to PC” function. Router Mode- Using as a broadband router User Manual v1.0.0 http://www.sapido.com.tw/... -
Page 21: One Button Setup
Enter the User name and Password into the blank and then click Login. The default values for User Name and Password are admin (all in lowercase letters). 3.2.1 One button setup This page is used to configure all of the server router function. User Manual v1.0.0 http://www.sapido.com.tw/... -
Page 22: Parental Control
Time Zone Select Change Password Set a new password There are several different WAN interface,Ethernet port、3.5G usb WAN Type Setup dongle、wireless RB-1830 support 2.4GHz and 5GHz band Wireless Setup Input DNS information which is provided by your ISP Encryption 3.2.2 Parental Control 3.2.2.1... -
Page 23: Mac Filter Schedule
Current Filter Table Click Delete Selected will delete the selected item. Click Delete All Delete Selected & Delete will delete all items in this table. Reset You can click Reset to cancel. 3.2.2.3 Schedule Wireless available schedule User Manual v1.0.0 http://www.sapido.com.tw/... -
Page 24: Aircloud Storage
3.2.3 AirCloud Storage 3.2.3.1 FTP server User Manual v1.0.0 http://www.sapido.com.tw/... -
Page 25: Samba Management
The WAN access type is depended on the service that you contract with the provider. The RB-1830 provides five selections for the WAN access type, Static IP, DHCP Client, PPPoE, PPTP and L2TP. Check with your ISP if you don’t know the WAN type. -
Page 26: Static Ip
3.2.4.1 Static IP Select WAN under the IP Config menu, and choose Ethernet Port for the WAN Interface. Its associated setting will show up. User Manual v1.0.0 http://www.sapido.com.tw/... - Page 27 Input ISP Default Gateway Address, . Default Gateway Input DNS information which is provided by your ISP Select 3G as a back up solution or none. Backup select Some ISPs require MAC address registration. In this case, enter Clone Mac Address User Manual v1.0.0 http://www.sapido.com.tw/...
-
Page 28: Dhcp Client
Reset to clear all the input data. 3.2.4.2 DHCP Client Item Description Select "DHCP Client" WAN Access Type You can keep the default as the host name, or input a specific Host Name name if required by your ISP. User Manual v1.0.0 http://www.sapido.com.tw/... -
Page 29: Pppoe
MAC address registered to the provider to "Clone MAC Address" Click on Apply Change to save the setting date, or you may click Apply Change & Reset on Reset to clear all the input data. 3.2.4.3 PPPoE User Manual v1.0.0 http://www.sapido.com.tw/... - Page 30 MAC address registered to the provider to "Clone MAC Address" Click on Apply Change to save the setting date, or you may click Apply Change & Reset on Reset to clear all the input data. User Manual v1.0.0 http://www.sapido.com.tw/...
-
Page 31: Pptp
3.2.4.4 PPTP Item Description Select "PPTP" WAN Access Type Input your server IP address provided by your ISP. If you don’t Server IP Address know, please check with your ISP. User Manual v1.0.0 http://www.sapido.com.tw/... -
Page 32: L2Tp
MAC address registered to the provider to "Clone MAC Address" Click on Apply Change to save the setting date, or you may click Apply Change & Reset on Reset to clear all the input data. 3.2.4.5 L2TP User Manual v1.0.0 http://www.sapido.com.tw/... - Page 33 Input the password provided by your ISP. Password Select Attain DNS Automatically. Or select Set DNS Manually, if you want to specify the DNS, and enter the DNS provided by your ISP in DNS 1 2 3. User Manual v1.0.0 http://www.sapido.com.tw/...
-
Page 34: Advance Function
This option is to enable Web Server Access function on WAN. Enable Web Server Access on WAN 3.2.5 WAN Interface- 3.5G USB dongle Select WAN under the IP Config menu, and choose 3G usb dongle for the WAN Interface. Its associated setting will show as below. User Manual v1.0.0 http://www.sapido.com.tw/... - Page 35 MAC address registered to the provider to "Clone MAC Address" If your 3G USB adapter is a pay-as-you-go plan base, select “Dial Always / Dial on demand on demand” and disconnect the connection when you don't use the User Manual v1.0.0 http://www.sapido.com.tw/...
-
Page 36: Wan Interface- Wireless
Apply Change Rebooting this product is started. Please wait for a while. 3.2.6 WAN Interface- Wireless Select WAN under the IP Config menu, and choose wireless for the WAN Interface. Its associated setting will show as below. User Manual v1.0.0 http://www.sapido.com.tw/... -
Page 37: Ap Mode-Using As A Access Point
MAC address registered to the provider to "Clone MAC Address" Click on Apply Change to save the setting date, or you may click Apply Change & Reset on Reset to clear all the input data. AP Mode-Using as a Access Point User Manual v1.0.0 http://www.sapido.com.tw/... - Page 38 Enter the User name and Password in to the blank and then Click Login. The default values for User Name and Password are admin (all in lowercase letters). Select LAN under the IP Config menu User Manual v1.0.0 http://www.sapido.com.tw/...
-
Page 39: Wifi Ap Mode- Using As A Network Converter
Click on Apply Change to save the setting date, or you may click Apply Change & Reset on Reset to clear all the input data. WiFi AP Mode- Using as a Network Converter Make sure to shift the mode into WiFi AP Mode. User Manual v1.0.0 http://www.sapido.com.tw/... - Page 40 The default gateway is and for User Name and Password are admin (all in lowercase letters). Click Login to enter. User Manual v1.0.0 http://www.sapido.com.tw/...
- Page 41 MAC address registered to the provider to "Clone MAC Address" Click on Apply Change to save the setting date, or you may click Apply Change & Reset on Reset to clear all the input data. User Manual v1.0.0 http://www.sapido.com.tw/...
-
Page 42: Chapter 4 Wireless Setup
Chapter 4 Wireless Setup Wireless Setup There are two ways to setup wireless LAN with RB-1830. You can use either way to setup Wireless LAN. 4.1.1 Setup Wireless LAN by WPS button You can setup wireless LAN easily by using the WPS button if both WLAN router and the WLAN adapter (client) are WPS supported. - Page 43 (7) Back to the WLAN adapter utility and click its “PBC” (C) button. The utility will start searching the destination connection. (8) Confirm the information form the Utility User Manual v1.0.0 http://www.sapido.com.tw/...
-
Page 44: Wireless Band Mode
Note: The setup image might be some differences when using other branded Adapter. 4.1.2 Wireless band mode Support switchable 802.11n single-band or dual-band radio frequency 4.1.3 Wireless Basic Setup from Web GUI The Wireless Basic Settings include Band, Mode, SSID, Channel Number and other wireless settings. User Manual v1.0.0 http://www.sapido.com.tw/... - Page 45 User Manual v1.0.0 http://www.sapido.com.tw/...
- Page 46 Please select the channel; it has Auto, 36,40,44,48,52,56,60,64,100,104,108,112,116,120,124,128,132,1 36,140,149,153,157,161,165. Broadband SSID User may choose to enable Broadcast SSID or not. Data Rate Please select the data transmission rate. Associate Clients Check the AP connectors and the Wireless connecting status. http://www.sapido.com.tw/ User Manual v1.0.0...
-
Page 47: Multiple Aps
4.1.3.1 Multiple APs The RB-1830 can support several SSIDs (wireless LAN group). It can be used as if there are multiple wireless LAN access points with one product. Each SSID could be set with different data rate, WMM and access type. -
Page 48: Enable Universal Repeater Mode
SSID. Click on Apply Changes to save the settings. (Please disable the DHCP service first) Users can use the Network Configuration page to check the information about “Wireless Repeater Interface Configuration”. User Manual v1.0.0 http://www.sapido.com.tw/... -
Page 49: Wireless Security Setup
There are five Encryption types supported: “None”, “WEP”, “WPA (TKIP)”, ”WPA2(AES)”, and “WPA2 Mixed”. Enabling WEP can protect your data from eavesdroppers. If you do not need this feature, select “None” to skip the following setting. User Manual v1.0.0 http://www.sapido.com.tw/... - Page 50 (ASCII and Hex) for wireless network. (2) 802.1x Authentication It is a safety system by using authentication to protect your wireless network. Encryption- WPA (WPA, WPA2, and WPA2 Mixed), WPA Authentication Mode User Manual v1.0.0 http://www.sapido.com.tw/...
-
Page 51: Wireless Access Control
(3) Apply Change & Reset: Click on ‘Apply Changes’ to save setting data. Or click ‘Reset’ to reset all the input data. Wireless Access Control Access Control allows user to block or allow wireless clients to access this router. Users can User Manual v1.0.0 http://www.sapido.com.tw/... - Page 52 (1) Please select Deny Listed in Wireless Access Control Mode first, and then fill in the MAC address what you plan to block in the MAC Address field. Click Apply Changes to save the setting. (2) The MAC address what you set will be displayed on the Current Access Control List. User Manual v1.0.0 http://www.sapido.com.tw/...
- Page 53 (3) The wireless client will be denied by the wireless router. User Manual v1.0.0 http://www.sapido.com.tw/...
-
Page 54: Router Mode Security Setup
Chapter 5 Router Mode Security Setup This section contains configurations for the RB-1830’s advanced functions such as: virtual server, DMZ, and Firewall to provide your network under a security environment. 5.1.1 Virtual Server The Virtual Server feature allows users to create Virtual Servers by re-directing a particular range of service port numbers (from the WAN port) to a particular LAN IP address. -
Page 55: Dmz
Please enter the specific IP address for DMZ host. DMZ Host IP Address Click on Apply Changes to save the setting data. Or you may click Apply Changes & Reset on Reset to clear all the input data. Firewall User Manual v1.0.0 http://www.sapido.com.tw/... -
Page 56: Qos
The QoS can let you classify Internet application traffic by source/destination IP address and port number. To assign priority for each type of application and reserve bandwidth can let you have a better experience in using critical real time services like Internet phone, video conference …etc. User Manual v1.0.0 http://www.sapido.com.tw/... - Page 57 Set local IP Address if the address type is by IP Address MAC Address Set MAC Address if the address type is by MAC Address Select Guaranteed minimum bandwidth or Restricted maximum Mode bandwidth Key in the bandwidth. Bandwidth Write your comment here. Comment User Manual v1.0.0 http://www.sapido.com.tw/...
-
Page 58: Port Filtering
Click Delete Selected will delete the selected item. Click Delete All Delete Selected & Delete will delete all items in this table. Reset You can click Reset to cancel. Port 80 has been blocked as the following illustrate. User Manual v1.0.0 http://www.sapido.com.tw/... -
Page 59: Ip Filtering
Click on Apply Changes to save the setting data. Or you may click Apply Changes & Reset on Reset to clear all the input data. It will display all ports that are filtering now. Current Filter Table User Manual v1.0.0 http://www.sapido.com.tw/... -
Page 60: Denial Of Service
Denial of Service Item Description Check “ ” to enable DoS function for Enable DoS Prevention Enable DoS Prevention prevention. You also can uncheck ““ ” to Enable DoS Prevention disable DoS function. 5.2.5 VLAN Settings User Manual v1.0.0 http://www.sapido.com.tw/... - Page 61 Item Description Add VLAN tag to packet Set VLAN ID(1~4096) It indicates the frame priority level. Values are from 0 (best effort) to Priority 7 (highest); 1 represents the lowest priority Enable or Disable CIF User Manual v1.0.0 http://www.sapido.com.tw/...
-
Page 62: Chapter 6 Advanced Setup
WAN is changed, and the information will be updated to DDNS service provider automatically. Choose correct Service Provider from drop-down list, here including Service Provider DynDNS, TZO, ChangeIP, Eurodns, OVH, NO-IP, ODS, Regfish RB-1830 embedded in User Manual v1.0.0 http://www.sapido.com.tw/... -
Page 63: Wireless Advanced Setup
Click on Apply Changes to save the setting data. Or you may click on Apply Changes & Reset Reset to clear all the input data. Wireless Advanced Setup In Advanced Settings page, more 802.11 related parameters are tunable. User Manual v1.0.0 http://www.sapido.com.tw/... - Page 64 Users can get better wireless transmission efficiency when they Short GI enable this function. Users can adjust RF output power to get the best wireless network RF Output Power environment. Users can choose from 100%, 70%, 50%, 35%, and User Manual v1.0.0 http://www.sapido.com.tw/...
-
Page 65: Wireless Site Survey
Access Point in a minute without any hassle. RB-1830 could support both Self-PIN or PBC modes, or use the WPS button (at real panel) to easy enable the WPS function. - Page 66 (2). Fill in the PIN number from the wireless card in Client PIN Number field, and then click “Start PIN”. (3). Click PIN from Adapter Utility to complete the WPS process with the wireless router. User Manual v1.0.0 http://www.sapido.com.tw/...
-
Page 67: System Management
Start PBC: (1). Press the WPS button (A) from RB-1830 and wait for Wireless/WPS LED light (B) changed into orange. (2). Press the WPS button (C) from the adapter until the setup window shows up. (3). Open a web browser to check the internet connection. -
Page 68: Statistics
6.3.1 Statistics It shows the packet counters for transmission and reception regarding to Ethernet networks User Manual v1.0.0 http://www.sapido.com.tw/... -
Page 69: Walk On Lan Schedule
Motherboard that supports WOL, as well as a Network Controller (NIC) supporting this function. Most of the newer Motherboard (circa 2002 and On), have an On Board NIC that supports WOL. Otherwise you need to install a PCI NIC that is WOL capable. User Manual v1.0.0 http://www.sapido.com.tw/... -
Page 70: Change Password
Users can set or change user name and password used for accessing the web management interface in this section. Click on Apply Changes to save the setting data. Or you may click on Reset to clear all the input data. 6.3.4 Firmware Upgrade User Manual v1.0.0 http://www.sapido.com.tw/... -
Page 71: Profile Save
5 seconds with a stick. The router will reboot and all settings will be restored to factory default settings. If the problem still exists, you can visit our web site to see if there is any firmware for download to solve the problem. 6.3.5 Profile Save User Manual v1.0.0 http://www.sapido.com.tw/... - Page 72 This is especially useful in the event you need to reset the router to its default settings. Save Configuration (1). Click Save (2). Please click “Save” to save the configuration to your computer. (3). Select the location which you want to save file, then click Save. User Manual v1.0.0 http://www.sapido.com.tw/...
- Page 73 Load configuration file (1). Click Choose File (2). Select configuration file then click Open (3). Click Upload to upload configuration file to RB-1830. (4). After 90 seconds, RB-1830 will reboot automatically. Reload factory default setting (1). Please click Reset User Manual v1.0.0...
-
Page 74: Time Zone Setting
(2). Please click OK to start reload factory default setting to RB-1830. (3). After 90 seconds, RB-1830 will reboot automatically. 6.3.6 Time Zone Setting Users can synchronize the local clock on the router to an available NTP server (optional). To complete this setting, enable NTP client update and select the correct Time Zone. -
Page 75: Upnp Setting
(data sharing, communications, and entertainment) and in corporate environments for simplified installation of computer components. RB-1830 supports UPnP function, and can cooperate with other UPnP devices. When you activate UPnP, please click My Network Places. Users will see an Internet Gateway Device icon. -
Page 76: Language Setting
Reset to clear all the input data. Refresh 6.3.9 Language Setting The RB-1830 provide 12 languages for Web GUI. You can select the language interface from the dropdown list and by following steps. User Manual v1.0.0 http://www.sapido.com.tw/... -
Page 77: 6.3.10 Routing Setup
It is the type of routing characterized by the absence of communication between routers regarding the current topology of the network.This is achieved by manually adding routes to the router routing table. User Manual v1.0.0 http://www.sapido.com.tw/... - Page 78 There are 3 options: Transmit Disable:do not send any RIP packet out Send RIP1 packet out Send RIP2 packet out There are 3 options: Receive Disable:do not receive any RIP packet Only receive RIP1 packet Only receive RIP2 packet User Manual v1.0.0 http://www.sapido.com.tw/...
-
Page 79: Log & Status
The category provides Network Config and Event Log status for users to know the operation status. 6.4.1 Network Config Users can check the Internet status under this category, including Firmware version, Wireless setting, Connecting Time, WAN, TCP/IP …information. User Manual v1.0.0 http://www.sapido.com.tw/... -
Page 80: Event Log
6.4.2 Event Log You may enable the event log feature here. User Manual v1.0.0 http://www.sapido.com.tw/... - Page 81 Apply Changes & Refresh & to renew the system time, or on Clear to clear all the record. Clear * The following figure is an example when users click Apply Changes to record the event log. User Manual v1.0.0 http://www.sapido.com.tw/...
-
Page 82: Logout
Logout This function logs out the user. User Manual v1.0.0 http://www.sapido.com.tw/... -
Page 83: Chapter 7 Samba Server
Chapter 7 Samba Server The RB-1830 is able to act as a Samba server to share the file on USB storage in local network. How to use RB-1830 as a Samba server Plug in the USB hard disk/Flash. \\192.168.1.1 Star your web browser and input Star “My Computer”... -
Page 84: Chapter 8 Ddns Service Application
If you don’t have a DDNS account, please follow the steps to complete your DDNS with Dynamic IP settings. http://www.dyndns.com/ First access the Internet and fill into the address field of your web browser, then click Create Account. User Manual v1.0.0 http://www.sapido.com.tw/... - Page 85 Fill in the form as required, and then click on Create Account button. User Manual v1.0.0 http://www.sapido.com.tw/...
- Page 86 When you got this account created message, close it, and check your mailbox. You would get a mail from DynDNS website. Click on the indicated address within your mail to confirm. User Manual v1.0.0 http://www.sapido.com.tw/...
- Page 87 Click on login. Click My Services after logging in. Click Add New Hostname. Put in your favorite hostname and service type, and then click Create Host after finished. User Manual v1.0.0 http://www.sapido.com.tw/...
- Page 88 Your hostname has been created when you see the following page. User Manual v1.0.0 http://www.sapido.com.tw/...
-
Page 89: Chapter 9 Q & A
LAN cable, the changes cannot be made, or password is lost. A: In case RB-1830 is inaccessible; you can try to restore its factory default settings. Please press the “Reset” button and keep it pressed for over 7 seconds and the light of STATUS will vanish. -
Page 90: Os Setting
A: There are two ways to know. Way 1: Check with your Internet Service Provider. Way 2: Check the setting screen of RB-1830. Click on Status & Log item to select Network Configuration on the Main Menu. WAN IP is shown on the WAN interface. - Page 91 5. Select Direct connection to the Internet and click on OK button. 6. Click on OK button. Web page hangs, corrupt downloads, or nothing but junk characters is being displayed on the screen. What do I need to do? User Manual v1.0.0 http://www.sapido.com.tw/...
-
Page 92: Rb-1830 Setup
Q: RB-1830 couldn’t save the setting after click on Apply button? A: RB-1830 will start to run after the setting finished applying, but the setting isn’t written into memory. Here we suggest if you want to make sure the setting would be written into memory, please reboot the device via Reboot under System Management directory. -
Page 93: Wireless Lan
Finally, you might want to keep the system you're trying to configure in the same room as the router, at least during the initial configuration, in order to minimize potential interference from concrete walls or steel beams. User Manual v1.0.0 http://www.sapido.com.tw/... - Page 94 RF Shielding: Your environment may tend to block transmission between the wireless stations. This will mean high access speed is only possible when close to the Access Point. Q: Some applications do not run properly when using the Wireless Router. User Manual v1.0.0 http://www.sapido.com.tw/...
-
Page 95: Support
A: The default WEP of WinXP is Authentication Open System - WEP, but the WEP of RB-1830 is only for Shared Key - WEP, it caused both sides couldn’t communicate. Please select the WEP of WinXP from Authentication Open System to Pre-shared Key - WEP, and then the WEP wireless interface between WinXP and RB-1830 would be communicated. -
Page 96: Others
In this situation, we suggest to disable DHCP server in router and configure your PC manually. USB Device Q: How many USB devices can be connected to the Product? A: RB-1830 has 1 USB ports. User Manual v1.0.0 http://www.sapido.com.tw/... -
Page 97: Chapter 10 Appendices
FireFox ver. 2.0.0.11 and the following related versions.3. Safari ver. 3.04 and the following related versions. 10.3 Communications Regulation Information Should any consumers need to learn more information, services and supports, please contact the supplier of your product directly. User Manual v1.0.0 http://www.sapido.com.tw/...