Advertisement
Available languages
Available languages
MODEL #UTDT9IW7
IN-WALL
DIGITAL TIMER
Call customer service at 1-866-994-4148,
8 a.m. - 6 p.m., EST, Monday - Thursday,
8 a.m. - 5 p.m., EST, Friday.
IMPORTANT PRODUCT INFO
• Single Pole: Timer will control devices from one location.
Do not use in a 3-Way application where multiple switches
control the same device.
• Neutral Wire: This is a wire that must be available as part
of the wiring in the building. Timer will not function
properly if a neutral wire is not available in the wall box
(see Step 3 under "Installation").
• Direct Wire: This timer is only intended to be permanently
installed into an electrical wall box.
• Tool Required: One (1) standard flathead screwdriver
(not included).
INSTALLATION INSTRUCTIONS
1. Turn off power at circuit breaker or fuse box before
uninstalling existing device or installing new timer.
2. Remove existing wall plate and switch from wall box.
3. Make sure the following 3 wires are present in the wall
box. (see Diagram A)
a. 1 Hot Wire from circuit breaker box
b. 1 Load Wire to the device to be powered
c. 1 Neutral Wire
If these are not present, this Timing Device will not
function properly. Additional wiring to the wall box will be
required before installation of this timer can be completed.
4. Strip wires 1/2 inch. (see Diagram A)
From Timer
5. Use the included wire nuts
Black Wire
and securely twist together
Red Wire
to attach the timer wires to
White Wire
the building wires.
Green Wire
(see Diagram A)
*
or to ground post or screw terminal
Hot Wire
Black Wire
Load Wire
Red Wire
Neutral Wire
White Wire
Ground Wire
Green Wire
Diagram A
AB13840
6. Insert timer into wall box (2-1/2 inch) being careful not to
ITEM #0141224
pinch any wires. Be sure timer is upright with the LCD
screen located at the top of the timer. (see Diagram B)
7. Fasten timer to the wall box using the screws provided.
(see Diagram B)
8. Place the included rocker/decorator wall plate around the
timer face. (see Diagram B)
9. Restore power at circuit breaker or fuse box.
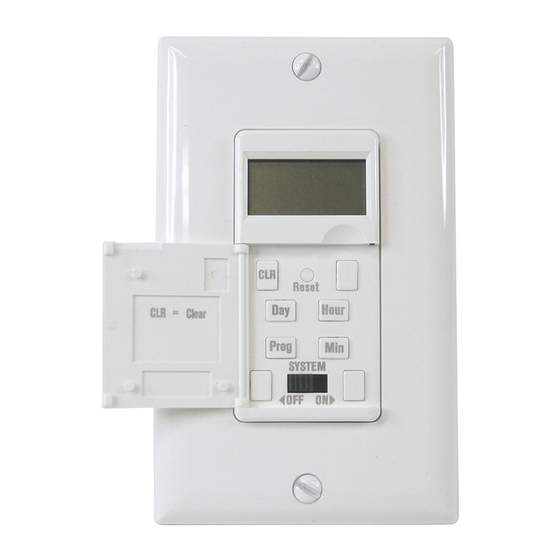
OPERATING INSTRUCTIONS
1 - 4
1. POWER-UP or RESET Sequence
a. Open the door.
b. Position the SYSTEM switch to "ON".
c. Press the "Reset" button with the tip of a small non-
In Wall Box
metallic insulated tool, such as a pencil (not included).
Hot Wire
d. Display will flash 12:00 AM on Monday for a few minutes.
Load Wire
If no other action taken, the clock may engage with the
Neutral Wire
*
incorrect time.
Ground Wire
2. Setting the CURRENT TIME (Time Setup)
a. Press the "Prog" button to enter Time Setup. The icon
"CLK" will appear. NOTE: To enter Time Setup following
or during any other step in these instructions, wait for the
colon ":" between the hours and minutes to begin
blinking and then press the "Prog" button.
b. Press the "Day" button to advance the day.
c. Press the "Hour" button to advance the hours, paying
special attention to the "A" which represents AM and "P"
for PM.
d. Press the "Min" button to advance the minutes.
Diagram B
MO
12:00
A
CLR
Reset
Day
Hour
CLR
=
Clear
Prog
Min
SYSTEM
OFF
ON
e. To save the Current Time settings and go directly to
Event Setup, immediately press the "Prog" button and
skip to step 3b below. To exit Time Setup without
starting Event Setup, wait about 6 seconds and the
Programmed Time will be automatically saved, or
press any of the 3 unmarked buttons to save your
settings. NOTE: The colon ":" between the hours and
minutes will continually blink, indicating the clock is
running.
3. Programming ON/OFF EVENTS (Event Setup)
a. Press the "Prog" button twice to enter Event Setup. The
icon "PROG" and "1 ON --:--" will appear. NOTE: The
"1" represents Program 1.
b. Using the "Hour" and "Min" buttons, enter desired ON
time.
c. Using the "Day" button, enter desired day(s) of week for
programming to be ON. Choose any individual day or
blocks of days including MO-FR, SA-SU, or MO-SU.
NOTE: To clear any programming entered in error in
Steps B or C above, press the "CLR" button. To recall
what was just cleared, press the "CLR" button a second
time.
d. Press the "Prog" button once to save the ON
programming. "PROG" and "1 OFF --:--" will now
appear.
e. Using the "Hour" and "Min" buttons, enter desired OFF
time.
f. Using the "Day" button, enter desired day(s) of week for
programming to be OFF. Choose any individual day or
blocks of days including MO-FR, SA-SU, or MO-SU.
NOTE: To clear any programming entered in error in
Steps E or F above, press the "CLR" button. To recall
what was just cleared, press the "CLR" button a second
time.
g. Press the "Prog" button once to save the OFF
programming and advance to the next event (up to 18
events available denoted by the numbers 1 through 18).
To end Event Setup, wait about 6 seconds and the
Programmed Events will be automatically saved, or
press any of the 3 unmarked buttons to save your
settings.
4. REVIEWING, CHANGING & DELETING Events
a. Press the "Prog" button twice to enter Event Setup. The
icon "PROG", "1 ON" and any specific programmed
times will appear.
b. TO REVIEW THE EVENTS, continue to press the
"Prog" button and it will cycle through all 18 events, one
setting at a time.
c. TO CHANGE AN EVENT, using the "Prog" button,
locate the event(s) to change and then use the "Hour",
"Min" and "Day" buttons accordingly. Press the "Prog"
button once to save changes and advance to the next
event.
d. TO DELETE AN EVENT, using the "Prog" button locate
the event(s) to delete and then press the "CLR" button.
The hours, minutes and days will be deleted, and "--:--"
will appear. Press the "Prog" button once to confirm
Advertisement

Related Manuals for Utilitech UTDT9IW7


Summary of Contents for Utilitech UTDT9IW7
-
Page 1: Operating
Be sure timer is upright with the LCD Event Setup, immediately press the “Prog” button and MODEL #UTDT9IW7 screen located at the top of the timer. (see Diagram B) skip to step 3b below. To exit Time Setup without... -
Page 2: System On/Off
HELPFUL TIPS SAFETY INFORMATION & SPECIFICATIONS deletion and advance to the next event. NOTE: When deleting an event, be sure to delete both the ON and • Timer has up to 18 customizable ON/OFF Event Settings to THIS TIMER IS FOR USE WITH A 120 V AC POWER SOURCE. OFF settings for that event. -
Page 3: Funcionamiento
Asegúrese de que el e. Para guardar la configuración de la hora actual e ir MODELO #UTDT9IW7 temporizador esté en posición vertical con la pantalla LCD ubicada en directamente a Configuración de evento, presione de la parte superior del mismo. -
Page 4: Solución De Problemas
CONSEJOS PRÁCTICOS confirmar la eliminación y avance al siguiente evento. NOTA: ADVERTENCIA Al borrar un evento, asegúrese de eliminar tanto las • El temporizador tiene hasta 18 configuraciones de ENCENDIDO/ configuraciones de ENCENDIDO como las de APAGADO Para evitar incendios, descargas o la muerte, apague el para dicho evento.