Table of Contents
Advertisement
Quick Links
Advertisement
Table of Contents

Related Manuals for Kenwood DVT-6300


Summary of Contents for Kenwood DVT-6300
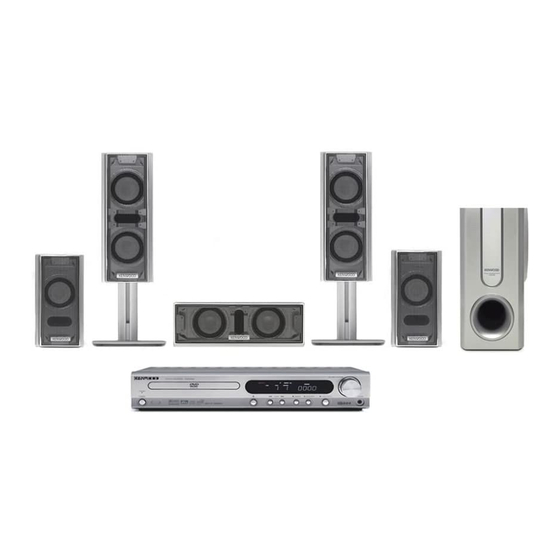
- Page 1 DVD HOME THEATER SYSTEM DVT-6300 DVT-7300 DVT-8300 INSTRUCTION MANUAL This instruction manual is for some models. Model availability and features (functions) may differ depending on the country and sales area. B60-5476-08 00 (K/P/E/X) 04/02...
-
Page 2: Introduction
Introduction Before applying power Units are designed for operation as follows. U.S.A. and Canada ... AC 120 V only Europe and U.K..AC 230 V only Australia ... AC 240 V only Safety precautions WARNING : TO PREVENT FIRE OR ELECTRIC SHOCK, DO NOT EXPOSE THIS APPLIANCE TO RAIN OR MOISTURE. -
Page 3: Fcc Warning
If any accessories are missing, or if the unit is damaged or fails to operate, notify your dealer immediately. If the unit was shipped to you directly, notify your shipper immediately. Kenwood recommends that you retain the original carton and packing materials in case you need to move or ship the unit in the future. -
Page 4: Table Of Contents
Special features and Contents Special features This document classifies the applications of each feature using the following marks. : Description of a feature that can be used with DVD. : Description of a feature that can be used with CD. : Description of a feature that can be used with VCD. -
Page 5: Discs Information
Discs information Types of playable discs The system using this unit does not only play music from CD but can also play the discs listed below to offer you high-quality entertainment of video of movies and live concerts. DVD VIDEO Playable Disc Logo mark on disc Disc size... -
Page 6: Region Codes
Region Codes Every player of this model has a certain region code assigned to it based on the country where the player is used. When the player is used to play back DVD VIDEO discs, it can only play the DVD VIDEO discs carrying the region codes matching the region code of the player. -
Page 7: Video Formats
Video formats The TV picture display and disc signal systems can be divided roughly into two TV formats (NTSC and PAL). They are variable depending on countries and areas. This unit has a function for changing the video format according to the TV type. Please confirm the type of your TV. Checking the Video Format Check the video format of the TV to be used When the video formats are different :... -
Page 8: Important Items
Important items Maintenance Maintenance of the unit When the front panel or case becomes dirty, wipe with a soft, dry cloth. Do not use thinner, benzine, alcohol, etc. for these agents may cause discoloration. Reference Disc handling precautions Handling Hold the disc so that you do not touch the playing surface. -
Page 9: System Connections
Excessive insertion of the cable Note Note can cause defective contact. Attaching the cushions (For DVT-6300 and DVT-7300) Attach cushions to the base of the speaker as shown below. The cushions prevent the speaker from sliding, and dampen its vibra- tions. -
Page 10: Am Loop Antenna
AM loop antenna AM loop antenna connection The supplied antenna is for indoor use. Place it as far as possible from the main system, TV set, speaker cords and power cord, and set it to a direc- tion which provides the best reception. -
Page 11: Connecting To A Tv
Connecting to a TV (for U.S.A., Canada and Australia) COMPONENT Video cord (for U.S.A. and Canada) (Commercially available) (Composite) Video cord S-Video cord (Commercially available) Connecting to a TV (for Europe) SCART cable (Commercially available) (Composite) Video cord S-Video cord (Commercially available) The S-Video output terminal of this unit is only for output of the built-in Note Note... -
Page 12: Connecting To Audio Video Equipments
Connecting to Audio video equipments VCR or DVD recorder AUDIO VIDEO Audio/video cord (Commercially available) DTS disclaimer clause DTS Digital Surround™ is a discrete 5.1 channel digital audio format available on CD, LD, and DVD software which consequently cannot be decoded and played back inside most CD, LD, or DVD players. For this reason, when DTS- encoded software is played back through the analog outputs of the CD, LD, or DVD player, excessive noise will be exhibited. -
Page 13: Controls And Indicators
Controls and indicators Indicates current surround mode Indicates current audio stream Output channel Indicates DVD: DVD video indicator CD: Audio CD indicator MP3: MP3 indicator VCD: Video CD indicator POWER For U.S.A. and Canada For other countries 1 STANDBY indicator 2 POWER on/off (ON/STANDBY) key (For U.S.A. -
Page 14: Operation Of Remote Control Unit
Operation of remote control unit SLOW Model : RC-R0311E (for Europe) RC-R0311 (for other countries) Infrared ray system Loading batteries 1 Remove the cover. Operation Insert the power plug into a power outlet, press the POWER (ON/STANDBY) key of the main unit or POWER key on the remote control to on, then press the desired remote control key. -
Page 15: Set Up Functions
Set Up functions Preparation for Set Up 1 Set the POWER key (ON/ STANDBY key ) to power on. Set up menu Initial Settings By using the Setup menu, you can make various adjustments to items such as picture and sound. You can also set a language for the subtitles and the Setup menu, among other things. -
Page 16: Language
Language Disc Audio Original English Disc Subtitle French Disc Menu German Rating Spanish Country Code Italian TV Aspect Chinese Menu Language Polish Progressive Scan Hungarian Other – – – – 5.1 Speaker Setup Others Disc Audio/ Disc Subtitle/ Disc Menu Select the language you prefer for the audio Track (Disc Audio), Subtitles, and the Disc Menu Original:... -
Page 17: Country Code
LOCK (Continued) Changing the Password (4-digit code) 1 Select LOCK on the setup menu then press the Cursor right (3) key. 2 Enter the old 4-digit code, then press ENTER key. 3 Select "Change" using the Cursor up/down (5/ ∞) keys. then press ENTER. 4 Enter the new 4-digit code, then press ENTER key. -
Page 18: Others
Others The DRC, Vocal and PBC settings can be changed. Press the Cursor up/down (5/∞) keys to select the desired item and press ENTER key. The setting of the selected item is changed between On and Off. Disc Audio Disc Subtitle Vocal Disc Menu Rating... -
Page 19: Dvd Menu Language Code List
DVD menu language code list Language Language Code Abkhazian 6566 Fiji Afar 6565 Finnish Afrikaans 6570 French Albanian 8381 Frisian Ameharic 6577 Galician Arabic 6582 Georgian Armenian 7289 German Assamese 6583 Greek Aymara 6588 Greenlandic Azerbaijani 6590 Guarani Bashkir 6665 Gujarati Basque 6985... -
Page 20: Setting Up Listen Mode
Setting up LISTEN mode What are LISTEN modes? You can experience true home-theater sound with your new system. This system incorporates several listen modes to let you enjoy surround sound with a wide variety of program sources. Each produces multiple channels of surround-sound, but each does it differently. -
Page 21: To Set The Listen Mode Manually
To set the LISTEN mode manually According to the contents of the disc played in this unit, the LISTEN MODE (selected by the LISTEN MODE key) can be selected. At the time of PCM or DOLBY DIGITAL (2 ch) source 1 Press the LISTEN MODE key. -
Page 22: Speaker Setting
Speaker setting Positioning the speakers To achieve the optimum effects obtainable with this SURROUND SOUND system, it is important to posi- tion the speakers properly. Refer to the following illustration to find the best location in your room. Center speaker Front R speaker Sub woofer Front L speaker... -
Page 23: Before Operation
Before operation On screen display The on-screen Banner Display contains many playback features. To see the Banner Display, press ON SCREEN key on the remote while a disc is playing. Use the Cursor (5/∞/2/3) keys on the remote to move through the different features in the Banner Display. -
Page 24: Let's Put Out Some Sound
Let's put out some sound Preparation Turn on the POWER. Basic use method Selecting the desired input MAIN UNIT REMOTE 1 Press ‰/[INPUT When press VIDEO 1/2 key SELECTOR] key for on the remote, switches more than 3 seconds. input modes as shown below. 2 Press ‰/[INPUT 1 VIDEO 1 (audio, video) SELECTOR] key... -
Page 25: Receiving Broadcast Station
Receiving broadcast station It is also possible to receive them by one-touch operations by storing up to 30 stations in the preset memory. (§ ) Select the TUNER input Press the TUNER/BAND key on the remote. REMOTE Select the broadcast band Press the TUNER/BAND key on the remote. -
Page 26: Storing The Broadcast Stations (One-By-One Presetting)
You can store up to 30 stations for FM and AM (MW) in the memory and recall with a single touch of the key. Storing the broadcast stations (one-by-one presetting) Select a station (auto tuning or manual tuning) Press the 7 /MEMORY key on the main unit. -
Page 27: Using Rds Function ( For Europe Only)
RDS is a system which transmits useful information (digital data) for FM broadcasts together with the broadcast signal. Tuners and receivers designed for RDS reception can extract the information from the broadcast signal for use with various functions such as automatic display of the station name. - Page 28 PTY function The PTY information is composed of an identification sym- bol, which helps the FM radio to recognize the program type of each FM station. The 31 PTY modes are shown in the display by pressing the PTY key. Using the PTY search function Select the FM band.
-
Page 29: Playback Of Disc
Playback of disc Basic play Preparation Turn on the POWER. Load a disc. MAIN UNIT Open the tray. Place a disc. Start playback. MAIN UNIT ÷ When the 3 key is pressed while a tray is open, the tray closes automatically, and then playback begins. To stop playback MAIN UNIT REMOTE... -
Page 30: Disc Playback Features
Disc playback features Notes Notes ÷ You won't hear the sound (audio) on the DVD and VCD when you're using the Skip, Search, Step or Slow motion features. ÷ Playback features are not available during the opening cred- its of a movie. Skipping chapters or tracks MAIN UNIT REMOTE... -
Page 31: Slow Motion Playback
STEP (freeze frame and frame advance) REMOTE Slow motion playback REMOTE SLOW Playback from desired title, chapter or track. Because DVD VIDEO discs use digital technology, a title can be divided into individual chapters (similar to tracks on a CD). (At the time of DVD playback) REMOTE Press ON SCREEN key. -
Page 32: Various Playback Functions
Various playback functions Select Audio Language If the disc was created with different language tracks, you can use the AUDIO key on the remote to temporarily change the DVD player’s Audio setting. During playback, press the AUDIO key on the re- mote. -
Page 33: Select Camera Angle
Select Camera angle Some disc contains multiple angles particular scene or sequence. If the disc only has one angle, this feature won’t work. During playback, press the ANGLE key on the remote. Angle icon Select the Camera angle with press the ANGLE key. -
Page 34: Repeat Play
Repeat play Desired title, chapter, track or disc can be played back repeatedly. At the time of DVD playback. ÷ "CHAPTER " : Repeat the chapter that is playing. ÷ "TITLE " : Repeat the title that is playing. At the time of CD/VCD playback. ÷... -
Page 35: Surround
Time Search To start playing at any chosen time on the disc. During playback, press the ON SCREEN key on the remote. The time search box shows the elapsed playing time. Press Cursor up/down (5/∞) keys on the remote to select the time clock icon. Time clock icon ÷... -
Page 36: Program Play
Program play You can listen to the desired tracks of the current CD or VCD in any desired order. Program Edit Insert a disc and close the tray. Press P.MODE key to enter the Program edit mode. Select specific track by press Cursor up/down (5/∞) keys. - Page 37 Delete a track from Program list Press the Cursor (2/3/5/∞) keys to select the track that you wish to delete from the Program list. Press CLEAR key. Delete the complete Program list Select “Clear All” icon, then press ENTER key. The complete program for the disc is deleted.
-
Page 38: Mp3 /Wma/Jpeg Media Playback
MP3 /WMA/JPEG media playback Guidance of MP3/WMA/JPEG MP3/WMA/JPEG media that can be played back with this equipment Usable media : CD-ROM, CD-R, CD-RW Usable formats : ISO9660 level 1 (excluding expanded formats) Files that can be played back : MP3 files, WMA files and JPEG files Creating media for playing back on this equipment Compressing MP3/WMA Please set up the transfer bit rate setting for the compression software when compressing MP3/WMA files as follow. -
Page 39: Playing Back Mp3/Wma/Jpeg Files
Playing back MP3/WMA/JPEG files ÷ It is not possible to play back folders and files that exceed the maximum limitations of the media. ÷ A certain amount of time is required for the player to confirm the media on which MP3/WMA/JPEG files have been re- corded before playback will commence. -
Page 40: Searching (Only For Mp3/Wma Files)
Searching (only for MP3/WMA files) º During playback, press the 4 or ¢ key for more than 2 seconds. MAIN UNIT REMOTE Press and hold the 4 or ¢ key repeatedly. ÷ Each press switches the searching speed. 1 FF 2 X (¢ key) or FR 2 X (4 key) 2 FF 4 X (¢... -
Page 41: Mp3 /Wma Program Playback
MP3 /WMA program playback ( fl ) You can listen to the desired files of the current MP3/WMA disc in any desired order. Program Edit Insert a disc and close the tray. Press P.MODE key to enter the Program edit mode. -
Page 42: Other Function
Other function Sleep Timer You can set this receiver to turn off automatically at a specified time. Press SLEEP key on the remote to set the desired sleep time. The SLEEP indicator and sleep time appears in the dis- play window. ÷... -
Page 43: In Case Of Difficulty
In case of difficulty What appears to be a malfunction may not always be serious. If your unit should not perform as expected, consult the table below to see if the problem can be corrected before seeking help from your dealer or service representative. Operation to reset The microprocessor may fall into malfunction (impossibility to operate erroneous display, etc.) when the power cord is unplugged while power is ON or due to an external factor. - Page 44 DVD player unit Symptom Playback does not start when the 3 key is pressed. Playback starts but no image/sound is seen heard. The picture is disrupted when the image is fast forwarded or fast reversed. No sound is heard. No picture is displayed. The picture does not look good or the pic- ture/sound quality is poor.
- Page 45 DVD player unit Symptom Playback will not start even after a title is se- lected. The parental level cannot be changed. The voice or subtitle language selected in the initial setting is not played. Menu screen messages are not shown in the desired language.
-
Page 46: Specifications
Y-signal ... 1 Vp-p /75 Ω -signal ... 0.7 Vp-p /75 Ω RGB output (SCART) (for Europe) ... 0.7 Vp-p /75 Ω KENWOOD follows a policy of continuous advancements in development. For this reason specifications may Notes Notes be changed without notice. - Page 47 Speaker system (continued) [ KSW-7300 ] (Front) Enclosure ... Bass-Refrex (Magnetically shielded) Speaker configuration ... 50 mm (2”), cone type ✕ 2 Impedance ... 8 Ω Power Handling Capacity (DVR-6300) ... 60 W Dimensions ... W: 124 mm (4-7/8”) H: maximum 337 mm (13-1/4”) Weight (net) ...
- Page 48 For your records Record the serial number, found on the back of the unit, in the spaces designated on the warranty card, and in the space provided below. Refer to the model and serial numbers whenever you call upon your dealer for information or service on this product.