Table of Contents
Advertisement
TM
BY
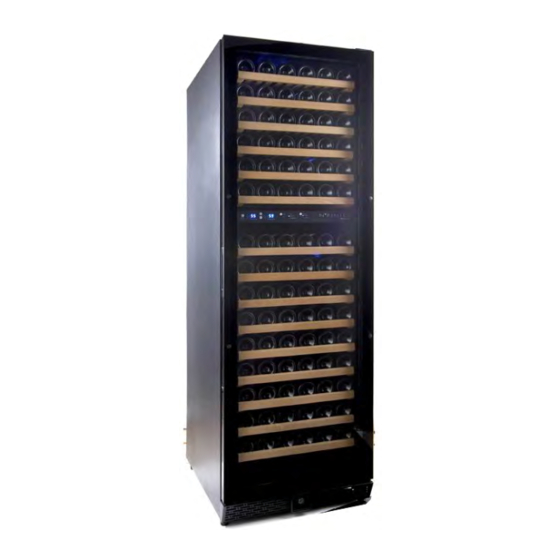
170 bottle Full glass door, two temp
INSTRUCTION MANUAL
Model # 273 03 70
PLEASE READ THIS MANUAL CAREFULLY BEFORE INSTALLING AND OPERATING.
PLEASE NOTE: For Optimal Use Of This Product, The Temperature Of The Lower Cooling Zone Should Be Set At
Least 4˚ F Above The Temperature Of The Upper Cooling Zone.
For More Information About The Operation Of This Product, Please Reference Pages 8 & 9 Of This Manual
1
Advertisement
Table of Contents

Related Manuals for N'Finity N'FINITY 273 03 70


Summary of Contents for N'Finity N'FINITY 273 03 70
- Page 1 170 bottle Full glass door, two temp INSTRUCTION MANUAL Model # 273 03 70 PLEASE READ THIS MANUAL CAREFULLY BEFORE INSTALLING AND OPERATING. PLEASE NOTE: For Optimal Use Of This Product, The Temperature Of The Lower Cooling Zone Should Be Set At Least 4˚...
-
Page 2: Table Of Contents
TABLE OF CONTENTS Chapter Contents Page # Part I. Diagram & Description of Wine Cellar Part II. Important Safety & Pre-Use Instructions Part III. Installation Instructions (a) General Installation Instructions (b) Installation of Built-In Unit (c) Reversing the Door Swing Part IV. -
Page 3: Part I. Diagram & Description Of Wine Cellar
PART I. DIAGRAM & DESCRIPTION OF WINE CELLAR YOUR WINE CELLAR ALSO INCLUDES THE FOLLOWING: • Instruction manual • 15 rolling shelves • Two (2) keys • Top and bottom hinges/screws (for changing the door hinge) -
Page 4: Important Safety & Pre-Use Instructions
PART II: IMPORTANT SAFETY INSTRUCTIONS To reduce the risk of fire, electrical shock, or injury when WARNING using your appliance, follow these basic precautions: Read all instructions before using the Wine Cellar. DANGER or WARNING: Risk of child entrapment. Child entrapment and suffocation are not only problems of the past. Junked or abandoned appliances are still dangerous…... -
Page 5: (B) Installation Of Built-In Unit
(b) Installation of Built-In Cellar The cutout dimension illustrated in figure ( B ) allows for door swing and access to the pull-out shelves when installed as a built-in appliance. If installing between frameless cabinets, a ½” wide filler strip or side panel may be needed on hinge side. The filler strip will act as a spacer between the appliance case and adjacent cabinet door swing. -
Page 6: Operating Your Wine Cellar
PART IV. OPERATING YOUR WINE CELLAR Each Wine Cellar includes an Operating Panel on the front of the unit. This Operating Panel includes several features to operate and control the temperature of both the UPPER and LOWER zones of the Wine Refrigerator. The Operating Panel includes the following features:... - Page 7 ON/OFF: Turns the Wine Cellar on or off. UPPER ZONE: Adjusts and displays, via LED, the desired temperature (F) and the actual temperature (F) of the UPPER zone. LOWER ZONE: Adjusts and displays, via LED, the desired temperature (F) and the actual temperature (F) of the LOWER zone.
-
Page 8: Part V. Temperature Settings
PART V. TEMPERATURE SETTINGS FOR WINE SERVICE 1. Different varietals of wine require different temperature settings. The recommended temperature ranges for serving different varietals of wine are listed below Your Wine Cellar will indicate when you have set the Upper/Lower zones to the below temperature ranges. Red Wines: 52 - 64°F White Wines... -
Page 9: Layout & Storage
PART VI. LAYOUT AND STORAGE Your cabinet was designed to store a maximum number of bottles securely. We recommend that you observe the tips below to optimize loading. Disperse your bottles even so as not to concentrate weight in any one area, Also, be careful that your bottles do not touch either the back of the cabinet or the step at the bottom. -
Page 10: Care & Maintenance
PART VIII. CARE AND MAINTENANCE Cleaning Your Wine Cellar. Turn off the power, unplug the appliance, and remove all items including all shelves.. Wash the inside surfaces with warm water and baking soda solution. The solution should be about 2 tablespoons of baking soda with a quart of water. -
Page 11: Troubleshooting Guide
Be sure the appliance stays secure in the upright position during transportation. Also protect the outside of the appliance with a blanket or similar item. Energy saving Tips The Wine Cellar should be located in the coolest area of the room, away from heat producing appliances, and away from direct sunlight. -
Page 12: Part X. Technical Information
PART XI. WARRANTY INFORMATION Please speak to your Retailer before calling Wine Enthusiast if you did not purchase your Wine Cellar directly from Wine Enthusiast. Limited warranty – 90 day replacement plan with a free 9 month upgrade, totaling 1 year, on parts and labor from the date of shipment.