Table of Contents
Advertisement
Advertisement
Table of Contents

Related Manuals for N'Finity 3000


Summary of Contents for N'Finity 3000
- Page 2 We manufacture, test and certify 100% of our wine cooling units in the USA. By sourcing the best components and closely controlling our manufacturing processes, we can assure the highest-quality, lowest defect manufacturing rates in the industry. Copyright © 2011. N’FINITY and Wine Enthusiast are registered trademarks of Wine Enthusiast Companies. All rights reserved.
-
Page 3: Table Of Contents
TABLE OF CONTENTS Quick Reference Guide ....... Introduction ........Receiving &... -
Page 4: Quick Reference Guide
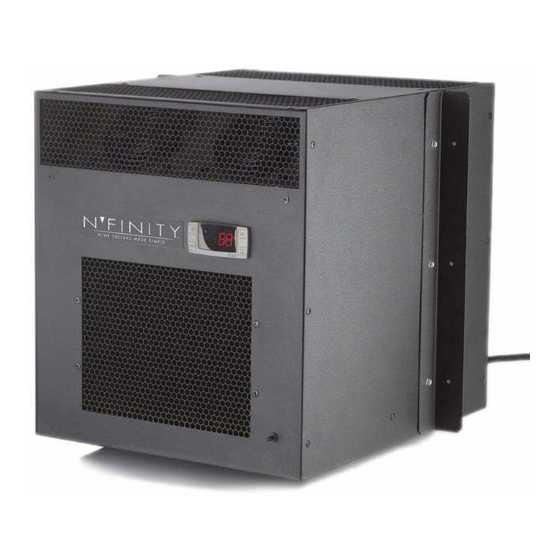
N'FINITY QUICK REFERENCE GUIDE Front / Side View Controller Power Cord (front location optional) Air Sensor Rear / Side View Power Cord (rear location standard) Rear Drain Port Front Drain Port Page 2 WE 081313... -
Page 5: Introduction
If you have any questions about your N'FINITY unit, please call us at 1-800-648-6058. This User’s Manual is intended to assist in the proper installation and maintenance of the N'FINITY cooling system. In order to ensure the longevity of your cooling unit, the equipment should be installed properly and have a proper care and maintenance schedule. -
Page 6: Preparing The Wine Cellar
The unit should be mounted within 18“ of the top of the room in order to achieve sufficient cooling. As the room cools down, the warm air will rise to the ceiling. Mounting the N'FINITY high in the room will create a consistently cool environment by capturing the warm air and replacing it with cool air. - Page 7 AMP’s Product Dimensions (cubic feet) (lbs) (running) (W x H x D) 3000 14.25” x 15.75” x 17” 4200 1000 14.25” x 15.75” x 17” Temperature Delta - 30°F (when exhaust environment does not exceed above 85°F and below 50°F) Warranty - 2 yr parts &...
-
Page 8: Pre-Installation
Electrical Needs The N'FINITY System requires a dedicated 110-volt 20-amp circuit. The unit draws a large amount of amps at initial start up. By designating a dedicated circuit breaker, you will guarantee the unit has enough power to run effectively. Contact an electrician for assistance with the installation of this dedicated electrical circuit: Match the electrical outlet to the plug provided on the N'FINITY unit. -
Page 9: Preparing The Installation Location
PREPARING THE INSTALLATION LOCATION Minimum Tools Needed Level Hammer Screwdriver Locate the desired installation location (no lower than 18” inches from the ceiling). Using a stud finder, locate the studs on either side of the center point, and mark them with vertical lines. -
Page 10: Installing The System
INSTALLING THE SYSTEM Single Piece Mounting Bracket The unit utilizes a single piece mounting bracket, this sturdy bracket frames the installation location and secures the unit to the wall. Applying Insulation Tape Locate the (4) precut pieces of black foam tape included with the system, two larger pieces and two smaller pieces. -
Page 11: Drain Line
DRAIN LINE Condensation Drain Line Tube The condensation drain line tube is used to remove excess condensation from the unit to a proper discharge location. It is important that the drain line tube is properly connected and used to prevent leakage and other problems associated with excess condensation. Failure to use the condensation drain line tube will void the warranty on the unit. -
Page 12: System Operation -Version 2 Controller
SYSTEM OPERATION - VERSION 2 CONTROLLER EFFECTIVE JUNE 2012 NOTE: Confirm if you have a Version 2 Controller using the above illustration as a guide. If Your controller does not match this illustration than you have a Version 1 Controller featured on page 14. Initial Start-Up: When power is applied to the unit, the control will briefly display all symbols, and the Compressor symbol will be displayed (if unit is calling for cooling). -
Page 13: Version 2 Controller Functions
VERSION 2 CONTROLLER FUNCTIONS Menu Navigation & Value Increase Power On/Off *Press and hold (hold for approx. 3 seconds) to manually enter & Escape defrost mode. Probe Value & Menu Navigation Alarm Folder & Value Decrease *Press and hold to enter the parameter menu. - Page 14 Alarm The Alarm symbol is shown when the unit encounters an issue that needs attention, the dis- played alarm codes are explained below. The alarm code will remain displayed until corrected. Alarm Codes Message Cause Solution “E1” Faulty Air Sensing Probe Contact Customer Service The air probe is sensing a 1.
-
Page 15: Version 2 Controller Wiring Schematic
VERSION 2 CONTROLLER WIRING SCHEMATIC Page 13... -
Page 16: System Operation -Version 1 Controller
2 hours. During the defrost cycle, unit shuts down. Air Sensor Each N'FINITY cooling unit comes equipped with an air sensing probe. The air sensing probe senses the temperature of the cellar air and cycles the unit on and off based on the desired cellar temperature. -
Page 17: Version 1 Controller Functions
VERSION 1 CONTROL FUNCTIONS Up and Down Buttons Use to adjust values or browse Defrost button parameter codes. Manually start Defrost - hold 3-5 sec Up and Down Buttons Use to adjust values or browse parameter codes. SET button Display Set Point - press 1 sec Up and Down Buttons Modify Set Point - hold 3-5 sec In programming mode it selects a... -
Page 18: Version 1 Controller Wiring Schematic
VERSION 1 CONTROLLER WIRING SCHEMATIC Page 16 WE 081313... -
Page 19: Troubleshooting Guide
TROUBLESHOOTING GUIDE Unit has ice forming on the evaporator Possible Cause Solution Evaporator filter and/or coil are dirty. Clean filter and coil with a vacuum. If coil is very dirty, use a small hand spray with a small amount of liquid dish washer detergent. - Page 20 TROUBLESHOOTING GUIDE Unit leaks water Possible Cause Solution Unit is not level Unit should be level in wall to prevent leaking Drain line clogged or kinked Check drain line to make sure water can flow freely. Drain is clogged preventing water from escaping Disconnect Drain and clear out.
-
Page 21: Technical Assistance & Maintenance
The customer service representative will be able to assist you with your questions and warranty informa- tion more effectively if you provide them with the following: • The model and serial number of your N'FINITY Series Unit. • Location of unit and installation details, such as ventilation, ducting, construction of your wine cel- lar, and room size. -
Page 22: Installation Terms And Conditions
Wine Enthusiast shall not be liable to Purchaser for any delay of delivery of a Product caused by Force Majeure, or any other cause beyond Wine Enthusiast’s control. 2. N'FINITY PRODUCT LIMITED WARRANTY A. Two (2) Year Limited Warranty. - Page 23 End User must follow the required installation, use and maintenance procedures set forth by Wine Enthusiast in N'FINITY’s Owner’s Manual. The Owner’s Manual is shipped with each Product and if another copy is needed, replacement copies can be downloaded from Wine Enthusiast’s website (www.WineEnthusiast.com) or by contacting Wine Enthusiast directly for a new copy of the Owner’s Manual.
- Page 24 6. CUSTOMER SERVICE AND TROUBLESHOOTING Wine Enthusiast’s technical support department is available to answer and questions or inquiries for End Users regarding a N'FINITY Product, as well as to assist in performing basic troubleshooting, Monday through Friday, from 9:00 a.m. to 6:00 p.m. EST, at telephone number 1-800-648-6058.
- Page 25 Page 23...
- Page 26 Wine Enthusiast Companies 333 North Bedford Rd., Mt. Kisco NY 10549 www.wineenthusiast.com...