
Related Manuals for Life Smart LS1002THD13


Summary of Contents for Life Smart LS1002THD13
- Page 1 INFRARED ZONE HEATING SYSTEM OWNER’S MANUAL Model No. LS1002THD13 WARNING: READ THIS ENTIRE OWNER’S MANUAL CAREFULLY BEFORE USE.
- Page 2 Thank you for choosing a LIFESMART Infrared Zone Heating System. This owner’s manual will provide you with valuable information necessary for the proper care and maintenance of your new product. Please take a few moments to thoroughly read the instructions and familiarize yourself with all the operational aspects of your new heater.
- Page 3 Customer Service and Support To Obtain Warranty Support or Advice, Please Complete These Easy Steps: Contact LIFESMART PRODUCTS Technical Support 1-866-484-2066 or 1-214-614-2509 Phone Warranty@lifesmartproducts.com E-mail Visit us: www.lifesmartproducts.com You will need to provide the unit's model number, serial number (located on the heater’s front panel, rear panel, or on the box), date of purchase, retailer of...
-
Page 4: Important Safety Instructions
IMPORTANT S AFETY I NSTRUCTIONS READ A ND U NDERSTAND A LL I NSTRUCTIONS, S AFETY W ARNINGS, AND F AQ’s B EFORE U SING T HE H EATER ... - Page 5 9. This heater is not intended for use in bathrooms, laundry areas and similar indoor locations, nor any locations that use GFCI outlets. 10. Never place heater where it may fall into a bathtub or other water receptacles. 11. Do not run cord under carpet. Do not cover cord with throw rugs, runners, or similar coverings.
-
Page 6: Frequently Asked Questions (Faqs)
FREQUENTLY ASKED QUESTIONS (FAQ’S) My heater emits a “strange” odor when I first open the box/when I turn the heater on for the first time. Why? These are both normal. This heater is treated with a special heat safe/resistant coating. This odor will sometimes be present when the box is opened, and may be compared to a heaters version of “new car smell.”... - Page 7 Why doesn’t the temperature on my heater match the temperature display on my wall, or external thermostat This is completely normal. The temperature display on your heater may vary from the temperature display on another thermostat (like the one mounted to your wall or a purchased external thermostat).
- Page 8 Why doesn’t the fan speed increase when I change the setting from LOW to HIGH? This is normal. The heater’s fan’s speed is not affected by the HI/LO settings. The fan is designed to vent the heat at one soft, comfortable, and energy efficient speed. What is affected by the HI setting is the heat output.
-
Page 9: Specifications
SPECIFICATIONS Voltage Rating 120 V (60Hz) Power Consumption 1500W Unit Size 11.4 in. (W) x 14.5 in. (D) x 15 in. (H) Unit Weight 14.3 lbs SAFETY FEATURES Tip-Over Safety Feature This heater is equipped with a tip-over safety feature. Once the heater is tipped over, an internal switch will automatically shut the heater off. -
Page 10: Product Diagram
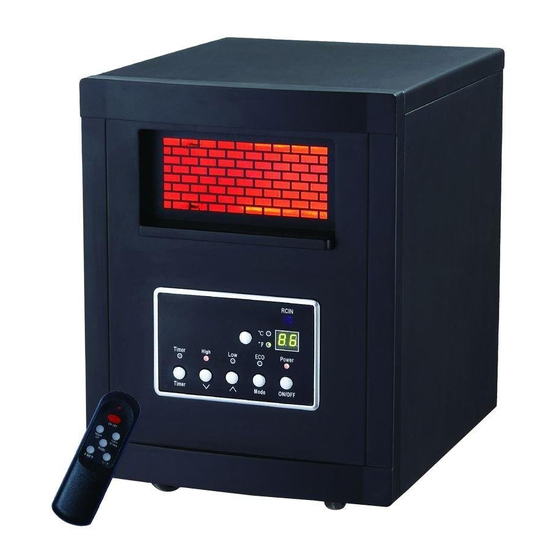
IN THE BOX ·INFRARED ZONE HEATING SYSTEM ·REMOTE CONTROL (2 AAA batteries not Included) ·INSTRUCTION BOOKLET PRODUCT DIAGRAM Remote Control Air Intake Air Outlet Cord Clamp Control Panel Wheels Master Power Switch Temp Sensor... -
Page 11: Control Panel
Control Panel 1. Remote control signal sensor 2. Digital display: Indicates set desired room temperature 3. Power indicator light: Indicates that the heater is receiving power from outlet. Will flash when powered “ON’ 4. ON/OFF button: Powers the display on and off 5. -
Page 12: Remote Control
Remote Control Temp up button: To increase desired temperature ON/OFF button: Powers the display on and off Temp down button: To decrease desired temperature Mode button: Used for mode selection ℃/℉ button: For alternating between Fahrenheit and Celsius Timer button: Used to engage timer mode and to set hour value for the timer Battery compartment (rear of remote) Battery compartment cover... - Page 13 PREPARATION Place the heater on a firm, level surface and plug into a grounded 120V 60Hz power outlet. Heater to be operated only in upright position with caster wheels attached. Turn on the main power switch in the rear of the unit. Press the On/Off button on the display to power up the heater’s display.
-
Page 14: Operating Instructions
OPERATING INSTRUCTIONS 1. Power the Display On/Off and Select Desired Mode Turn the heater on by pressing the ON/OFF button on the control panel or by pressing the Power button on the supplied remote control. Turn the heater off by pressing the ON/OFF button on the control panel or by pressing the Power button on the supplied remote control. - Page 15 POWER-OFF TIMER 3. Setting the Function Note: The Power-Off-Timer Function will allow for the heater to power OFF after a certain set time, and can only be set while the heater’s display is in the “On” position. Turn the heater to the “On” position. Press the Timer button on the heater’s control panel or the remote.
- Page 16 5. Setting Electro Lock The Electro Lock can help avoid the heater from being accidentally engaged by children. The locking mechanism can be set in both the display ON and OFF modes. Press Temp Up and Temp Down buttons at the same time for 3 seconds.
-
Page 17: Maintenance
The unit 1) Remove bracket screws (4X) 2) Remove Air filter MAINTENANCE Unplug the unit and let it cool completely. To keep the heater clean, the outer shell may be cleaned with a soft, damp cloth. You may use a mild detergent if necessary. -
Page 18: Basic Troubleshooting
STORAGE Store the heater in a cool, dry location when not in use. To prevent dust and dirt build-up, use the original packaging to repack the unit. BASIC TROUBLESHOOTING If the heater will not operate, please check the following before seeking repair advice: 1. -
Page 19: Limited Manufacturer Warranty
Limited Manufacturer Warranty 1 Year Limited Warranty: LIFESMART warrants this heater against defects in materials and workmanship on functional parts, for a period of 1 year from the original date of purchase. Your sales receipt showing the date of purchase of the product is your proof of purchase. Keep it in a safe place for future reference. -
Page 20: Warranty Limitations
Warranty Limitations This warranty does not apply if the unit has been subject to negligence, fabrication, misuse, abuse, or repairs (unless authorized verbally, or in writing, by an Authorized LIFESMART Representative) alteration by non-LIFESMART authorized personnel, inappropriate installations, or any case beyond the control of LIFESMART. -
Page 21: Manual Del Usuario
SISTEMA DE CALEFACCIÓN LOCALIZADA POR INFRARROJOS MANUAL DEL USUARIO Modelo N.° LS1002THD13 ADVERTENCIA: LEA ATENTAMENTE TODO ESTE MANUAL DEL USUARIO ANTES DE UTILIZAR EL PRODUCTO. - Page 22 Gracias por elegir un sistema de calefacción localizada por infrarrojos de LIFESMART. Este manual del usuario le proporcionará valiosa información necesaria para el cuidado y mantenimiento adecuado de su nuevo producto. Por favor, tómese unos minutos para leer en detalle las instrucciones y familiarizarse con el funcionamiento de su nuevo calefactor. POR FAVOR, CONSERVE ESTAS INSTRUCCIONES ...
- Page 23 Soporte y Servicio De Atención Al Cliente Para obtener soporte o asesoramiento sobre la garantía, por favor, complete estos tres simples pasos: Contáctese con el departamento soporte técnico de LIFESMART PRODUCTS 1-866-484-2066 o 1-214-614-2509 Por Teléfono Warranty@lifesmartproducts.com Por Correo Electrónico Por Paginá...
-
Page 24: Instrucciones De Seguridad Importantes
INSTRUCCIONES D E S EGURIDAD I MPORTANTES ANTES D E U TILIZAR E L C ALEFACTOR, L EA Y C OMPRENDA T ODAS L AS INSTRUCCIONES, ... - Page 25 6. Desenchufe siempre el calefactor cuando este no se encuentre en funcionamiento. 7. No ponga en funcionamiento ningún calefactor que tenga un cable o un enchufe dañado, o luego de que el calefactor haya estado funcionando mal, se haya caído o haya sido dañado de alguna forma.
- Page 26 POR FAVOR, CONSIDERE LAS PREGUNTAS FRECUENTES QUE APARECEN EN LAS PRÓXIMAS PÁGINAS ANTES DE UTILIZAR SU CALEFACTOR.
-
Page 27: Preguntas Frecuentes
PREGUNTAS FRECUENTES Mi calefactor despide un olor “raro” al abrir la caja por primera vez/ la primera vez que lo enciendo. ¿Por qué? Ambas cosas son normales. Este calefactor tiene un revestimiento de seguridad especial resistente al calor. Este olor aparecerá algunas veces al abrir la caja y podría ser comparado con la versión para calefactor de “olor a auto nuevo”. - Page 28 Una vez que haya enchufado y encendido el calefactor, ¿cuánto tardará en calentar la habitación? Por lo general, tardará aproximadamente media hora hasta que el cambio de temperatura se sienta. Por favor, recuerde que con cualquier proceso de calefacción existen muchas variables. Ubicación (en el hogar), diseño y tamaño de la habitación, cuán aislada se encuentra la habitación, cuántas ventanas y puertas hay, cuánta superficie de hormigón sin revestimiento hay (ya que actúa como disipador de calor con cualquier clase de sistema de calefacción), el abrir y...
- Page 29 ¿Puedo utilizar más de un calefactor a la vez? ¿Puedo utilizar el calefactor y otro electrodoméstico a la vez? Sí. Pero asegúrese de que ambos electrodomésticos no estén enchufados en el mismo circuito. Cada calefactor (los calefactores son considerados electrodomésticos) necesita de su propio circuito con un mínimo de 15 A (sin ningún otro artefacto enchufado en el mismo circuito).
- Page 30 Mi calefactor no funciona tan bien como otro calefactor de otra marca que he comprado. ¿Por qué ocurre esto? Existen muchas marcas de calefactores en el mercado. Cada marca diseña sus calefactores con diferentes especificaciones en cuanto al calor, velocidades del ventilador, colores, tipos de materiales, pantallas y componentes eléctricos.
-
Page 31: Especificaciones
ESPECIFICACIONES Potencia de tensión 120 V (60 Hz) Consumo de energía 1500 W eléctrica 28.96 cm (ancho) x 36.8 cm (profundidad) x Tamaño de la unidad 38.1 cm (alto) Peso de la unidad 6.49kg CARACTERÍSTICAS DE SEGURIDAD Característica de seguridad en caso de caída Este calefactor está... - Page 32 Filtro De Aire Salida de Aire Control Remoto Abrazaderas ESQUEMA DEL PRODUCTO de Cuerda Panel de Control EN LA CAJA SISTEMA DE CALEFACCIÓN CONTROL REMOTO • • LOCALIZADA POR INFRARROJOS (2 BATERÍAS AAA REQUIRIDAS Y VENDIDAS POR SEPARADO MANUAL DE INSTRUCCIONES •...
-
Page 33: Panel De Control
PANEL DE CONTROL 13 14 15 1. Sensor de señal del control remoto. 2. Pantalla digital: indica la temperatura programada deseada para la habitación. 3. Luz indicadora de energía eléctrica: indica que el calefactor está recibiendo energía desde el tomacorriente. 4. - Page 34 Botón Timer: se utiliza para activar el modo temporalizador y para programar Botón Mode: se utilize para seleccionar el modo. BotónON/OFF: enciende o apaga la pantalla Botón Temp. Down: para disminuir la temperatura deseada. Botón Temp. Up: para aumentar la temperatura deseada. Botón ℃/℉: permite cambiar de Fahrenheit a Celsius Mode button: Used for mode Tapa...
- Page 35 Filtro de aire Instale Baterias PREPARACIÓN Posterior del Oprima y Control Remoto Ubique el calefactor en una superficie firme y nivelada y enchúfelo a un tomacorriente de 120V (circuito dedicado de 15 A Recorra como mínimo) 60 Hz, con la debida conexión a tierra instalada. Ponga en funcionamiento el calefactor sólo cuando esté en La Tapa posición vertical y con las ruedas incorporadas.
-
Page 36: Instrucciones De Funcionamiento
INSTRUCCIONES DE FUNCIONAMIENTO 1. Encender la pantalla con el botón On/Off y seleccione el modo deseado Encienda el calefactor presionando el botón ON/OFF en el panel de control o presionando el botón Power en el control remoto suministrado. Apague el calefactor presionando el botón ON/OFF en el panel de control o presionando el botón Power en el control remoto suministrado. - Page 37 3. Configurar la función TEMPORALIZADOR DE DESACTIVACION Nota: La función temporalizador desactivado le permitirá al calefactor apagarse luego de cierto tiempo programado y sólo puede ser configurada cuando la pantalla del calefactor se encuentra en la posición “encendida”. Coloque la pantalla del calefactor en la posición "On/Encendida".
- Page 38 5. Configurar la función de seguro/bloqueo electrónico El bloqueo electrónico evitará que un niño modifique accidentalmente, las configuraciones del calefactor. El mecanismo de bloqueo puede ser configurado en ambos modos de pantalla: ON y OFF (Encendido y Apagado). Mantenga presionado por 3 segundos y al mismo tiempo los botones Temp.
-
Page 39: Mantenimiento
La Unidad Oprima y Recorra La Tapa Saque Baterias 1) Quité los cuatro tornillos 2) Quité el filtro de aire y la malla Posterior del Tapa Control Remoto MANTENIMIENTO 1. Desenchufe la unidad y deje que se enfríe por completo. Replazca La Tapa y 2. -
Page 40: Resolución De Problemas Básicos
ALMACENAMIENTO Coloque el calefactor en un lugar fresco y seco cuando no se encuentre en uso. Para prevenir que entre polvo en el interior de la unidad y que esta se ensucie, utilice el embalaje original para guardarla. RESOLUCIÓN DE PROBLEMAS BÁSICOS Si el calefactor no funciona, por favor, controle lo siguiente antes de solicitar asesoramiento para su reparación: 1. - Page 41 Garantía de Fábrica Limitada Garantía limitada de 1 año: LIFESMART garantiza que este calefactor está libre de defectos en cuanto a materiales y fabricación de las piezas en buen estado, por un período de 1 año a partir de la fecha original de compra. Su factura, en la cual aparece la fecha de adquisición del producto, es su comprobante de la compra realizada.
- Page 42 Limitaciones de la garantía No se aplicará esta garantía si la unidad ha sido sometida a negligencia, fabricación, uso incorrecto, abuso o reparaciones (salvo autorización verbal o por escrito de un representante autorizado de LIFESMART), alteración por personal no autorizado por LIFESMART, instalaciones inadecuadas o cualquier caso que quede fuera del control de LIFESMART.
- Page 43 LS1002THD13 Rev 1 Printed In China...