Sennheiser SK 500 G2 Instructions For Use Manual
Hide thumbs
Also See for SK 500 G2:
- Instructions for use manual (124 pages) ,
- Service manual (27 pages) ,
- Product sheet (1 page)
Table of Contents
Advertisement
Advertisement
Table of Contents

Related Manuals for Sennheiser SK 500 G2


Summary of Contents for Sennheiser SK 500 G2
- Page 1 SK 500 Instructions for use...
- Page 2 Sennheiser a world-leading company in this field. Please take a few moments to read these instructions carefully, as we want you to enjoy your new Sennheiser product quickly and to the fullest.
-
Page 3: Table Of Contents
Contents The SK 500 G2 bodypack transmitter ......... 36 The channel bank system ..........36 Safety instructions ..............37 Delivery includes ..............37 Areas of application ..............38 The operating controls ............39 Indications and displays ............40 Preparing the bodypack transmitter for use ..... 42 Inserting and replacing the batteries ...... -
Page 4: The Sk 500 G2 Bodypack Transmitter
The SK 500 G2 bodypack transmitter The SK 500 G2 bodypack transmitter is part of the evolution wireless series ew 500 G2. With this series, Sennheiser offers high-quality state-of-the-art transmission systems with a high level of operational reliability and ease of use. Transmitters and receivers permit wireless transmission with studio-quality sound. -
Page 5: Safety Instructions
Use a damp cloth for cleaning the unit. Do not use any cleansing agents or solvents. Delivery includes The packaging contains the following items: 1 SK 500 G2 bodypack transmitter 2 batteries 1 BPP 1 bodypack pouch 1 Instructions for use... -
Page 6: Areas Of Application
Transmitter Receiver (to be Area of ordered separately) application EM 500 G2 eater Presentation Sports (aerobic) SK 500 G2 Vocals Using instruments wirelessly EK 500 G2 Speech Vocals Presentation Camera-mounted applications... -
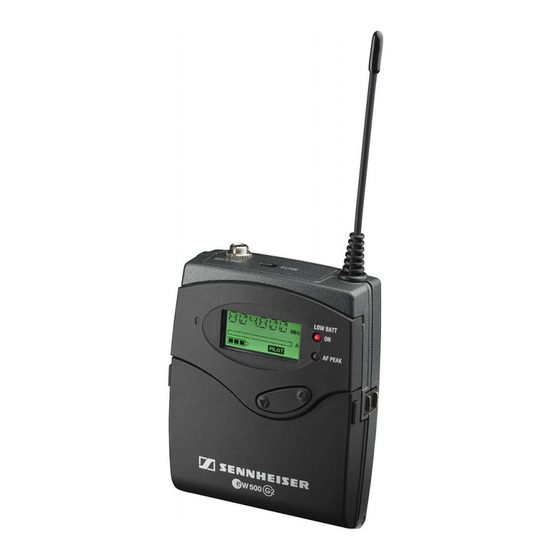
Page 7: The Operating Controls
The operating controls · · ³ » ¹ ¿ ¸ ´ ² ¶ º ¾ µ ³ Microphone/line input (MIC/LINE), 3.5 mm jack socket · Antenna » Red LED for operation and battery status indication (ON/LOW BAT) ¿ Yellow LED for audio peak (AF PEAK) ´... -
Page 8: Indications And Displays
Indications and displays LC display panel Alphanumeric display “B.CH“ – appears when the channel bank and the channel number are displayed “MHz“ – appears when the frequency is displayed 4-step battery status display Lock mode icon (lock mode is activated) “PILOT”... - Page 9 “MUTE” display The “MUTE” display appears on the display panel when the transmitter is muted (see “Muting the transmitter” on page 46). Modulation display The level display for audio signal “AF” shows the modulation of the transmitter. When the transmitter’s audio input level is excessively high, the level display for audio signal “AF”...
-
Page 10: Preparing The Bodypack Transmitter For Use
Inserting and charging the accupack The transmitter can also be powered via the rechargeable Sennheiser BA 2015 accupack. Insert the accupack into the battery compartment as described above. The transmitter has two charging contacts and a sensing contact on its short sides. -
Page 11: Connecting The Microphone/Line Cable
displays, the transmission of transmitter battery status information to the rack-mount receivers and the switch-off thresholds at the end of the operating time are corrected correspondingly. Due to the missing sensor, individual rechargeable battery cells will not be identified as accupacks. The monitoring of the accupack temperature during charging in the L 2015 charger. -
Page 12: Attaching The Transmitter To Clothing
Positioning the microphones The ME 3 and ME 4 microphones are directional microphones, i.e. their sound inlet should always be directed towards the sound source (e.g. mouth). The ME 2 with omni-directional pick-up pattern picks up sound equally from all directions. It is the best choice if movements of the speaker’s head have to be compensated for. -
Page 13: Using The Bodypack Transmitter
Using the bodypack transmitter Switching the transmitter on/off The transmitter can only be switched off when the standard display is shown on the display panel. When in the operating menu, briefly pressing the ON/OFF button will cancel your entry (ESC function) and return you to the standard display with the last stored settings. -
Page 14: Muting The Transmitter
Muting the transmitter The transmitter has a MUTE switch that noiselessly mutes the transmitter’s audio signal without switching the transmitter off. ¹ Set the MUTE switch to the position ’MUTE’. The “MUTE” display appears on the display panel. Provided that the pilot tone function is activated on both the transmitter and the receiver, the “MUTE”... -
Page 15: The Operating Menu
The operating menu A special feature of the Sennheiser ew 500 G2 series is the similar, intuitive operation of transmitters and receivers. As a result, adjustments to the settings can be made quickly and “without looking” – even in stressful situations, for example on stage or during a live show or presentation. -
Page 16: Working With The Operating Menu
Working with the operating menu By way of example of the “TUNE” menu, this section describes how to use the operating menu. After switching the transmitter on, the standard display is shown on the display panel. Getting into the operating menu Press the button to get from the standard display into the operating menu. - Page 17 Storing a setting Press the button to store the setting. “STORED” appears on the display, indicating that the setting has been stored. The display then returns to the top menu level. With most menus, new settings become effective immediately without having to be stored. An exception are the “BANK”, “CHAN”, “TUNE”...
-
Page 18: Operating Menu Of The Transmitter
Operating menu of the transmitter EXIT BANK BANK BANK Changing the channel 1...8, U (User Current channel bank bank Bank) Stores the setting STORED 1.03 1.02 B.CH CHAN B.CH Current channel Channel 01...20 Changing the channel (display depends on Stores the setting "DISPLY"... - Page 19 DISPLY NAME VOCAL GUCAL Assigning the Current transmitter name Transmitter name transmitter a name (6 characters) Letters w/o pronounciation marks, numbers from 0...9, special characters, spaces STORED SET: 5 x next character, then store RST. RST. OK OK RESET Security check OK, NO Loading the factory- preset default settings...
-
Page 20: Adjustment Tips For The Operating Menu
Adjustment tips for the operating menu Switching between channel banks – BANK Via the “BANK” menu, you can switch between the transmitter’s nine channel banks. Each of the channel banks “1” to “8” has up to 20 switchable channels that are factory-preset to a transmission frequency (see “The channel bank system”... -
Page 21: Adjusting The Sensitivity
Use the rocker button to select the desired transmission frequency. Transmission frequencies are tunable in 25-kHz steps within a switching bandwidth of 36 MHz max. For intermodulation-free frequencies, please refer to the enclosed frequency table. Adjusting the sensitivity – SENSIT Via the “SENSIT”... -
Page 22: Selecting The Standard Display
Selecting the standard display – DISLPY Via the “DISPLY” menu, you can select the standard display: Contents of standard Selectable standard display display “FREQ” “NAME” “CHAN” Entering a name – NAME Via the “NAME” menu, you can enter a freely selectable name for the transmitter. -
Page 23: Activating/Deactivating The Pilot Tone Transmission
remains unchanged. After the reset, the transmitter is restarted and the standard display is shown on the display panel. Activating/deactivating the pilot tone transmission – PILOT Via the “PILOT” menu, you can activate or deactivate the pilot tone transmisssion. The pilot tone supports the receiver’s squelch function (Squelch) and protects against interference due to RF signals from other units. -
Page 24: Troubleshooting
Reduce the AF level is adjusted too output level high If problems occur that are not listed in the above table or if the problems cannot be solved with the proposed solutions, please contact your local Sennheiser agent for assistance. -
Page 25: Recommendations And Tips
Recommendations and tips ... for the ME 2 and ME 4 clip-on microphones To reduce level variations to a minimum when the user turns his or her head away from the microphone, attach the microphone as centrally as possible. To protect the microphone against excessive sweat/ moisture, avoid direct skin contact. -
Page 26: Care And Maintenance
Care and maintenance Use a slightly damp cloth to clean the transmitter from time to time. Note: Do not use any cleansing agents or solvents. -
Page 27: Specifications
±24 kHz / ±48 kHz ≤ ±15 ppm Frequency stability RF output power at 50 Ω typ. 30 mW AF characteristics Noise reduction system Sennheiser AF frequency response 40–18,000 Hz ≥ 110 dB(A) S/N ratio (at 1 mV and peak deviation) ≤ 0.9 %... -
Page 28: Connector Assignment
Microphones ME 2 MKE 2-ew ME 3 ME 4 Transducer condenser condenser condenser condenser Principle Sensitivity 20 mV/Pa 5.6 mV/Pa 1.6 mV/Pa 40 mV/Pa Pick-up omni- omni- super- cardioid pattern directional directional cardioid Max. SPL 130 dB SPL 140 dB SPL 150 dB SPL 120 dB SPL Connector assignment 3.5 mm jack plug Polar diagrams and frequency response... -
Page 29: Accessories
Frequency response curve ME 2 Frequency response curve ME 3 Frequency response curve ME 4 Accessories ME 2 Clip-on microphone, condenser, omni-directional MKE 2 Clip-on microphone , black or beige, condenser, omni-directional ME 4 Clip-on microphone, condenser, cardioid ME 3 Headmic, condenser, super-cardioid CI 1 Instrument cable,... - Page 30 Recht unseren Garantiebestim- mungen nicht entgegensteht. ENGLISH The guarantee period for this Sennheiser product is 24 months from the date of purchase. Excluded are accessory items, rechargeable or disposable batteries that are deli- vered with the product; due to their characteristics these products have a shorter service life that is principally dependent on the individual frequency of use.
- Page 31 U.S. provided that no national law limits our terms of gua- rantee. FRANÇAIS La période de garantie pour ce produit Sennheiser est de 24 mois à compter de la date d'achat. Sont exclues, les batte- ries rechargeables ou jetables livrées avec le produit. En rai- son de leurs caractéristiques ces produits ont une durée de...
- Page 32 Senza questo documento, che deve essere con- trollato dal centro di servizio Sennheiser, qualsiasi riparazi- one viene effettuata solo dietro pagamento. Le prestazioni gratuite di garanzia possono consistere nell'eliminazione del difetto di materiale o fabbricazione attraverso la riparazione, la sostituzione di parti o del com- pleto apparecchio, secondo nostro insindacabile giudizio.
- Page 33 De garantietermijn begint vanaf de aankoopdatum. Daa- rom dient u de originele aankoop-bon goed te bewaren. Zonder dit bewijs, dat door de Sennheiser servicepartner wordt gecontroleerd, worden reparaties in principe tegen kostenvergoeding uitgevoerd.
- Page 34 EG-Konformitäts-Erklärung / EC Certificate of Conformity Déclaration de conformité pour la CEE Certificato di conformitá comunitario Declaración de Conformidad / EG-Conformiteitsverklaring SENNHEISER electronic GmbH & Co. KG Am Labor 1, D-30900 Wedemark erklären, dass die Produkte declare that these devices déclarons que ces appareils...
- Page 35 Bemerkung: Vor Inbetriebnahme sind die jeweiligen länderspezifischen Vorschriften zu beachten! Important: Before putting the device into operation, please observe the respective country-specific regulations! Important: Avant d’utiliser l’appareil, veuillez observer les dispositions légales en vigueur dans votre pays. Nota: Prima della messa in funzione seguite le prescrizioni vigenti nel paese nel quale viene utilizzato! Observación: !Anterior a la puesta en funcionamiento deberán observarse las...
- Page 36 Sennheiser electronic GmbH & Co. KG 30900 Wedemark, Germany Phone +49 (5130) 600 0 Fax +49 (5130) 600 300 www.sennheiser.com Printed in Germany Publ. 12/03 90663/A01...