
Related Manuals for Sony XAV-722


Summary of Contents for Sony XAV-722
- Page 1 4-263-230-13(1) AV Center Operating Instructions XAV-722 ©2011 Sony Corporation...
- Page 2 Be sure to install this unit in the dashboard of Warning if your car’s ignition has no the car for safety. For installation and ACC position connections, refer to the supplied Be sure to set the Auto Off function “Installation/Connections” guide. (page 38).
-
Page 4: Table Of Contents
Table of Contents Discs Notes on safety ......7 Notes on installation..... . 7 Playing discs . - Page 5 iPod Operations Monitor Adjustment Playing an iPod ......29 Adjusting the monitor angle ....35 Setting the play mode .
- Page 6 Index....... . . 57 Support site If you have any questions or for the latest support information on this product, please visit the web site below: http://www.sony-asia.com/section/support http://www.sony-asia.com/caraudio/ Provides information on models and manufacturers of compatible digital audio players.
-
Page 7: Notes On Safety
Notes on safety Notes on installation • Comply with your local traffic rules, laws and • We recommend this unit should be installed by a regulations. qualified technician or service personnel. • While driving – If you try to install this unit by yourself, refer to –... -
Page 8: Copyrights
12 TONE ANALYSIS and its logo are trademarks of Sony This product uses font data which is licensed to Corporation. Sony by Monotype Imaging Inc. or its affiliates. “WALKMAN” and iPhone, iPod, iPod classic, iPod nano, and “WALKMAN” logo are iPod touch are trademarks of Apple Inc., registered... -
Page 9: Playable Discs And Symbols Used In These Operating Instructions
Playable discs and symbols used in these Operating Instructions This unit can play various video/audio discs. The following chart helps you to check if a disc is supported by this unit, as well as what functions are available for a given disc type. Disc symbol in manual Disc format DVD VIDEO... -
Page 10: Location And Function Of Controls
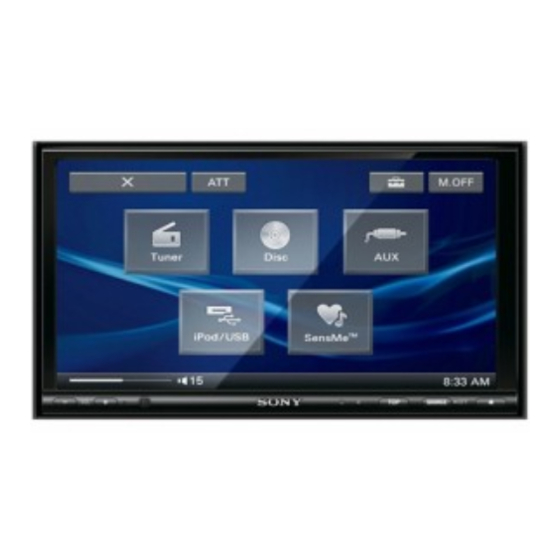
Location and function of controls Main unit SOURCE F TOP button For details, see the pages listed below. Press to open the source list. A Disc slot (located behind the front panel) G SOURCE/OFF button page 17 Press to turn on the power/change the source: “Tuner”... - Page 11 A “Source List” key Screen displays Touch to open the source list. When no source is selected: B “Top” key Touch to open the source list. C Clock page 42, 45 Source List (Close) key Touch to close the menu. E “ATT”...
-
Page 12: Rm-X170 Remote Commander
RM-X170 Remote Commander E EQ (Equalizer) button • The remote commander can be used to operate the audio controls. For menu operations, use Press to select an equalizer curve from 7 the touch panel. music types (“Xplod”/“Vocal”/“Edge”/ • For details, see the pages listed below. “Cruise”/“Space”/“Gravity”/“Custom”/ •... -
Page 13: Mode Button
J .m/M> buttons *1 When playing with PBC functions. *2 Operation differs depending on the disc (page 18). Radio: *3 When two auxiliary devices are used. Press to tune to stations automatically. Press and hold to find a station manually. Note The remote commander will not operate when the unit Disc*... -
Page 14: Getting Started
• For details on setting the character encoding, Getting Started see page 38. • For details on setting the display language, see Resetting the unit page 38. Note Before operating the unit for the first time, or For East Asia models, some characters may not be after replacing the car battery or changing the displayed correctly, depending on the language/ connections, you must reset the unit. -
Page 15: Radio
Reception controls Radio Touch the display if the reception controls are not Listening to the radio displayed. Touch “Source List,” then “Tuner.” The radio reception display appears, and the Source List preset list is displayed automatically. Source List Receive Preset Band Memory Menu... -
Page 16: Reception Indications
Reception indications Receiving stored stations Select the band, then touch “Preset List.” Touch the desired number (“P1” to Source List “P6”). Receive Preset Overview Band Menu List List FM stations with Radio Data System (RDS) service send inaudible digital information along with the regular radio program signal. -
Page 17: Selecting Pty
Selecting PTY Discs During FM reception, touch “PTY List.” Playing discs The PTY list appears if the station is transmitting PTY data. Depending on the disc, some operations may be To scroll the list, touch v/V. different or restricted. Touch the desired program type. Refer to the operating instructions supplied with The unit searches for a station broadcasting your disc. -
Page 18: Playback Controls
Playback controls Touch the display if the playback controls are not displayed. Source List Common to all discs/formats Source List Play Menu List SHUF Album Play Menu Control SHUF “Source List” Touch to open the source list. (page 11) “ATT” Touch to attenuate the sound. -
Page 19: Playback Indications
“DVD Control” Playback indications Touch to open the DVD control menu, Touch the display if the indications are not which contains the following items. displayed. • “Audio”: Touch repeatedly to select For audio discs, some indications are always the audio language/format. (page 20)* displayed during playback. -
Page 20: Using Pbc (Playback Control) Functions
Configuring audio settings Using PBC (playback control) functions Note Discs in DTS format are not supported. The sound is not output if the DTS format is selected. The PBC menu interactively assists with Changing the audio language/ operations while a PBC-compatible VCD is played. -
Page 21: Changing The Audio Channel
Changing the audio channel Locking discs — Parental control MPEG-4 When playing a VCD/CD/MP3/WMA/AAC/ * Excluding DVD-R/DVD-R DL/DVD-RW in VR mode. Xvid/MPEG-4, you can listen to both the right and left channel, only the right channel, or only You can lock a disc, or set playback restrictions the left channel via both the right and left according to a predetermined level such as speakers. -
Page 22: Changing The Area And Its Movie Rating Level
Repeat and shuffle play Changing the area and its movie rating level The restriction levels can be set based on the area MPEG-4 and its movie ratings. During playback, touch “Play Menu,” While no source is selected, touch then the “Repeat” or “Shuffle” box “Source List,”... -
Page 23: Direct Search Play
The shuffle options and switching order of each Direct search play disc/format are indicated below. Disc/format Options “OFF”: Returns to normal play MPEG-4 mode. You can directly locate a desired point by “Title”: Plays chapters in the specifying the title number, chapter number, etc. current title in random order. -
Page 24: Usb Device Operations
• This unit cannot recognize USB devices via a USB Support site hub. • Be sure to use the USB cable supplied with the http://www.sony-asia.com/section/support device if a cable is needed when making a USB http://www.sony-asia.com/caraudio/ connection. Notes on playback •... -
Page 25: Enjoying Music According To Your Mood - Sensme
In order to group tracks by channel or mood, your mood — SensMe™ track sound patterns need to be analyzed by 12 TONE ANALYSIS, which is loaded with Sony’s unique “SensMe™ channels” and “Content Transfer.” “SensMe™ mood” features automatically group With the USB device connected to your... -
Page 26: Setup
Registering a USB device using Playing tracks in channels “SensMe™ Setup” — SensMe™ channels USB device registration is required to enable the “SensMe™ channels” automatically group tracks SensMe™ function on the unit. into channels by their tunes. You can select and play a channel that fits your mood, activity, etc. - Page 27 Channel list “SensMe™ channels” playback controls and indications x Recommended, Shuffle All “Morning” (5:00 AM – 9:59 AM) “Daytime” (10:00 AM – 3:59 PM) “Evening” (4:00 PM – 6:59 PM) “Night” (7:00 PM – 11:59 PM) Shuffle All “Midnight” (12:00 AM – 4:59 AM) Plays tracks recommended for each time of day.
-
Page 28: Playing Tracks In Mood Maps - Sensme™ Mood
“SensMe™ mood” playback controls Playing tracks in mood maps and indications — SensMe™ mood “SensMe™ mood” distributes tracks as dots on a two-axis mood map, based on the characteristics of the individual tracks. Fast Mood By touching the point on the map according to your mood, a circle appears around the touched Type point, and the tracks inside the circle are played. -
Page 29: Ipod Operations
About resuming mode Support site When the iPod currently playing is connected to the dock connector, the mode of this unit changes http://www.sony-asia.com/section/support to resuming mode and playback starts in the http://www.sony-asia.com/caraudio/ mode set by the iPod. In resuming mode, repeat/shuffle play are not In these Operating Instructions, “iPod”... -
Page 30: Repeat And Shuffle Play
Repeat and shuffle play Operating an iPod directly — Passenger control During playback, touch “Play Menu,” then the “Repeat” or “Shuffle” box You can directly operate an iPod connected to repeatedly until the desired option this unit. appears. Repeat or shuffle play starts. During playback, touch “Play Menu,”... -
Page 31: Useful Functions
Touch the desired file. Useful Functions Playback of the selected file starts. Listing up tracks/images/video Searching for a track by files — List listening to track passages — ZAPPIN™ Selecting a track/image/video file MPEG-4 While playing short track passages from a disc or You can list up albums/folders/tracks/images/ USB device in sequence, you can search for a video files, and select a desired one to play. -
Page 32: Using Gesture Command
Using Gesture Command Sound Adjustment You can perform frequently-used operations by Selecting the sound quality drawing the following command stroke on the — EQ7 reception/playback display. Do this You can select an equalizer curve from 7 music types (“Xplod,” “Vocal,” “Edge,” “Cruise,” Radio reception: “Space,”... -
Page 33: Adjusting The Sound Characteristics
Optimizing sound for the Other equalizer types are also adjustable. listening position — Intelligent Time Alignment Adjusting the sound characteristics The unit can change the localization of sound by delaying the sound output from each speaker to The sound balance between left and right suit your position, and simulate a natural sound speakers (“Balance”) and front and rear speakers field with the feeling of being in the center of it... -
Page 34: Calibrating The Listening Position - Intelligent Time Alignment Tune
Calibrating the listening position Speaker configuration and — Intelligent Time Alignment Tune volume setup You can precisely calibrate your listening position from each speaker so that the sound Creating a virtual center speaker delay reaches the listener more correctly. — CSO Before starting, measure the distance between your listening position and each speaker. -
Page 35: Adjusting The Speaker Volume
Adjusting the speaker volume Monitor Adjustment You can adjust the volume level of each Adjusting the monitor angle connected speaker. The adjustable speakers are “Front R” (Front You can adjust the monitor angle for best Right), “Front L” (Front Left), “Surround L” viewing. -
Page 36: Setting The Background Screen
Note Setting the background screen This setting is available only when the parking brake is set. You can select the screen theme, visualizer and picture brightness for the background screen Customizing the picture according to your preference. The options “Custom 1” and “Custom 2” of Touch “Source List,”... -
Page 37: Selecting The Aspect Ratio
Selecting the aspect ratio Settings The setting menu includes the following You can change the screen aspect ratio. categories. The options are indicated below. • “General”: General settings (page 38) “Normal”: Picture with 4:3 • “Sound”: Sound settings (page 40) aspect ratio (regular picture). -
Page 38: General Settings
General settings c “General” c the desired item c the desired option. For details on this procedure, see Touch “Basic setting operation” on page 37. For details, see the pages listed below. “z” indicates the default setting. Item Option Purpose Unit status Security Control (page 45) –... - Page 39 Item Option Purpose Unit status Key Illumination ON (z) To turn on the button illumination. Any status To turn off the button illumination. Rotary Commander Default (z) To use in the factory-set Changes the operative position. Any status direction of rotary commander Reverse To use on the right side of controls.
-
Page 40: Sound Settings
Sound settings c “Sound” c the desired item c the desired option. For details on this procedure, see “Basic Touch setting operation” on page 37. For details, see the pages listed below. “z” indicates the default setting. Item Option Purpose Unit status EQ7 (page 32) OFF (z) - Page 41 Item Option Purpose Unit status Subwoofer ON (z) To set the connection status Sets the subwoofer connection to on. No source status. selected To set the connection status to off. RBE (Rear Bass Enhancer) OFF (z), To select the mode. RBE1, RBE2, (page 34) During reception/...
-
Page 42: Screen Settings
Screen settings c “Screen” c the desired item c the desired option. For details on this procedure, see “Basic Touch setting operation” on page 37. For details, see the pages listed below. “z” indicates the default setting. Item Option Purpose Unit status Screen Select (page 36) –... -
Page 43: Dvd And Other Playback Settings
DVD and other playback settings c “Visual” c the desired item c the desired option. For details on this procedure, see “Basic Touch setting operation” on page 37. For details, see the pages listed below. “z” indicates the default setting. Item Option Purpose... - Page 44 Item Option Purpose Unit status Monitor Type 16:9 (z) To display a wide picture. Selects an aspect ratio suitable Suitable when connecting for the connected monitor. to a wide-screen monitor or (The screen aspect ratio of this a monitor with a wide unit also changes.) mode function.
-
Page 45: Setting The Security Code
Setting the security code Setting the clock This unit has a security function to discourage The clock uses a 12-hour indication. theft. Enter a 4-digit number as your security Touch “Source List,” then code. The general setting menu appears. If not, Once the security function is activated, you need touch “General.”... -
Page 46: Using Optional Equipment
Setting the type of device Using Optional Equipment By setting the type (video or audio) of each connected device, the background screen can be Auxiliary audio/video switched accordingly. equipment While no source is selected, touch “Source List,” then The general setting menu appears. If not, You can connect up to 2 optional devices, such as touch “General.”... -
Page 47: Rear View Camera Settings
Rear view camera settings Additional Information You can display setting items on the picture from Precautions the rear view camera to assist operation. This setting is available only when: • Cool off the unit beforehand if your car has been –... -
Page 48: Notes On Discs
Notes on finalizing discs Notes on discs The following discs are required to be finalized to play on this unit. • Do not expose discs to direct sunlight or heat • DVD-R/DVD-R DL (in video mode/VR mode) sources such as hot air ducts, nor leave it in a car •... -
Page 49: About Mp3 Files
About MP3 files About MPEG-4 files • MP3, which stands for MPEG-1 Audio Layer-3, is MPEG-4 files meeting the following a music file compression format standard. It requirements can be played. Playback is not be compresses audio CD data to approximately 1/10 guaranteed for all MPEG-4 files meeting the of its original size. -
Page 50: Maintenance
If the fuse blows, check the power connection and replace the fuse. If the fuse blows again after replacement, there may be an internal malfunction. In such a case, Fuse (10A) consult your nearest Sony dealer. -
Page 51: Specifications
Power requirements: 12 V DC car battery Specifications (negative ground (earth)) Dimensions: Approx. 178 × 100 × 189 mm × 4 × 7 in) (w/h/d) Monitor section Mounting dimensions: Approx. 182 × 111 × 164 mm Display type: Wide LCD color monitor ×... -
Page 52: Troubleshooting
For details on compatible editions or Service Packs, The following checklist will help you remedy visit the following support site: problems you may encounter with your unit. http://www.sony-asia.com/section/support Before going through the checklist below, check the http://www.sony-asia.com/caraudio/ connection and operating procedures. - Page 53 Operation of the remote commander is not Picture possible. There is no picture/picture noise occurs. If the Monitor Off function is activated (no lighting), • A connection has not been made correctly. operation of the remote commander is not possible •...
- Page 54 Sound is noisy. USB playback Keep cords and cables away from each other. Items cannot be played via a USB hub. This unit cannot recognize USB devices via a USB hub. Disc operation Items cannot be played. The disc cannot be loaded. Reconnect the USB device.
-
Page 55: Error Displays/Messages
USB device. Offset There may be an internal malfunction. t Check the connection. If the error indication remains on the display, consult your nearest Sony dealer. Output connection failure. The connection of speakers/amplifiers is incorrect. -
Page 56: Language Code/Area Code List
Language code/area code list Language code list The language spellings conform to the ISO 639: 1988 (E/F) standard. Code Language Code Language Code Language Code Language 1027 Afar 1183 Irish 1347 Maori 1507 Samoan 1028 Abkhazian 1186 Scots Gaelic 1349 Macedonian 1508 Shona... -
Page 57: Index
Index AAC 9, 49 Demonstration (Demo) 42 Image rotate (Image Turn) 18 Angle (Angle) 19 Dimmer level Initial settings Area code 56 (Dimmer Level) 38 (Initial Setting) 14 Audio channel (Stereo) 21 Dimmer setting (Dimmer) 38 Intelligent Time Alignment Audio DRC (Audio DRC) 43 Discs 9 33, 34 Audio format (Audio) 20... - Page 58 PAL 38 Screen aspect ratio Parental control settings (Aspect) 37, 42 (DVD Parental Control) 21, 43 Screen settings (Screen) 42 Passenger control Security function (Passenger Control) 30 (Security Control) 45 Picture EQ 36, 42 SensMe™ 25 Play menu (Play Menu) 18 Shuffle play Playable discs 9 (Shuffle) 22, 24, 30...
- Page 60 Sony Corporation Printed in Thailand...