
Related Manuals for Husqvarna TS 60


Summary of Contents for Husqvarna TS 60
- Page 1 Operator’s manual Manuel d’utilisation TS 60 Manual de instrucciones US FR ES...
-
Page 2: Key To Symbols
KEY TO SYMBOLS Symbols on the machine Other symbols/decals on the machine refer to special certification requirements for certain markets. WARNING! The machine can be a WARNING dangerous tool if used incorrectly or carelessly, which can cause serious or ”WARNING For Your Own Safety Read Instruction Manual Before Operating Saw a) Wear eye protection. -
Page 3: Table Of Contents
CONTENTS Contents KEY TO SYMBOLS Symbols on the machine ..........Explanation of warning levels ........CONTENTS Contents ..............PRESENTATION Dear customer! ............Features ............... PRESENTATION What is what on the machine? ........MACHINE´S SAFETY EQUIPMENT General ................ BLADES General ................ Transport and storage .......... -
Page 4: Presentation
More than 300 years of innovation The stand is foldable and height adjustable. Husqvarna AB is a Swedish company based on a tradition Jet stream containment system with slurry that dates back to 1689, when the Swedish King Charles XI... -
Page 5: Presentation
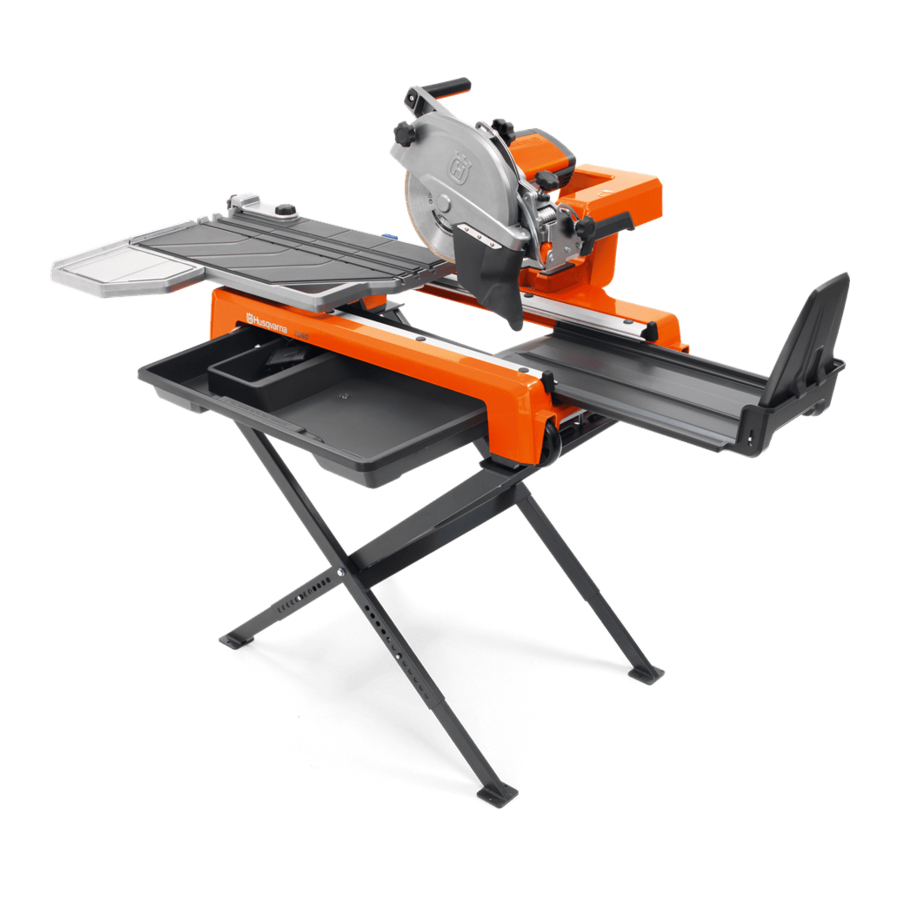
PRESENTATION What is what on the machine? 1 Locking nut, depth stop adjustment 17 Adjustable ruler 2 Knob, depth stop adjustment 18 Locking knob, blade guard 3 Locking knob, depth adjustment 19 Blade Guard 4 Handle, cutting arm 20 Product and type plate 5 Button, locking blade shaft 21 Locking knob, miter cutting 6 Side table... -
Page 6: Machine´s Safety Equipment
MACHINE´S SAFETY EQUIPMENT General • Flip the power switch down to stop the machine. Check that the motor and the blade stop. Make sure that the cutting blade can rotate freely until it is completely stopped. WARNING! Never use a machine that has faulty safety equipment! A defective power switch should be replaced by an authorized service workshop. -
Page 7: Blades
BLADES General • Diamond blades can become dull when the wrong feeding pressure is used or when cutting certain materials such as heavily reinforced concrete. Working with a blunt diamond blade causes overheating, which can result in the WARNING! Blades can break and cause diamond segments coming loose. -
Page 8: Assembling And Adjustments
ASSEMBLING AND ADJUSTMENTS General • Pull out the locking knob on the conveyor cart. • Mount the frame legs together using the bolts. The legs can be folded together for easier transport. • Adjust the working height by releasing the spring loaded •... - Page 9 ASSEMBLING AND ADJUSTMENTS • Screw the cutting guide onto the conveyor cart. The guide • Place the water pump in the water tray. The pump can be folded outwards for angled cuts. Use the angle compartment should face towards the working position. markings on the cutting guide to set the correct angle.
-
Page 10: Depth Stop Adjustment
ASSEMBLING AND ADJUSTMENTS • Connect the power cable for the water pump to the plug • Check the position of the blade by moving the conveyor on the machine. cart to its forward and rear end position. The blade should never hit the cart. -
Page 11: Fit The Blade
ASSEMBLING AND ADJUSTMENTS • Loose all adjustable brackets. • When mounting the blade pull out the spray nozzle and move it from or towards the centre axle depending on the size of the blade(10” or 8” blades). • When mounting the blade pull out the spray nozzle and move it from or towards the centre axle depending on the size of the blade(10”... -
Page 12: Operating
OPERATING Protective equipment General safety precautions This section describes basic safety directions for using the General machine. This information is never a substitute for professional skills and experience. Do not use the machine unless you are able to call for help in the event of an accident. -
Page 13: Electrical Safety
OPERATING Dust warning • Always shut down the machine before disconnecting the power plug. • Never drag the machine by means of the cord and never WARNING! Cutting, especially when DRY pull out the plug by pulling the cord. Hold the plug to cutting, generates dust that comes from the disconnect the power cord. -
Page 14: Work Safety
OPERATING • Keep cable away from heat, oil, charp edges or moving • Check that the machine is assembled correctly and do not parts. Damaged or entangled cable increase the risk of show any signs of damage. electric shock. • Always perform daily maintenance before starting the •... - Page 15 OPERATING • Store the equipment in a lockable area so that it is out of reach of children and unauthorized persons. • For transport and storage of Blades, see the section "Blades". • Lift the machine at the short ends.
-
Page 16: Starting And Stopping
STARTING AND STOPPING Before starting WARNING! Please read the operator’s manual carefully and make sure you understand the instructions before using the machine. Wear personal protective equipment. See instructions under the heading ”Personal protective equipment”. Make sure no unauthorised persons are in the working area, otherwise there is a risk of serious personal injury. -
Page 17: Maintenance
MAINTENANCE General • Lift the brush retainer spring to one side (1). • Pull out the coal brush from the holder (3). • Fit the new carbon brush. Make sure to fit the carbon WARNING! The user must only carry out the brush the right way and that is slides easily into the brush maintenance and service work described in holder. -
Page 18: Technical Data
TECHNICAL DATA Technical data Power, kW (hp) 1,7 (2.3) Voltage, V Phases 50-60 Frequency, Hz Speed, rpm 3000 Water pump, V Water pump frequency, Hz 0.48 Water pump, A Water pump Hmax (m) Water pump Qmax (l/h) 1350 Blade size - max, mm (inches) 254 (10) 78 (3) Saw depth - max, mm (inch) -
Page 19: Us Warranty Statement
EQUIPMENT Equipment manufactured by Husqvarna is warranted to be free from manufacturing defects in normal service for a period of two (2) years from date of purchase by the original consumer purchaser. Component manufacturers offer separate warranty periods. -
Page 20: Wiring Diagram
WIRING DIAGRAM START BROWN BLUE GREEN/YELLOW Motor... -
Page 21: Explication Des Symboles
EXPLICATION DES SYMBOLES Symboles sur la machine Les autres symboles/autocollants présents sur la machine concernent des exigences de certification spécifiques à certains marchés. AVERTISSEMENT! La machine utilisée de manière imprudente ou inadéquate WARNING peut devenir un outil dangereux, pouvant causer des blessures graves voire ”WARNING For Your Own Safety Read Instruction Manual Before Operating Saw a) Wear eye protection.