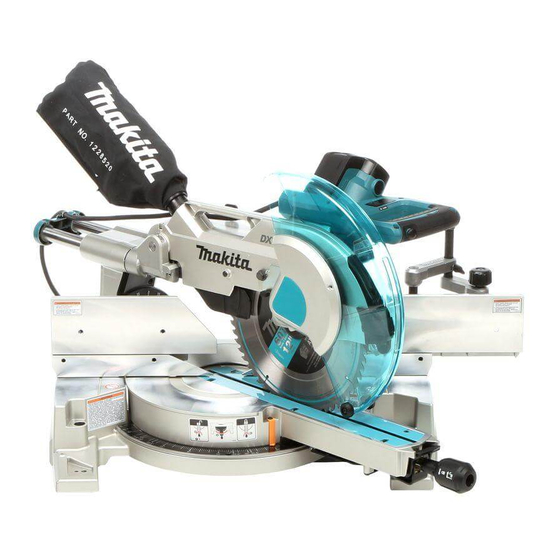
Makita LS1216 Instruction Manual
Slide compound miter saw
Hide thumbs
Also See for LS1216:
- Instruction manual (172 pages) ,
- Technical information (35 pages) ,
- Instruction manual (168 pages)

Related Manuals for Makita LS1216


Summary of Contents for Makita LS1216
- Page 1 INSTRUCTION MANUAL Slide Compound Miter Saw LS1216 LS1216L 010049 DOUBLE INSULATION IMPORTANT: Read Before Using.
-
Page 2: Specifications
ENGLISH (Original instructions) SPECIFICATIONS Model LS1216/ LS1216L Blade diameter 305 mm Hole diameter European countries: 30 mm, other than European countries: 25.4 mm Max. Miter angle Left 52° , Right 60° Max. Bevel angle Left and Right 45° Max. Cutting capacities (H x W) - Page 3 Net weight For all countries other than European countries LS1216…26.3 kg LS1216L …26.4 kg For European countries LS1216…26.5 kg LS1216L…26.6 kg Safety class • Due to our continuing programme of research and development, the specifications herein are subject to change without notice.
- Page 4 Do not force the tool. Makita Corporation responsible It will do the job better and safer at the rate for manufacturer declare that the following Makita which it was intended. machine(s): Use the right tool. Designation of Machine: Slide Compound Miter Saw Do not force small tools or attachments to do the job of a heavy duty tool.
-
Page 5: Additional Safety Rules
18. Use outdoor extension leads. Unplug tool before changing blade When tool is used outdoors, use only extension servicing. cords intended for outdoor use. Always secure all moving portions before 19. Stay alert. carrying the tool. Watch what you are doing. Use common sense. Stopper pin which locks the cutter head down Do not operate tool when you are tired. -
Page 6: Functional Description
27. Do not use the saw to cut other than wood, INSTALLATION aluminum or similar materials. 28. Connect miter saws to a dust collecting device Bench mounting when sawing. 29. Select saw blades in relation to the material to 1. Stopper pin be cut. - Page 7 If guard becomes damaged through age or UV light raised. exposure, contact a Makita service center for a new guard. DO NOT DEFEAT OR REMOVE GUARD. WARNING: Positioning kerf board Never defeat or remove the blade guard or the •...
- Page 8 1. Lock lever 2. Locking screw 009496 First, unplug the tool. Loosen all the screws (3 each on left and right) securing the kerf boards. Re-tighten them only to the extent that the kerf boards can still be easily 1. Adjusting bolt 2.
-
Page 9: Adjusting The Miter Angle
handle is lowered completely. If a blade makes 1. Latch lever contact with the base it may cause kickback and result in serious personal injury. Stopper arm 1. Stopper arm 2. Adjusting screw 010322 To adjust the bevel angle, loosen the lever at the rear of the tool counterclockwise. - Page 10 Before plugging in the tool, always check to • personal injury. Return tool to a Makita service see that the switch trigger actuates properly center for proper repairs BEFORE further usage. and returns to the "OFF" position when NEVER defeat the lock-off button by taping down •...
- Page 11 Aligning the laser line Laser beam action For models LS1216L only 1. Switch for laser 009494 Laser line can be shifted to either the left or right side of 009492 the blade according to the applications of cutting. Refer CAUTION: to explanation titled "Laser beam action"...
- Page 12 Accidental start up of the tool may result in serious personal injury. Use only the Makita socket wrench provided to • install or remove the blade.Failure to use the wrench may result in overtightening or insufficient tightening of the hex bolt and serious personal injury.
-
Page 13: Dust Bag
NOTE: Return the blade guard and center cover to its original If you connect a Makita vacuum cleaner to this tool, • position. Then tighten the hex bolt clockwise to secure cleaner operations can be performed. - Page 14 of a coasting blade may result in serious personal 1. Upper fence injury and damage to the workpiece. 2. Lower fence When cutting a workpiece that is longer than • 3. Red indicating the support base of the saw, the material area should be supported the entire length beyond the support base and at the same height to...
- Page 15 Position the vise arm according to the thickness and clockwise. Then turn the vise knob clockwise to secure shape of the workpiece and secure the vise arm by the workpiece. tightening the screw. If the screw to secure the vise arm The maximum width of workpiece which can be secured contacts the carriage, install the screw on the opposite by the horizontal vise is 215 mm.
- Page 16 mark (saw mark) in the workpiece and the Slide (push) cutting (cutting wide workpieces) precision of the cut will be impaired. During a slide cut, gently push the carriage toward • 1. Lock lever the guide fence without stopping. If the carriage 2.
- Page 17 kickback resulting in possible in serious personal NOTICE: injury. When pressing down the handle, apply pressure in • parallel with the blade. If a force is applied Miter cutting perpendicularly to the turn base or if the pressure Refer to the previously covered "Adjusting the direction is changed during a cut, the precision of miter angle".
- Page 18 with its CEILING CONTACT EDGE 1. Inside corner against the guide fence on the saw. 2. Outside corner The finished piece to be used will • always be on the LEFT side of the blade after the cut has been made. In the case of right bevel cut Table (A) Bevel angle...
- Page 19 Cutting aluminum extrusion 1. Crown molding stopper L 1. Guide fence (Optional 2. Vise accessory) 3. Spacer block 2. Crown molding 4. Aluminum stopper R extrusion (Optional 5. Spacer block accessory) 3. Turn base 009521 009523 1. Crown molding When securing aluminum extrusions, use spacer stopper L blocks or pieces of scrap as shown in the figure to 2.
- Page 20 results and kickback which may result in serious Example: personal injury When cutting workpieces 115 mm and 120 Be sure to return the stopper arm to the original • mm high, use a wood facing with the position when performing other than groove following thickness.
- Page 21 move resulting in possible loss of control, kickback and serious personal injury. 1. Upper fence 2. Vertical vise 3. Workpiece 4. Platform 010356 Place the workpiece to be cut on the platform secured to the tool. Secure the workpiece firmly against the upper fences with a vise before cutting.
-
Page 22: Adjusting The Cutting Angle
the carriage. Turn the grip counterclockwise which secures the turn base. Turn the turn base so that the pointer points to 0° on the miter scale. Then turn the turn base slightly clockwise and counterclockwise to seat the turn base in the 0° miter notch. (Leave as it is if the pointer does not point to 0°.) Loosen the hex sockets bolts securing the guide fence using the socket wrench. - Page 23 Push the carriage toward the guide fence and 45° bevel angle tighten the locking screw clockwise and pull 1. Pointer the lock lever towards the front of the saw to 2. Scale plate secure the carriage. Lower the handle fully 3.
- Page 24 NOTE: Check the position of laser line regularly for • accuracy . Have the tool repaired by a Makita authorized 1. Screw to change the movable range of the adjusting • service center for any failure on the laser unit.
-
Page 25: Replacing Carbon Brushes
Misuse of an accessory or attachment may result in serious personal injury. If you need any assistance for more details regarding these accessories, ask your local Makita Service Center. Steel & Carbide-tipped saw blades • 001145 Remove and check the carbon brushes regularly. - Page 28 Makita Corporation Anjo, Aichi, Japan 884908A220...