
Related Manuals for MasterCraft 055-6737-2


Summary of Contents for MasterCraft 055-6737-2
-
Page 1: User Manual
TABLE SAW WITH DUAL EXTENSION WINGS 055-6737-2 User Manual Toll-free helpline 1-800-689-9928... -
Page 2: Table Of Contents
Table of contents PAGE SECTION .................... I. Specifications II. General safety guidelines ..............................III. Electrical information IV. Know your table saw ..............................V. Assembly and adjustments VI. Operating instructions ..................................VII. Maintenance VIII. Troubleshooting guide 3 .................................. -
Page 3: General Safety Guidelines
II. General safety guidelines WARNING: Read all the safety guidelines and instructions before you use this electric power tool! WARNING! When using electrical power tools, the following essential safety measures have to be observed to prevent electric shocks, injury and fire hazards. Failure to adhere to the safety guidelines and instructions can cause electric shock, fire and/or severe injuries. - Page 4 II. General safety guidelines(continued) 13.Wear safety equipment. Wear safety goggles. If the work creates dust, wear a dust mask. 14.Attach the dust extraction unit. If there are connections for dust extraction and collection equipment, then make sure that the equipment is correctly attached and used. 15.Never use the cable for purposes which it is not intended for.
- Page 5 II. General safety guidelines(continued) 25.Warning! The use of other insertion tools and accessories can present a danger of injury to you. 26.Let a specialist electrician repair your electric power tool. This electric power tool corresponds to the applicable safety conditions. Repairs are only allowed to be carried out by a specialist electrician, using original replacement parts;...
- Page 6 II. General safety guidelines(continued) 38.Never reach into the openings of the device! Never insert objects into the openings of the device (e.g. the saw blade casing, dust extraction adaptor). Danger of cuts! 39.Never remove the cutting piece if the machine is still switched on or running! Danger of cutting yourself! 40.Cut workpieces may have sharp edges, ridges or wooden splinters! Danger of cutting injuries! 41.Always switch the machine off and remove the power plug when your leave the machine.
-
Page 7: Electrical Information
III. Electrical information GUIDELINES FOR USING EXTENSION CORDS WARNING: THIS TABLE SAW IS INTENDED FOR INDOOR USE ONLY. DO NOT EXPOSE IT TO RAIN OR USE IT IN DAMP LOCATIONS. Make sure the extension cord is in good condition. When using an extension cord, be sure to use one that is heavy enough to carry the current that your product will draw. -
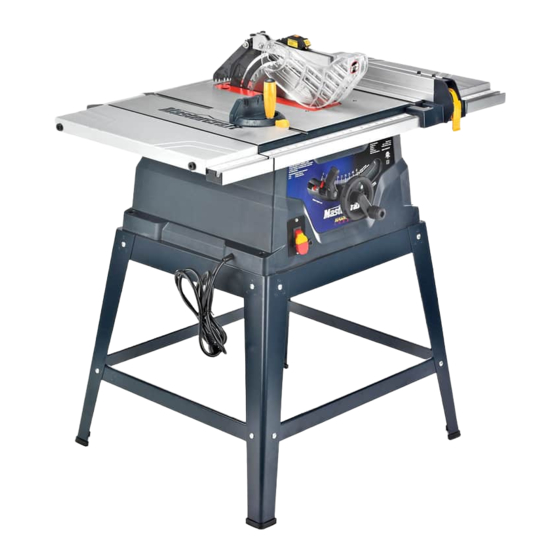
Page 8: Know Your Table Saw
IV. Know your table saw Blade guard Table insert Mitre gauge Rip fence Side table extension Bevel angle pointer and scale Blade elevation handwheel Blade bevel lock knob ON/OFF switch with Key Stand Overload reset switch Blade Table Splitter Kickback pawls Side table extension Mounting holes... -
Page 9: Assembly And Adjustments
V. Assembly and adjustments UNPACKING 1. Carefully remove the table saw from the carton. 2. Separate the parts. 3. Lay out all of the parts, and check them against the parts listed below. Examine all of the parts carefully. WARNING: •... -
Page 10: Assemble The Stand
V. Assembly and adjustments(continued) WARNING: DO NOT CONNECT THE PLUG TO THE OUTLET UNTIL ALL INSTALLATIONS AND ADJUSTMENTS HAVE BEEN COMPLETED AND YOU HAVE READ AND UNDERSTOOD THE SAFETY AND OPERATIONAL INSTRUCTIONS. ASSEMBLE THE STAND (FIG.1) 1. Unpack all of the parts, and group them by type and size (see Fig.1). Refer to the parts list for correct quantities. - Page 11 V. Assembly and adjustments(continued) ATTACH THE TABLE SAW TO THE STAND (FIG.1, 2) WARNING: DO NOT OPERATE THIS MACHINE ON THE FLOOR. THIS IS A VERY DANGEROUS POSITION. 1. Place cardboard or an old blanket on floor in order to protect the surface of the saw table. 2.
- Page 12 V. Assembly and adjustments(continued) WARNING: FAILURE TO PROVIDE A SAWDUST FALL-THROUGH AND REMOVAL HOLE WILL CAUSE SAWDUST TO BUILD UP IN THE MOTOR AREA, WHICH MAY RESULT IN A FIRE HAZARD OR CAUSE DAMAGE TO THE MOTOR. MOUNTING THE SAW TO ANOTHER SURFACE (FIG. 3,3-1) 1.
- Page 13 V. Assembly and adjustments(continued) WARNING: ALWAYS KEEP YOUR WORK AREA CLEAN, UNCLUTTERED, AND WELL LIT. DO NOT WORK ON FLOOR SURFACES THAT ARE SLIPPERY FROM SAWDUST OR WAX. KEEPING THE AREA CLEAN (FIG. 4) Fig. 4 Sawdust and wood chips that fall under the saw will accumulate on the floor.
-
Page 14: Install The Blade To Arbor
V. Assembly and adjustments(continued) WARNING: TO AVOID INJURY FROM AN ACCIDENTAL STARTUP, VERIFY THAT THE SWITCH IS IN THE “OFF” POSITION AND THE PLUG IS NOT CONNECTED TO THE OUTLET. IN ORDER TO AVOID SERIOUS INJURY, THE TABLE INSERT MUST BE LEVEL WITH THE TABLE. -
Page 15: Assemble The Blade Guard/Splitter
V. Assembly and adjustments(continued) WARNING: TO AVOID INJURY FROM AN ACCIDENTAL STARTUP, VERIFY THAT THE SWITCH IS IN THE “OFF” POSITION AND THE PLUG IS NOT CONNECTED TO THE OUTLET. ASSEMBLE THE BLADE GUARD Fig. 10 AND THE SPLITTER (FIG. 10, 11, 12) MAKE SURE THE SAW IS DISCONNECTED FROM THE POWER SOURCE WHEN INSTALLING THE BLADE GUARD AND... - Page 16 V. Assembly and adjustments(continued) INSTALL THE TABLE EXTENSIONS Fig. 13 (FIG. 13) 1. Loosen the screw (1) before installing table side extension. NOTE: Make sure the front mounting tube has the measuring scale visible from the front of the saw. 2.
- Page 17 V. Assembly and adjustments(continued) WARNING: To avoid injury from an accidental startup, verify that the switch is in the “off” position and the plug is not connected to the outlet. ADJUST THE TABLE EXTENSION Fig. 16 (FIG. 16) NOTE: The table extension can be installed on the right side of the table or on the left side of the table, as needed, in order to support a long workpiece.
- Page 18 V. Assembly and adjustments(continued) ADJUST THE RIP FENCE (FIG. 17) Fig. 17 1. The fence (1) is moved by lifting the handle (2) and sliding the fence to the desired location. Pushing down on the handle locks the fence in place. 2.
- Page 19 V. Assembly and adjustments(continued) ADJUSTING THE 90° AND 45° POSITIVE STOPS (FIG. 19, 20) This saw has positive stops that will quickly position the saw blade at 90° to the table. Make adjustments only if necessary. Fig. 19 90°Stop (FIG. 19) 1.
- Page 20 V. Assembly and adjustments(continued) BLADE TILT POINTER 1. When the blade is positioned at 90°, adjust the blade tilt pointer read 0° on the scale. 2. Loosen the holding screw, position the pointer over the 0°, and tighten the screw. NOTE: Make a trial cut on a scrap piece of wood before making critical cuts.
-
Page 21: Operating Instructions
VI. Operating instructions BASIC SAW OPERATIONS RAISE THE BLADE (FIG.21) In order to raise or lower the blade, turn the blade elevation handwheel (1) to the desired blade height, and then tighten the lock knob (2) in order to maintain the desired blade angle. TILTING THE BLADE (FIG. - Page 22 VI. Operating instructions(continued) USING THE TABLE EXTENSION Fig. 23 (FIG. 23) 1. Unlock the table extension knob (2) on the two extension tube brackets. 2. Slide the extension tubes in or out until the scale on the front tube is positioned at the desired distance.
- Page 23 VI. Operating instructions(continued) RIPPING (FIG. 24 & 25) WARNING To prevent serious injury: • Never use the mitre gauge when ripping. • Never use more than one rip fence during a single cut. • Do not allow familiarity or frequent use of your table saw to cause careless mistakes. Remember that even a fraction of a second of carelessness is enough to cause a severe injury.
-
Page 24: Bevel Ripping
VI. Operating instructions(continued) CAUTION! AVOID KICKBACK BY PUSHING ONLY ON THE SECTION OF WORKPIECE THAT WILL PASS BETWEEN THE BLADE AND THE FENCE. BEVEL RIPPING This operation is the same as ripping, except that the bevel angle is set to an angle other than 0°. - Page 25 VI. Operating instructions(continued) CROSSCUTTING (FIG. 26) CAUTION! To prevent serious injury: • Do not allow familiarity or frequent use of your table saw to cause careless mistakes. Remember that even a fraction of a second of carelessness is enough to cause a severe injury.
- Page 26 VI. Operating instructions(continued) BEVEL CROSSCUTTING (FIG. 27)0°~45° BLADE BEVEL & 90° MITRE ANGLE This cutting operating is the same as crosscutting, Fig. 27 except that the blade is at a bevel angle other than 0°. This operation must be performed with mitre gauge in the right side groove.
- Page 27 VI. Operating instructions(continued) MITERING (FIG. 29)0°~45° MITRE ANGLE This sawing operation is the same as crosscutting, except that the mitre gauge is locked at an angle other than 90°. 1. Set the blade (1) to the 0° bevel angle, and Fig.
-
Page 28: Dado Cutting
VI. Operating instructions(continued) DADO CUTTING (FIG. 31 FIG. 31-1) Fig. 31 1. Unplug the power cord before removing and/or installing dado blades. 2. When making dado cuts, a dado insert plate must be installed in place of the regular table insert. 3. -
Page 29: Maintenance
VII. Maintenance CAUTION! For your own safety, turn the switch OFF and remove the key. Remove the plug from the power source before maintaining or lubricating your saw. GENERAL MAINTENANCE Clean out all sawdust that has accumulated inside the saw base and around the motor. Polish the saw table with an automotive wax in order to keep it clean and to make it easier to slide the workpiece. -
Page 30: Troubleshooting Guide
VIII. Troubleshooting guide WARNING! To avoid injury from an accidental start-up, always turn switch OFF and unplug the table saw before moving, replacing the blade or making adjustments. SYMPTOM POSSIBLE CAUSES CORRECTIVE ACTION The saw will not start 1. The saw is not plugged in 1. -
Page 31: Warranty
IX. Warranty 3-Year Limited Warranty This Mastercraft product is guaranteed for a period of three(3)years from the date of original retail purchase against defects in workmanship and materials, except for the following components: a) Component A: Batteries, chargers and carrying case, which are guaranteed for a period of two (2) years from the date of original retail purchase against defects in workmanship and materials;... - Page 32 IX. Warranty(continued) Additional Limitations This warranty applies only to the original purchaser and may not be transferred. Neither the retailer nor the manufacturer shall be liable for any other expense, loss or damage, including, without limitation, any indirect, incidental, consequential or exemplary damages arising in connection with the sale, use or inability to use this product.
-
Page 33: Part List
Table Saw with Dual Extension Wings ® When servicing the Mastercraft table saw, use only Mastercraft replacement parts. The use of any other parts may cause damage to the product. Any and all servicing of the table saw should be performed by a qualified service technician. - Page 34 X. Part list(continued) Description Description Locking nut M5 Extension table scale base let Reinforce side board Label left Rack B Square screw M6×16 Bolt M5×8 Hex nut M6 Bolt M3×18 Bolt M5×16 Bolt ST2.9×10 Uncork ring 3.5 Bolt ST4.2×12 Locking nut M3 Rubber ring Adjustment pole Switch box cover...
- Page 35 X. Part list(continued) Description Description Gear Bolt M5×16 Ring for shaft 16 Gear cover Self-lubricating bearing Bearing 6003-2Z Blade wrench Ring for shaft or hole 35 Output shaft Hex key Half-round key 5×6.5×16...
- Page 36 18 52 96 96 97 98 195 194 118 119 46 12 86 46 12 86 46 12 Imported by Mastercraft Canada Toronto, Canada M4S 2B8...