Table of Contents
Advertisement
MESURES DE SÉCURITÉ IMPORTANTES
"Lorsque vous utilisez un appareil électrique, il faut toujours observer certaines mesures élémentaires de sécurité y compris les suivantes."
"Lisez toutes les instructions avant d'utiliser cette machine à coudre."
DANGER-
Pour réduire le risque de décharge électrique:
1. "Cette machine à coudre ne devrait jamais être laissé sans surveillance lorsqu'elle est branché. Débranchez toujours cette
machine à coudre de la prise externe de courant immédiatement après usage et avant le nettoyage.
MISE EN GARDE-
1. " Cet appareil ne doit pas être utilisé comme un jouet. Une stricte surveillance doit être exercée lorsque l'appareil est utilisé
par ou près des enfants."
2. " Cet appareil n'est pas destiné à être utilisé par des personnes (y compris des enfants) avec des handicaps physiques
réduisant les capacités sensoriel ou mental ou d'un manque d'expérience ou de connaissance, à moins qu'ils ne soient
sous la surveillance ou les directives, concernant l'utilisation de l'appareil, d'une personne responsable de leur sécurité. Les
enfants doivent être surveillés afin de s'assurer qu'ils ne jouent pas avec cet appareil."
3. " N'utilisez cet appareil qu'aux fins mentionnées dans ce manuel. N'utilisez que les accessoires recommandés par le
manufacturier tel qu'indiqué dans ce manuel."
4. " N'utilisez jamais cet appareil si le cordon ou la fiche sont endommagés, si l'appareil ne fonctionne pas correctement, s'il a
été échappé ou endommagé ou immergé. Retournez cette machine à coudre chez le concessionnaire autorisé ou centre de
réparations le plus-près pour être vérifié. réparé, ou faire les réglages électrique ou mécanique."
5. " Si le cordon d'alimentation est endommagé, il doit être remplacé par le fabricant, son agent de service ou toutes personnes
qualifiées, afin d'éviter une menace."
6. " N'utilisez jamais la machine à coudre lorsque les évents sont obstrués. Gardez les évents de la machine à coudre et du
rhéostat libre de mousse, poussière ou tissu."
7. " Ne jamais laissez tomber ou insérer des objets dans les ouvertures."
8. "Pour usage à l'intérieur seulement."
9. " Ne pas faire fonctionner si des produits en aérosol sont utilisés ou si de l'oxygène est administré."
10. " Pour débrancher, déplacer l'interrupteur à la position "Arrêt" (Off ou 0), ensuite débrancher la fiche de la prise de sortie
électrique."
11. " Éteignez ou débranchez l'appareil lorsque vous la laissez sans surveillance, débranchez l'appareil avant de la déplacer pour
effectuer l'entretien ou le remplacement des ampoules."
12. " Ne pas débrancher en tirant sur le cordon. Pour débrancher, tirer sur la fiche pas le cordon."
13. " Garder les doigts loin des pièces en mouvements. Une attention spéciale doit être prise autour de l'aiguille de la machine à
coudre."
14. " Ne cousez jamais si la plaque aiguille est endommagée cela pourrait faire briser l'aiguille."
15. " N'utilisez pas des aiguilles croche."
16. " Ne tirez ni ne poussez sur le tissu en cousant. Cela pourrait faire dévier l'aiguille et la briser."
17. " Mettre l'interrupteur à Arrêt (OFF ou 0) lorsque vous faites des ajustements près de l'aiguille, tel que l'enfilage ou le
remplacement de l'aiguille, l'enfilage de la canette, le changement du pied presseur, etc."
18. " Toujours débrancher la machine à coudre de la prise de sortie du courant électrique lorsque vous enlevez des couvercles,
pour lubrifier ou lorsque vous voulez faire les ajustements tel qu'indiqué dans le manuel d'instruction."
19. " Pour éviter un choc électrique ne jamais mettre la machine ou le câble d'alimentation ou la prise d'alimentation dans l'eau ou autres
liquides."
20. "La consommation maximum de l'ampoule DEL est de 0.3 watt, le voltage maximale est de 5volts DC, si l'ampoule DEL est
endommagée, vous ne devriez cesser d'utiliser le produit et l'envoyer au fabriquant ou a un agent de service pour être réparer
ou remplacer."
21. " Attention voir ce qui suit pour éviter des blessures:
- Débranchez le rhéostat (pédale) de l'appareil lorsque vous le laissez sans surveillance.
- Débranchez le rhéostat (pédale) de l'appareil avant d'en effectuer l'entretien."
"PRECAUTION-
CONSERVEZ CES INSTRUCTIONS
Cette machine à coudre est conçue pour usage domestique seulement.
RHÉOSTAT (États-Unis et Canada seulement)
Utilisez le modèle YC-485 EC ou JF-1000, pour cette machine à coudre.
INFORMATIONS CONCERNANT LES FICHES POLARISÉES (États-Unis et Canada seulement)
Cet appareil est équipé d'une fiche polarisée (une lame est plus large que l'autre). Pour réduire les risques de décharge
électrique, cette fiche est conçue pour être branchée dans une prise de courant polarisée d'une seule façon. Si la fiche ne peut
pas être insérée entièrement dans la prise, tournez la fiche. Si la fiche ne peut toujours pas entrer dans la prise, veuillez contacter
un électricien qualifié afin qu'il vous installe une prise murale appropriée. En aucun cas ne modifiez pas la fiche.
Cet appareil est conforme à la directive CEE 2004/108/EC concernant les normes de
compatibilités électromagnétiques.
Veuillez noter qu'en cas de destruction, ce produit doit bénéficier d'un recyclage sécurisé, conforme à la législation
nationale applicable aux produits électriques/électroniques. En cas de doute, veuillez contacter votre distributeur
agréé.
SINGER est une marque enregistrée de The Singer Company Limited ou de ses sociétés affiliées.
©2010 The Singer Company Limited ou ses sociétés affiliées. Tous droits réservés.
Pour réduire le risque de brûlures, de feu, de décharge électrique ou de
blessures personnelles:
Pièces en mouvement- Afin d'éviter tout risque de blessure placer l'interrupteur a Arrêt
(Off ou 0) avant de faire l'entretient. Fermer les couvercles avant de faire fonctionner la
machine."
1
Advertisement
Table of Contents

Related Manuals for Singer Futura XL-550


Summary of Contents for Singer Futura XL-550
- Page 1 électriques/électroniques. En cas de doute, veuillez contacter votre distributeur agréé. SINGER est une marque enregistrée de The Singer Company Limited ou de ses sociétés affiliées. ©2010 The Singer Company Limited ou ses sociétés affiliées. Tous droits réservés.
- Page 2 Si tiene alguna duda al respecto, por favor contacte con el distribuidor. SINGER es una marca registrada de The Singer Company Limited o sus filiales. ©2010 The Singer Company Limited o sus filiales. Reservados todos los derechos.
-
Page 3: Table Of Contents
TABLE OF CONTENTS 1. GETTING TO KNOW YOUR MACHINE 3. PREPARATION FOR EMBROIDERY SEWING Machine identification ---------------------------------------------- 6 - 7 Before attaching embroidery unit ---------------------------- 64 - 67 Accessories ----------------------------------------------------------- 8 - 9 Attaching embroidery foot, Inserting the bobbin, Set up your machine -------------------------------------------- 10 - 11 Threading the top thread, Extension table, Spool pins ---------------------------------------------------------- 10 - 11 Attaching embroidery unit -------------------------------------- 68 - 69... - Page 4 TABLE DES MATIERES 1. VOTRE MACHINE À COUDRE Couture décorative ---------------------------------------------- 60 - 61 Description de la machine ---------------------------------------- 6 - 7 Astuces pour la couture de dessin -------------------------- 60 - 61 Accessoires ----------------------------------------------------------- 8 - 9 Plus d’exemple de couture ------------------------------------ 62 - 63 Préparation de la machine ------------------------------------- 10 - 11 3.
- Page 5 CONTENIDO 1. PRINCIPALES PARTES DE LA MAQUINA 3. PREPARACION PARA BORDADO Identificación de la máquina ------------------------------------- 6 - 7 Antes de colocar la unidad de bordado -------------------- 64 - 67 Accesorios ------------------------------------------------------------ 8 - 9 Colocando el pie de bordado, Preparación de la máquina ------------------------------------ 10 - 11 Enhebrado del hilo de la canilla, Porta carretes ----------------------------------------------------- 10 - 11...
-
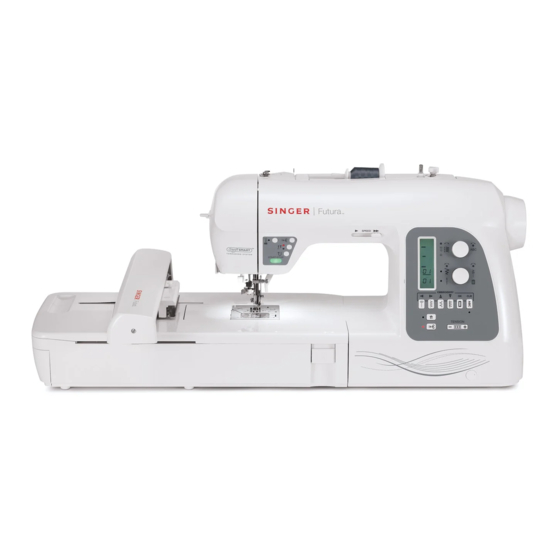
Page 6: Getting To Know Your Machine
1. GETTING TO KNOW YOUR MACHINE MACHINE IDENTIFICATION 1. Pre-tension guide 2. Bobbin winding tension disk 3. Threading lever 4. Face cover 5. Thread cutter/holder 6. Extension table (Accessory box) 7. Bobbin winder spindle 8. Bobbin winder latch 9. Operation buttons 10. -
Page 7: Votre Machine À Coudre
1. VOTRE MACHINE À COUDRE 1. PRINCIPALES PARTES DE LA MAQUINA DESCRIPTION DE LA MACHINE IDENTIFICACION DE LA MAQUINA 1. Guide pré-tension 1. Guía hilo 2. Guide-fil 2. Guía hilo 3. Levier d’enfileur 3. Palanca de ensartado 4. Plaque frontale 4. -
Page 8: Accessories
ACCESSORIES FOR SEWING MACHINE 1. Needles 2. Bobbins 3. Auxiliary spool pin 4. Spool pin felt discs 5. Spool pin cap (mini) 6. Spool pin cap (small) 7. Spool pin cap (large) 8. Buttonhole opener/Brush 9. Screwdriver for needle plate 10. -
Page 9: Accessoires
ACCESSOIRES ACCESORIOS POUR LA MACHINE À COURE PARA MAQUINA DE COSER 1. Aiguilles 1. Agujas 2. Canettes 2. Canillas 3. Porte-bobine auxiliaire vertical 3. Pasador de carrete auxiliar 4. Rondelle feutre 4. Disco del pasador carrete 5. Chapeau pour petite bobine 5. -
Page 10: Set Up Your Machine
SET UP YOUR MACHINE Set power/light switch at “OFF” Be sure to wipe off any surplus oil from needle plate area Mettez l’interrupteur moteur/ before using your machine the first time. lumière sur “OFF”. Machine socket POWER LINE CORD/FOOT CONTROL Poner el Interruptor de corriente/ Connecteur de la luz de velocidad en “OFF”... -
Page 11: Préparation De La Machine
PRÉPARATION DE LA MACHINE PREPARACION DE LA MAQUINA Avant d’utiliser votre machine pour la première fois, bien Asegurarse de limpiar cualquier aceite sobrante del área de la essuyer tout excédent d’huile sur la plaque de recouvrement plancha de aguja, antes de usar, por primera vez, la máquina. et ses abords. -
Page 12: Winding Bobbin
WINDING BOBBIN Be sure to use Class 15 J bobbins. 1. Place a spool of thread on the spool pin, and secure it with the spool pin cap. Pull the thread out from the spool and place it through thread guides as shown in illustration. 2. -
Page 13: Préparation De La Canette
PRÉPARATION DE LA CANETTE DEVANADO DE LA CANILLA Assurez-vous d’utiliser uniquement des Este seguro de usar clase 15 J bobinas. canettes de Type 15J. 1. Placez une bobine de fil en place sur un porte-bobine et 1. Coloque el carrete de hilo en el pasador de carrete y fixez-la bien à... -
Page 14: Threading The Bobbin Thread
THREADING THE BOBBIN THREAD 1. Raise the needle to its highest position by rotating the hand wheel counter clockwise (toward you). 2. Remove the bobbin cover plate by pushing the release button to the right. Bobbin cover will pop up sufficiently to allow you to remove the cover. -
Page 15: Enfilage Du Fil De Canette
ENFILAGE DU FIL DE CANETTE ENHEBRADO DEL HILO DE LA CANILLA 1. R e l e v e z l ’ a i g u i l l e e n p o s i t i o n h a u t e e n t o u r n a n t 1. -
Page 16: Threading The Top Thread
THREADING THE TOP THREAD A. Raise the presser foot lifter. Always be sure to raise the presser foot lifter before threading the top thread. (If the presser foot lifter is not raised, correct thread tension cannot be obtained.) B. Turn the hand wheel counter clockwise (toward you) until the needle is in its highest position. -
Page 17: Enfilage Du Fil Supérieur
ENFILAGE DU FIL SUPÉRIEUR ENHEBRADO DEL HILO SUPERIOR A. Soulevez le pied presseur. Veillez à toujours soulevez le A. Levante el prensatelas. Siempre asegúrese de levantar releveur de pied presseur avant d’enfiler le fil supérieur. (Si el prensatelas antes de bobinar el hilo superior. (Si no le releveur de pied presseur n’est pas soulevez, vous ne se levanta el prensatelas, no se podrá... -
Page 18: Using Automatic Needle Threader
USING AUTOMATIC NEEDLE THREADER UTILISATION DE L’ENFILE-AIGUILLE AUTOMATIQUE Be sure to raise the presser foot lifter and raise the needle to its highest position before threading. Veillez à relever le pied presseur et à lever l’aiguille dans sa position la plus haute avant d'enfiler le fil. -
Page 19: Uso Del Ensatador Automatico
USO DEL ENSATADOR AUTOMATICO HELPFUL SUGGESTIONS: Put a drop of sewing machine oil onto the felt Asegurarse de levantar la palanca del prensatelas y la disc, if the machine is used after a long interval. aguja a la posición más elevada antes del ensartado. SUGGESTION UTILE : ... -
Page 20: Needle, Thread And Fabric Chart
16/100 purple band * For best sewing results, always use a Singer Branded Needle. TABLEAU DES AIGUILLES, FIILS ET TISSUS TABLA DE HILO, AGUJA Y MATERIAL Le choix d’une aiguille et du fil correspondant à votre tissu Su material determinará el selecctión de aguja y hilo. Esta tabla es guía práctica para al selección de aguja y hilo. -
Page 21: Changing The Needle
Always disconnect the machine from power supply by removing the plug from the wall-outlet. Changing the needle 1. Raise the needle bar to its highest position by turning the Flat side hand wheel counter clockwise (toward you). Côté plat Lado plano Needle 2. -
Page 22: Adjusting Top Thread Tension
ADJUSTING TOP THREAD TENSION Under side Côté de dessous Helpful Hint: A slight adjustment to a higher number or a Reverso lower number may improve sewing appearance. Well balanced Correct Bien equilibrada STRAIGHT STITCHING Top side The correct appearance of your stitching is largely determined Côté... -
Page 23: Réglage De La Tension Du Fil Supérieur
RÉGLAGE DE LA TENSION DU FIL AJUSTE DE LA TENSION DEL HILO SUPÉRIEUR SUPERIOR Suggestion utile: Un léger ajustement sur le côté + ou Consejo útil: Un pequeño ajuste para el lado + o – de – de AUTO améliorera l’apparence de la couture. AUTO mejorará... -
Page 24: Control Panel Function
CONTROL PANEL FUNCTIONS 1. LCD DISPLAY When turning on the machine without the embroidery unit attached, straight stitch number 00, is selected. The information on the display changes for regular sewing, programming and embroidering. For regular sewing, the LCD display shows the number of the selected stitch, an image of the stitch, and stitch width and stitch length settings. -
Page 25: Fonctions Du Panneau De Commande
FONCTIONS DU PANNEAU DE COMMANDE FUNCIONES DEL PANEL DE CONTROL 1. AFFICHEUR ACL 1. DISPLAY LCD En allumant la machine sans que l'unité de broderie soit Al encender la máquina sin la unidad de bordado instalada attachée, le numéro 00, couture au point droit, est sélectionné. aparece la Puntada Recta No. - Page 26 4. STITCH SELECTION DIAL There are two main categories of stitches: • utility and decorative stitches that are sewn continuously (buttonholes are also included here) • stitches that are sewn in single repetitions and can be programmed into longer sequences. Turn the dial to browse the available stitches one by one.
- Page 27 4. CADRAN DE SÉLECTION DE POINT 4. SELECTOR SELECCIÓN DE PUNTADA Il y a deux catégories principales de points : Hay dos principales categorías de puntadas: • les points utilitaires et décoratifs qui sont cousus de façon • Las puntadas utilitarias y decorativas que continuamente se continue (les boutonnières sont aussi incluses ici) usan (aquí...
- Page 28 6. TWIN NEEDLE SAFETY When using twin needles, press the twin needle safety button regardless of the stitch you selected. Doing so will reduce the stitch width automatically and save broken needles and possible damage to your machine. When the button is pressed, the LED indicator next to the button is lit, indicating that Twin Needle Safety is activated.
- Page 29 6. UTILISATION SÉCURITAIRE DE L'AIGUILLE 6. SEGURO DE AGUJA DOBLE DOUBLE Al usar Aguja Doble, presione el botón de seguridad de la Lorsque vous utilisez l'aiguille double, appuyez sur le aguja sin tener en cuenta la puntada seleccionada. De esa bouton de prise en charge sécuritaire de l'aiguille double manera se reducirá...
-
Page 30: Functions Of Operation Switch Panel
FUNCTIONS OF OPERATION SWITCH PANEL 1. TACKING STITCH MODE BUTTON Press Tacking Stitch and the sewing machine makes 4 tiny fixing stitches to tie off the sewing on all patterns. Press START/STOP to sew. Press Tacking Stitch button when the machine is stopped so tacking stitch will be activated, the position of the tacking stitches will be at the exact spot in the pattern where the Tacking Stitch button is pushed. -
Page 31: Fonctions Des Touches Du Panneau De Commande
FONCTIONS DES TOUCHES DU FUNCIONES DEL PANEL DE PANNEAU DE COMMANDE OPERACIÓN 1. BOUTON DU MODE DE POINT D’ARRÊT 1. BOTON DE MODO DE PUNTADA DE REFUERZO Appuyez sur le Point de bâti et la machine à coudre exécute Presione la Puntada Hilvanado y la máquina hará 4 puntadas 4 petits points de bâti pour barrer la couture sur tous les pequeñas reparadoras para unir La costura en todos los motifs. -
Page 32: Starting To Sew
2. STARTING TO SEW 2. COMMENCEZ À COUDRE 2. EMPEZER A COSER QUICK REFERENCE TABLE TABLEAU DE RÉFÉRENCE CUADRO DE REFERENCIA OF STITCH LENGTH AND RAPIDE DES LONGUEURS R A P I D A D E L A R G O Y WIDTH ET LARGEURS DE POINTS ANCHO DE PUNTADA... - Page 33 LENGTH WIDTH LENGTH WIDTH STITCH STITCH LONGUEUR (mm) LARGEUR (mm) LONGUEUR (mm) LARGEUR (mm) LARGO ANCHO LARGO ANCHO POINT POINT AUTO MANUAL AUTO MANUAL AUTO MANUAL AUTO MANUAL AUTO MANUEL AUTO MANUEL AUTO MANUEL AUTO MANUEL PUNTADA PUNTADA AUTO MANUAL AUTO MANUAL AUTO...
- Page 34 LENGTH WIDTH LENGTH WIDTH STITCH STITCH LONGUEUR (mm) LARGEUR (mm) LONGUEUR (mm) LARGEUR (mm) LARGO ANCHO LARGO ANCHO POINT POINT AUTO MANUAL AUTO MANUAL AUTO MANUAL AUTO MANUAL AUTO MANUEL AUTO MANUEL AUTO MANUEL AUTO MANUEL PUNTADA PUNTADA AUTO MANUAL AUTO MANUAL AUTO...
- Page 35 LENGTH WIDTH LENGTH WIDTH STITCH STITCH LONGUEUR (mm) LARGEUR (mm) LONGUEUR (mm) LARGEUR (mm) LARGO ANCHO LARGO ANCHO POINT POINT AUTO MANUAL AUTO MANUAL AUTO MANUAL AUTO MANUAL AUTO MANUEL AUTO MANUEL AUTO MANUEL AUTO MANUEL PUNTADA PUNTADA AUTO MANUAL AUTO MANUAL AUTO...
-
Page 36: Straight Stitching
STRAIGHT STITCHING Straight stitch is most frequently used for all types of sewing. Let’s begin by following the steps below. 1. SETTINGS Presser foot - General Purpose Foot NOTE: Based upon the weight of the fabric, slight “fine tuning” of the tension may be desired. A. -
Page 37: Point Droit
PUNTADA RECTA POINT DROIT Ceci est le point le plus utilisé pour toute genre de couture. Punto recto se usa más frecuentemente para coser todo tipos Apprenez à vous servir correctement de votre machine, en de costura. Comencemos siguiendo los pasos abajo. suivant les étapes ci-dessous. -
Page 38: Inserting Zippers And Piping
INSERTING ZIPPERS AND PIPING Use the zipper foot to sew to the right or left of the zipper or to sew close to a cord. Needle to left of foot Needle to right of foot Aiguille à gauche du pied presseur Aiguille à... -
Page 39: Insérer Une Fermeture Àglissière Ou Un Biais (Galonner)
INSÉRER UNE FERMETURE À INSERCION DE CREMALLERAS Y VIVO GLISSIÈRE OU UN BIAIS (GALONNER) Utilizar el prensatelas de cremalleras que permite coser a la Utilisez le pied fermeture glissière, au moyen duquel vous derecha o la izquierda de la cremallera o cerca del cordón pouvez piquer aussi bien à... -
Page 40: Zigzag Stitching
ZIGZAG STITCHING Under side 04 05 Côté de dessous SETTINGS :Presser foot - General Purpose Foot Reverso The top thread may appear on the bottom depending on the thread, fabric, type of stitch and sewing speed, but the bobbin thread must never appear on the top of the fabric. Top side Côté... -
Page 41: Point Zigzag
POINT ZIGZAG PUNTADA ZIG-ZAG 04 05 04 05 RÉGLAGES :Pied presseur - Pied universel AJUSTES :Pie prensatelas - Pie universal Le fil supérieur peut paraître sur l’envers, en fonction du fil, du El hilo superior puede aparecer en la parte inferior, según el tissu et de la vitesse de couture, mais le fil de la canette ne hilo, tejido, tipo de puntada y velocidad de costura, pero el hilo doit jamais paraître sur l’endroit. -
Page 42: Blind Stitch
BLIND STITCH SETTINGS :Presser foot - Blind Hem Foot Medium to heavyweight fabric Material de peso medio a pesado - Regular blind stitch for normal fabrics Tissus moyens et lourds - Elastic blind stitch for soft, stretchable fabrics Under side Under side Reverso Reverso... -
Page 43: Puntada Invisible
PUNTADA INVISIBLE POINT INVISIBLE RÉGLAGES :Pied presseur - Pied point invisible AJUSTES :Pie prensatelas - Prensatelas de puntada invisible - Point invisible pour les tissus tissés Puntada invisible regular para las telas normales Puntada invisible super elástico para las telas - Point invisible pour les tissus extensibles suves, elástico 1. -
Page 44: Stretch Stitches
STRETCH STITCHES SETTINGS :Presser foot - General Purpose Foot Stretch stitches are mainly for use on knit or stretchable fabrics, but can also be used on woven fabrics. STRAIGHT STRETCH STITCH Straight stretch stitch is far stronger than an ordinary straight stitch because it locks three times - forwards, backwards and forwards. -
Page 45: Points Extensible
POINTS EXTENSIBLE PUNTADAS ELASTICAS RÉGLAGES :Pied presseur - Pied universel AJUSTES :Pie prensatelas - Pie universal Les points extensibles sont généralement utilisés pour les Las puntadas elásticas se utilizan principalmente en géneros de tissus élastiques, mais peuvent ètres utilisès sur tissus tissés. punto o materiales elásticos, pero también se puede usar en materiales corrientes. -
Page 46: Honeycomb Stitch
HONEYCOMB STITCH 1. Make several rows of gathers across the fabric that you wish to smock. 2. With a narrow strip of fabric directly under the line of gathering, stitch over the gathers. The design will be a series of small diamonds. SLANT OVEREDGE STITCH Seams and overcasts in one operation to produce a narrow, supple seam, particularly suited to swimwear, sportswear,... - Page 47 POINT NID D’ABEILLE PUNTADA PANAL 1. Piquez au point droit, des lignes de fronces séparées de 1. Realiza una línea recta de fruncidos a través del tejido que ± 8 mm. Tirez sur le fil inférieur et froncez le tissu jusqu’à se desea adornar con nido de abeja.
- Page 48 ENTREDEUX STITCH Useful for decorative stitching on borders and for use in heirloom sewing. The Entredeux stitch is most often sewn with a Wing Needle (SINGER Style 2040) to create holes in the stitch pattern.
- Page 49 Le point entredeux et le plus en costuras antiguas. La puntada “Entre dos” es más souvent cousu à l’aide d’une aiguille aile (Style Singer 2040) comúnmente usada con una aguja “de ala” (Singer estilo pour créer des trous dans le motif du point.
-
Page 50: Ladder Stitch
LADDER STITCH The Ladder stitch is primarily used for drawn thread hemstitching. It can also be used for sewing over thin tape in an opposite or same color. Place the stitch in the center and a special effect will be obtained for decoration. Another use for the ladder stitch is couching over narrow ribbon, yarn or elastic. -
Page 51: Pose De Boutons
POINT D’ÉCHELLE PUNTADA EN ESCALERA Le point d’échelle est principalement utilisé pour la couture La puntada en escalera se usa principalmente para hacer d’ourlets à fil tiré. Il peut également être utilisé pour effectuer dobladillos. También se puede usar para coser sobre cinta fina la couture par dessus une mince bande d’une couleur de un color opuesto o del mismo color. -
Page 52: Buttonholes
BUTTONHOLES Tab B Languette B USING BUTTONHOLE FOOT Lengüeta B Tab A Butée A 1. Insert a button in between tab A and tab B. Lengüeta A 2. Buttonholes can be sewn to match the size of the button. It is helpful to remove the extension table when sewing a buttonhole, to keep the foot from vibrating when moving across the table. -
Page 53: Confection Des Boutonnières
CONFECTION DES BOUTONNIÈRES CONFECCION DE OJALES UTILISATION DU PIED BOUTONNIÈRE USO DEL PIE DE OJALADORA 1. Introduisez un bouton entre les butées A et B. 1. Inserte un botón entre la lengüeta A y la lengüeta B. 2. Les boutonnières peuvent être cousues de manière à 2. - Page 54 5. Carefully mark the position of buttonhole on your garment. 6. Place the fabric under the foot. Pull out the bobbin thread underneath the fabric to a length of about 4 inches to the rear. 7. Align the buttonhole mark on the fabric with the mark on the buttonhole foot, and then lower the buttonhole foot.
- Page 55 5. Marquez soigneusement la position de la boutonnière sur 5. Marque cuidadosamente la posición del ojal en la vestimenta. le vêtement. 6. Coloque el material debajo del pie. Tire del hilo de la 6. Placez le tissu sous le pied. Tirez le fil de la bobine sous le bobina debajo del material a un largo de aproximadamente tissu sur une longueur d’environ 10 centimètres vers l’arrière.
- Page 56 9. When sewing is finished, use a buttonhole opener to open up the fabric in the center of the buttonhole. Be careful not to cut any of the bartack threads. CORDED BUTTONHOLES Spur Saliente Hook filler cord (crochet thread or buttonhole twist) over the Tige spur and pull both ends of the cord forward under the foot and tie off the cord as shown in the illustration.
-
Page 57: Couture De Boutonnières Avec Des Tissus Difficiles À Coudre
9. Une fois la couture terminée, utilisez un outil d’ouverture 9. Cuando se termina la costura, use un abridor de ojales de boutonnière pour ouvrir le tissu au centre de la para abrir el material en el centro del ojal. boutonnière. -
Page 58: Manual Buttonhole
MANUAL BUTTONHOLE * Use the automatic buttonhole stitches (#94-99) and automatic buttonhole foot for buttons up to 1 3/4 ”(45mm) in length. For larger buttons use the satin foot and the manual buttonhole stitches (#91-93). * Use the satin foot to create larger buttonholes. 1. -
Page 59: Boutonnière Manuelle
BOUTONNIÈRE MANUELLE OJAL MANUAL * Utiliser les points de boutonnière automatiques (#94-99) et * Use el ojalador automático en puntadas (#94-99) y el le pied de boutonnière automatique pour un bouton jusqu'à 1 prensatelas para ojales hasta un 1 3/4" (45 mm) de largo. 3/4 "(45mm) de long. -
Page 60: Decorative Sewing
DECORATIVE SEWING Presser foot: Satin foot. Different types of decorative stitches are available. The following are examples of how to use and sew these stitches. You can use other stitches in the same way. • You should carry out a test sewing on a scrap piece of the fabric being sewn, to check the stitch pattern to be used. -
Page 61: Couture Décorative
COUTURE DÉCORATIVE COSTURA DECORATIVA Pied Presseur: Pied Point Bourdon Pie Prensatelas: Pie Prensatelas para coser en satín Différents types de points décoratifs sont disponibles. Se dispone de diferentes tipos de puntadas decorativas Les exemples suivants vous démontrent la façon d'utiliser et Los siguientes son ejemplos de cómo usar y coser estas puntadas. -
Page 62: More Sewing Examples
MORE SEWING EXAMPLES See examples to the right for more examples on how to use the decorative stitches. -
Page 63: Plus D'exemple De Couture
PLUS D'EXEMPLE DE COUTURE MAS EJEMPLOS DE COSTURA Voir les exemples à droite pour plus d'exemples sur la façon Ver ejemplos a la derecha de cómo usar las puntadas d'utiliser les points décoratifs. decorativas. -
Page 64: Preparation For Embroidery Sewing
3. PREPARATION FOR EMBROIDERY SEWING BEFORE ATTACHING EMBROIDERY UNIT Foot holder ATTACHING EMBROIDERY FOOT Support du pied Sujetador prensatelas Always be sure to turn off power to machine before changing presser foot. Screw CAUTION Guia * Raise presser foot lifter. * Turn the hand wheel counter clockwise (toward you) until the needle is in its highest position. -
Page 65: Préparatifs Pour La Broderie
3. PRÉPARATIFS POUR LA BRODERIE 3. PREPARACION PARA BORDADO AVANT DE FIXER L’UNITÉ DE BRODERIE ANTES DE COLOCAR LA UNIDAD DE BORDADO FIXATION DU PIED BRODERIE COLOCANDO EL PIE DE BORDADO Veillez à toujours couper l’alimentation électrique Asegúrese siempre de desconectar la máquina de la machine avant de changer le pied presseur. -
Page 66: Extension Table
THREADING THE TOP THREAD Refer to page 16 - 19. NOTE: It is recommended to thread the upper thread before transmitting a design to the machine for embroidery. EXTENSION TABLE 1. Turn off power to machine. 2. Slide the extension table to left to remove it from machine. (Refer to page 106 - 107.) - Page 67 ENFILAGE DU FIL SUPÉRIEUR ENHEBRADO DEL HILO SUPERIOR Reportez-vous aux page 16 - 19. Consulte las página 16 - 19. NOTEZ : Il est recommandé d’enfiler le fil supérieur avant de NOTA : Se recomienda enhebrar antes de transferir los datos. transmettre un dessin à...
-
Page 68: Attaching Embroidery Unit
ATTACHING EMBROIDERY UNIT Connector cap Couvercle de connecteur Always be sure to turn off power to machine Tapa de conector before installing embroidery unit. CAUTION 1. Turn off the machine. Turn connector cap to the right to open. Connector Connecteur Carriage Conector Chariot... -
Page 69: Fixation De L'unité De Broderie
FIXATION DE L’UNITÉ DE BRODERIE COLOCANDO LA UNIDAD DE BORDADO A s e g ú r e s e s i e m p r e d e d e s c o n e c t a r l a Veillez toujours à... -
Page 70: Securing Fabric In Embroidery Hoop
SECURING FABRIC IN EMBROIDERY HOOP NOTE: For information about using appropriate stabilizer, see page 72 - 73. 1. Loosen hoop adjusting screw and place fabric between inner and outer frame. Pull fabric edges to remove slack. NOTE: Apply stabilizer when appropriate, see page 72 - 73. 2. -
Page 71: Installer Le Tissu Dans Le Cerceau De Broderie
INSTALLER LE TISSU DANS LE ASEGURANDO EL MATERIAL EN EL ARO CERCEAU DE BRODERIE DE BORDADO NOTEZ : Pour des informations sur l’utilisation de l’entoilage NOTA: Para información sobre el uso de estabilizador approprié, voir la page 72 - 73. apropiado, consulte la página 72 - 73. -
Page 72: Using Fabric And Stabilizer
USING FABRIC AND STABILIZER FABRIC Use stabilizer to produce best results when embroidering on the following fabrics. Fabrics which lack firmness or stability such as lightweight cotton. Lightweight fabrics such as this, may lack firmness or stability and when embroidered may pull in, which may result in problems such as shrinkage and puckering of the fabric around the embroidery area. -
Page 73: Utilisation Du Tissu Et De L'entoilage
UTILISATION DU TISSU ET DE USANDO EL MATERIAL Y L’ENTOILAGE ESTABILIZADOR TISSU MATERIAL Utilisez l’entoilage pour produire des finitions de broderie plus Use el estabilizador para lograr terminaciones de bordado attrayantes lorsque vous utilisez des tissus tels que les suivants. más atractivas cuando usa materiales como los siguientes. - Page 74 When embroidering onto fabric which is smaller than Embroidery surface at fabric edge the hoop size, or when embroidering close to the Surface de broderie sur le bord du tissu edge of the fabric, attach the stabilizer as illustrated. Superficie de bordado en el borde del material WHEN EMBROIDERING ALONG THE EDGE OF FABRIC SUCH AS A HANDKERCHIEF Stabilizer...
- Page 75 Si vous effectuez la broderie sur un tissu de taille Si se está bordando sobre material que es más plus petite que celle du cerceau, ou si vous brodez pequeño que el tamaño del aro, o cuando se borda à proximité du bord du tissu, fixez le stabilisateur cerca del borde del material, coloque el estabilizador comme indiqué...
-
Page 76: Hoop Release Lever
PREPARING THE MACHINE BEFORE INSTALLING THE HOOP 1. Turn hand wheel counter clockwise (toward you) until the needle comes to its highest position. ATTACHING AND REMOVING EMBROIDERY HOOP ( A ) 1. Raise presser foot and needle, and push up lever (A) of embroidery foot with your finger and pass embroidery hoop under it. -
Page 77: Préparation De La Machine Avant D'installer Le Cerceau
PRÉPARATION DE LA MACHINE AVANT PREPARANDO LA MAQUINA ANTES DE D’INSTALLER LE CERCEAU INSTALAR EL ARO 1. Tournez le volant jusqu’à ce que l’aiguille soit à sa position 1. Gire el volante hacia delante hasta que la aguja llegue a su la plus haute. -
Page 78: Installation Of Software
INSTALLATION OF SOFTWARE In order to start using the software on your PC you would have to first install the contents of the CD to your PC. This procedure is refered to as “installation procedure”. Please follow the instructions below in order to successfully i n s t a l l t h e s o f t w a r e f o r y o u r F U T U R A s e w i n g &... -
Page 79: Installation Du Logiciel
INSTALLATION DU LOGICIEL INSTALACIÓN DEL SOFTWARE Afin d’utiliser le logiciel sur votre PC, vous devez d’abord Para comenzar a utilizar el software en su PC deberá instalar installer les contenus du CD sur votre PC. Cette procédure fait primero el contenido del CD en su PC. Este procedimiento se référence à... - Page 80 Now you are prompted to select the Program Folder where the shortcut for the software will be stored. Simply click on “Next” to continue. Finally you are requested to confirm all the selections made during the installation set-up. Pressing the "Next" button will finally start the copy and installation of the software files to the given directory on the hard disk.
- Page 81 Vous êtes, à présent, invité à sélectionner le Dossier de Ahora se le incita que elija la Carpeta del Programa en la Programmes où le raccourci du logiciel sera mis en mémoire. que se almacenará la abreviatura para el software. Cliquez simplement sur «Suivant»...
-
Page 82: Function Buttons When Embroidering
FUNCTION BUTTONS WHEN EMBROIDERING Thread Cutter Coupe fil OPERATION SWITCHES Cortador de hilo THREAD CUTTER Press Thread Cutter to automatically cut the top and bobbin threads whenever the machine is stopped. Forward stitch button If Thread Cutting Mode is active (see page 28 - 29), the Interupteur couture avancé... -
Page 83: Fonction Des Boutons En Mode Broderie
FONCTION DES BOUTONS EN MODE FUNCIONES DE BOTONES AL BORDAR BRODERIE. INTERRUPTORES DE FUNCIONAMIENTO TOUCHES DE FONCTIONNEMENT COUPE FIL CORTADOR DE HILO Appuyez sur le Coupeur de Fil pour couper automatiquement Presione el Cortador de Hilo para que los hilos superior y de les fils du haut et de la canette chaque fois que la machine bobina se corten automáticamente al momento de parar la est arrêtée. -
Page 84: Troubleshooting
TROUBLESHOOTING SKIPPED STITCHES AND THREAD BREAKAGES OCCUR Needle tip is broken. Thread path is incorrect. Refer to page 16 - 19. Replace needle. Needle is bent. Thread is tangled around spool holder. Replace needle. Refer to page 10 - 11. Needle is not installed correctly. -
Page 85: Dépannage
DÉPANNAGE LOCALIZACION DE AVERIAS DES POINTS SAUTÉS ET LE FIL SE CASSE SE SALTAN PUNTADAS Y SE ROMPE EL HILO Le fil est enfilé La pointe de l’aiguille La punta de la El hilo está mal est épointée incorrectement. aguja está rota. pasado. -
Page 86: Hoop Bracket
EMBROIDERY PATTERN IS MIS-ALIGNED MACHINE SIDE HOOP SIDE No stabilizer attached Embroidering is when using light or continuing when stretch fabric. thread is tangled. If the thread remains Attach stabilizer to tangled, the fabric the fabric. may pucker and Refer to page 72 - ruin the finished embroidery. - Page 87 LE MOTIF DE BRODERIE EST MAL ALIGNÉ PATRON DE BORDADO DESALINEADO LADO DE LA MAQUINA CÔTÉ MACHINE CÔTÉ CERCEAU LADO DEL ARO Aucun entoilage Estabilizador sin La broderie continue Se continúa bordando n’est fixé quand vous colocar cuando usa lorsque le fil est cuando el hilo está...
-
Page 88: Helpful Information For Embroidering With Futura
HELPFUL INFORMATION FOR Embroidered section Embroidering direction EMBROIDERING WITH FUTURA Section brodée Direction de broderie Sección bordada Dirección de bordado 1. If stitches are missing If the embroidery machine detects that the thread has broken, it may continue to embroider up to about eight stitches without any thread (blank stitches) before it automatically stops. -
Page 89: Information Utile Pour La Broderie Avec La Futura
INFORMATION UTILE POUR LA INFORMACIÓN DE AYUDA BRODERIE AVEC LA FUTURA 1. Si des points sont manqués. 1. Si faltan puntadas Si la machine à broder détecte une rupture du fil, Si la máquina de bordar detecta que el hilo se ha elle pourra continuer à... -
Page 90: Resizing Individual Letters
4. Will the density of a design be adjusted when resizing design ? When sizing designs in the software you can resize designs from the Library in the hoop on screen and keep the design integrity. All other formats should be changed in the DESIGN/CHANGE SIZE menu in order to change the stitch count. - Page 91 4. Est-il possible de régler la densité d’un 4.- ¿La densidad del diseño se ajustará al motif quand celui-ci est redimensionné ? redimensionarlo? En réglant les dimensions des motifs dans le programme, Cuando se dimensiona (cambiar tamaño) un diseño vous pouvez redimensionner les motifs à partir de con el software se puede redimensionar éste desde la bibliothèque dans le cerceau sur l‘écran et garder la Biblioteca de Diseños en el bastidor de la pantalla...
- Page 92 9. TOP THREAD DOES NOT STAY IN THE NEEDLE EYE If embroidering several color blocks in the same color the machine might cut the top thread too short. If that happens, deactivate Thread Cutting Mode (see page 28- 29) to make sure the top thread stays in the needle eye. 10.
- Page 93 9. L E F I L S U P É R I E U R N E R E S T E 9. EL HILO SUPERIOR NO PERMANECE PAS DANS LE CHAT (LE TROU) DE EN EL OJO DE LA AGUJA L’AIGUILLE.
-
Page 94: Multi Hoop
Multi-Hoop Multi-hooping is a special feature in the software that will allow Fig. 1 embroidery data which is larger than a single embroidery hoop Fig. 1 to be sent to the machine to stitch out, while making it easy to Fig. -
Page 95: Cerceau Multiple
Cerceau Multiple Aro multiple Le Cerceau Multiple est une caractéristique spéciale du logiciel, qui Aros multiples es una caracteristica especial en el software que permettra aux données de broderie qui sont plus grandes qu'un permitirá que los datos de bordado que sean mayores para un cerceau de broderie à... - Page 96 3. Select a large design or individual design elements and arrange them in the hoop area on the screen. The example shown uses lettering and designs from the Design Library that is built into the software. (Additional numbered hoops will appear as the design parts flow out of the first hoop section).
- Page 97 3. Choisir un grand dessin de broderie ou des éléments de 3. Seleccione un diseño grande o elemenros de diseño dessin de broderie individuel et placer-les dans le secteur individuales y acomodelos en el area del aro en la du cerceau sur l’écran. Dans l’exemple nous utilisons un pantalla.
- Page 98 6. The next screen prompts you to input the first of three alignment points, A, B, and C. These alignment points will inform the machine exactly where the crosslines are positioned in the hoop. It is extremely important that the points are accurately input on the cross lines.
- Page 99 6. L’écran suivant vous invite à saisir le premier de trois 6. La siguiente pantalla le pide ingresar el primero de points d’alignement, A, B et C. Ces points d’alignement tres puntos de alineación, A, B, y C. Estos puntos de indiqueront précisément à...
- Page 100 8. Once point A is entered, the PC screen and machine display will prompt you to enter in points B and C. Follow the same procedures for inputting points B and C. In a case where the three points were input wrong, and they do not form an exact right angle, the software will show the following error message and give you an opportunity to enter the alignment points again.
- Page 101 8. Une fois que le point A est entré, l'écran du PC et l'afficheur 8. Una vez que el punto A se registró, la pantalla de la PC y de la machine vous inviteront à entrer les points B et C. el tablero de la máquina pedirá...
-
Page 102: Control Panel When Embroidering
CONTROL PANEL WHEN Go to stitch position EMBROIDERING Allez à la position de couture When embroidering, the dials on the control panel are used to Vaya a la posición de step through the design color by color and within a color block. puntada After transferring desired design(s) to your FUTURA sewing and embroidery machine, the display shows number of current... -
Page 103: Panneau De Configuration En Mode Broderie
PANNEAU DE CONFIGURATION EN PANEL DE CONTROL AL BORDAR MODE BRODERIE Al bordar, los selectores ubicados en el Panel de Control se usan para mover el diseño color por color y dentro de un En brodant, les cadrans sur le panneau de contrôle sont bloque de color. -
Page 104: Helpful Messages When Embroidering
HELPFUL MESSAGES MESSAGES UTILES EN MENSAJES UTILES WHEN EMBROIDERING BRODANT CUANDO SE BORDA Display on control panel Situation Affichage sur le Condition panneau de contrôle Situación Depliegue en panel de control Embroidery unit is mounted, but USB cable is not connected. USB cable is disconnected after transferring embroidery data. -
Page 105: Messages Utiles Pour La Broderie
Display on control panel Situation Affichage sur le Condition panneau de contrôle Situación Depliegue en panel de control Embroidery data has been completely transferred. The number of the current color block (A) (number one directly after transferring) and total number of transferred color blocks (B) are shown on the display. Les données de broderie ont été... -
Page 106: Other Things You Should Know
4. OTHER THINGS YOU SHOULD KNOW PRESSER FOOT LIFTER There are three positions for your presser foot. 1. Lower the presser foot to sew. 2. Raise the lifter to the middle position to insert or remove fabric. 3. Lift it to its highest position to change the presser foot or to remove thick fabric. -
Page 107: D'autres Choses Que Vous Devriez Savoir
4. D'AUTRES CHOSES QUE VOUS 4. OTRAS COSAS QUE USTED DEVRIEZ SAVOIR DEBE SABER LEVIER DU PIED PRESSEUR PALANCA PIE PRENSATELAS Il y a 3 positions pour votre Pied Presseur : Su prensatelas tiene tres posiciones. 1. Abaisser le levier pour coudre. 1. -
Page 108: Performance Checklist
PERFORMANCE CHECKLIST GENERAL PROBLEMS Machine does not sew. * Power switch is turned off.- Turn on the switch. (see page 10 - 11). * Buttonhole lever is not raised when sewing stitch patterns. – Raise buttonhole lever. (see page 52 - 55). * Buttonhole lever is not lowered when sewing buttonhole. -
Page 109: Vérification Des Petits Problèmes De Couture
VÉRIFICATION DES PETITS PROBLÈMES CUADRO DE VERIFICACION DE DE COUTURE RENDIMIENTO PROBLÈMES GENERAUX PROBLEMAS GENERALES La machine ne coud pas: Máquina no cose. * L’interrupteur est hors fonction. L’activé (voir page 10 - 11). * El interruptor de energía no está conectado. - Ponerio en la posición LOW o HIGH (vea página 10 - 11). -
Page 110: Cleaning Hook Area And Feed Dogs
Put one drop of sewing machine oil on the hook race as indicated by the arrows. (A, B) NOTE: Singer Brand Sewing Machine Oil is suggested. DO NOT use “all purpose” oil as it is not suited for sewing machine lubrication. -
Page 111: Nettoyage Des Griffes Et Du Crochet
NOTA: Se sugiere usar aceite de máquina de coser N’UTILISEZ PAS d’huile “universelle”, elle ne convient marca Singer. NO use aceite “para todo uso” debido pas à la lubrification des machines à coudre. a que no es el más adecuado para la lubricación de su máquina de coser. -
Page 112: Oiling Inside The Face Cover
For the machine used after a long interval : It should be oiled before it is used. CAUTION: Always remove the dust and lint before oiling. For best results always use SINGER Brand Sewing Machine Oil. Use of oil other than Sewing Machine Oil will cause damage to your machine. -
Page 113: Huilage De L'intérieure De La Plaque Frontale
Para mejores resultados usar siempre Aceite para Pour obtenir les meilleurs résultats, utilisez l’huile Máquinas de Coser marca SINGER. Usar aceite que no pour machine à coudre SINGER. L’utilisation d’une sea especial para máquina de coser dañará su máquina. -
Page 114: Special Accessories
Doing so will result in broken needles and possible damage to your machine. Use of a Singer Brand twin needle (Style 2025) is strongly recommended. The twin needle is an optional purchase. -
Page 115: Accessoires Spéciales
L’utilisation d’une aiguille jumelée de 3 mm de la marque La aguja gemela es una compra opcional. Singer (Style 2025) est fortement recommandée. Se recomienda usar una aguja doble (estilo 2025) de 3 mm L’aiguille jumelée est un accessoire en option marca Singer. -
Page 116: Foot Control
HELPFUL MESSAGES MESSGES D’AIDE MENSAJES DE AYUDA Messages are displayed with LED Les messages apparaissent sur l’écran Los mensajes se muestran en el display lamps above stitch pattern numbers on numéraire de l’écran de contrôle et/ numérico del panel de control y/o la control panel and/or PC screen. -
Page 117: Messages D'aide
On control panel Problem Correction Sewing Embroidery Sur le panneau de Problème Correction Couture Broderie commande Problema Corrección Costura Bordado En el panel de control Breakage of top thread is detected. Supply top thread and restart. ○... - Page 118 ENGLISH / FRANÇAIS / ESPAÑOL © Part No. 82491 3/11 1/12 ( 1 )
-
Page 119: Instruction Manual
XL-550 INSTRUCTION MANUAL MANUEL D’INSTRUCTION MANUAL DE INSTRUCCIONES... -
Page 120: Important Safety Instructions
Please note that on disposal, this product must be safely recycled in accordance with relevant National legislation relating to electrical/ electronic products. If in doubt please contact your retailer for guidance. SINGER is a registered trademark of The Singer Company Limited or its affiliates. ©2010 The Singer Company Limited or its affiliates. All rights reserved.