Motorola DCX3400 Series User Manual
High-definition all-digital dual-tuner cable set-top with ocap software
Hide thumbs
Also See for DCX3400 Series:
- User manual (55 pages) ,
- Specifications (2 pages) ,
- Quick start manual (2 pages)
Table of Contents
Advertisement
Advertisement
Table of Contents

Related Manuals for Motorola DCX3400 Series


Summary of Contents for Motorola DCX3400 Series
- Page 1 DCX with OCAP Software DCX3400 User Guide...
- Page 2 IMPORTANT SAFETY CONSIDERATIONS The DCX3400 set-top requires careful handling to avoid potential damage to its internal hard disk drive or the loss of recorded data. Be sure to follow these requirements during transportation and installation.
- Page 3 During Installation • Do not place the terminal in an enclosed area where the cooling vents are blocked or impede the flow of air through the ventilation openings. • Install the terminal so that its position does not interfere with its proper ventilation. For example, do not place the terminal on a bed, sofa, rug, or similar surface that could block the ventilation openings.
- Page 4 Software. The Software is never sold. Motorola licenses the Software to the original customer and to any subsequent licensee for personal use only on the terms of this License. Motorola and its third party licensors retain the ownership of the Software.
- Page 5 THIS LICENSE SHALL TERMINATE AUTOMATICALLY if you fail to comply with the terms of this License. Motorola is not responsible for any third party software that is provided as a bundled application, or otherwise, with the Software or that is downloaded to, or otherwise installed on, the Product.
- Page 6 © 2010 Motorola, Inc. All rights reserved. No part of this publication may be reproduced in any form or by any means or used to make any derivative work (such as translation, transformation, or adaptation) without written permission from Motorola, Inc.
-
Page 7: Table Of Contents
Contents Introduction Features Front Panel Rear Panel Operation Turning Power On and Off Changing Channels Adjusting the Volume Interactive Program Guide Front Panel Format Button Operation Video Format Indicators (Front Panel Display) M-Card™ Digital Video Recorder (DVR) Connecting Your DCX Set-top Video Connection Options Connecting HDTV —... -
Page 8: Introduction
Congratulations on receiving a Motorola DCX3400 Series High-Definition All-Digital Dual- Tuner Cable Set-top with OCAP™ software, one of the most advanced interactive digital cable set-tops available today. Motorola has merged the extraordinary features of digital cable—the seemingly endless programming options, interactive program guides, Video on Demand (VOD), and commercial-free, CD quality music—with the flexibility of a dual-... -
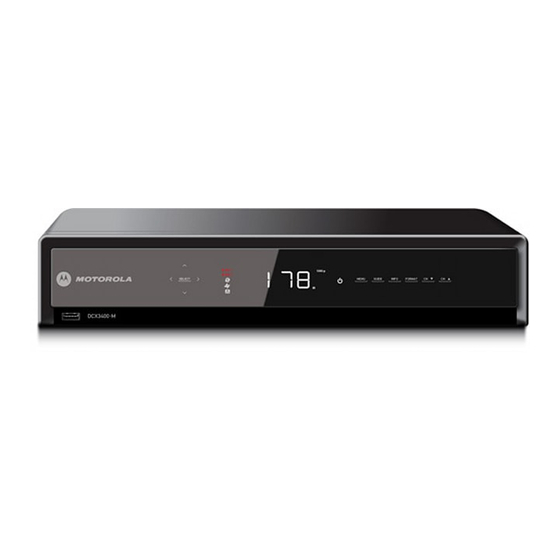
Page 9: Front Panel
Front Panel Figure 1 – Front Panel Item Description USB 2.0 High-Speed connector* Cursor — Menu navigation Select — Selects menu options Power — Turns the set-top on and off (standby) Menu — Displays the menu Guide — Displays the program guide Info —... -
Page 10: Rear Panel
Rear Panel Figure 2 – Rear Panel Item Description YPbPr — Component video output (HDTV) Audio Out — Analog L/R (Fixed) audio (SDTV) Audio Out — Analog L/R (Variable) audio (SDTV) Digital Audio (Coaxial S/PDIF) — Provides Dolby® Digital or PCM output Digital Audio (Optical S/PDIF) —... -
Page 11: Operation
Operation Turning Power On and Off Press on the front panel or remote control to turn the DCX set-top on or off POWER (standby). When using the remote control, be sure it is in cable mode by pressing CABLE before pressing . -
Page 12: Interactive Program Guide
When the Interactive Program Guide (IPG) is active, the Format button located on the front panel of the DCX3400 set-top allows you to quickly change how video is processed by the Component Video (YPbPr) and HDMI outputs. Pressing the Format button will toggle the output between the normal, stretch, and zoom functions. -
Page 13: Digital Video Recorder (Dvr)
Digital Video Recorder (DVR) The DCX3400 set-top is equipped with an internal hard drive for DVR (Digital Video Recorder) functionality, which provides the ability to record both Standard-Definition TV (SDTV) and High-Definition TV (HDTV) programs. Storage time varies based on the video format and specific channel. - Page 14 You can also easily switch from viewing the prerecorded program to either of the programs you’re recording. Play Recorded Programming On Networked Set-tops In Your Home. Using integrated MoCA networking, DCX3400-M recorded entertainment can be accessed by other compatible non-DVR set-tops with integrated MoCA, when enabled by application software.
-
Page 15: Connecting Your Dcx Set-Top
Connecting Your DCX Set-top Instructions and diagrams are included for the following connections: • High-Definition Television (HDTV) • A/V receiver — Audio • Standard-Definition TV (SDTV) • Standard-Definition TV (SDTV) and VCR/DVD Recorder • A/V receiver, Standard-Definition TV (SDTV), and VCR/DVD Recorder Before you move or change components on your entertainment system, review the following: •... - Page 16 • RF Output — SDTV If no other input is available on your TV, the RF Output of the DCX3400 set-top can be connected to the Antenna or Cable Input on your TV. The RF Output carries both video and audio. Set your TV to channel 3 or 4.
-
Page 17: Connecting Hdtv - Single Connection For Video/Audio
Connecting HDTV — Single Connection for Video/Audio Cable In Connect an RF coaxial cable to the cable wall outlet and the CABLE IN connector on the DCX set-top. HDMI If your TV has an HDMI input, this is for both audio and video if you are using the TV speakers. -
Page 18: Connecting Your Dcx Set-Top To An Hdtv - Single Connection For Video/Audio
Connecting Your DCX Set-top to an HDTV — Single Connection for Video/Audio Note: Only (1) HDTV video/audio connection needs to be made to an HDTV. Note: On-screen graphics will not be displayed when using IEEE-1394 connection. Refer to Section 6 for more information. Note: Solid lines indicate optimum connections. -
Page 19: Connecting Hdtv - Separate Video/Audio Connections
Audio • If your TV does not have digital audio inputs, connect the stereo audio cable to the AUDIO L/R connectors on the DCX3400 set-top and the AUDIO L/R connectors on the HDTV. • If your TV supports digital audio inputs, use the digital audio OPTICAL S/PDIF or COAXIAL S/PDIF outputs instead of the AUDIO L/R outputs. -
Page 20: Connecting Your Dcx Set-Top To An Hdtv - Separate Video/Audio
Connecting Your DCX Set-top to an HDTV — Separate Video/Audio Note: Only (1) video connection and (1) audio connection needs to be made to an HDTV. Note: HDMI-to-DVI adapter is not included with the set-top. Note: Solid lines indicate optimum connections. 4 •... -
Page 21: Connecting Your Dcx Set-Top To An Hdtv - Alternate Audio
Connecting Your DCX Set-top to an HDTV — Alternate Audio Note: Only (1) audio connection needs to be made to an HDTV. Note: Solid lines indicate optimum connections. 4 • Connecting Your DCX Set-top... -
Page 22: Connecting An A/V Receiver - Audio
Connecting an A/V Receiver — Audio There are several options available for audio connections to your A/V receiver: • Digital audio (OPTICAL S/PDIF) • Digital audio (COAXIAL S/PDIF) • Stereo audio (AUDIO L/R) If your A/V receiver supports it, the optical (S/PDIF) or coaxial (S/PDIF) digital audio outputs may be used in place of the stereo audio outputs (AUDIO L/R). -
Page 23: Connecting Your Dcx Set-Top To An A/V Receiver - Audio
Connecting Your DCX Set-top to an A/V Receiver — Audio Note: Only (1) audio connection needs to be made to an A/V Receiver. Note: Solid lines indicate optimum connections. 4 • Connecting Your DCX Set-top... -
Page 24: Connecting An Sdtv
Connecting an SDTV 1. Connect the stereo audio cable to the AUDIO L/R connectors on the DCX set-top and the AUDIO L/R connectors on the Standard-Definition TV (SDTV). 2. Connect an S-Video cable to the S-VIDEO OUT connector on the DCX set-top and the INPUT S-VIDEO on the TV. -
Page 25: Connecting Your Dcx Set-Top To An Sdtv
Connecting Your DCX Set-top to an SDTV Note: S-Video and Composite video require separate audio connections. Note: Only (1) video connection and (1) audio connection is required. Note: Solid lines indicate optimum connections. 4 • Connecting Your DCX Set-top... -
Page 26: Connecting An Sdtv And Vcr/Dvd Recorder
Connecting an SDTV and VCR/DVD Recorder 1. Connect a stereo audio cable to the AUDIO OUT L/R connectors on the DCX3400 set-top and the INPUT AUDIO L/R connectors on the stereo VCR. 2. Connect a composite video cable to the VIDEO OUT connector on the DCX3400 set- top and the INPUT VIDEO connector on the stereo VCR. -
Page 27: Connecting Your Dcx Set-Top To An Sdtv And Vcr/Dvd Recorder
Connecting Your DCX Set-top to an SDTV and VCR/DVD Recorder If degraded picture quality is observed while viewing copy-protected limited view programs, do not connect through a VCR. Instead, connect the set-top directly to the TV. 4 • Connecting Your DCX Set-top... -
Page 28: Connecting An A/V Receiver, Sdtv, And Vcr/Dvd Recorder
Connecting an A/V Receiver, SDTV, and VCR/DVD Recorder 1. Connect a stereo audio cable to the AUDIO OUT L/R connectors on the DCX set-top and the INPUT L/R connectors on the A/V receiver. 2. Connect an S-Video cable to the S-Video out connector on the DCX set-top and the S-Video connector on the A/V receiver. -
Page 29: Connecting Your Dcx Set-Top To An A/V Receiver, Sdtv, And Vcr/Dvd Recorder
Connecting Your DCX Set-top to an A/V Receiver, SDTV, and VCR/DVD Recorder Note: Solid lines indicate optimum connections. Note: Consult your A/V receiver manual for additional wiring options or constraints when including a VCR/DVD Recorder in your configuration. If degraded picture quality is observed while viewing copy-protected limited view programs, do not connect through a VCR. -
Page 30: Recording Your Connections
Recording Your Connections Use this diagram to record connections between your home entertainment components. You can use this diagram to reconnect your system if you move the equipment or add new equipment. Disconnect the power from the DCX set-top before connecting or changing cable connections. -
Page 31: Data Devices
Data Devices Do not attempt to connect data devices without contacting your service provider. Advanced data features require the proper application and network infrastructure to operate. 5 • Recording Your Connections... -
Page 32: On-Screen Graphics
On-Screen Graphics Your DCX set-top can generate graphics that overlay the video programming or fill the entire television screen. Common examples include on-screen menus (such as the User Settings menu), closed captioning, and interactive program guides. The DCX set-top overlays these graphics whenever you open a menu, enable closed captioning, or scroll through a program grid. -
Page 33: Configuring The Settings Menu
1. Ensure the DCX3400 is installed properly. 2. With the set-top in stand-by mode, press the MENU key on the front panel. 3. If the TV is on, the on-screen User Settings menu lists the DCX3400 settings that can be adjusted. - Page 34 Figure 4 – Power ON Timer Menu Figure 5 – Power OFF Timer Menu 4. Use the remote control or the cursor keys on the front panel to navigate the on- screen menus: • ▲ ▼ Press the keys to highlight the setting you wish to change. •...
- Page 35 The Video Sharpness setting affects all of the video outputs. By default, the sharpness level of 3 is selected. The DCX3400 supports five distinct levels of video picture sharpness. A value of 1 corresponds to a “softer” picture while a value of 5 corresponds to a “sharper”...
- Page 36 Setting Description Power OFF Designated time for set-top to power off. Timer Status Disabled/Enabled Day Option Weekends, Weekdays, Every Sunday, Every Monday, Every Tuesday, Every Wednesday, Every Thursday, Every Friday, Every Saturday. • Set Time 12-hour clock • AM/PM Sleep Timer Off/On 7 •...
-
Page 37: Troubleshooting
Troubleshooting Before calling your service provider, review this troubleshooting guide. This information can help you quickly solve a problem. If your problem still exists, contact your service provider. Problem Possible Solution The DCX set-top will The DCX set-top may have received a software update and may not power on not power on while the new software is being installed. - Page 38 There is no audio Not all programs feature full Dolby Digital [5.1] or Dolby Digital from the center Plus [7.1] surround sound. In some cases, the programs may and/or surround only contain left and right stereo audio. speakers of a home •...
- Page 39 There are black bars All 4:3 HDTVs display HD programs in letterbox format (black above and below the bars above and below the picture) because of the shape of the picture display screen. Some SD programs are broadcast in the letterbox format with black bars above and below the picture.
-
Page 40: Open Source Software Attribution
-------------------------------- dhcpcd-0.8.29 For instructions on how to obtain a copy of any source code being made publicly available by e2fsprogs_1.25 Motorola related to software used in this Motorola product you may send your request in e2fsprogs_1.29 writing to: ebtables-v2.0.8-2 Motorola, Inc. - Page 41 The contents of the NOTICE file are for informational purposes only and do not modify the License. You may add Your own attribution Specific attribution items for component mx4j-2.0.1: Motorola includes component mx4j, notices within Derivative Works that You distribute, alongside or as an addendum to the version 3.0.2, http://mx4j.sourceforge.net...
- Page 42 customary use in describing the origin of the Work and reproducing the content of the NOTICE Standard Widget Toolkit (http://www.eclipse.org/swt/) with modifications file. The JFreeChart project (http://www.jfree.org/jfreechart/) 7. Disclaimer of Warranty. Unless required by applicable law or agreed to in writing, Licensor The Mozilla Foundation (http://www.mozilla.org/).
- Page 43 THE SOFTWARE IS PROVIDED “AS IS”, WITHOUT WARRANTY OF ANY KIND, EXPRESS OR a) it complies with the terms and conditions of this Agreement; and b) its license agreement: IMPLIED, INCLUDING BUT NOT LIMITED TO THE WARRANTIES OF MERCHANTABILITY, i) effectively disclaims on behalf of all Contributors all warranties and conditions, express and FITNESS FOR A PARTICULAR PURPOSE AND NONINFRINGEMENT.
- Page 44 Agreement is published, Contributor may elect to distribute the Program (including its modifications and/or translated into another language. (Hereinafter, translation is included Contributions) under the new version. Except as expressly stated in Sections 2(a) and 2(b) without limitation in the term “modification”.) Each licensee is addressed as “you”. above, Recipient receives no rights or licenses to the intellectual property of any Contributor Activities other than copying, distribution and modification are not covered by this License;...
- Page 45 Program subject to these terms and conditions. You may not impose any further restrictions on Also add information on how to contact you by electronic and paper mail. the recipients’ exercise of the rights granted herein. You are not responsible for enforcing If the program is interactive, make it output a short notice like this when it starts in an compliance by third parties to this License.
- Page 46 developers Less of an advantage over competing non-free programs. These disadvantages are Thus, it is not the intent of this section to claim rights or contest your rights to work written the reason we use the ordinary General Public License for many libraries. However, the Lesser entirely by you;...
- Page 47 (compiler, kernel, and so on) of the operating system on which the executable runs, unless that WRITING WILL ANY COPYRIGHT HOLDER, OR ANY OTHER PARTY WHO MAY MODIFY AND/OR component itself accompanies the executable. REDISTRIBUTE THE LIBRARY AS PERMITTED ABOVE, BE LIABLE TO YOU FOR DAMAGES, INCLUDING ANY GENERAL, SPECIAL, INCIDENTAL OR CONSEQUENTIAL DAMAGES ARISING It may happen that this requirement contradicts the license restrictions of other proprietary OUT OF THE USE OR INABILITY TO USE THE LIBRARY (INCLUDING BUT NOT LIMITED TO LOSS...
- Page 48 o Redistributions of source code must retain the above copyright notice, this list of conditions author of the parts of the library used. This can be in the form of a textual message at program and the following disclaimer. startup or in documentation (online or textual) provided with the package. o Redistributions in binary form must reproduce the above copyright notice, this list of Redistribution and use in source and binary forms, with or without modification, are permitted conditions and the following disclaimer in the documentation and/or other materials provided...
- Page 49 a) distribute a Standard Version of the executables and library files, together with instructions 4. BEOPEN SHALL NOT BE LIABLE TO LICENSEE OR ANY OTHER USERS OF THE SOFTWARE (in the manual page or equivalent) on where to get the Standard Version. FOR ANY INCIDENTAL, SPECIAL, OR CONSEQUENTIAL DAMAGES OR LOSS AS A RESULT OF USING, MODIFYING OR DISTRIBUTING THE SOFTWARE, OR ANY DERIVATIVE THEREOF, EVEN b) accompany the distribution with the machine-readable source of the Package with your...
- Page 50 RESULTING FROM LOSS OF USE, DATA OR PROFITS, WHETHER IN AN ACTION OF CONTRACT, License contents for all components under the westhawk_6.0 family: NEGLIGENCE OR OTHER TORTIOUS ACTION, ARISING OUT OF OR IN CONNECTION WITH THE Bouncy Castle License Note: USE OR PERFORMANCE OF THIS SOFTWARE.
- Page 51 Horsham, PA 19044 U.S.A. http://www.motorola.com MOTOROLA and the Stylized M logo are registered in the US Patent and Trademark Office. All other product or service names are the property of their respective owners. ©2010 Motorola, Inc. All rights reserved. 570768-001-a...