
Related Manuals for Sony RM-PP402


Summary of Contents for Sony RM-PP402
- Page 1 3-866-296-11(1) Remote Commander Operating Instructions RM-PP402 1999 by Sony Corporation...
-
Page 2: About This Manual
Precautions About This Manual On safety The instructions in this manual are for model RM-PP402. Should any solid object or liquid fall into the cabinet, unplug the Check your model number by looking at the lower right receiver and have it checked by qualified personnel before corner of the front side. -
Page 3: Table Of Contents
Changing the Factory Setting of a Function properly oriented in the battery compartment. When Button 12 using the remote, point it at the remote sensor g on the Operating Non-Sony Components 13 receiver. Additional Information 16 Troubleshooting 16 Specifications 17... -
Page 4: Location Of Parts And Basic Remote Operations
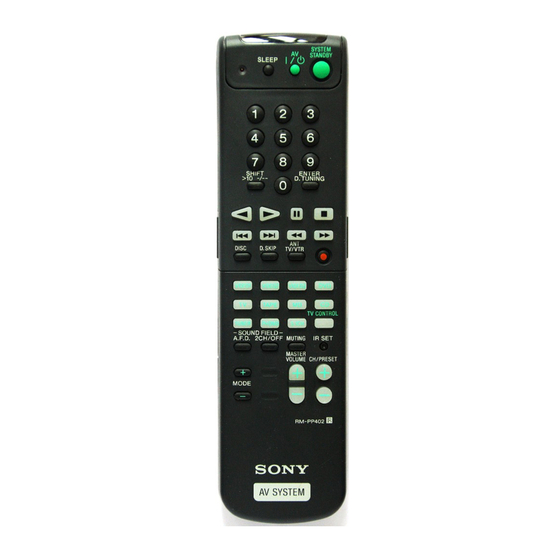
Location of Parts Description Parts and Basic Remote Operations SYSTEM STANDBY 1 / u SLEEP This chapter provides information on the location of buttons and how to use them to perform basic operations. SHIFT ENTER > 10 - / - - D.TUNING DISC D.SKIP... - Page 5 5.1CH to the 5.1CH INPUT jacks on the receiver a) Sony VCRs become operable when you press the VIDEO1, 2, or 3 button. These buttons correspond to VHS, Beta, and 8mm, respectively. To select an LD player or satellite tuner (etc.) press the button for the function to which you connected the component.
- Page 6 Parts Description 7 BASS BOOST button Press to increase the bass of the front speakers. The BASS BOOST indicator on the receiver lights up when the function is turned on. 8 CURSOR MODE button Press repeatedly to select a cursor mode, SURROUND, MENU MENU BASS/TREBLE (EQ), etc.
- Page 7 !¢ Numeric buttons (1 to 0) Button(s) Component(s) Function Inputs the corresponding numeric value. When tape deck, MD deck, Sets the tape deck in inputting a channel, disc, or track number, 0 selects 10. DAT deck recording standby !∞ ENTER D.TUNING button r + ( (if VCR, Tape deck, DAT Starts recording.
- Page 8 Parts Description @º DVD MENU button Press to display the DVD menu. Then use the cursor buttons on the remote to perform the menu operations (see “@™ Cursor buttons (V/v/B/b), ENTER button, and EXIT/RETURN button” on this page). @¡ VCR MENU button MENU MENU Press to display the VCR menu on the TV screen.
- Page 9 @ª TV CONTROL button — You close the top cover of the remote If you are using a Sony TV, you can use this remote to In either cases, the cursor buttons revert back to receiver operate the TV without turning on the receiver. When operations.
- Page 10 + 9 CD player with a multi-disc changer only. If you press the TV CONTROL button The remote is set to operate only Sony TVs. In this case, only the following buttons are operable: • TV/VIDEO button • CH/PRESET +/– buttons •...
-
Page 11: Advanced Remote Operations
This chapter describes how to change the factory setting of a function button and how to set the remote to control SYSTEM STANDBY 1 / u SLEEP Program SYSTEM non-Sony components. STANDBY indicator AV 1/u Numeric buttons SHIFT ENTER >... -
Page 12: Changing The Factory Setting Of A Function Button
(page 5) to suit the components in your system. MASTER VOLUME – button to reset all the function For example, if you connect a Sony LD player to the buttons to the factory settings or to clear the VIDEO 2 jacks on the receiver, you can set the VIDEO2 programmed signals. -
Page 13: Operating Non-Sony Components
The remote is reset to its factory-setting. system. Furthermore, you can also program this remote for Sony Press IR SET to turn on the program indicator. components that the remote is unable to control. Note that the remote can control the components that accept First press down MASTER VOLUME –, then AV 1/u,... -
Page 14: Make Code(S)
DENON Use the numeric codes in the tables below to control non- Sony conponents and also Sony components that the KENWOOD remote is normally unable to control. Since the remote signal that a component accepts differs depending on the... - Page 15 02, 03, 15, 31, 32, 33, 34 PHILIPS 29, 30, 31 SANYO PIONEER SHARP RCA/PROSCAN 22, 29, 30, 31, 41, 47 SONY SAMSUNG 42, 43, 44, 45 TELEFUNKEN 23, 36, 37, 38 SANYO 17, 20, 46 THOMSON 30, 37, 39...
-
Page 16: Additional Information
If you experience any of the following difficulties while using the receiver, use this troubleshooting guide to help you remedy the problem. Should any problem persist, consult your nearest Sony dealer. The remote does not function. / Point the remote at the remote sensor g on the receiver. -
Page 17: Specifications
Specifications General Remote control system Infrared control Power requirements 3 V DC with two R6 (size-AA) batteries 210 × 56 × 268 mm (8 × 2 × Dimensions inches) Mass (approx.) 125 g (4.4 oz) excluding batteries Design and specifications are subject to change without notice. -
Page 20: Sony
Sony Corporation Printed in Malaysia...