Table of Contents
Advertisement
Advertisement
Table of Contents

Related Manuals for Focusrite iTrack Pocket


Summary of Contents for Focusrite iTrack Pocket
- Page 1 User Guide www.focusrite.com FFFA001060...
- Page 2 Cet appareil numérique de la classe B est conforme à la norme NMB-003 du Canada. RoHS Notice Focusrite Audio Engineering Limited has conformed and [its/this] product[s] conform[s], where applicable, to the European Union’s Directive 2002/95/EC on Restrictions of Hazardous Substances (RoHS) as well as the following sections of California law which refer to RoHS, namely sections 25214.10, 25214.10.2, and 58012, Health and Safety Code;...
-
Page 3: Table Of Contents
Connecting and powering the iTrack Pocket........ -
Page 4: Overview
Pocket has to offer. If you can’t find the information you need in the User Guide, be sure to consult http://www.focusrite.com/answerbase, which contains a comprehensive collection of answers to common technical support queries. -
Page 5: Box Contents
The iTrack Pocket draws power from the iPhone, so there are no batteries, AC adaptors or additional leads to worry about. The iTrack Pocket also acts as a stand for the iPhone, optimising its camera position for video capture. -
Page 6: Getting Started
Do register your product at www.focusrite.com/register. We take a great interest in who our customers are, and it is by learning more about what you do and how you use Focusrite products that we will be able to develop more great products for you to make music with in the future. -
Page 7: Using The Itrack Pocket
Moving the iTrack Pocket around, and trying recordings at different distances and angles to the source will produce different sounding... - Page 8 Try raising the iTrack Pocket above the table top by standing it on a pile of books or something similar (the box the iTrack Pocket came in might be suitable) to reduce surface reflections.
-
Page 9: Connecting And Powering The Itrack Pocket
One end of the cable is fitted with a Micro USB connector; plug this into the DEVICE LINK socket on the rear of the iTrack Pocket. The other end is fitted with a Lightning connector; plug this into the socket on your iPhone. -
Page 10: Using The Itrack Pocket With Impact
Impact is available free of charge from the Apple App Store. You can either launch Impact and then connect your iPhone to iTrack Pocket, or connect it first and then launch the app. Launching the app opens with a splash screen and then goes directly to the Record screen: Your iPhone needs to be in landscape orientation for Impact to be able to record;... - Page 11 Meter display Input select Waveform display area From the Record screen, you can do several things: • Start recording immediately, using the iTrack Pocket’s microphones • Change the input source selection • Select the front or rear iPhone camera •...
-
Page 12: Recording
Monitoring can be enabled by touching the Headphones button on the Input Selection screen. *Impact may, of course, be used without the iTrack Pocket, but then operates as a mono recorder, using the iPhone’s own single microphone. -
Page 13: Replay/Preview
Replay/Preview To access either the recording you just made, or an earlier one, touch the Library icon. This opens the Preview screen, where the last recording to be made will be available for replay. Recording number Upload button Recordings button Your video is visible here. -
Page 14: Library
You will probably need to trim your recording for length, to remove the sections before and after the performance. This is called “top-and-tailing”. Touch the Trim button to open the Trim screen: The “filmstrip” at the top of the screen and the waveform display now represent the overall duration of the recording. -
Page 15: Upload
The first video frame of each recording is displayed as a thumbnail. If there isn’t enough room on the screen for all the saved recordings, swipe vertically to see the others. Touch the one you want to replay; this opens the Preview screen (as described previously) with the selected recording displayed. You can delete any unwanted recordings from the Library by touching the Select button;... -
Page 16: Using The Itrack Pocket With Garageband
Tap the jack plug icon to open the Input Settings controls. In Channel, select Stereo. Adjust the level wheel (on the side of the iTrack Pocket marked “Mic R”) to achieve the desired recording level. Observe the on-screen bargraph meter and the Clip LED on the front of the unit;... - Page 17 NOTE: You can use the internal monitor within GarageBand to check your recording on headphones if wished. Do not use the iPhone’s internal speaker for monitoring, as feedback may occur. NOTE: If you are using a different recording app a similar procedure will be necessary; check the app’s Help files for information.
-
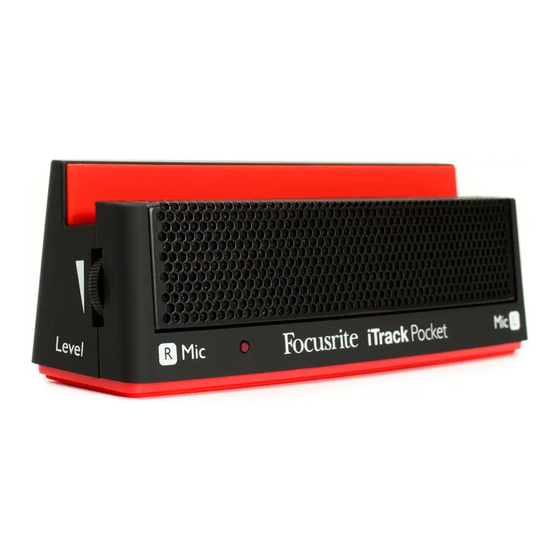
Page 18: Hardware Features
HARDWARE FEATURES Front/Side Panels The front panel includes the input connectors for mic and line/instrument signals, and the input gain control. iPhone slot Right microphone position (behind grille) Left microphone position (behind grille) Recording level control (at side) Instrument input – ¼” jack socket (at side) Clip LED –... -
Page 19: Performance Specifications
COPYRIGHT AND LEGAL NOTICES Focusrite is a registered trademark and iTrack Pocket is a trade mark of Focusrite Audio Engineering Limited. GarageBand and iPhone are trademarks of Apple Inc., registered in the U.S. and other countries. © 2012 Google Inc. All rights reserved. YouTube is a trademark of Google Inc.