Table of Contents
Advertisement
Advertisement
Table of Contents

Related Manuals for Focusrite Scarlett 6i6


Summary of Contents for Focusrite Scarlett 6i6
-
Page 1: User Guide
User Guide www.focusrite.com FA 0900-01... -
Page 2: Important Safety Instructions
IMPORTANT SAFETY INSTRUCTIONS Read these instructions. Keep these instructions. Heed all warnings. Follow all instructions. Do not use this apparatus near water. Clean only with dry cloth. Do not block any ventilation openings. Install in accordance with the manufacturer’s instructions. Do not install near any heat sources such as radiators, heat registers, stoves, or other apparatus (including amplifiers) that produce heat. - Page 3 The apparatus shall be connected to a mains socket outlet with a protective earthing connection. Laite on liitettävä suojamaadoituskoskettimilla va rustettuumpistorasiaan. Apparatet må tikoples jordet stikkontakt. Apparaten skall anslutas till jordat uttag. CAUTION: TO REDUCE THE RISK OF ELECTRIC SHOCK, DO NOT REMOVE COVER (OR BACK).
-
Page 4: Environmental Declaration
Cet appareil numérique de la classe A est conforme à la norme NMB-003 du Canada. RoHS Notice Focusrite Audio Engineering Limited has conformed where applicable, to the European Union’s Directive 2002/95/EC on Restrictions of Hazardous Substances (RoHS) as well as the following sections of California law which refer to RoHS, namely sections 25214.10, 25214.10.2, and 58012, Health and Safety Code;... -
Page 5: Table Of Contents
Scarlett 6i6 Performance Specifications ........ -
Page 6: Overview
- before they arrive at your DAW. The Scarlett 6i6 also has connectors for sending and receiving MIDI data; this lets you use it as a MIDI “hub” between your computer’s USB port and other items of MIDI equipment in your system. -
Page 7: Box Contents
Box Contents Along with your Scarlett 6i6 you should have: • AC mains adaptor (DC PSU) • USB cable • Getting Started Guide • Software Activation card, with codes for accessing the following on-line resources: – Scarlett MixControl (6i6 edition) – includes Mac/Windows USB drivers –... -
Page 8: Getting Started
BEFORE CONNECTING THE INTERFACE TO YOUR COMPUTER. Software Installation All software required by the Scarlett 6i6 - and several powerful and useful extras - are available for download from the Focusrite website (www.focusrite.com/register). The Software Activation card provided with your Scarlett 6i6 contains validation codes which you will need to enter at the above web address. -
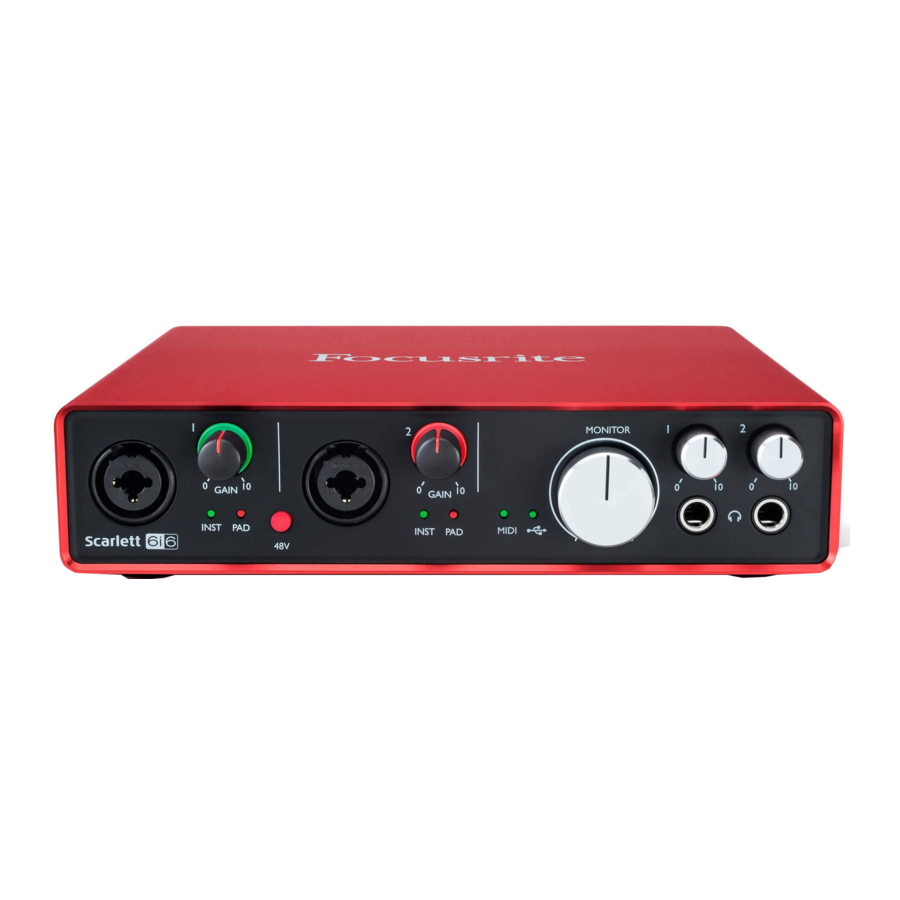
Page 9: Hardware Features
HARDWARE FEATURES Front Panel The Front Panel includes input connectors for Mic, Line and Instrument signals, the input gain and monitoring controls, and sockets for headphones. 1. Inputs 1 and 2 – XLR Combo type input sockets - connect microphones, instruments (e.g., guitar), or line level signals via XLR or ¼”... -
Page 10: Rear Panel
15. External DC power input – power the Scarlett 6i6 via a separate AC adaptor (PSU) rated at 12 V DC and 1 A. Note that the Scarlett 6i6 cannot be powered via its USB port from the host computer. -
Page 11: Connecting Your Scarlett 6I6
Power Your Scarlett 6i6 should be powered from an external 12 V DC, 1 A mains adaptor. A suitable adaptor is supplied with the unit. IMPORTANT: We very strongly recommend that you only use the supplied mains adaptor. Failure to use this adaptor is likely to permanently damage the unit and will also invalidate your warranty. -
Page 12: Audio Setup In Your Daw
DAW that uses Core Audio. After installing Scarlett MixControl and connecting the hardware, you can start using your Scarlett 6i6 with the DAW of your choice. To allow you to get started if you do not already have a DAW application installed on your computer, Ableton Live Lite is included; this will be available to you once you’ve downloaded and activated your software on-line. -
Page 14: Connecting Microphones And Instruments
Example of Usage The Scarlett 6i6 is an excellent choice for several different recording and monitoring applications. Some typical configurations are shown below. Connecting microphones and instruments Digital FX device Amplifier This setup illustrates a configuration for recording two singers and a piano with DAW software on Mac or PC. - Page 15 Each channel of the Scarlett 6i6 has a PAD facility, selectable from Scarlett MixControl (in the Input Settings panel below the Mixer section); switching the Pad into circuit reduces the input sensitivity by 10 dB.
-
Page 16: Low Latency Monitoring
The Scarlett 6i6, in conjunction with Scarlett MixControl, allows “low latency monitoring”, which overcomes this problem. You can route your input signals directly to the Scarlett 6i6’s headphone and line outputs. This enables the musicians to hear themselves with ultra-low latency – i.e., effectively in “real time”... -
Page 17: Connecting Scarlett 6I6 To Loudspeakers
Connecting Scarlett 6i6 to loudspeakers The 1/4” jack outputs on the rear panel will normally be used to drive monitoring speakers. Self- powered monitors (e.g., typical computer speakers) incorporate internal amplifiers, and may be connected directly. Passive loudspeakers will require a separate stereo amplifier; in this case, the rear panel outputs should be connected to the amplifier’s inputs. - Page 18 In the example illustrated, two stereo and two mono keyboards are connected to the six inputs of the Scarlett 6i6; Outputs 1 and 2 go to the main PA system. The player can set up a rough keyboard mix in Scarlett Mix Control and then adjust the levels of the two mono sources against the stereo ones...
-
Page 19: Scarlett Mixcontrol
(Windows only) are available from Scarlett MixControl. Note: Scarlett MixControl is a generic product, and may be used with other hardware interfaces in the Focusrite Scarlett range. When you connect a Scarlett interface to your computer and launch Scarlett MixControl, the model of interface is automatically detected, and the software configured to suit the number of inputs and outputs, and other facilities, available on the hardware. -
Page 20: Mixer
Each mix may be formed from any of the 6 of the Scarlett 6i6’s inputs and/or up to 12 DAW tracks, and any six of the eight mixes may be sent to any number of outputs. All mixer controls are independent for each mix. -
Page 21: Input Channel
Inputs Clicking the button offers two lists: ; selecting Inputs opens a list of all the available Scarlett 6i6 inputs, and selecting opens a list of all the available DAW outputs. Any input not available is greyed-out. Note that channels may be mono, or in pairs for stereo operation. - Page 22 Input Channels Control Fader Meter Stereo Mute Solo Channel Names Pan Control If the mix has been defined as a stereo one (see page 23), the Pan control (in the form of a slider) positions the channel signal in the stereo image, i.e., the signal is faded between two audio outputs such as monitor L and R.
- Page 23 DAW tracks, external digital inputs or analogue inputs 3 and 4, or by adjusting the GAIN controls on the Scarlett 6i6 in the case of analogue inputs 1 and 2.
-
Page 24: Output Channel
You can route the mix to any or all of the Scarlett 6i6’s physical outputs; if just one output is selected, its name is displayed at the top of the Many…... - Page 25 Scarlett 6i6 and Scarlett MixControl are to be routed to the Scarlett 6i6’s physical outputs. Each of the Scarlett 6i6’s physical outputs is listed, and the audio signal to be sent to that output may be selected from the drop-down menu which appears when the button to the left of that output is clicked.
-
Page 26: Routing Presets
Routing Presets As Scarlett MixControl permits such great flexibility in routing possibilities, Routing Presets are provided to help you with making your routing and mixer set-ups. Using Presets enables you to set up your routing quickly for recording (monitoring your inputs) and mixing (sending signals out to outboard processors or external mixer). -
Page 27: Monitor Section
Monitor control enable buttons (1 to 4) These buttons select which line outputs of the Scarlett 6i6 are affected by the other GUI monitor section controls, and also the front panel monitor controls. Depending on your monitoring set-up, you can control no speakers, just a single speaker, or up to 4 speakers simultaneously. - Page 28 WARNING: The ‘grey’ state should be selected when a line output is to be used to drive external processors. Note that in this state, the signal routed to that output will be at full level. Should you have amplifiers/loudspeakers connected to the output, this may result in a very high sound level in your monitor speakers or headphones.
- Page 29 Monitor level control knob Set the output level of all selected outputs with this control, using the mouse. The numeric display below shows the current monitor output level. Attenuates the monitor output level by 18 dB. Mute Mutes all monitor outputs. Left Mute switch Mutes all odd-numbered outputs.
-
Page 30: Device Status Section
Sample Rate display This displays the sample rate currently in use by the Scarlett 6i6. To change the sample rate, click on the red displayed value and select 44.1 kHz, 48 kHz, 88.2 kHz, or 96 kHz from the list. - Page 31 This option lets you set the buffer size of your ASIO driver. A small buffer size will in result in lower latency, but at the expense of increased CPU usage. A high buffer size will result in higher latency, but lower CPU usage. If you are using lots of virtual instruments and effects processing in your DAW project, and the CPU usage is high, then increase the buffer size.
-
Page 32: File Menu
Save to Hardware - This saves the current Scarlett MixControl set-up to the Scarlett 6i6 hardware. If you are moving the Scarlett 6i6 from one computer to another and want to retain the set-up, or want to use it in “stand-alone” mode, select this option. -
Page 33: Scarlett 6I6 Performance Specifications
Scarlett 6i6 Performance Specifications Configuration Inputs 6: analogue (4), S/PDIF (2) Outputs 6: analogue (4), S/PDIF (2) Mixer Fully assignable 6-in/6-out Digital Performance A-D Dynamic Range 104 dB CCIR-RMS (all inputs) D-A Dynamic Range 102 dB CCIR-RMS (line outputs) Supported sample rates 44.1 kHz, 48 kHz, 88.2 kHz &... -
Page 34: Physical And Electrical Characteristics
COPYRIGHT AND LEGAL NOTICES Focusrite is a registered trade mark and Scarlett 6i6 is a trade mark of Focusrite Audio Engineering Limited. All other trade marks and trade names are the property of their respective owners.