Table of Contents
Advertisement
B
-L
OWL
IFT
M
IXERINSTRUCTIES
M
I
IXER
NSTRUCTIONS
R
OBOTS DE CUISINE
K
ÜCHENMASCHINEN
M
- I
IXER
STRUZIONI
I
NSTRUCCIONES DE
B
RUKSANVISNING KÖKSMASKIN
B
RUKSANVISNING KJOKKENMASKINER
Y
LEISKONEEN KÄYTTÖOHJEET
B
RUGSANVISNING KØKKENMASKINE
I
NSTRUÇÕES DA BATEDEIRA MULTIFUNÇÕES
∆ΗΓΙΕΣ ΡΗΣΗΣ
M
IXERS
: M
'
ODE D
EMPLOI
-A
NWEISUNGEN
B
ATIDORA
Advertisement
Table of Contents

Related Manuals for KitchenAid Bowl-Lift Mixer


Summary of Contents for KitchenAid Bowl-Lift Mixer
- Page 1 IXERS IXERINSTRUCTIES IXER NSTRUCTIONS ’ OBOTS DE CUISINE ODE D EMPLOI ÜCHENMASCHINEN NWEISUNGEN IXER STRUZIONI NSTRUCCIONES DE ATIDORA RUKSANVISNING KÖKSMASKIN RUKSANVISNING KJOKKENMASKINER LEISKONEEN KÄYTTÖOHJEET RUGSANVISNING KØKKENMASKINE NSTRUÇÕES DA BATEDEIRA MULTIFUNÇÕES ∆ΗΓΙΕΣ ΡΗΣΗΣ...
-
Page 2: Table Of Contents
Table of Contents Important Safeguards..................1 Electrical Requirements ..................1 Bowl-Lift Mixer Features ..................2 Assembling Your Bowl-Lift Mixer ...............3 Assembling Your Pouring Shield ................4 Using Your KitchenAid ® Accessories..............5 Beater to Bowl Clearance...................5 Care and Cleaning .....................6 Planetary Mixing Action..................6 Stand Mixer Use ....................6 Speed Control Guide - 10 Speed Mixers ............7... -
Page 3: Important Safeguards
7. The use of attachments not Mixer in water or other liquid. recommended or sold by 3. Close supervision is necessary KitchenAid may cause fire, when any appliance is used by or electrical shock or injury. near children. 8. Do not use the Stand Mixer 4. -
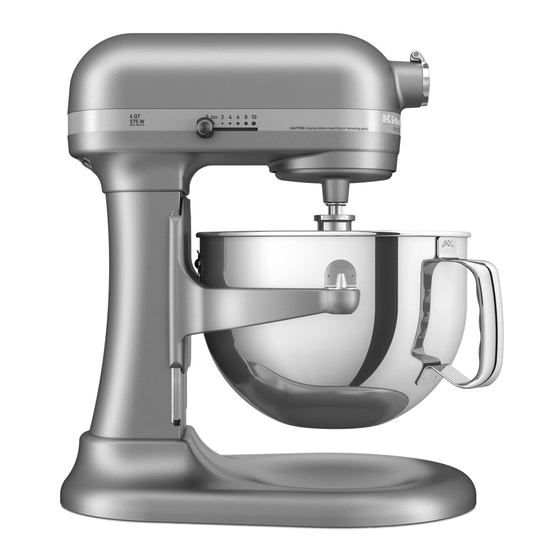
Page 4: Bowl-Lift Mixer Features
Bowl-Lift Stand Mixer Features Motor Head Attachment Hub (see page 11) Attachment Speed Knob Control Knob Bowl-Lift Handle (not shown) Bowl Height Adjustment Screw Beater Shaft Spring Latch and Bowl Pin (not shown) Stainless Steel Bowl Locating Pins Bowl Handle Bowl Support Wire Whip Flat Beater... -
Page 5: Assembling Your Bowl-Lift Mixer
Assembling Your Bowl-Lift Mixer To Attach Bowl 1. Turn speed control “O”. 2. Unplug Stand Mixer or disconnect power. 3. Place bowl-lift handle in down position. 4. Fit bowl supports over locating pins. 5. Press down on back of bowl until 4. -
Page 6: Assembling Your Pouring Shield
Assembling Your Pouring Shield* To Attach Wide Mouth To Attach Pouring Shield (fits all Pouring Shield (fits all 6-quart 5-quart bowl-lift models) bowl-lift models) 1. Turn speed control “O”. 1. Turn speed control “O” 2. Unplug Stand Mixer or disconnect 2. -
Page 7: Using Your Kitchenaid Accessories
Using Your KitchenAid ® Accessories Flat Beater for normal to heavy mixtures: cakes biscuits creamed frostings quick breads candies meat loaf cookies mashed potatoes pie pastry Wire Whip for mixtures that need air incorporated: eggs sponge cakes egg whites angel food cakes... -
Page 8: Care And Cleaning
® around the Your KitchenAid Stand Mixer will mix stationary bowl, at faster and more thoroughly than most the same time other electric mixers. Therefore, the... -
Page 9: Speed Control Guide - 10 Speed Mixers
Speed Control Guide – 10 Speed Mixers All speeds have the Soft Start™ feature which automatically starts the Stand Mixer at a lower speed to help prevent ingredient splash-out and “flour puff” at startup then quickly increases to the selected speed for optimal performance. Number of Speed STIR For slow stirring, combining, mashing,... -
Page 10: Mixing Tips
Speed 6 for high speed. For best favorite recipes for use with your results, mix for the time stated on the ® KitchenAid Stand Mixer. package directions. To help determine a mixing Adding Nuts, Raisins, or... -
Page 11: Mixing And Kneading Yeast Dough
Mixing and Kneading Yeast Dough Kneading Yeast Doughs Using the PowerKnead™ Spiral Dough Hook 1. Place all dry ingredients including yeast into bowl, except last 1 to 2 cups (125 to 250 gr) flour. 2. Attach bowl and PowerKnead™ Spiral Dough Hook. Raise mixer bowl. -
Page 12: Egg Whites
Sharp peaks form when wire whip is egg whites ..GRADUALLY to 8 removed, but whites are actually soft. Whipping Stages Stiff but not Dry With your KitchenAid ® Stand Mixer, Sharp, stiff peaks form when wire egg whites whip quickly. So, watch whip is removed. -
Page 13: Attachments And Accessories - General Instructions
The hub and shaft housing are tapered to assure a snug fit, even after prolonged use and ® wear. KitchenAid Attachments require no extra power unit to operate them; the power unit is built-in. -
Page 14: When You Need Service
Under heavy loads with All service should be handled locally extended mixing time periods, you by an Authorized KitchenAid Service may not be able to comfortably Center. Contact the dealer from touch the top of the unit. This is whom the unit was purchased to normal. -
Page 15: Bowl-Lift Mixers Warranty
KITCHENAID DOES NOT ASSUME ANY RESPONSIBILITY FOR INCIDENTAL OR CONSEQUENTIAL DAMAGES. KitchenAid Europa, Inc. Nijverheidslaan 3 Box 5 B-1853 Strombeek-Bever BELGIUM ™ FOR THE WAY IT’S MADE. - Page 16 ™ FOR THE WAY IT’S MADE. ™ ® Registered Trademark/™ Trademark of KitchenAid, U.S.A. © 2004. All rights reserved. Specifications subject to change without notice. 9708309 (3807dZw1204)