Table of Contents
Advertisement
Quick Links
Advertisement
Table of Contents

Related Manuals for Daewoo KUF-150Q


Summary of Contents for Daewoo KUF-150Q
- Page 1 Service Guides KUF-150Q...
-
Page 2: Table Of Contents
Contents 1. Overview of washing machine 1. Product features........................2 2. Comparison of product specifications.................3 3. Names and functions of each part................4 4. Functions of the buttons.....................5 2. Instructions for using the washing machine 1. Method for using the full automatic course...............6 2. -
Page 3: Overview Of Washing Machine
1. Overview of washing machine 1. Product features 1. World’ s first air bubble washing method to improve washing power significantly. 2. Use of nano silver maximizes sterilization and odor removal and is antibiotic. 3. Strong and luxurious washing plate used. 4. -
Page 4: Comparison Of Product Specifications
Overview of washing machine 2. Comparison of product specifications Items KUF-150Q Rated power consumption 600 W Wash and Spin weight 15 kg Weight 51 kg Exterior dimension (WxHxD) 630(W)x1055(H)x720(D)mms High 95ℓ 81ℓ Water level 65ℓ small 50ℓ Standard water level 225ℓ... -
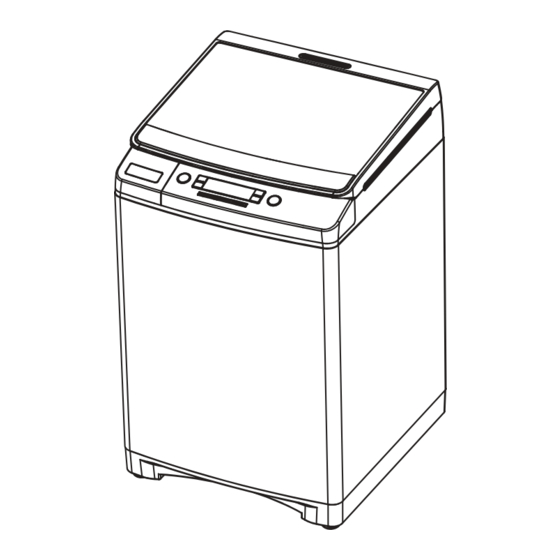
Page 5: Names And Functions Of Each Part
Overview of washing machine 3. Names and functions of each part Cold water supply Hot water supply Door knob LED lamp LINT FILTER Contol Panel Detergent case Power cord Drain hose Height adjusting legs Water supply Drain hose Water hose fixer User manual hoses (two) (two) -
Page 6: Functions Of The Buttons
Overview of washing machine 4. Functions of the buttons • Power • Water temperature • Water level Use it to switch Select the desired amount Depending on the laundry on the of water depending on the type, select one from hot, equipment. -
Page 7: Instructions For Using The Washing Machine
2. Instructions for using the washing machine 1. How to use a washing course FUZZY course (Standard course method) " What is a standard course? In this course, the washer selects the best way to wash your laundry on its own. Press the power button. -
Page 8: Delicate Course
Instructions for using the washing machine Delicate course Press the power Press course You must pour neutral Press the start button. selection to select cleaning agent in the button. wool. cleaning agent case. Select ‘Delicate’ Course ● The default setting is mid for water level and 2 times general rinsing... - Page 9 Instructions for using the washing machine Duster course ■ Used for handkerchiefs, towels or floor cloths. Press the power Press course Select the water Press the start button. selection to select temperature and button. rag. level. Select ‘Duster’ Course ● The default setting is Extra low for water level and 1 times general...
-
Page 10: Air Bubble Up Washing
Instructions for using the washing machine 2. Air bubble up washing Gym Shoes course " Used to wash Gym Shoes. Press the power Press air bubble up You must pour neutral Press the start button. washing course cleaning agent in the button. - Page 11 Instructions for using the washing machine Underwear course " Used to wash underwear. Press the power Press air bubble up Select the water Press the start button. washing course temperature and button. selection to select level. underwear. Select ‘underwear’ Course ●...
-
Page 12: Manual Setting (Wash, Rinse, Spin)
Instructions for using the washing machine 3. Progress of washing/rinsing and spin drying " If you only want washing, rinsing and spin drying, then do as follows. Use each button to change the setting. ※ When the clean rinsing lamp is on, clean rinsing will proceed. ※... -
Page 13: Disassembly And Reassembly
3. Disassembly and Reassembly 1. WIRING DIAGRAM... -
Page 14: Exploded View Diagram
DISASSEMBLY AND REASSEMBLY 2. EXPLODED VIEW DIAGRAM... - Page 15 DISASSEMBLY AND REASSEMBLY RIGHT FRONT...
- Page 16 DISASSEMBLY AND REASSEMBLY...
- Page 17 DISASSEMBLY AND REASSEMBLY...
-
Page 18: Parts List
PARTS LIST 3. Parts list 1. PARTS LIST Item Code Items Materials and Sizes Q'TY Remarks 3614542000 PLATE T AS ABS, UV-BASE 3618105800 NOZZLE TOP 3618105810 NOZZLE UNDER 3613270830 HOSE INLET HOT EPDM 60 ID9.5 OD14.5 L467.5±2.5 3613270840 HOSE INLET COLD EPDM 60 ID9.5 OD14.5 L512.5±2.5 3613270850 HOSE INLET RINSE EPDM 60 ID9.5 OD14.5 L522.5±2.5 3611205800... - Page 19 PARTS LIST Item Code Items Materials and Sizes Q'TY Remarks 3616605100 BUTTON COURSE L ABS 3616605200 BUTTON COURSE R ASB 3611697600 DECO WINDOW 3616605500 BUTTON FUNCTION ABS A37 PRPSSW150Q PCB AS DWF-150Q STANBY POWER IW A38 36117AD500 DOOR OUTER 3611697000 DOOR DECO A 3611697500 DOOR DECO B...
- Page 20 PARTS LIST Item Code Items Materials and Sizes Q'TY Remarks 3616105400 BALANCER AS 100'S, HIDDEN 3611904700 FILTER AS 100'S LINT FILTER AS 3612202900 FRAME FALL 3618815300 3612507210 GUIDE FILTER AS HIDDEN FILTER(SUS 0.6T) 3616008600 SPECIAL BOLT FOR GUIDE FILTER 3616003700 SPECIAL SCREW SUS 5.5*16 FOR BALANCER AS...
- Page 21 PARTS LIST Item Code Items Materials and Sizes Q'TY Remarks 7341801511 BOLT HEX 6B-1 8*15 MFZN 3618301300 PROTECTOR GEAR SBHG 1.6T 3616590220 BELT V M20.5, AGING 60HZ 3616590230 M21, AGING 50HZ 3614800710 SENSOR HALL AS DWF-100MV, 5.4 INVERTER 3611502700 CUSHION DOWN POM(8MM) 3964821120 WM244XA011 120V L=1450...
-
Page 22: Disassembly Procedure
Disassembly procedure 4. Disassembly procedure 1. How to disassemble the upper plate 1) Release the four screws in the rear of the door 2) Separate the bracket (two units in L/R) and separate the cover. Caution. Separate it while holding the front of the door with one hand. - Page 23 Disassembly procedure 7) Remove the two rear fixing screws. 8) Remove the rear panel by pulling it upwards. 9) Separate the cleaning agent injection box by 10) Remove the Front panel fixing screw. pulling it towards you. 11) Push the front panel to the right and lift it up. 12) Remove the fixing screws for the PCB assemblu and separate the PCB assembly.
- Page 24 Disassembly procedure 2. How to disassemble the door ass’ y 1) Place the door on top of a soft cloth or towel. 2) Remove the screws(7 EA) 3) Push the bottom glass with one hand and pull the 4) Remove the door glass. door with the other hand to separate it.
-
Page 25: Directions For Disassembly And Adjustment
How to Disassemble/Assemble 5. directions for disassemBly and adjustment Warning BEFORE ATTEMPTING TO SERVICE OR ADJUST ANY PART OF THE WASHING MACHINE, DISCONNECT THE POWER CORD FROM THE ELECTRIC OUTLET. Gear Mechanism Ass’y Replacement GEAR MECHANISM ASS’Y REPLACEMENT Raise the top plate on the outer cabinet. Remove the cap pulsator from the pulsator Loosen four screws mounting outer tub cover assy by using screw driver... - Page 26 How to Disassemble/Assemble Remove the tub i assy. Lay the front of the washer on the floor. Remove four special bolts of gear protect by using a box wrentch and remove gear protect. Remove the V-belt. Remove four special bolt of gear mechanism Pull out the gear mechanism assy.
- Page 27 How to Disassemble/Assemble MOTOR SYNCHRONOUS AND VALVE REPLACEMENT (NON PUMP MODEL) Lay the front of the washer on the floor. Take out the wire of motor synchronous from Loosen two special screw of motor the braket. synchronous. Separate the motor synchronous from the base.
-
Page 28: The Repair Method Of Gear Mechanism For Clutch Spring Problem
How to Disassemble/Assemble 6. the repair method of gear mechanism for clutch spring problem the structure of gear mechanism ●TOOL FOR REPLACING THE CLUTCH BOSS ASSEMBLY● Tool name Specification Q’ty Fixing jig Ratchet handle Socket and extension bar socket : 10mm, 17mm per each Cotton yarn some... - Page 29 How to Disassemble/Assemble how to check the clutch spring CHECKING METHOD IN THIS CASE, YOU MUST EMPTY THE SPIN TUB FIRST. 1) TO CHECK THE REVOLUTION OF SPIN TUB. IF THE SPIN TUB DOES NOT REVOLVE AND ONLY THE PULSATOR IS TURNING, THAT IS CLUTCH SPRING DEFECT.
-
Page 30: The Process Of Disassembling
How to Disassemble/Assemble The Process Of Disassembling Disassembling 1 Process Notice Remove the protector Use wrench or driver - ratchet handle - extension bar - socket : 10mm Release screws marked 4-point Remove the v-belt Loosen the fastening nut Use fixing jig for pulley as to see fig 1. - Page 31 How to Disassemble/Assemble Disassembling 2 Process Notice Disassemble the pulley Disassemble the clutch boss Catch the boss and pull upward assembly with spiral rotate in the clockwise direction Separate coupling from clutch boss ass’y Cleaning Clean the drum plate, coupling surface and contact face between drum plate and coupling...
-
Page 32: The Process Of Assembling
How to Disassemble/Assemble The Process Of Assembling Assembling 1 Process Notice Assemble the coupling Check the uneven face of coupling is assembled upward Assemble the new clutch boss - Push in the clutch boss ass’y ass’y with rotating on the clockwise direction. - Page 33 How to Disassemble/Assemble Assembling 2 Process Notice Assemble the fastening nut - Use fixing jig and 17mm socket wrench as if disassembling, as fastening torque about 100~200kgf-cm. - Check the end-play, up and downward and check the binding force, too much or not on bi-direct of rotation.
- Page 34 How to Disassemble/Assemble REPLACE THE CASE FILTER ASS’Y 1 separate the back cover from 2 remove two screws 3 remove three screws washing machine 4 turn the case filter ass’y and 5 separate the drain hose i from 6 separate the cavitation hose separate it from the drain motor the case filter ass’y from the case filter ass’y...
-
Page 35: Electric Circuit
4. Electric Circuit 1. SEQUENCE CHART F F u u z z z z y y E E C C O O C C l l a a s s s s i i f f i i c c a a t t i i o o n n T T i i m m e e E.low low high E.low low... - Page 36 ELECTRIC CIRCUIT D D u u s s t t e e r r T T u u b b c c l l e e a a n n C C l l a a s s s s i i f f i i c c a a t t i i o o n n T T i i m m e e E.low low high E.low low...
- Page 37 ELECTRIC CIRCUIT B B l l a a n n k k e e t t D D e e l l i i c c a a t t e e C C l l a a s s s s i i f f i i c c a a t t i i o o n n T T i i m m e e E.low low high...
- Page 38 ELECTRIC CIRCUIT G G y y m m S S h h o o e e s s S S c c h h o o o o l l B B a a g g C C l l a a s s s s i i f f i i c c a a t t i i o o n n T T i i m m e e E.low low high E.low low...
- Page 39 ELECTRIC CIRCUIT U U n n d d e e r r w w e e a a r r S S p p o o r r t t s s w w e e a a r r C C l l a a s s s s i i f f i i c c a a t t i i o o n n T T i i m m e e E.low low...
-
Page 40: Convenient Service Function
ELECTRIC CIRCUIT 2. Convenient functions 1 1 . . O O p p t t i i o o n n a a n n d d L L E E D D / / b b u u z z z z e e r r c c h h e e c c k k ( ( i i n n i i t t i i a a l l t t e e s s t t m m o o d d e e ) ) 1) How to enter the initial test mode 1>... - Page 41 ELECTRIC CIRCUIT 2 2 . . W W a a s s h h i i n n g g a a g g i i n n g g f f u u n n c c t t i i o o n n ( ( D D 1 1 ) ) 1) How to enter the D1 test mode 1>...
-
Page 42: Pcb Error Displays
ELECTRIC CIRCUIT 3. PCB error displays E E R R R R O O R R C C o o n n t t e e n n t t s s d d i i s s p p l l a a y y e e d d Drain error. -
Page 43: Troubleshooting
ELECTRIC CIRCUIT 4. Troubleshooting P P r r o o b b l l e e m m s s M M a a t t t t e e r r s s t t o o C C h h e e c c k k T T r r o o u u b b l l e e s s h h o o o o t t i i n n g g Check the voltage •... - Page 44 ELECTRIC CIRCUIT P P r r o o b b l l e e m m s s M M a a t t t t e e r r s s t t o o C C h h e e c c k k T T r r o o u u b b l l e e s s h h o o o o t t i i n n g g Check →...
- Page 45 ELECTRIC CIRCUIT P P r r o o b b l l e e m m s s M M a a t t t t e e r r s s t t o o C C h h e e c c k k T T r r o o u u b b l l e e s s h h o o o o t t i i n n g g Check if water is supplied when the •...
- Page 46 Office: 1-2 Jeodong-1 ga Jung-gu Seoul Customer Service: (Rep.) 360-8282 http://www.dwe.daewoo.co.kr...
- Page 47 규 격 MEMO 총 40p 10.09.27-표지 (파생 DWF-150Q -> KUF-150Q), 1p, 3p, 4p, 5p, 11p, 13p, 14p, 15p, 16p, 18p, 19p, 20p 수정_ 신규 13p 10.09.28-19p, 20p, 24p, 25p, 26p, 27p, 28p, 29p, 30p, 31p, 32p, 33p(페이지 추가 5페이지) 수정_ 신규 12p 연락처...