thomann Millenium MPS-600 User Manual
E-drum module
Hide thumbs
Also See for Millenium MPS-600:
- User manual (128 pages) ,
- Assembly instructions manual (16 pages) ,
- Assembly instructions manual (16 pages)
Table of Contents
Advertisement
Advertisement
Table of Contents

Related Manuals for thomann Millenium MPS-600


Summary of Contents for thomann Millenium MPS-600
- Page 1 MPS-600 e-drum module user manual...
- Page 2 Musikhaus Thomann e.K. Treppendorf 30 96138 Burgebrach Germany Telephone: +49 (0) 9546 9223-0 E-mail: info@thomann.de Internet: www.thomann.de 04.06.2012...
-
Page 3: Table Of Contents
Table of contents Table of contents General notes............................... 5 Safety instructions............................. 7 Features............................... 10 Installation..............................11 Operating elements..........................14 Operation..............................21 6.1 Quick start............................21 6.2 LCD display............................24 6.3 Storing functions..........................25 6.4 Drum kits............................. 26 6.5 Mixer functions..........................39 6.6 Playing and adapting songs...................... - Page 4 Table of contents 6.10 Utility menu............................. 64 6.11 SD card............................... 72 Technical specifications........................81 Cleaning............................... 83 Protecting the environment......................84 Appendix..............................85 10.1 Trigger and pads..........................85 10.2 Pre-installed drum kits......................... 88 10.3 Voice list............................90 10.4 Song list............................117 e-drum module...
-
Page 5: General Notes
General notes General notes This user manual contains important information on safe operation of the device. Read and follow all safety notes and all instructions. Save this manual for future reference. Make sure that it is available to all persons using this device. If you sell the device to other users, be sure that they also receive this manual. - Page 6 General notes Signal word Meaning DANGER! This combination of symbol and signal word indicates an immediate dangerous situation that will result in death or serious injury if it is not avoided. CAUTION! This combination of symbol and signal word indicates a possible dangerous situation that can result in minor injury if it is not avoided.
-
Page 7: Safety Instructions
Safety instructions Safety instructions Intended use Drum modules are intended to be used for converting digital trigger signals from drum pads to various percussion sounds. Use the unit only as described in this manual. Any other use or use under other operating conditions is considered to be improper and may result in personal injury or property damage. - Page 8 Safety instructions Safety DANGER! Danger for children Ensure that plastic bags, packaging, etc. are disposed of properly and are not within reach of babies and young children. Choking hazard! Ensure that children do not detach any small parts (e.g. knobs or the like) from the unit.
- Page 9 Safety instructions NOTICE! Operating conditions This device has been designed for indoor use only. To prevent damage, never expose the device to any liquid or moisture. Avoid direct sunlight, heavy dirt, and strong vibrations. NOTICE! External power supply The device is powered by an external power supply. Before connecting the external power supply, ensure that the input voltage (AC outlet) matches the voltage rating of the device and that the AC outlet is protected by a residual cur‐...
-
Page 10: Features
Features Features 674 voices (drums, percussion, SFX …) and 18 hi-hat combinations 99 pre-installed drum kits (40 preset kits, 59 user kits) 120 preset songs, 100 user songs Maximum polyphony: 64 Sequencer, click, mixer and EQ MIDI functions, SD card slot Headphones, USB- and MIDI connections e-drum module... -
Page 11: Installation
Installation Installation Setup, connecting pads and Setup and installation of the pads and pedals are described in detail in the included setup pedals guide. Finally, check that all connecting cables between the pads and the drum module are connected correctly. Connecting the power supply Connect the supplied power adapter to the 9 V input of the device and then insert the mains plug into a mains wall outlet. - Page 12 Installation Connecting headphones Connect your stereo headphones to the PHONES output of the drum module. Connecting audio devices Connect the inputs of your amplifier or powered speaker to the ‘OUTPUT’ sockets of the drum module. When using a mono amp, connect its input to the ‘L/MONO’ output socket of the module.
- Page 13 Installation Connecting MIDI devices Connect external MIDI devices to the ‘MIDI IN/OUT’ connections or the USB socket of the drum module. Connecting CD or MP3 player Connect CD or MP3 player to the ‘AUX IN’ input of the drum module. MPS-600...
-
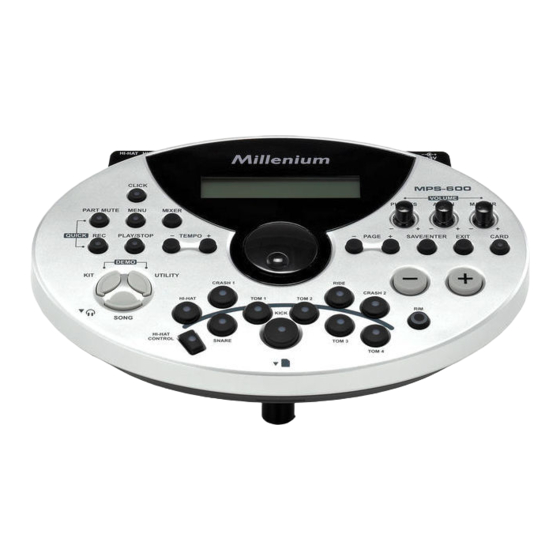
Page 14: Operating Elements
Operating elements Operating elements Front panel e-drum module... - Page 15 Operating elements Display [PAGE +], [PAGE –] Navigation buttons to scroll through the menu pages and to move the cursor. VOLUME Volume controls for the headphones output (PHONES), AUX input (AUX IN) and overall volume (MASTER) [SAVE/ENTER] Button to save changed settings and to open sub menus and folders. [EXIT] Button to leave the current menu level and to cancel a function.
- Page 16 Operating elements Jog Wheel Use the wheel to increase or decrease the value of the currently indicated parameter. [TEMPO +], [TEMPO –] Buttons to increase or decrease the tempo of song playback and click. To reset, press both buttons simultaneously. [CLICK] Turns the click function on or off.
- Page 17 Operating elements [REC] + [PART MUTE] Button combination for ‘Quick Record’ function. [PLAY/STOP] Button to start or stop song playback and recording. [KIT] Button to open the kit menu. [UTILITY] Button to open the utility menu. [UTILITY] + [KIT] Button combination for entering the demo mode. [SONG] Button to open the song menu.
- Page 18 Operating elements Pad select buttons with indicator LED Buttons to play the programmed pad voice in the current kit. In the menus KIT, MIXER and UTILITY, you can use these buttons to select the desired pad. After selecting, the indicator LED of the corresponding pad will light up. In the modes SONG / DEMO / CARD, the LEDs indicate the currently playing pad.
- Page 19 Operating elements Rear panel MPS-600...
- Page 20 Operating elements Socket for the connection of the power adapter for voltage supply. POWER ON / OFF Main switch to turn the unit on or off. USB port to connect a computer with USB MIDI interface. MIDI IN / MIDI OUT Connections for external MIDI devices.
-
Page 21: Operation
Operation Operation 6.1 Quick start In this chapter we describe some basic functions such as playing demo songs, the selection of drum kits, voices and songs as well as the use of the click function of the e-drum set. The sub‐ sequent chapters then describe in detail the various features, programming functions and parameters. - Page 22 Operation Drum kits The E-drum set offers 40 pre-installed drum kits in total. Press the [KIT] button and select the desired drum kit using the jog wheel or the [+] / [–] buttons. For more information about drum kits, settings and functions, see Ä...
- Page 23 Operation Pads, triggers and voices The E-drum set consists of several pads that are assigned to at least one trigger point (or simply trigger). Each trigger produces its own sound when being played, the so-called ‘Voice’. The sound of a trigger can be produced by striking the pad or by keystroke on the drum module ([HI-HAT], [CRASH], [TOM], [RIDE], [KICK], [SNARE]).
-
Page 24: Lcd Display
Operation 6.2 LCD display Number of the current drum kit Main display area (song, kit, menu name) e-drum module... -
Page 25: Storing Functions
Operation Function mode, menu Kit index Display area for song number, measure, beat and tempo Button symbols Time signature 6.3 Storing functions Internal memory, SD card The Electronic Drum Kit offers the opportunity to adapt all preset songs (1 ... 120, see Ä... -
Page 26: Drum Kits
Operation The settings of the preset songs can be changed before and during playback. Any change to the preset songs, however, is discarded when another song is selected or the device is switched off. Modified preset songs and any other changes can always be created as new user's songs using [SAVE/ENTER], see Ä... - Page 27 Operation Selecting a drum kit Press the [KIT] button. ð The display shows the number and name of the currently selected drum kit. Select the desired drum kit using the [+] / [–] buttons or the jog wheel. The selected drum kit is immediately active.
- Page 28 Operation Modifying a drum kit For each trigger of the drum kit, you can set the corresponding sound and several sound parameters. Press the [KIT] button. ð The display shows the number and name of the currently selected drum kit, e.g. ‘Acoust-1’...
- Page 29 Operation ð The indicator LED of the pad key lights up. Change the displayed parameters as desired. For testing, press the corresponding pad select button or hit the pad. To change from one parameter to the next use the [PAGE+] or [PAGE–]. Change the value of the parameter using the [+] / [–] buttons or the jog wheel.
- Page 30 Operation Parameter, display Description Value range MidiNote MIDI note assigned to the trigger. If the current value is Ä Chapter 10.1 ‘Trigger and pads’ already selected for another trigger, the display shows ‘!’ on page 85 and thereby recommends to select another value. Duration Length of the assigned MIDI note 0,0 s…0,8 s...
- Page 31 Operation Pattern function Each trigger can be programmed so that when you hit the respective pad not just a single sound is produced, but a complex pattern or a preset or user song is played. Up to seven pads can be programmed within a user kit for playing patterns / songs. Press the [KIT] button.
- Page 32 Operation Press the [+] button to turn the pattern function on. ð The value changes to ‘Pattern: ON’ . The pattern function is enabled for the selected pad. Press the [SAVE/ENTER] button. ð The display now shows the parameter ‘Grp:’ . Use the [+] / [–] buttons or the jog wheel to select the desired pattern or song group.
- Page 33 Operation Parameter, display Description Value range Pattern or song group DrumLoop, 1shot, PercLoop, HIT, TAP, UserSong Pattern or song 1…220 Retrig Retrigger mode ST/SP, ReST VelCtrl Adjustable touch sensitivity ON, OFF Volume Volume 0…127 X'Pose Transposing –12…12 RstTime Reset time OFF, 0.1…0.4 s (in steps of 0.1 s) DrumVoc Drum voice...
- Page 34 Operation For the groups ‘DrumLoop’ and ‘1shot’, the parameter ‘RstTime’ is disabled (display ‘–’ ). For the group ‘TAP’, the parameter ‘Retrig’ is disabled (display ‘–’ ). For the group ‘HIT’, the parameters ‘RstTime’ and ‘Retrig’ are disabled (display ‘–’ ). When playing with adjustable touch sensitivity, the volume of each pad is controlled by touch intensity ( ‘VelCtrl ON’...
- Page 35 Operation Changing the user kit order In Kit menu, you can change the order of the user kits as desired. Press the [KIT] button. ð The display shows the number and name of the currently selected drum kit, e.g. ‘Acoust-1’ . The current memory slot is indicated in the lower right area of the display as ‘DATA xxx’...
- Page 36 Operation Press the [KIT] button. ð The display shows the number and name of the currently selected drum kit, e.g. ‘Acoust-1’ . The current memory slot is indicated in the lower right area of the display as ‘DATA xxx’ . Use the [PAGE +] button to change to the user kit group and select the desired kit with the [+] / [–] buttons or the jog wheel.
- Page 37 Operation Modifying and saving user kits With your drum set, you can use the existing preset kits as a basis for user kits. The user kits can then be either stored in the device or on an SD card. Use the [PAGE –] button to change to the preset kit group and select the desired kit with the [+] / [–] buttons or the jog wheel.
- Page 38 Operation Any unsaved changes are discarded when selecting another kit or switching the unit off. Saving on SD card Use the [PAGE +] button to change to the user kit group and select the desired kit with the [+] / [–] buttons or the jog wheel. Press the [SAVE/ENTER] button.
-
Page 39: Mixer Functions
Operation Press the [SAVE/ENTER] button. ð The first character of the kit name (or the group description, if all kits are stored) is highlighted and can be changed using the [+] / [–] buttons or the jog wheel. Use the [PAGE –] and [Page +] button to move the cursor to the next or previous position. - Page 40 Operation Use the [+] / [–] buttons or the jog wheel to select the desired drum kit. Press the [MIXER] button to open the MIXER menu. ð The display shows the parameter ‘KITVol:’ and the number and current volume of the selected drum kit.
- Page 41 Operation Press the [PAGE –] button to get to the previous parameter. Press [EXIT] to quit the menu. Setting the trigger volume To set the volume for each trigger of a kit, proceed as follows: Use the [+] / [–] buttons or the jog wheel to select the desired drum kit. Press the [MIXER] button to open the MIXER menu.
- Page 42 Operation Determine the trigger whose volume should be adjusted. In order to do this, press one of the pad select keys or simply hit the pad. To select a trigger that is associated with the edge of a pad, press the [RIM] button additionally to the pad select key. To select the trigger of the closed hi-hat, press the [HI-HAT CONTROL] button additionally to the pad select key.
- Page 43 Operation Setting the song track volume To set the volume of each song track, proceed as follows: Press the [MIXER] button to open the MIXER menu. ð The display shows the parameter ‘KITVol:’ and the number and current volume of the selected drum kit.
- Page 44 Operation Any unsaved changes are discarded when selecting another kit or switching the unit off. Parameter, display Description Value range DrumVol Drum sound volume 0…127 PercVol Percussion sound volume 0…127 Part1Vol Volume track 1 0…127 Part2Vol Volume track 2 0…127 Part3Vol Volume track 3 0…127...
-
Page 45: Playing And Adapting Songs
Operation 6.6 Playing and adapting songs Your digital drum set provides 220 memory slots in total for preset (1…120) and user songs (121…220). Each song consists of seven so-called parts (tracks) that can be mixed using a sequencer. The ‘drum kit’ part plays the pad sound, the tracks ‘perc’, ‘part1’ are the backing parts and are reserved for the other instruments and/or voices. - Page 46 Operation Song playback Select the desired song as described and press the [PLAY/STOP] button to start playing. ð The indicator LED of the button lights up. To stop playback, press the [PLAY/STOP] button again. ð The indicator LED of the button turns off. If necessary, adapt the song volume to the kit volume, see Ä...
- Page 47 Operation Press the [SAVE/ENTER] button. Press [PAGE +] or [PAGE –] to jump to the next or previous parameter (see following table). Adjust the desired parameter value using the [+] / [–] buttons or the jog wheel. Parameter, display Description Value range Tempo Playback speed of the song is reset to original...
- Page 48 Operation Parameter, display Description Value range Kit Link Not supported in current software version. TapSync Not supported in current software version. All available parameters can be changed during playback. The changes are effective immediately. Part settings All preset songs consist of seven tracks in total, the so-called parts (drum part, percussion part, Part1…5).
- Page 49 Operation Press the [PAGE +] button. ð The display shows the ‘PART:’ menu. Use the [+] / [–] buttons or the jog wheel to select the various parts successively. ‘Drum’ and ‘Perc’: Press the [SAVE/ENTER] button. Then you can use the [+] / [–] but‐ tons or the jog wheel to assign a certain kit and adjust the volume and the reverb effect.
- Page 50 Operation Confirm the change with [SAVE/ENTER]. ð The display briefly shows ‘SAVE OK!’ . Then the original song is displayed with its new name. Parameter, display Description Value range Drum kit Ä Chapter 10.3 ‘Voice list’ on page 90 Volume Volume 0…127 Reverb...
- Page 51 Operation All parameters can be changed during playback. The changes are effective immedi‐ ately. Deleting parts You can delete certain parts of user songs. Press the [SONG] button. Select the desired user song, see Ä ‘Playing a song’ on page 45. Press the [MENU] button.
- Page 52 Operation Press the [SAVE/ENTER] button. ð The display shows the confirmation prompt ‘Sure?’ . Press [EXIT] to cancel or confirm with [SAVE/ENTER]. ð If you confirm, the display briefly shows ‘Erase OK!’ . Storing songs Preset songs can be modified and adapted during playback. These changes remain effective until another songs is selected or the unit is switched off.
-
Page 53: Muting
Operation Confirm the change with [SAVE/ENTER]. ð The display briefly shows ‘SAVE OK!’ . Then the original song is displayed with its new name. All songs stored in the unit can be copied to an SD card, see Ä Chapter 6.11 ‘SD card’ on page 72. - Page 54 Operation Press the [PART MUTE] button if you want to mute only the drum part of a song. Press the [PART MUTE] button again to unmute the part. Press the buttons [MENU] and [PART MUTE] simultaneously to mute a certain part of a song.
-
Page 55: Record Function
Operation Press the [CARD] button and use the [+] / [–] buttons or the jog wheel to select the desired song. Press the [MENU] and [PART MUTE] buttons simultaneously. ð The indicator LED of the [PART MUTE] flashes. The display shows ‘CH1: PLAY’ . Use the [+] / [–] buttons or the jog wheel to select the channel that you want to be muted. - Page 56 Operation Press the [PLAY/STOP] button to stop and save the recording. ð The display shows the first unused user song slot, in factory default condition ‘MySng001’ . If desired, use the [+] / [–] buttons or the jog wheel to select another user song (e.g., to overwrite an existing song).
- Page 57 Operation Record via preset songs Select the preset song that you want to record a drum track to (see Ä ‘Playing a song’ on page 45. Press the [REC] button. ð The display shows the first unused user song slot, in factory default condition ‘MySng001’...
- Page 58 Operation Start the recording with [PLAY/STOP]. ð The indicator LEDs of the buttons [REC] and [PLAY/STOP] light up during recording. Stop the recording with [PLAY/STOP]. ð The indicator LEDs of the buttons [REC] and [PLAY/STOP] turn off. The recording is saved in the unit as a new user song with the previously entered name and it's shown in the display.
- Page 59 Operation To rename and save see Ä ‘Storing songs’ on page 52. The recording can be paused and resumed at any time in any mode. To do so, press the [REC] button. The indicator LED of the button flashes as long as the recording is paused and the display shows ‘Rehearsal’...
- Page 60 Operation Use the [PAGE –/+] buttons to get to the next or previous parameter (see the following table). ð The parameter setting can be changed with the buttons [+] and [–] or the jog wheel. When all parameters are set, you can directly start the recording by pressing the [PLAY/STOP] button.
- Page 61 Operation Parameter, display Description Value range Mode Recording mode New, Overdub The drum and percussion part can be overwritten (Overdub) or newly created (New). Parts 1…5 are always overwritten. Loop Number of loops OFF, 1…99 Qntize Resolution of quantisation OFF, 1/8, 1/8t, 1/16, 1/16t, 1/32, 1/32t, 1/64 Sync-ST Synchron start CLICK OFF ([PLAY/STOP] flashing), ON ([PLAY/STOP] off)
-
Page 62: Click Functions
Operation Quantization always includes all parts. Always the starting point of a note will be quantize, but not its length. 6.9 Click functions Press the [CLICK] button to turn the click function on or off. When the click is active, the indi‐ cator LED of the button is flashing. - Page 63 Operation Use the buttons [PAGE –/+] to get to the next or previous parameter (see the following table). ð The parameter setting can be changed with the [+] / [–] buttons or the jog wheel. All changes are immediately effective. Quit the settings menu with [EXIT]. Parameter, display Description Value range...
-
Page 64: Utility Menu
Operation 6.10 Utility menu In the utility menu, you can adjust various device parameters within five submenus and reset all values to factory default condition. Press the [UTILITY] button to open the menu. ð The display shows ‘TRIGGER’ . Use the [Page–/+] buttons to jump between the parameters (see the following chapters). Press the [SAVE/ENTER] button to open the respective submenus. - Page 65 Operation 6.10.1 Trigger adjustment In the TRIGGER submenu, you can adjust the settings of all pads (for parameters see the fol‐ lowing table). Activate the desired pad by playing it or pressing the respective button of the drum module. Parameter, display Description Value range Sensitive...
- Page 66 Operation Parameter, display Description Value range Rim-Sens Touch sensitivity of the Rim trigger 1…24 Splash-S Touch sensitivity of the Splash cymbal 20…200 Sensitive The touch sensitivity regulates the volume response of a pad regardless of the actual touch intensity. The higher the value, the higher the volume when playing the pad, and vice versa. Thresh The threshold determines at what touch intensity a trigger generates a sound.
- Page 67 Operation Retrig_C If multiple sounds are generated in a row when playing a pad, this is called ‘double trigger‘. This effect can e.g. be caused by irregular waveforms, especially in trigger decay. With "Retrig_C", these distortions can be suppressed. The higher this value is set, the more likely it is, that hits in rapid succession - for example in a drum roll - are no longer detected.
- Page 68 Operation Mask-T If multiple sounds are generated in a row when playing a pad, this is called ‘double trigger’. This effect can e.g. be caused by the rebound or by leaving the stick or mallet on the pad. With "T-Mask", a period is defined in which trigger hits are ignored. The higher this value is set, the more likely it is, that hits in rapid succession are not detected.
- Page 69 Operation 6.10.2 Reverb effect, equalizer In the EFFECT submenu, you can turn the reverb effect and the equalizer on or off and make adjustments (for parameters see table below). Parameter, display Description Value range Reverb Reverb effect on/off ON, OFF RvbTyp Effect type SRoom, MRoom, LRoom, Hall1, Hall2, PLate, Delay,...
-
Page 70: Midi Settings
Operation 6.10.3 MIDI settings In the MIDI SET submenu, you can adjust the settings for handling MIDI files (for parameters see table below). Parameter, display Description Local ON: Output provides drum module and MIDI sound. OFF: Drum module muted, only MIDI sound. SoftThru ON: Looping MIDI input to MIDI output. - Page 71 Operation 6.10.4 Saving global settings SAVE GLOBAL: Use this sub menu to save all user settings to an SD card. 6.10.5 Resetting to factory default settings Use the RESET submenu to reset the device to the original factory settings (see following table).
-
Page 72: Sd Card
Operation 6.11 SD card With the SD card function of the drum module, you can play MIDI files directly from an SD card, load MIDI files from the card into the device memory, store user songs as MIDI files on a card Ä... - Page 73 Operation If the selected folder does not contain any supported files, the following note appears on the display: ‘NO FILE!’ . To leave the folder, press [EXIT]. Playing MIDI files from an SD card Insert the SD card with your MIDI files into the SD card slot of the drum module. Press the [CARD] button.
- Page 74 Operation In the CARD menu you can program the loop playback and pre-count function. The drum module supports SMF 0 and 1 (maximum of 32 tracks, up to 1024 pulses / quarter note). Files bigger than 542 KB are not supported. Loading MIDI files from the SD You can load MIDI files with a size of up to 32 KB into the drum module.
- Page 75 Operation Press the [SAVE/ENTER] button, select the user song type (1Shot, Loop, TAP, HIT) with the [+] / [–] buttons or the jog wheel and confirm with [SAVE/ENTER]. ð The display shows the first unused user song, in factory default condition ‘MySng001’...
- Page 76 Operation To save and overwrite an existing user song confirm the confirmation prompt ‘Overwrite?’ with [SAVE/ENTER]. ð The display briefly shows ‘Song loaded’ . MIDI channel Part Drum Percussion Part 1 Part 2 Part 3 Part 4 Part 5 e-drum module...
- Page 77 Operation If you want to use an internal kit, controller 0 must be set to ‘127’. Otherwise a GM kit is used. If you load a MIDI file into an existing user song, the original song is deleted, although the display shows ‘No space’ ! Muting a MIDI channel Press the [CARD] button.
- Page 78 Operation Deleting MIDI files Press the [CARD] button. ð The indicator LED of the button lights up. The display shows the SD card menu. Use the [+] / [–] buttons or the jog wheel to select the desired file. Press [SAVE/ENTER] to change between the directory levels.
- Page 79 Operation Confirm the confirmation prompt ‘Format card?’ with [SAVE/ENTER]. Press [EXIT] to cancel. Formatting the SD card will erase all data on the card irretrievably! Error messages Error message Explanation No Card No card inserted, card not readable Card Locked Card is write protected Card Error Write / read error...
- Page 80 Operation Error message Explanation FileError File error FileTooBig MIDI file exceeds 32 KB No space Memory overflow e-drum module...
-
Page 81: Technical Specifications
Technical specifications Technical specifications Number of voices 674 (drums, percussion, SFX, …) plus 18 hi-hat combinations Drum–kits 40 preset kits 59 user kits Sequencer 120 preset songs 100 user-defined songs 7 song parts (drums, percussion, part 1…part 5) Play modes: One shot, loop, tap, hit Tempo: 30…280 Resolution: 192 ticks per quarter note Metronome function... - Page 82 Technical specifications USB MIDI MIDI IN/OUT AUX IN/OUT (1/4" phone socket) 3 × tom pads 1 × floor tom pad 1 × snare pad 1 × kick pad 2 × crash pads 1 × hi-hat Operating voltage supply Power adapter (DC 9 V e-drum module...
-
Page 83: Cleaning
Cleaning Cleaning Device parts Clean the accessible parts of the device regularly. The frequency of cleaning depends on the operating environment: moist, smoky or particularly dirty environments may cause a higher accumulation of dirt on the components of the device. Use a dry soft cloth for cleaning. -
Page 84: Protecting The Environment
Protecting the environment Protecting the environment Disposal of the packaging mate‐ rial For the transport and protective packaging, environmentally friendly materials have been chosen that can be supplied to normal recycling. Ensure that plastic bags, packaging, etc. are properly disposed of. Do not just dispose of these materials with your normal household waste, but make sure that they are collected for recycling. -
Page 85: Appendix
Appendix Appendix 10.1 Trigger and pads The table below shows the assignment of the triggers and pads available. Trigger Description MIDI note (standard) KICK SNARE SNARE R TOM1 TOM1 R TOM2 TOM2 R MPS-600... - Page 86 Appendix Trigger Description MIDI note (standard) TOM3 TOM3 R TOM4 TOM4 R RIDE RIDE R RIDE Bell CRASH1 CRASH1 R CRASH2 CRASH2 R O HIHAT e-drum module...
- Page 87 Appendix Trigger Description MIDI note (standard) O HIHAT R Half Open HIHAT Half Open HIHAT R C HIHAT C HIHAT R CTRL P HIHAT Splash MPS-600...
-
Page 88: Pre-Installed Drum Kits
Appendix 10.2 Pre-installed drum kits The table below shows the numbers and names of the pre-installed drum kits. Name Name Acoust-1 Rock FunkBand PopRock Pwrbd Jazz Std-2 Brush Acoust-2 Songo Fusion 1971's Camco Timbals JzBrush O school Room Tr606 e-drum module... - Page 89 Appendix Name Name Disco Step Industry DrumBass Lowfi Funk Metal HipHop-1 Electron HipHop-2 JzLatin House-1 Noise House-2 Std-1 Vintage R&B Junkyard Magic M-box Teckno MPS-600...
-
Page 90: Voice List
Appendix 10.3 Voice list Display Full name Display Full name StdBd1 Standard Kick 1 JazzBd2 Jazz Kick 2 StdBd2 Standard Kick 2 BandBd1 Big Band Kick 1 ClascBd1 Classic Kick 1 BandBd2 Big Band Kick 2 ClascBd2 Classic Kick 2 CamcoBd1 Camco Kick 1 RockBd1... - Page 91 Appendix Display Full name Display Full name HipopBd3 Hiphop Kick 3 AcBd6 Acoust Kick 6 HipopBd4 Hiphop Kick 4 AcBd7 Acoust Kick 7 1969Bd 1969 Kick AcBd8 Acoust Kick 8 1971Bd 1971 Kick AcBd9 Acoust Kick 9 1976Bd 1976 Kick AcBd10 Acoust Kick 10 PwrBd...
- Page 92 Appendix Display Full name Display Full name AcBd22 Acoust Kick 22 TechBd Techno Kick AcBd23 Acoust Kick 23 DrBsBd Drum Bass Kick AcBd24 Acoust Kick 24 JunkydBd Junkyard Kick AcBd26 Acoust Kick 26 NoiseBd Noise Kick AcBd27 Acoust Kick 27 IndBd Industry AcBd28...
- Page 93 Appendix Display Full name Display Full name ElBd5 Electron Kick 5 ElBd18 Electron Kick 18 ElBd6 Electron Kick 6 ClasSn1 Classic Snare 1 ElBd7 Electron Kick 7 ClasSnR1 Classic Snare Rim 1 ElBd8 Electron Kick 8 ClasSn2 Classic Snare 2 ElBd9 Electron Kick 9 ClasSnR2...
- Page 94 Appendix Display Full name Display Full name RockSnR1 Rock Snare Rim 1 CamoSnR Camco Snare Rim RockSn2 Rock Snare 2 BrushSn1 Brush Snare 1 RockSn3 Rock Snare 3 BrushSn2 Brush Snare 2 RoomSn1 Room Snare 1 BrushSnR Brush Snare Rim RoomSn2 Room Snare 2 FunkSn1...
- Page 95 Appendix Display Full name Display Full name RingoSn Ringo Snare 1976SnR R1976 Snare Rim RingoSn Ringo Snare Rim R&BSn R&B Snare HipopSnl Hiphop Snare 1 R&BSnS R&B Snare Stick HipopSn2 Hiphop Snare 2 LowfiSn Lowfi Snare 506Sn1 506 Snare 1 LowfiSnS SLowfi Snare Stick 506SnR1...
- Page 96 Appendix Display Full name Display Full name AcSn7 Acoust Snare 7 DrBsSn2 Drum Bass Snare 2 HouseSn1 House Snare 1 JySn Junkyard Snare HouseSn2 House Snare 2 JySnS Junkyard Snare Stick HouseSn3 House Snare 3 Noise SnNoise Snare StepSn Step Snare 606Sn TR606 Snare StepSnS...
- Page 97 Appendix Display Full name Display Full name ElSn10 Electronic Snare 10 ElSn24 Electronic Snare 24 ElSn12 Electronic Snare 12 ElSn25 Electronic Snare 25 ElSn13 Electronic Snare 13 ElSn26 Electronic Snare 26 ElSn14 Electronic Snare 14 ElSn27 Electronic Snare 27 ElSn15 Electronic Snare 15 ElSn28 Electronic Snare 28...
- Page 98 Appendix Display Full name Display Full name ClsTmR1a Classic Tom Rim 1 a ClsTm2b Classic Tom 2 b ClsTm2a Classic Tom 2 a ClsTmR2b Classic Tom Rim 2 b ClsTmR2a Classic Tom Rim 2 a ClsTm3b Classic Tom 3 b ClsTmR3a Classic Tom 3 a ClsTmR3b...
- Page 99 Appendix Display Full name Display Full name CamcoTm4 Camco Tom 4 AcTm6 Acoust Tom 6 CamcoTm5 Camco Tom 5 AcTmR6 Acoust Tom Rim 6 CamcoTm6 Camco Tom 6 StdTm1 Standard Tom 1 AcTm1 Acoust Tom 1 StdTm2 Standard Tom 2 AcTmR1 Acoust Tom Rim 1 StdTm3...
- Page 100 Appendix Display Full name Display Full name RockTm6 Rock Tom 6 FusnTm3 Fusion Tom 3 RoomTm1 Room Tom 1 1969Tm1 1969 Tom 1 RoomTm2 Room Tom 2 1969Tm2 1969 Tom 2 RoomTm3 Room Tom 3 1969Tm3 1969 Tom 3 RoomTm4 Room Tom 4 1971Tm1 1971 Tom 1...
- Page 101 Appendix Display Full name Display Full name HiphpTm4 Hiphop Tom 4 BshTm2a Brush Tom 2 a HiphpTm5 Hiphop Tom 5 BshTm3a Brush Tom 3 a HiphpTm6 Hiphop Tom 6 BshTm4a Brush Tom 4 a JazzTm1a Jazz Tom 1 a BshTm5a Brush Tom 5 a JazzTm2a Jazz Tom 2 a...
- Page 102 Appendix Display Full name Display Full name BshTm5b Brush Tom 5 b 808Tm3 808 Tom 3 BshTmR5b Brush Tom Rim 5 b 808Tm4 808 Tom 4 BshTm6b Brush Tom 6 b 808Tm5 808 Tom 5 BshTmR6b Brush Tom Rim 6 b 808Tm6 808 Tom 6 TomRim...
- Page 103 Appendix Display Full name Display Full name 909Tm1 909 Tom 1 lndTm2 Industry Tom 2 909Tm2 909 Tom 2 lndTm3 Industry Tom 3 909Tm3 909 Tom 3 Std20Rd Standard 20" Ride JyTm1 Junkyard Tom 1 Std22Rd Standard 22" Ride JyTm2 Junkyard Tom 2 StdRdBl Standard Ride Bell...
- Page 104 Appendix Display Full name Display Full name FlatRd Flat Ride MuteRdBl Mute Ride Bell TechRd1 Techno Ride 1 RideEg1 Ride Edge 1 TechRd2 Techno Ride 2 RideEg2 Ride Edge 2 JyBreak Junkyard Break 60'sRdR 60's Ride Rim JyMetal Junkyard Metal ClPopRdR Clean Pop Ride Rim ClsRd...
- Page 105 Appendix Display Full name Display Full name China1 China 1 CryCrBl Crystal Crash Bell ClsCr1 Classic Crash 1 China2 China 2 ClsCr2 Classic Crash 2 ChinaLow China Low ClsCr3 Classic Crash 3 OrHit1 Orchestra Hit 1 ClsCr4 Classic Crash 4 OrHit2 Orchestra Hit 2 Splash...
- Page 106 Appendix Display Full name Display Full name 909Cr1 TR 909 Cymbal 1 StdHOpRB Standard HH Open Rim B 909Cr2 TR 909 Cymbal 2 RockHOp Rock HH Open JyCr1 Junkyard Cymbal 1 PopHOp Pop HH Open JyCr2 Junkyard Cymbal 2 PopHOpR Pop HH Open Rim EfCr1 Cymbal Effect 1...
- Page 107 Appendix Display Full name Display Full name 606HOp TR 606 HH Open MiniHfR Mini HH Half Rim 808HOp TR 808 HH Open ClsHfRA Classic HH Half Rim a 909HOp TR 909 HH Open ClsHfRB Classic HH Half Rim B JyHOp Junkyard HH Open CamHfOp Camco HH Half Open...
- Page 108 Appendix Display Full name Display Full name MiniHCsR Mini HH Close Rim StdHPdA Standard HH Pad A ClsHCsA Classic HH Close A StdHPdB Standard HH Pad B ClsHCsB Classic HH Close B RockHPd Rock HH Pad ClsHCsRB Classic HH Close Rim B PopHpd Pop HH Pad CamcoHCs...
- Page 109 Appendix Display Full name Display Full name 808HPd TR 808 HH Pad ScratchP ScratchPush JyHPd Junkyard HH Pad DJ Efx DJEFX NoiceHPd Noices HH Pad HiQZap HiQZap BrshHPd Bass HH Pad DingBl DingBell Splashed Splashed FingeSnp FingerSnaps PopSPd Pop Splashed StdClap StandardClap MiniSPd...
- Page 110 Appendix Display Full name Display Full name Shaker Shaker SlpTbl Slap Tabla CgslpLo Conga SlapLow MuTblslp Mute Tablaslap CgslpHi Conga Slap High Cabasa Cabasa ElectCgL Elect Conga Low Maracas Maracas OpCga Open Conga Whistle Short Whistle Cgaslp Conga Slap GuiroS Guiro Short CowBl Cow bell...
- Page 111 Appendix Display Full name Display Full name SleighBl Sleigh Bells Cowbell8 Cowbell 8 WindCh WindChimes Cowbell9 Cowbell 9 Castanet Castanets Cowbell10 Cowbell 10 SurdoMut SurdoMuted Cowbell11 Cowbell 11 SurdoOpn SurdoOpen Tabla1 Tabla 001 LotusDrm LotusDrum Tabla2 Tabla 002 Cowbell1 Cowbell 1 Tabla3 Tabla 003 Cowbell2...
- Page 112 Appendix Display Full name Display Full name FX 4 FX17 FX 17 FX 5 FX18 FX 18 FX 6 FX19 FX 19 FX 7 FX20 FX 20 FX 8 FX21 FX 21 FX 9 FX22 FX 22 FX10 FX 10 FX23 FX 23 FX11...
- Page 113 Appendix Display Full name Display Full name FX30 FX 30 FX43 FX 43 FX31 FX 31 FX44 FX 44 FX32 FX 32 FX45 FX 45 FX33 FX 33 FX46 FX 46 FX34 FX 34 FX47 FX 47 FX35 FX 35 FX48 FX 48 FX36...
- Page 114 Appendix Display Full name Display Full name FX56 FX 56 FX69 FX 69 FX57 FX 57 FX70 FX 70 FX58 FX 58 DJ 001 FX59 FX 59 DJ 002 FX60 FX 60 DJ 003 FX61 FX 61 DJ 004 FX62 FX 62 DJ 005 FX63...
- Page 115 Appendix Display Full name Display Full name Fx002 Fx15 Fx015 Fx003 Fx16 Fx016 Fx004 Fx17 Fx017 Fx005 Fx006 Fx007 Three Three Fx008 Four Four Fx009 Five Five Fx10 Fx010 Fx11 Fx011 Seven Seven Fx12 Fx012 Eight Eight Fx13 Fx013 Nine Nine Fx14 Fx014...
- Page 116 Appendix Display Full name Display Full name ClassicA Classic A ClassicB Classic B Jazz Jazz Prog Prog StandrdA Standrd A Voice Voice StandrdB Standrd B House House Rock Rock Brush Brush Junk Junk Vintage Vintage Dirty Dirty Mini Mini Bass Bass e-drum module...
-
Page 117: Song List
Appendix 10.4 Song list Display Full name Display Full name Pattern loop Fusion1 Fusion 1 BigBand1 Big Band 1 Hiphop Hiphop D N'B1 Drum N'Bass 1 16BT Pop 16 Beat Pop Ballad1 Ballad 1 Dance1 Dance 1 Swing1 Swing 1 LtinDan1 Latin Dance 1 Pop1... - Page 118 Appendix Display Full name Display Full name Pattern loop Pop Bald Pop Ballad Ltin Jz3 Latin Jazz 3 Pop Fuk2 Pop Funk 2 LtinPop2 Latin Pop 2 3/4 Jazz 3/4 Jazz Reggae1 Reggae 1 Pop Bosa Pop Bossa Fusion3 Fusion 3 Samba1 Samba 1 Swing2...
- Page 119 Appendix Display Full name Display Full name Pattern loop LtinDan2 Latin Dance 2 Dance2 Dance 2 D N'B2 Drum N'Bass 2 R&B2 R&B 2 Pop Rk Pop Rock R N'R1 Rock N'Roll 1 Punk Punk Boogie1 Boogie 1 Fusion4 Fusion 4 Beguine Beguine BreakBt2...
- Page 120 Appendix Display Full name Display Full name Pattern loop Disco1 Disco 1 R N'R2 Rock N'Roll 2 Arabic1 Arabic 1 Piano Bt Piano 8 Beat House House Rock2 Rock 2 Arabic2 Arabic 2 1 Shot Ltin Jz4 Latin Jazz 4 Funk6 Funk 6 Country...
- Page 121 Appendix Display Full name Display Full name 1 Shot Latin1 Latin 1 Percussion loop World2 World 2 Pop3 Pop 3 Latin2 Latin 2 Jazz2 Jazz 2 Bossa Bossa Reggae4 Reggae 4 Samba2 Samba 2 Reggae5 Reggae 5 3/4Pop 3/4 Pop Ltin Rk2 Latin Rock 2 Choru T1...
- Page 122 Appendix Display Full name Display Full name Bass Tp1 Bass Tap 1 Pizz Str Pizzcato Strings Syn Str Synth String Tap Bass Tp4 Bass Tap 4 Brigh T2 Brightness Tap 2 Crystal Crystal Bass Tp2 Bass Tap 2 Xylophon Xylophone Pad Tap1 Pad Tap 1 Bass Tp5...
- Page 124 Musikhaus Thomann e.K. · Treppendorf 30 · 96138 Burgebrach · Germany · www.thomann.de...