Table of Contents
Advertisement
Quick Links
Advertisement
Table of Contents

Related Manuals for Nanosat Nano Premium SE

Summary of Contents for Nanosat Nano Premium SE
-
Page 2: Table Of Contents
TABLE OF CONTENTS Table of Contents Table of Contents Safety Warning General Information Package Contents & Features Front Panel Rear Panel Remote Control Unit (RCU) Programing the Remote Control Installing Equipment Channel List Guide Menu Guide Main Page I. CHANNEL MANAGER II. -
Page 3: Safety Warning
SAFETY WARNING GENERAL INFORMATION Warning Package Contents & Features User’s Package Contents Manual Please read the following recommended instructions carefully to avoid the risk of your physical Injury User’s Please ensure that the following items are included with the receiver in your packing. Manual before the product is operated. -
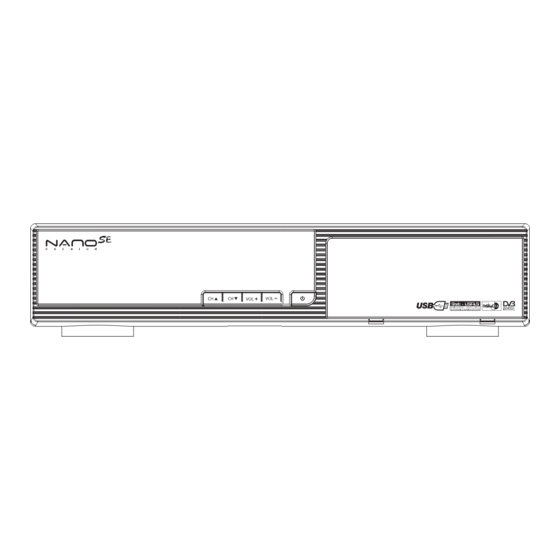
Page 4: Front Panel
12. USB PORT (Wi-Fi Only) To upgrade firmware / Recording. Connect VIDEO to the TV or other equipment. This is to be used for Nanosat Wifi Adapter only. 5. TV / VCR 13. POWER SUPPLY Connect to TV or VCR. -
Page 5: Remote Control Unit (Rcu)
GENERAL INFORMATION GENERAL INFORMATION Remote Control Unit (RCU) Remote Control Unit (RCU) 1. POWER 21. PAL / NTSC Switch the receiver between operation and standby mode. Switch PAL or NTSC mode. 2. TV POWER 22. INFO Turn on/off the TV. Display the program information box on the screen and edit the name of favorite channel list. -
Page 6: Programing The Remote Control
GENERAL INFORMATION GENERAL INFORMATION Programing the Remote Control Programing the Remote Control Programing the RCU There are two ways to program the remote control - Automatic Code Search or Direct Entry. I. Using Automatic Code Search 1) Turn on the component you want to control (TV, VCR or DVD). 2) Press and hold the component key you want to program. -
Page 7: Installing Equipment
INSTALLING EQUIPMENTS CHANNEL LIST GUIDE Connections Channel List Guide This section explains several ways of connecting the receiver to your existing TV, VCR and Hi-Fi system. You CHANNEL LIST GUIDE can choose one of the following setups that we recommend. If you have any problem or need help, consult your dealer or service provider. -
Page 8: Menu Guide
CHANNEL LIST GUIDE MENU GUIDE Channel List Guide I. Channel Manager MAIN PAGE 4. EPG (Electronic Program Guide) Press the [MENU] key on the RCU to open Main a) Press EPG button on the live mode. Page on the screen. Main Page will be displayed. b) EPG of the current channel appears on the screen. -
Page 9: Installation
MENU GUIDE MENU GUIDE I. Channel Manager II. Installation II. INSTALLATION I-2. Rename 1. Using◀ ▶go to the Rename mode. This section may help you to set up antenna and 2. Select the channel that you want to rename using ▲▼ scan satellite or transponder, etc. - Page 10 MENU GUIDE MENU GUIDE II. Installation II. Installation II-2. DiSEqC Switch II-3 Motor Setup 1. Select Channel Search in Installation using ▲▼ f) Motor Control and press OK. Select the position using ◀ ▶ and then press OK. a) If you select DiSEqC Switch and press OK on the menu, Message box displays on the screen.
- Page 11 MENU GUIDE MENU GUIDE II. Installation II. Installation II-4. Network II-4. Network This section may help you to set up network con- 2) Configuration in your STB figurartion. a) Please go to IP Set up and click “Apply” (Installations Network IP Set up) 1.
-
Page 12: Options
MENU GUIDE MENU GUIDE III. Options III. Options III. OPTIONS III-2. Control Panel 1. Select TV Setup in Options using and press his section may help you to set up OSD language, time, etc. Select Options in Main Page using ▲▼... -
Page 13: Utility
MENU GUIDE TROUBLESHOOTING IV.Utility Troubleshooting IV. UTILITY Before contacting your local service center, please read the tips below carefully. If the problem persists after completing the following procedure, please contact your local retrailer for further instructions. This section may help you to use USB, etc. Select Utility in Main Page using and press OK. -
Page 14: Specifications
SPECIFICATIONS SPECIFICATIONS Specifications Specifications I. Tuner & Channel IV. A/V & Date In/Out Item Specification Specification Item CVBS, L, R Output(Yellow, White, Red Jack) with Volume Control Type 1 x F Type, IEC169-24, Female RCA Output Component Video(YUV) Out Frequency Rage 950MHz to 2150MHz S-VHS Output 4-pin MINI...