
Related Manuals for Jensen JMC-255


Summary of Contents for Jensen JMC-255
-
Page 1: Instruction Manual
JMC-255 CD MP3 MICRO SYSTEM INSTRUCTION MANUAL Please read this Instruction Manual carefully before using the unit and retain it for future reference... -
Page 2: Important Safety Instructions
TO PREVENT FIRE OR SHOCK HAZARD, DO NOT USE THIS PLUG WITH AN EXTENSION CORD, RECEPTACLE OR OTHER OUTLET UNLESS THE BLADES CAN BE FULLY INSERTED TO PREVENT BLADE EXPOSURE. TO PREVENT FIRE OR SHOCK HAZARD, DO NOT EXPOSE THIS APPLIANCE TO RAIN OR MOISTURE. The Caution Marking is located at the bottom enclosure of the apparatus. - Page 3 13. Unplug this apparatus during lightening storms or when unused for a long periods of time. 14. Refer all servicing to qualified service personnel. Servicing is required when the apparatus has been damaged in any way, such as power-supply cord or plug is damaged, liquid has been spilled or objects have fallen into the apparatus, the apparatus has been exposed to rain or moisture, does not operate normally, or has been dropped.
- Page 4 Follow the advice below for safe operations. ON PROTECTION AGAINST LASER ENERGY EXPOSURE As the laser beam used in this compact disc player is harmful to the eyes, do not attempt to disassemble the casing. Stop operation immediately if any liquid or solid object should fall into the cabinet. Do not touch the lens or poke at it.
-
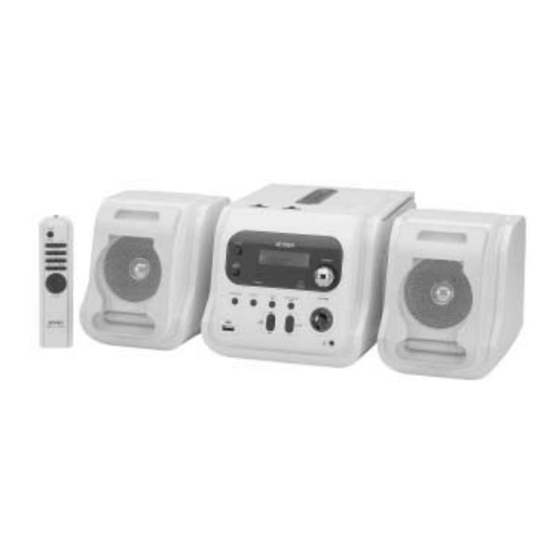
Page 5: Location Of Controls
LOCATION OF CONTROLS 1. CD DOOR 2. FUNCTION SWITCH (AUX/CD/RADIO) 3. BAND SWITCH (AM/FM/FM ST.) 4. LCD DISPLAY 5. POWER BUTTON (ON/OFF) 6. BASS BOOST BUTTON 7. STANDBY LED INDICATOR 8. TUNING KNOB 9. REMOTE SENSOR 10. CD PROGRAM BUTTON 11. -
Page 6: Important Notes
Avoid installing the unit in locations described below: Places exposed to direct sunlight or close to heat radiating appliances such as electric heaters. Dusty places. Places subject to constant vibration. Humid or moist places. SPEAKER BOX CONNECTION 1. Insert the speaker cables by pushing down on the Red and Black terminal levers located on the back of the main unit. -
Page 7: Battery Care
2. Install 2 x “AAA” (UM-4) size batteries (not included) according to the polarity diagram inside the battery compartment. 3. Close the battery door. IMPORTANT: Be sure that the batteries are installed correctly. Wrong polarity may damage the unit and void the warranty. Note: For best performance and longer operating time, we recommend the use of alkaline-type batteries. -
Page 8: Using The Remote Control Correctly
USING THE REMOTE CONTROL CORRECTLY Point the Remote Control at the REMOTE SENSOR located on the main unit. The button functions are the same as the corresponding controls on the main unit. Bright ambient light sources can cause interference when using the infrared REMOTE SENSOR. -
Page 9: Radio Operation
(two “clicks” will be heard). AUXILIARY (AUX) OPERATION You can play other music sources (MP3 player or other digital audio player) through the speakers of this system by connecting the AUX IN Jack to your external player’s audio out jack or headphone jack. - Page 10 THIS PLAYER PLAYS NOT ONLY COMMERCIAL CD’S BUT ALSO CD-RW DISCS. Because of non-standardized format definition/production of CD-R/RW, playback quality & performance are not guaranteed. Manufacturer is not responsible for the playability of CD-R/RW due to recording conditions such as PC performance, writing software, media ability, etc.
- Page 11 6. To pause the CD playback, press the CD PLAY/PAUSE "# BUTTON once. The Play Indicator “"” will blink continuously on the LCD DISPLAY. 7. Though the sound stops, the disc will continue to spin. To resume playing, press the CD PLAY/PAUSE "# BUTTON once again. The music will start from the exact position where it was paused.
-
Page 12: Programmed Play
15. To stop the CD, press the CD STOP BUTTON once no matter the CD is in Play or Pause mode. The LCD DISPLAY will show the total number of tracks of the disc again. 16. To turn off the unit, press the POWER BUTTON once. PROGRAMMED PLAY 1. -
Page 13: Playing Mp3 Discs
BUTTON once in CD stop mode, Program No. “ blink then press the CD SKIP/SEARCH FORWARD BUTTON to view the programmed track. 7. Repeat the procedure in step 6 above to view the rest of the programmed tracks one by one. 8. - Page 14 MP3 music can be stored into the CD Disc with or without folders according to your “MP3 burning method”. a. If the MP3 disc is created without dividing into folder, all track number will be shown directly on the LCD DISPLAY. The Album number e.g. will only appear briefly on the LCD DISPLAY after pressing the FOLDER UP "or DOWN &BUTTON.
- Page 15 When the MODE BUTTON is pressed once, the “REPEAT” Indicator will light. This single track of music will be repeated. 10. Repeat Folder : When the MODE BUTTON is pressed twice, the “REPEAT” and “ALBUM” indicators will be shown. This specific folder will be played repeatedly.
-
Page 16: Usb Operation
first program “ FOLDER UP " or DOWN & BUTTON and then press CD SKIP/SEARCH FORWARD % or BACKWARD $ BUTTON to select your desired music track. The LCD DISPLAY will show the track number of this specific Album to be programmed. Press the PROGRAM BUTTON to store this track in memory. -
Page 17: Using Headphones (Not Included)
2. Insert the USB plug of an Auxiliary device (e.g.: Portable MP3 Player or Flash Drive) into the USB PORT located on the front of this unit, The LCD DISPLAY will show “no”. 3. Press the CD/USB Button (#16) once, “USB” Indicator will be shown in the LCD DISPLAY. -
Page 18: Troubleshooting Guide
Never wrap the earphone lead around any animal or person. Special care should be taken with long wires. Clean your unit with a damp (never wet) cloth. Solvent or detergent should never be used. Avoid leaving your unit in direct sunlight or in hot, humid or dusty places. Keep your unit away from heating appliances and sources of electrical noise such as fluorescent lamps or motors. - Page 19 SERVICE Please refer to the instructions on the enclosed warranty card for returning your unit for service. When returning the unit, please remove any batteries to prevent damage to the unit in transit and/or from possible battery leakage. We are not responsible for batteries returned with the product or for the cost of replacement.