Sony DSC-TX9 Instruction Manual
12.2 megapixels exmor r™ cmos, 4x optical zoom/25mm wide angle, full hd movie, 8.8cm lcd and 3d
Hide thumbs
Also See for DSC-TX9:
- Instruction manual (492 pages) ,
- Handbook (190 pages) ,
- Service manual (22 pages)
Table of Contents

Related Manuals for Sony DSC-TX9


Summary of Contents for Sony DSC-TX9
- Page 1 DSC-TX9 GB Digital Still Camera/Instruction Manual RU Цифровой фотоаппарат/Инструкция по эксплуатации UA Цифровий фотоапарат/Посібник з експлуатації © 2010 Sony Corporation 4-196-231-41(2)
-
Page 2: Battery Pack
English Owner’s Record The model and serial numbers are located on the bottom. Record the serial number in the space provided below. Refer to these numbers whenever you call your Sony dealer regarding this product. Model No. DSC-TX9 Serial No. ______________________________... -
Page 3: Battery Charger
• Do not incinerate or dispose of in fire. • Do not handle damaged or leaking lithium ion batteries. • Be sure to charge the battery pack using a genuine Sony battery charger or a device that can charge the battery pack. -
Page 4: Regulatory Information
The number below is for the FCC related matters only. Regulatory Information Declaration of Conformity Trade Name: SONY Model No.: DSC-TX9 Responsible Party: Sony Electronics Inc. Address: 16530 Via Esprillo, San Diego, CA 92127 U.S.A. Telephone No.: 858-942-2230 This device complies with Part15 of the FCC Rules. Operation is subject to the... -
Page 5: For Customers In Europe
For Customers in Europe Notice for the customers in the countries applying EU Directives The manufacturer of this product is Sony Corporation, 1-7-1 Konan Minato-ku Tokyo, 108-0075 Japan. The Authorized Representative for EMC and product safety is Sony Deutschland GmbH, Hedelfinger Strasse 61, 70327 Stuttgart, Germany. For any service or guarantee matters please refer to the addresses given in separate service or guarantee documents. - Page 6 If the plug supplied with this equipment has a detachable fuse cover, be sure to attach the fuse cover after you change the fuse. Never use the plug without the fuse cover. If you should lose the fuse cover, please contact your nearest Sony service station.
-
Page 7: Table Of Contents
Table of contents Getting started Refer to “Cyber-shot Handbook” (PDF) on supplied CD-ROM...8 Checking the accessories supplied...8 Notes on using the camera ...8 Identifying parts ...12 Battery charging and the number of images/time that can be recorded ...13 Inserting the battery pack/a memory card (sold separately)...16 Setting the date and time/display color ...19 Shooting/viewing images Shooting still images ...21... -
Page 8: Refer To "Cyber-Shot Handbook" (Pdf) On Supplied Cd-Rom
Refer to “Cyber-shot Handbook” (PDF) on supplied CD-ROM For details on advanced operations, please read “Cyber- shot Handbook” (PDF) on the CD-ROM (supplied) using a computer. Refer to “Cyber-shot Handbook” for in-depth instructions on shooting or viewing images and connecting the camera to your computer, printer or TV (page 24). - Page 9 Functions built into this camera • This manual describes each of the functions of TransferJet-compatible/ incompatible devices, 1080 60i-compatible devices and 1080 50i-compatible devices. To check if your camera supports the TransferJet function, and whether it is a 1080 60i-compatible device or 1080 50i-compatible device, check for the following marks on the bottom of the camera.
- Page 10 • Do not press against the LCD screen. The screen may be discolored and that may cause a malfunction. Please use Sony genuine accessories If you use accessories manufactured by companies other than Sony, this could cause a camera trouble. • Using other manufacturers’ camera cases with magnets could cause a power supply trouble.
- Page 11 JEITA (Japan Electronics and Information Technology Industries Association). • Sony does not guarantee that the camera will play back images recorded or edited with other equipment, or that other equipment will play back images recorded with the camera.
-
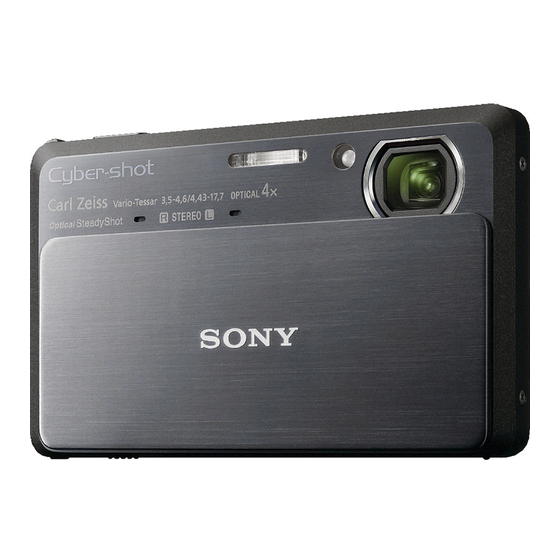
Page 12: Identifying Parts
Identifying parts Camera Cover panel Multi-output stand A Shutter button B Microphone C Lens cover D ON/OFF (Power) button E Power lamp F Flash G Self-timer lamp/Smile Shutter lamp/AF illuminator H Lens I LCD screen/Touch panel (Playback) button (Still) mode lamp (Movie) mode lamp M Zoom (W/T) lever (Still)/... -
Page 13: Battery Charging And The Number Of Images/Time That Can Be Recorded
Battery charging and the number of images/time that can be recorded Insert the battery pack into the battery charger. • You can charge the battery even when it is partially charged. Connect the battery charger to the wall outlet (wall socket). If you continue charging the battery pack for about one more hour after the... -
Page 14: Charging Time
(wall socket), and remove the battery pack from the battery charger. • Be sure to use the battery pack or the battery charger of the genuine Sony brand. Battery life and number of images you can record/... -
Page 15: Using The Camera Abroad
• The number of still images that can be recorded is based on the CIPA standard, and is for shooting under the following conditions. (CIPA: Camera & Imaging Products Association) – [LCD Brightness] is set to [Normal]. – Shooting once every 30 seconds. –... -
Page 16: Inserting The Battery Pack/A Memory Card (Sold Separately)
Inserting the battery pack/a memory card (sold separately) Open the cover. Insert a memory card (sold separately). With the notched corner facing as illustrated, insert the memory card until it clicks into place. Insert the battery pack. Align the battery pack with the guide arrow inside the battery insertion slot. -
Page 17: To Remove The Memory Card
Memory card that you can use The following memory cards are compatible with this camera: “Memory Stick PRO Duo” media, “Memory Stick PRO-HG Duo” media, “Memory Stick Duo” media, SD memory card, SDHC memory card and SDXC memory card. However, all memory cards are not guaranteed to work with this camera. MultiMediaCard cannot be used. -
Page 18: To Remove The Battery Pack
When there is no memory card inserted Images are stored in the camera’s internal memory (approximately 32 MB). To copy images from the internal memory to a memory card, insert a memory card in the camera, then touch Card Tool) t [Copy]. To remove the battery pack Battery eject lever Checking the remaining battery charge... -
Page 19: Setting The Date And Time/Display Color
Setting the date and time/display color Lower the lens cover. The camera is turned on. The power lamp lights up only when the camera starts up. • You can also turn on the camera by pressing the ON/OFF (Power) button. •... - Page 20 Superimposing the date on the images The camera does not have a feature for superimposing dates on images. By using “PMB” in the CD-ROM (supplied), you can print or save images with the date. For details, see the “PMB Help”. Setting the date and time again The date and time setup screen appears automatically only when the power is turned on the first time.
-
Page 21: Shooting Still Images
Shooting still images Lower the lens cover, then confirm that the (Still) of the mode lamp is on. Hold the camera steady as illustrated. • Slide the zoom (W/T) lever to the T side to zoom. Slide to the W side to return. Press the shutter button halfway down to focus. -
Page 22: Shooting Movies
Shooting movies Lower the lens cover, then press the mode button to set the shooting mode to (Movie). Press the shutter button to start recording. Press the shutter button again to stop recording. Changing the Movie Format Touch [Movie format]. Lens cover (Settings) t (Shooting Settings), then select... -
Page 23: Viewing Images
Viewing images Press the (Playback) button. • When you play back images on a memory card that were recorded on other cameras, the database file registration screen appears. Selecting next/previous image Touch (Next)/ (Previous) on the screen. • To play back movies, touch (Playback) in the center of the LCD screen. -
Page 24: Cyber-Shot Handbook" (Pdf)
Learning more about the camera (“Cyber-shot Handbook”) “Cyber-shot Handbook”, which explains how to use the camera in detail, is included on the CD-ROM (supplied). Refer to it for in-depth instructions on the many functions of the camera. For Windows users Turn on your computer, and insert the CD-ROM (supplied) into the CD-ROM drive. -
Page 25: List Of Icons Displayed On The Screen
List of icons displayed on the screen The displayed icon positions may differ according to the shooting mode. When shooting still images When shooting movies Display Indication Scene Recognition icon White balance Destination Scene Recognition Overlay icon for Superior Auto Adjustment Vibration warning Movie shooting scene... - Page 26 Display Indication Database file full/ Database file error warning Image size/Panorama image size/Quality AF range finder frame Spot metering cross- hairs Display Indication Focus Red-eye reduction AE/AF lock NR slow shutter Shutter speed F3.5 Aperture value ISO400 ISO number +2.0EV Exposure Value Close focus Flash mode...
-
Page 27: Number Of Still Images And Recordable Time Of Movies
Number of still images and recordable time of movies The number of still images and recordable time may vary depending on the shooting conditions and the memory card. Still images Capacity Internal memory Approx. Size 32 MB 16:9(9M) 16:9(2M) Notes •... - Page 28 Movies The table below shows the approximate maximum recording times. These are the total times for all movie files. Continuous shooting is possible for approximately 29 minutes at one time. The maximum size of an MP4-format movie file is up to approximately 2GB. Capacity Quality/Size AVC HD 17M FH...
-
Page 29: Precautions
Precautions Do not use/store the camera in the following places • In an extremely hot, cold or humid place In places such as in a car parked in the sun, the camera body may become deformed and this may cause a malfunction. •... - Page 30 On the internal rechargeable backup battery This camera has an internal rechargeable battery for maintaining the date and time and other settings regardless of whether the power is on or off. This rechargeable battery is continually charged as long as you are using the camera. However, if you use the camera for only short periods, it discharges gradually, and if you do not use the camera at all for about one month it becomes completely discharged.
-
Page 31: Specifications
Specifications Camera [System] Image device: 7.81 mm (1/2.3 type) Exmor R CMOS sensor Total pixel number of camera: Approx. 12.8 Megapixels Effective pixel number of camera: Approx. 12.2 Megapixels Lens: Carl Zeiss Vario-Tessar 4× zoom lens f = 4.43 mm – 17.7 mm (25 mm – 100 mm (35 mm film equivalent)) F3.5 (W) –... - Page 32 [LCD screen] LCD panel: Wide (16:9), 8.8 cm (3.5 type) TFT drive Total number of dots: 921 600 (1 920 × 480) dots [Power, general] Power: Rechargeable battery pack NP-BN1, 3.6 V AC-LS5 AC Adaptor (sold separately), 4.2 V Power consumption (during shooting): 1.0 W Operating temperature: 0°C to 40°C (32°F to 104°F)
- Page 33 • “Blu-ray Disc” and the logo are trademarks. • “AVCHD” and “AVCHD” logotype are trademarks of Panasonic Corporation and Sony Corporation. • Dolby and the double-D symbol are trademarks of Dolby Laboratories. • HDMI, the HDMI logo and High- Definition Multimedia Interface are trademarks or registered trademarks of HDMI Licensing LLC.
- Page 68 × × × × ×...
- Page 70 ® ®...
- Page 74 Рік виготовлення Для споживачів з Європи Примітка для покупців у країнах, де діють директиви ЄС Цей виріб виготовлено компанією Sony Corporation, 1-7-1 Konan Minato-ku Tokyo, 108-0075 Japan (Японія). Уповноваженим представником з питань електромагнітної сумісності та безпеки виробу є компанія Sony Deutschland GmbH, Hedelfinger Strasse 61, 70327 Stuttgart, Germany (Німеччина).
- Page 104 × × × × ×...
- Page 105 ® ®...
- Page 108 Printed in Japan...