
Related Manuals for IOGear GUIP201 M1023

Summary of Contents for IOGear GUIP201 M1023
- Page 1 Installation Installation Installation Guide USB Net ShareStation User Manual GUIP201 Part No. M1023...
-
Page 3: Table Of Contents
Table of Contents Introduction About this Manual Package Contents How it works Hardware Installation Windows XP/2000 Installation Connecting to a USB device Connecting to a Multifunction printer Connecting to a USB hub Disconnecting a USB device Request to Disconnect Vista Installation Connecting a USB device in Vista Connecting a USB hard drive in Vista Connecting to a USB hub in Vista... -
Page 4: Introduction
Introduction Thank you for purchasing the IOGEAR USB Net ShareStation Multifunction Print and Storage Server (hereafter referred to as “server”). This server is designed to connect your All-In-One/Multifunction devices, standard printers, and USB storage devices (hard drives, fl ash drives, and memory card readers) to your... -
Page 5: About This Manual
This manual provides introductory information as well as detailed instructions on how to set up and manage the IOGEAR USB Net ShareStation in various network environments. To fully benefi t from this document, you should be familiar with basic networking principles. The instructions de- scribed in this manual are based on the settings in a new server. -
Page 6: Package Contents
Package Contents Verify that nothing is missing from the package by using the checklist below. Please contact your dealer if anything is missing or damaged. All packing materials are recyclable. Please confi rm the items in the package below: 1 x USB Net ShareStation 1 x User Manual 1 x Software CD 1 x Power Adapter... -
Page 7: How It Works
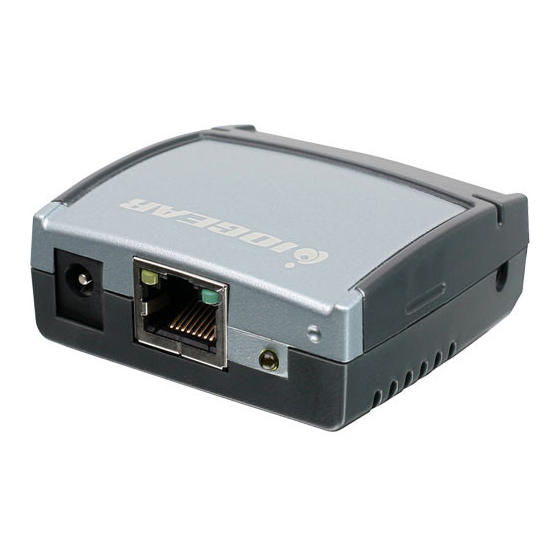
How it works Power Adapter Port Network Port USB Port... -
Page 8: Hardware Installation
Hardware Installation Hardware Installation *Make sure that your USB devices are switched off and that the server’s power adapter is disconnected. 1. Connect your USB device to the USB port of the USB Net ShareStation. USB device... - Page 9 2. Connect the USB Net ShareStation server to the router or switch with the Ethernet cable Ethernet Cable...
- Page 10 3. Connect the power adapter to the USB Net ShareStation server. When the Link indicator lights up, the USB Net ShareStation is correctly connected to the network. Ethernet Cable Power Adapter...
-
Page 11: Windows Xp/2000 Installation
Software Installation - XP/2K 1. Insert the Software CD into your computer. A splash screen should appear with a menu of options, including the option to install the appropriate USB Net ShareStation software, access the User Manual, or Exit out of the splash menu. - Page 12 2. The installation wizard will start the installation process, click “Next” to continue.
- Page 13 3. When the installation completes, click “Finish” to close the installation wizard.
- Page 14 4. On your desktop you will see a new IOGEAR icon called “Launch IOGEAR USB server”, double click the icon and it will bring up the IOGEAR USB server confi guration utility.
- Page 15 5. Once the IOGEAR utility is launched, Windows will prompt you with a “Found New Hardware Wizard” window. You will need to complete the wizard so that you will be able to use the USB Net ShareStation on your computer...
- Page 16 6. Click on “Install the software automatically (Recommended)” and click on Next to continue.
- Page 17 7. Windows will install the necessary drivers for the USB Net ShareStation.
- Page 18 8. Select Finish to complete the Found New Hardware Wizard.
- Page 19 9. Once you are fi nished with the Found New Hardware Wizard, the IOGEAR utility will show up and display all the active USB Net ShareStations connected on your network. In this screen, you will see the product listed as “IOGEAR GUIP201 – AA0001 (192.168.10.52)”. The “AA0001” is the last 6...
-
Page 20: Connecting To A Usb Device
USB Net ShareStation are powered on. The USB device will then show up on the IOGEAR USB Server utility underneath the “IOGEAR GUIP201.” as a green icon. The green icon indicates that the USB device is ready to be connected. If for any reason the USB device does not show up, please click the “Search”... - Page 21 2. Select the USB device that you will want to connect and click on the “Connect” button at the bottom...
- Page 22 3. Once the device has been connected, the green icon will turn orange to indicate that the connection has been established. The USB device now becomes available on your computer, and you can use this USB device as if it was directly connected to your computer.
-
Page 23: Connecting To A Multifunction Printer
IOGEAR GUIP201 and make sure your printer is powered on. You will then see the connected printer show up in the IOGEAR USB Server utility underneath the “IOGEAR GUIP201…” Select the printer from the list and click on the “Connect”... - Page 24 2. The printer will be detected as if it was plugged directly into your computer.
- Page 25 3. If this printer is connected to your computer for the fi rst time, then you will need to complete the setup wizard for the printer software and driver installation. Please follow the wizard to setup the printer. Make sure you have the correct CD or drivers for your printer and follow the on-screen steps in the wizard.
-
Page 26: Connecting To A Usb Hub
USB 2.0 hub (4-port maximum) to the USB Net ShareStation. Connect the USB cable of the USB hub to the USB port on the IOGEAR USB Net ShareStation, then connect the USB device(s) to the USB ports on the USB hub. Make sure the power adapter of the... - Page 27 2. After the USB device(s) are connected to the USB hub, the IOGEAR utility will automatically display the connected USB devices. If you do not see the USB device(s) that are connected, press Search to refresh the list.
-
Page 28: Disconnecting A Usb Device
Disconnecting a USB device 1. To disconnect a USB device, simply click on the connected USB device on the list of the utility software, and press the “Disconnect” button. The device will then no longer stay connected to your computer, however, you may re-connect the USB device again once the icon becomes green. -
Page 29: Request To Disconnect
Request to Disconnect 1. If a USB device is being used by another computer on your network, a red icon will be displayed in front of the device name. You will not have the option to disconnect the device, however, you may send a courtesy message to request that the other user disconnect/release the device. - Page 30 2. To send the courtesy disconnect message, right click on the USB device and select “Request Disconnect”, as shown below. A message will then be sent to the user requesting that they disconnect from the USB device. NOTE: If the occupying user denies this request, then you will not be able to send any further requests to the same user for 5 minutes.
- Page 31 The chart list below shows what each colored icon means in the confi guration software. USB device is available and ready to be connected The device is not connected but has some type of problem such as out of ink USB device has been established and is now connected Error with USB device.
-
Page 32: Vista Installation
Software Installation - VISTA 1. Insert the Software CD into your computer. A splash screen should appear with a menu of options, including the option to install the appropriate USB Net ShareSta- tion software, access the User Manual, or Exit out of the splash menu. To install the appropriate USB Net ShareStation software, click the installation button that corresponds to the operating system that... - Page 33 2. Click OK to start the installation process...
- Page 34 3. During the driver installation a Windows Vista security message will appear. Select “Install this driver software anyway” to continue.
- Page 35 4. Click on Finish to complete the installation process.
- Page 36 5. Once the installation process has been completed you will need to go to the Network window to confi gure the USB Net ShareStation. To do so, click on the Vista logo on the lower right corner of your screen and select Network from the right hand side of the menu.
- Page 37 6. The USB Net ShareStation icon will appear under other devices on the Network window. If the USB Net ShareStation or any other network icons in the network window do not appear, then a message will show up across the network screen indicating that Network Discovery is turned off.
- Page 38 7. To turn Network Discovery on, right click on the message, then select “Turn on network discovery and fi le sharing” from the list. Once Network Discovery has been enabled you will be able to see the USB Net ShareStation icon under Other Devices. If you are prompted by a User Account Control message notifying you that “Windows needs your permission to continue”...
- Page 39 8. Select “Yes, turn on network discovery and fi le sharing for all public networks”.
- Page 40 9. Right click on the USB Net ShareStation “IOGEAR GUIP201…” icon, and select “Install” to begin using the USB Net ShareStation.
- Page 41 10. Click on the blinking window at the system tray which is prompted by the “User Account Control” permission window. Click Continue to proceed with the installation.
- Page 42 11. After the driver installation has been completed the “IOGEAR GUIP201…” icon will change to a new product image. If the new product image icon does not change, press “F5” to refresh the Network window. Before installing the driver After driver installation the device icon will change.
-
Page 43: Connecting A Usb Device In Vista
Connecting to a USB device in Vista 1. After you have successfully installed the USB Net ShareStation driver, connect the USB device to the USB Net ShareStation and make sure both the USB device and the USB Net ShareStation are powered on. - Page 44 3. Right click on the USB device that you will want to connect and select “Connect” to establish the connection. You will see the device driver is installing and the status will show at the bottom right corner on your system tray. This message will go away once the drivers have been installed. After the installation is completed, the USB device will become available as if it were directly connected to your computer.
-
Page 45: Connecting A Usb Hard Drive In Vista
Connecting to a USB hard drive in VISTA 1. Connect the USB cable of the USB hard drive to the USB port on the USB Net ShareStation, and make sure both the USB hard drive and the USB Net ShareStation are powered on. After the USB hard drive is connected, the device icon will display in the Network widow. - Page 46 2. You will now see the external hard drive become available as if it were directly connected to your computer.
-
Page 47: Connecting To A Usb Hub In Vista
USB 2.0 hub (4-port maximum) to the USB Net ShareStation. Connect the USB cable of the USB hub to the USB port on the IOGEAR USB Net ShareStation, then connect the USB device(s) to the USB ports on the USB hub. Make sure the power adapter of the USB hub is plugged in and powered on. -
Page 48: Disconnecting A Usb Device In Vista
Disconnecting a USB device in Vista To safely disconnect a USB device under the Network window, right click the USB device icon and select “Disconnect” from the menu. Once the USB device has been disconnected, it will no longer be connected to your computer, and you can unplug the USB cable of the USB device from the USB Net ShareStation. -
Page 49: Request To Disconnect In Vista
Request to Disconnect in Vista If you would like to use a USB device that is being occupied by another user you may send a courtesy message asking the user to disconnect. You may do this by right clicking on the USB device icon that you will like to use and selecting “Request Remote to Disconnect.”... - Page 50 NOTE: after a system reboot, you might not be able to connect to any USB device for a short period of time. When right clicking on a device, you will see the following message instead of the option to “Connect.” Depending on the performance of your PC and the number of active USB Net ShareStations on your network, it may take up to 3 minutes...
-
Page 51: Setting Polling Interval - Xp
By default, this feature is not automatically confi gured. You may set a time so that the server will perform the polling automatically. To confi gure the polling interval, in the IOGEAR USB Server utility, click on File -> Settings -> Polling Interval. - Page 52 You may set a number from 1 – 60 in the “Seconds” box. Click on Submit to allow the new interval setting to take effect. Once you have set a number the utility will automatically update any changes made to server in the main dialog box.
-
Page 53: Web Management Interface
Web Management Interface To access web management interface in XP, in the IOGEAR USB Server utility, select the USB Server on the list, and click on the Confi g button. - Page 54 2. To access web management interface in VISTA, in the Network window, right click on the “IOGEAR GUIP201…” icon, and select “View device webpage.”...
- Page 55 3. The left panel of the web management interface provides a list of different options to choose from. Device Status: Displays the current USB device info and will tell you which computer a USB device is connected to. The interface is limited to support up to 4 USB devices.
- Page 56 Network: You can change the network settings according to your network specifi cations. If you would like to give the USB Net ShareStation a static IP address, you will need to Disable DHCP in the “DHCP Setting” menu. Once DHCP is disabled, enter the desired IP address on the IP address fi eld along with the subnet mask and click the “Submit”...
- Page 57 “Browse” to specify the fi rmware location on your PC. Once the location path of the fi rmware has been set, click “Submit” to begin the update. For all the latest fi rmware updates, please visit http://www.iogear.com/support/dm/ Please note that if the USB Net ShareStation has a set password, you will need to enter it into the...
- Page 58 Reset Device: The Reset Device window will allow you to reboot the USB Net ShareStation server. Please note that if the USB Net ShareStation has a set password, you will need to enter it into the password fi eld box.
- Page 59 Factory Default: Allows you to restore the USB Net ShareStation back to factory default. Please note that if the USB Net ShareStation has a set password, you will need to enter it into the password fi eld box.
- Page 60 Password Change: You can add or change an existing password on the USB Net ShareStation in this window. By default the USB Net ShareStation does not come with a default password.
-
Page 61: Faq
• Although the USB Net ShareStation could work with a very wide spectrum of USB devices, it still has limited support on some USB devices. Please refer to the supported device list for details. 2. How come I cannot see any servers on my IOGEAR USB Server listing window after installing it? Please make sure that all of your USB Net ShareStations are correctly connected to your network. -
Page 62: Fcc Statement
Federal Communications Commission (FCC) Statement 15.21 You are cautioned that changes or modifi cations not expressly approved by the part responsible for compliance could void the user’s authority to operate the equipment. 15.105(b) This equipment has been tested and found to comply with the limits for a Class B digital device, pursu- ant to part 15 of the FCC rules. - Page 63 Operation is subject to the following two conditions: 1) this device may not cause interference and 2) this device must accept any interference, including interference that may cause undesired operation of the device. FCC RF Radiation Exposure Statement: This equipment complies with FCC radiation exposure limits set forth for an uncontrolled environment. End users must follow the specifi...
-
Page 64: Ce Statement
CE Statement This device has been tested and found to comply with the requirements set up in the council directive on the approximation of the law of member states relating to EMC Directive 89/336/EEC, Low Voltage Directive 73/23/EEC and R&TTE Directive 99/5/EC. - Page 65 Limited Warranty IN NO EVENT SHALL THE DIRECT VENDOR’S LIABILITY FOR DIRECT, INDIRECT, SPECIAL, INCIDENTAL OR CONSEQUENTIAL DAMAGES RESULTING FROM THE USE OF THE PRODUCT, DISK OR ITS DOCUMENTATION EXCEED THE PRICE PAID FOR THE PRODUCT. The direct vendor makes no warranty or representation, expressed, implied, or statutory with respect to the contents or use of this documentation, and especially disclaims its quality, performance, merchant- ability, or fi...
-
Page 66: Contact
Microsoft Corporation. All other brand and product names are trademarks or registered trademarks of their respective holders. IOGEAR makes no warranty of any kind with regards to the information presented in this document. All information furnished here is for informational purposes only and is subject to change without notice. - Page 68 The use of our technology solutions helps reduce electronic waste. HEALTH IOGEAR supports healthy and fi t lifestyles. By integrating products with the latest scientifi c developments, IOGEAR’s solutions enhance the life of end- users.