Table of Contents
Advertisement
Advertisement
Table of Contents

Related Manuals for Intel NetStructure 470


Summary of Contents for Intel NetStructure 470
- Page 1 Intel NetStructure ® ™ 470 Switch User Guide...
- Page 2 Intel Corporation, 5200 NE Elam Young Parkway, Hillsboro OR 97124-6497 Intel Corporation assumes no responsibility for errors or omissions in this manual. Nor does Intel make any commitment to update the information contained herein. Intel is a trademark or registered trademark of Intel Corporation or its subsidiaries in the United States and other countries.
-
Page 3: Table Of Contents
Contents Intel® NetStructure 470T and 470F Switches User Guide 1 Setting up the Intel® NetStructure™ 470T and 470F Switches Overview ... 1 Management ... 1 Switch Features ... 2 LEDs ... 3 Connection Guidelines ... 4 Straight-through vs. Crossover Cables ... 4 2 Using the Intel®... - Page 4 Intel® NetStructure 470T and 470F Switches User Guide 4 Using the Web Device Manager Overview ... 27 Accessing the Web Device Manager ... 28 Navigating the Web Device Manager ... 28 Using Management Screens ... 29 Configuring the Switch’s IP Settings ... 31 Configuring a Port ...
- Page 5 Intel® NetStructure 470T and 470F Switches User Guide Configure IGMP Snooping ... 65 Configure Static MAC Addresses ... 66 Configure Port Security ... 67 Configure MAC Address Filtering ... 68 Configure Ethernet Multicast Filtering ... 69 Ethernet Multicast Filtering (Ports) ... 70 Port Mirroring ...
- Page 6 Browse Address Table ... 110 VLAN and GVRP Status ... 112 Tools ... 113 Switch Event Log ... 114 Ping a Device ... 115 Upload Configuration Image File ... 116 Save Settings ... 117 Appendix A: Technical Information Index Intel Customer Support...
-
Page 7: Setting Up The Intel Netstructure™ 470T And 470F Switches Overview
• Other SNMP-compliant applications can manage the switches if you aggregation and VLANs Network Manager, HP OpenView*, and IBM Tivoli NetView* are tailored for Intel products and show a graphical representation of the device. SNMP application. The Web Device Manager provides a graphical interface while Local Management is a menu-driven interface. -
Page 8: Switch Features
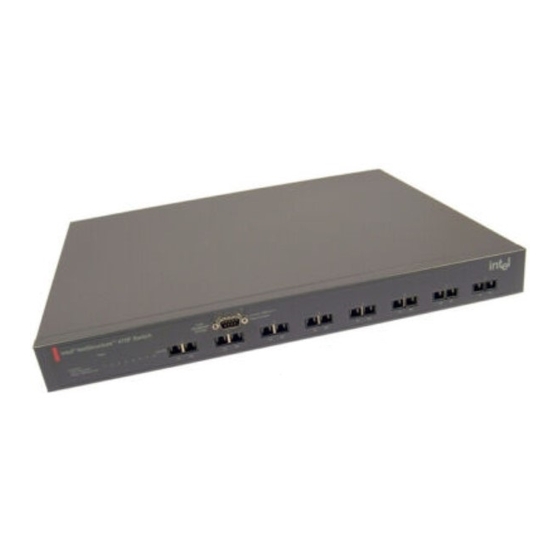
Status Status Intel® NetStructure™ 470T and 470F Switches User Guide Switch Features These are the major features of the 470 switches. 8-port 470F Switch (Product Code ES470F) Serial Link/Activity LEDs Port 6+2-port 470T Switch (Product Code ES470T) Speed LEDs Link/Activity LEDs... -
Page 9: Leds
The LEDs to the left of the ports indicate port status, individual port speed, and activity. NOTE After the switch is turned on, the Status LED blinks green once before the diagnostic mode starts. Setting Up the Intel® NetStructure™ 470T and 470F Switches 470F Status 470T Status State... -
Page 10: Connection Guidelines
NOTE Use certified Category 5 cables to connect 1000Mbps devices to the switch. Intel® NetStructure™ 470T and 470F Switches User Guide Connection Guidelines General • The 470T switch is can auto-negotiate port duplex. It can operate at half-duplex or full-duplex at 100Mbps, and full-duplex at 1000Mbps. - Page 11 Setting Up the Intel® NetStructure™ 470T and 470F Switches Crossover UTP cable (100Mbps) Switch (MDI-X) Hub (MDI-X) Straight-Through UTP cable (1000Mbps) Switch (MDI) Switch (MDI)
- Page 12 Intel® NetStructure™ 470T and 470F Switches User Guide...
-
Page 13: Using The Intel Netstructure™ 470T And 470F Switches Overview
NetStructure™ 470T and 470F Switches Overview Chapter 2 provides an overview for using the Intel and 470F Switches within a network. This chapter covers switching features like flow control and spanning tree, and includes a discussion of the more advanced features such as link aggregation and the types of VLANs available on the switch. -
Page 14: Sample Configuration
The following example illustrates how the 470T and 470F switches can be used in a network. In this example, the Intel NetStructure 480T Routing Switch is the backbone of the network, providing routing capability. The 470T and 470F switches provide gigabit connectivity from the 480T to the Intel Express 460T Standalone Switches through the 460T gigabit uplinks. -
Page 15: Flow Control
Flow Control During heavy network activity, the switch’s port buffers can receive too much traffic and fill up faster than the switch can send the information. In cases like this, the switch tells the transmitting device to wait until the information in the buffer can be sent. -
Page 16: Spanning Tree Protocol
Intel® NetStructure™ 470T and 470F Switches User Guide The switch checks the amount of broadcast traffic on each port every 20 seconds. If the port detects that the amount of broadcast traffic exceeds the upper threshold on two subsequent checks, the port drops all broadcast traffic. -
Page 17: Tagged Frames
Priority tagging (also known as Traffic Class Expediting) is usually set on the LAN adapter in a PC or switch and works with other elements of the network (switches, routers) to deliver packets based on priority. -
Page 18: Link Aggregation
Although there are eight priority levels, the 470 switches can only put a packet into one of the two queues. The switch maps levels 0-3 to the low queue and levels 4-7 to the high queue. If a packet is untagged, the switch can be set to use either the high or low queue for that port. -
Page 19: Virtual Lans
VLAN receive traffic only from other members. Creating a VLAN is the virtual equivalent to physically moving a group of devices to a separate switch (creating a Layer 2 broadcast domain). With VLANs you can reduce broadcast traffic for the entire switch, and increase security, without changing the wiring of your network. - Page 20 If a user changes to another location, the system administrator reassigns the port to the new VLAN. If a switch (or hub) is connected to a port that is part of a VLAN, all devices connected to the switch are also part of the VLAN.
- Page 21 (e.g. marketing), improves security (engineering can’t see marketing), and eases moves because the user doesn’t have to be physically located in the same group to participate in the VLAN. Using the Intel® NetStructure™ 470T and 470F Switches Intel ® NetStructure ™...
- Page 22 For example, you can attach a LAN using NetBEUI traffic to port 1 on the switch, and attach a LAN using IPX traffic to port 2 on the switch. Then, attach a router connected to the Internet, to port 8. Create an IP VLAN that incorportates ports 1, 2, and 8.
-
Page 23: Garp Vlan Registration Protocol (Gvrp)
Using the Intel® NetStructure™ 470T and 470F Switches Spanning Tree Protocol and VLANs The 470 switches support the Spanning Tree Protocol across the entire switch, not across each VLAN. If VLANs create a redundant link between two switches and both of those switches have the Spanning Tree Protocol enabled, one of the VLANs is disabled. -
Page 24: Internet Group Management Protocol (Igmp)
If the device sending out the GVRP updates is removed, the dynamic VLAN is removed. Intel® NetStructure™ 470T and 470F Switches User Guide GARP (Generic Attribute Registration Protocol) is defined by the IEEE 802.1D (1998 Edition) specification and is the mechanism used by switches and end nodes (servers, PCs, and so on) to propagate configuration across the network domain. -
Page 25: Using Intel Device View Overview
Device View allows you to manage Intel NetStructure™ 470T and • The ability to configure new network devices • A graphical device manager for Intel switches, hubs, and routers • Autodiscovery, which finds supported Intel devices on the network • The Device Tree, which shows all the supported devices detected on your network •... -
Page 26: Installing Intel Device View
CD-ROM. 2 Choose the version of Intel Device View you want to install. • To install Intel Device View for use on this PC only, click Install for Windows. • To install Intel Device View on a Web server, click Install for Web. -
Page 27: Starting Intel Device View
Install either the Windows or Web version of Intel Device View. Windows* version On your desktop, click Start and then point to Programs > Intel Device View > Intel Device View - Windows to go to the Intel Device View main screen. Web version NOTE... -
Page 28: Installing A New Switch
NetStructure™ 470T and 470F Switches User Guide Installing a New Switch After you install a new switch on your network, you can use the Intel Device View Device Install Wizard to configure it for management. To install and configure a new switch for management 1 Start Intel Device View. - Page 29 1 Right-click anywhere on the Device Tree. 2 On the menu that appears, click Add Device. 3 In the Add Device dialog box, type the IP address of the switch you want to add. 4 Fill in the other fields, as appropriate.
- Page 30 The device icon is highlighted in the Device Tree. Losing contact with a switch If Intel Device View loses contact with a switch, the color of the switch icon changes to red, to indicated that the switch is not responding.
-
Page 31: Managing A Switch
The 470 switch Web Device Manager appears in the Intel Device View window. For information about using the Web Device Manager, see Ch. 4. For information about using Intel Device View, see the Help or the User Guide on the Intel Device View installation CD-ROM. - Page 32 For example, when the switch experiences an RMON Event, it sends out an alarm. The switch also keeps a log that shows a list of the RMON Events and RMON Alarms that have occurred on the switch.
-
Page 33: Using The Web Device Manager Overview
Device Manager Overview With the Web Device Manager, which is built into the Intel 470T and 470F Switches, you can use a Web browser to manage and monitor the switch. For example, you can use the Web Device Manager to configure the switch or individual ports, or to monitor traffic statistics and utilization. -
Page 34: Accessing The Web Device Manager
Accessing the Web Device Manager 1 In the Location or Address field of your Web browser type the IP address of the switch. For example, to use the default IP address of the switch, type 192.0.2.1 and then press Enter. -
Page 35: Using Management Screens
After you select an option from the navigation menu, the corresponding screen appears on the right side of the Web Device Manager window. Switch faceplate graphic A graphical representation of the switch’s faceplate appears at the top of the screen. 470F... - Page 36 Intel® NetStructure™ 470T and 470F Switches User Guide If the option you selected allows you to configure or monitor a specific port, you can change to another port by clicking it on the faceplate graphic. Port color on the faceplate graphic indicates the status of the port.
-
Page 37: Configuring The Switch's Ip Settings
5 Click Save and Reboot for the new settings to take effect. Rebooting the switch temporarily interrupts network connectivity to the switch. Click Reboot Later if you want to reboot the switch later. The new IP settings do not take effect until the switch reboots. -
Page 38: Configuring A Port
IP settings, you must reboot the switch before the new settings can take effect. Intel® NetStructure™ 470T and 470F Switches User Guide Configuring a Port You can use the Web Device Manager to enable or disable a port, and to change its speed, duplex, flow control, and priority settings. -
Page 39: Managing User Accounts
Managing User Accounts Create user accounts to give specific users read or write access to the switch through the Web Device Manager and Local Management. You can create a maximum of three accounts on the switch. To create a user account... - Page 40 If you delete the account you used to log in for this session, you can continue to use that account until you log out. If you delete the only user account on the switch, log in again using the default of no user name and no password.
-
Page 41: Configuring Vlans
2 In the Current VLAN mode box, click the type of VLAN to set up. 3 Click Submit. 4 The switch automatically reboots. The 470 switches are rebooted whenever you change their VLAN operation mode. After the switch reboots, you can configure the type of VLAN that you selected. - Page 42 Intel® NetStructure™ 470T and 470F Switches User Guide Port-based VLAN You configure a port-based VLAN by creating the VLAN and then adding participating ports. The switch can support up to four port-based VLANs. However a port can be a member of only one VLAN; port-based VLANs cannot overlap.
- Page 43 Available ports box and click Add. To remove a port, click the port in the Member ports box and click Remove. • The switch supports a maximum of 12 IGMP Snooping sessions to manage broadcast traffic. If you want the VLAN to be part of an IGMP Snooping session, select the Enable IGMP Snooping check box.
- Page 44 Intel® NetStructure™ 470T and 470F Switches User Guide 2 Configure ports for egress (outbound) tagging. • Ensure that the VLAN Name field displays the name of the port you are configuring. • For each of the VLANs ports select Tag or Untag. This determines whether or not the system will remove (untag) tags before sending traffic out of each port.
- Page 45 7 belong to VLAN 100. The default setting for all ports is VID 1. • GVRP: Allows automatic VLAN configuration between the switch and nodes. • Ingress Filtering: Allows frames belonging to a specific VLAN to be forwarded if the port belongs to the same VLAN.
- Page 46 Intel® NetStructure™ 470T and 470F Switches User Guide Protocol-based VLAN You configure a protocol-based VLAN by creating the VLAN and then adding participating ports. The switch supports up to three protocol-based VLANs: IP, IPX, and NetBEUI. However, each port can be a member of only one VLAN;...
-
Page 47: Link Aggregation
6 Click Submit. Static MAC Addresses The switch has a MAC address table that stores all the MAC addresses that it learns from the network. The switch refers to this table forwarding traffic to specific ports, so it does not broadcast traffic to every port. - Page 48 Monitor menu, click Advanced, and then click MAC Address Table. Intel® NetStructure™ 470T and 470F Switches User Guide • You can manually add MAC addresses to the table. These are called static addresses, because they remain in the table until you remove them, even if the associated node is inactive or removed from the network.
-
Page 49: Setting Up Priority Tagging
When you define priority tagging, you can specify a priority value from 0 (low) to 7 (high). Traffic with a priority value of 0–3 is routed through the switch’s low priority queue. Traffic with a priority value of 4–7 is routed through the switch’s high priority queue. -
Page 50: Configuring Community Strings And Trap Receivers
A trap receiver is a computer on the network that is running an SNMP management application and receives messages sent by the switch. For example, the switch can send a trap to the trap receiver when it detects a change in port speed. -
Page 51: Monitoring Switch Activity
Monitoring Switch Activity With the Web Device Manager you can view traffic, utilization, and error statistics for the switch and for individual ports. For more information on statistics, see “Port Traffic Statistics,” “Port Error Statistics,” and “Packet Analysis” in Chapter 5. -
Page 52: Viewing/Changing Switch Information
Intel® NetStructure™ 470T and 470F Switches User Guide Viewing/Changing Switch Information You can view general information about the switch, such as its MAC address, firmware version, name, location, and contact person. Some of these fields can be updated, others are view-only. -
Page 53: Updating Switch Firmware
On the Update Firmware screen you can set up the switch to update its firmware from a TFTP server. If you do not have a TFTP server set up on your network, you can install the TFTP server software by installing Intel Device View. -
Page 54: Saving Configuration Changes And Logging Out
Intel® NetStructure™ 470T and 470F Switches User Guide 5 In the File Name box, type the name of the firmware file. 6 Click Submit. The switch automatically reboots. The next time the switch reboots it downloads and installs the new firmware during the boot process. -
Page 55: Using Local Management Overview
Device Manager using a text-based interface. Accessing Management You can access Local Management in two different ways: by connecting directly to the switch’s serial port, or through a Telnet session (using an assigned IP address or the default of 192.0.2.1). To use the serial port... -
Page 56: Logon Screen
Intel® NetStructure™ 470T and 470F Switches User Guide To useTelnet 1 Open a Telnet application. In Windows 98 or Windows NT*, select Run from the Start Menu, and then type telnet and press E. 2 On the Terminal menu, select Preferences. Make sure the emulation type is VT-100/ANSI and that VT100 arrows are enabled. -
Page 57: Navigation
Navigation The console menus provide a basic interface for configuring switch options. For navigation tips, see the text below the graphic. Help text at the bottom of the screen provides infor- mation on the selected item. Screen Legend Use the W Z A S keys or the T and b keys to move between screen fields. -
Page 58: Main Menu (Top Screen)
LOCATION To return to the Main Menu at any time, press c T. Intel® NetStructure™ 470T and 470F Switches User Guide Main Menu (Top Screen) Description The Main Menu is the starting point for all other Local Management screens. Use the W Z arrow keys to select an option, and then press E to display the screen. -
Page 59: Configure Device
Configure Device Description IP settings: Configures the switch’s IP address, subnet mask, and default LOCATION gateway, or enables BOOTP. Main Menu Port settings: Enables and disables ports, configures port speed, duplex, Configure Device flow control, and priority. GBIC port settings (470T only): Enables and disables ports, configures port speed, duplex, flow control, and priority. -
Page 60: Ip Settings
IP address dynamically, or if you assign an address manually. IP address: Displays the IP configuration used by the switch. Use the IP address shown here to access the switch through Telnet or a ping test. Subnet mask: Matches the mask for other devices on the network. -
Page 61: Port Settings
Port Settings Description Configure ports: Selects a range of ports to configure (press z). LOCATION State: Disables or enables ports (press z). Main Menu Configure Device Speed/Duplex: Changes the speed and duplex of the port (press z). Port Settings You can set the port to auto-negotiate speed, or to 100Mbps or 1000Mbps at half-duplex or full-duplex. -
Page 62: Flow Control
Even though there are eight priority levels, the switch can only route a packet into one of the two queues. The switch maps levels 0-3 to the low queue and levels 4-7 to the high queue. If a packet is untagged, the switch... -
Page 63: Configure Gbic Ports (470T Only)
Using Local Management Configure GBIC Ports (470T only) Description Port 7- and 8-GBIC: Displays the type of GBIC installed on the switch. State: Disables or enables ports (press z). Speed/Duplex: The GBIC ports operate at 1000Mbps/full-duplex only; this is a view-only field. -
Page 64: Priority Tagging
When you define priority tagging, you can specify a priority value from 0 (low) to 7 (high). Traffic with a priority value of 0 - 3 is routed through the switch’s low priority queue. Traffic with a priority value of 4 - 7 is routed through the switch’s high priority queue. -
Page 65: Switch Settings
Description: Displays description of switch. Port 7- and 8-GBIC: Displays the type of GBIC detected, if applicable. MAC address: Displays the unique hardware address assigned by Intel. Boot PROM version: Displays the version of the switch’s boot code. Firmware version: Displays the version of the firmware installed on the switch. -
Page 66: Configure Advanced Switch Settings
Normally, when the switch sends traffic out from a port, the data goes to the port’s transmit queue and then is sent out. If the port’s transmit queue is already busy trying to send out data the switch places the waiting traffic in the buffer memory until the port is ready to send it out. -
Page 67: Configure Spanning Tree Protocol
Spanning Tree status: Enables or disables (press z) support for the Spanning Tree Protocol, where the entire switch is a bridge for which you can set spanning tree parameters. (Note: If you are running 802.1Q VLANs, spanning tree is turned on automatically by the switch.) Topology changes: Displays the number of times the spanning tree has changed its configuration. - Page 68 Intel® NetStructure™ 470T and 470F Switches User Guide Hello time: Displays the time between transmissions of configuration BPDUs (Bridge Protocol Data Units) when the switch is, or is attempting to become, the root in the spanning tree. Type a number from 1 to 10 seconds (default is 2 seconds).
-
Page 69: Configure Spanning Tree For Ports
0 to 65535. The higher the value, the lower the chance of this port being used as the root port. If two ports on the switch have the same priority value, the spanning tree uses the port with the lowest number. For example, the spanning tree would choose port 1 over port 4 if they both had the same priority setting. -
Page 70: Forwarding And Filtering
LOCATION Main Menu Configure Device Forwarding and Filtering Intel® NetStructure™ 470T and 470F Switches User Guide Forwarding and Filtering Description Lock address table: Determines if the table learns new MAC addresses (press z). <Yes> prevents the switch from learning new MAC addresses. -
Page 71: Configure Igmp Snooping
IGMP Snooping state: Enables or disables IGMP Snooping (press IGMP Snooping age-out timer: Indicates the amount of time (in seconds) the switch waits to receive IGMP queries. The default time is 300 seconds. A query allows the server to determine which network hosts are (or want to be) part of the IP multicast group, and are configured and ready to receive traffic for the given application. -
Page 72: Configure Static Mac Addresses
If tag-based or port-based VLANs are currently active, you must assign each static MAC address to a specific VLAN. Intel® NetStructure™ 470T and 470F Switches User Guide Configure Static MAC Addresses Description Static MAC addresses are MAC addresses that remain in the switch’s address table, whether or not the device is physically connected to the switch. -
Page 73: Configure Port Security
Port security prevents unauthorized access of a port by “securing” a list of LOCATION specific MAC addresses to a port. If the switch sees a MAC address that is Main Menu not on the secured list, it discards the packet. -
Page 74: Configure Mac Address Filtering
Description MAC address filtering allows the switch to drop unwanted packets. The switch drop a packet when it sees the specified MAC address in either the source address or destination address. For example, if your network is congested because of high utilization from a specific MAC address, you can filter all packets transmitted from that address and restore network flow while you troubleshoot the problem. -
Page 75: Configure Ethernet Multicast Filtering
VLAN/VLAN ID: Indicates VLAN or VLAN ID. If VLANs are active on Configure Device the switch you can set Ethernet multicast filtering on a per VLAN basis. Forwarding and Filtering For port-based VLANs, press z to select the name of VLAN. For Configure Ethernet... -
Page 76: Ethernet Multicast Filtering (Ports)
Configure Device Forwarding and Filtering Configure Ethernet... Multicast filters per port Intel® NetStructure™ 470T and 470F Switches User Guide Ethernet Multicast Filtering (Ports) Description Action: Blocks or forwards traffic to the selected port (press z). APPLY CHANGES: Applies the changes to the multicast filter after you configure the ports. -
Page 77: Port Mirroring
LOCATION Main Menu Configure Device Port Mirroring NOTE Do not mirror traffic to a target port that is connected to a network device other than a protocol analyzer. The device’s behavior may be unpredictable. Using Local Management Port Mirroring Description Port mirroring is a diagnostic tool you can use to send a copy of the good Ethernet frames transmitted or received on one port to another port. -
Page 78: Link Aggregation
Link Aggregation Description Link aggregation is a way of combining ports on the switch to increase the available bandwidth and provide redundant links. All ports in the aggregated link take on the characteristics of the anchor port. This means if you set the anchor port to 1000Mbps full duplex (470T only), all the ports aggregated to that anchor port share the same setting. -
Page 79: Broadcast Storm Control
LOCATION Main Menu Configure Device Broadcast Storm Control Using Local Management Broadcast Storm Control Description You can use broadcast storm control to filter out broadcasts from faulty devices to prevent them from degrading network performance. For a more information about of broadcast storm control, see Chapter 2. Setting: Enables or disables broadcast storm control on each port (press Upper Threshold: Sets the threshold of broadcast traffic on a port (shown as a percentage of the port’s total bandwidth) that activates broadcast storm... -
Page 80: Configure Management Menu
Update firmware and configuration files: Configures the switch’s internal software and specifies the location of configuration files. Reset and console options: Reboots the switch or changes the settings on the serial port. You can also use this option to set the switch back to its factory defaults. -
Page 81: Community Strings & Trap Receivers
SNMP management application by sending a trap to the SNMP management stations (for example, PCs) defined here. Station IP address: Displays the IP addresses of PCs with SNMP applications (such as Intel Device View or LANDesk Manager) installed. State: Enables or disables sending of traps to the specified trap receiver. -
Page 82: Administer User Accounts
New password: Sets a new password for accessing Local Management. The password you specify here is used the next time you reset the switch or log out and log in to Local and Web Management. Passwords are case-sensitive and can be up to 15 characters long. - Page 83 Using Local Management Access level: Establishes a user’s access rights (press z). Administrators can make any changes to Local Management. All other users (categorized under Normal user) can view information but cannot make changes. To change a user’s access rights, see the “To modify a user’s access level”...
-
Page 84: Managing User Accounts
Intel® NetStructure™ 470T and 470F Switches User Guide Managing User Accounts System Administrators can create up to three user accounts for managing the switch. You can also change the access rights for current users and delete user accounts. Make sure you always set up at least one Administrator account. - Page 85 Using Local Management 6 To save the new password, press T to select SAVE CHANGES (below the Confirm new password field) and press E . To modify a user’s access level 1 On the Main Menu, select Configure Management, and then press E.
-
Page 86: Define Ip Access List
Define IP Access List Description Users with IP addresses defined on the access list can manage the switch. If user names and passwords are set up, the user must also enter a valid user name and password when accessing the console. If you do not create an access list, any user with a valid user name and password can manage the switch. -
Page 87: Update Firmware And Config Files
Update Firmware and Config Files Description Software update mode: Choose to update switch firmware over the LOCATION network or through a serial port. SLIP/PPP is available only after changing the Port setting in the Reset and Console Options in the Configure Main Menu Management menu (press z). -
Page 88: Reset And Console Options
LOCATION Main Menu Configure Management Reset and Console Options Intel® NetStructure™ 470T and 470F Switches User Guide Reset and Console Options Description Reset Options Reboot switch: Reboots the switch. If you changed the IP configuration or login setting, the new settings take effect after you select this option. -
Page 89: Configure Vlan Operation Mode
Use this screen to activate or change the type of VLAN operating on the switch. If there are no VLANs active on the switch, this is the first screen displayed when you select Configure VLAN from the Main Menu. By default, VLANs are not active on the Intel Switches so they must be activated before you can start configuring them. -
Page 90: Port-Based Vlans
A port can only be a member of a single port-based VLAN. Any port that is not a member of a user-defined VLAN is a member of the DEFAULT_VLAN. -
Page 91: Add A Port-Based Vlan
LOCATION Main Menu Configure VLAN Add a Port-based VLAN Using Local Management Add a Port-based VLAN Description VLAN Name: Assigns a name to the VLAN. Names can consist of any character (no spaces) and be up to 12 characters long. After a VLAN is created the name cannot be changed. -
Page 92: Edit/Delete A Port-Based Vlan
NOTE The DEFAULT_VLAN cannot be deleted from the switch. Intel® NetStructure™ 470T and 470F Switches User Guide To create a port-based VLAN 1 On the Main Menu, select Configure VLAN. Note: Make sure the switch’s current VLAN operation mode is set to port-based VLAN. -
Page 93: Change Port Membership In A Vlan
LOCATION Main Menu Configure VLAN Edit/Delete a Port-based VLAN Using Local Management Change Port Membership in a VLAN Description This screen is similar to the VLAN creation screen. You can change the membership status of ports within the VLAN but you cannot change the name of the VLAN. -
Page 94: Configure 802.1Q Vlans
LOCATION Main Menu Configure VLAN Intel® NetStructure™ 470T and 470F Switches User Guide Configure 802.1Q VLANs Description VLAN operation mode: Changes the type of VLAN operating on the switch, or disables VLANs entirely. Create an IEEE 802.1Q VLAN: Creates a new 802.1Q VLAN and adds ports to the VLAN. -
Page 95: Add An Ieee 802.1Q Vlan
4094. The DEFAULT_VLAN (created when you select a VLAN mode) has a VID of 1. Allow IGMP Snooping: Indicates if the switch performs IGMP snooping on this VLAN (press z). A maximum of 12 IGMP snooping sessions are allowed. -
Page 96: Add An Ieee 802.1Q Vlan (Configure Port Tagging)
Main Menu Configure VLAN Create an 802.1Q VLAN Add an 802.1Q VLAN... Intel® NetStructure™ 470T and 470F Switches User Guide Add an IEEE 802.1Q VLAN (Configure Port Tagging) Description VLAN Name: Displays the VLAN name assigned on the Add an IEEE 802.1Q VLAN (Configure Port Membership) screen. -
Page 97: Configuring 802.1Q Vlans
Configuring 802.1Q VLANs Setting up an 802.1Q VLAN is a three-step process. First, create a VLAN on the switch. Second, make sure that tagging is set up properly for your attached devices. Third, configure those devices that don’t support tagging. - Page 98 VID of the VLAN you want the port to use. Strips 802.1Q tags before sending traffic to the untagged device. When the switch needs to send traffic from a port to an untagged device, it strips the 802.1Q tag. Otherwise, the untagged device may not understand how to process the VID tag.
-
Page 99: Edit/Delete An 802.1Q Vlan
Description Use this screen to select a VLAN to edit the port membership in the VLAN LOCATION or delete the VLAN from the switch. Main Menu Action: Specifies whether you want to edit or delete a VLAN. Press Configure VLAN z to toggle between <Edit>... -
Page 100: Edit An Ieee 802.1Q Vlan (Configure Membership)
NOTE A ‘+’ next to the Member toggle indicates that port is a member of more than one VLAN. Intel® NetStructure™ 470T and 470F Switches User Guide Edit an IEEE 802.1Q VLAN (Configure Membership) Description Use this screen to change which ports are members of the VLAN. -
Page 101: Edit An Ieee 802.1Q Vlan (Configure Port Tagging)
Edit an IEEE 802.1Q VLAN (Configure Port Tagging) Description Use this screen to set the switch up to manage outgoing packets that do not contain IEEE 802.1Q VLAN tags. VLAN Name: Displays the name of the VLAN you are editing. -
Page 102: Configure Vlan Id For Untagged Traffic
Configure VLAN ID for Untagged Traffic Description Use this screen to set the switch up to manage incoming packets that do not contain IEEE 802.1Q VLAN tags or priority tagged traffic (packets with a VID of zero). This is an ingress rule only; it does not apply to outbound traffic. -
Page 103: Gvrp And Ingress Filter Settings
Configure Ports: Identifies the range of ports that you can configure (press LOCATION Main Menu GVRP: Allows the switch to create VLANs dynamically. Press z to Configure a VLAN toggle the action for each port. Options are: GVRP/Ingress Filter Settings... -
Page 104: Configure A Protocol-Based Vlan
Intel® NetStructure™ 470T and 470F Switches User Guide Configure a Protocol-based VLAN Description VLAN operation mode: Changes the type of VLAN operating on the switch, or disables VLANs entirely. Create a protocol-based VLAN: Creates a new protcol-based VLAN and adds ports to the VLAN. -
Page 105: Add A Protocol-Based Vlan
Using Local Management Add a Protocol-based VLAN Description VLAN Name: Assigns a name to the VLAN. The name can consist of any character (no spaces) and be up to 12 characters long. After a VLAN is created the name cannot be changed. Protocol: Select the protocol associated with the VLAN. -
Page 106: Edit/Delete A Protocol-Based Vlan
Intel® NetStructure™ 470T and 470F Switches User Guide Edit/Delete a Protocol-based VLAN Description Use this screen to select a VLAN, to edit the port membership in the VLAN or delete the VLAN from the switch. Action: Specifies whether you want to edit or delete a VLAN. Press z to toggle between <Edit>... -
Page 107: Edit A Protocol-Based Vlan (Configure Membership)
Using Local Management Edit a Protocol-based VLAN (Configure Membership) Description Use this screen to identify which ports are members of the VLAN. VLAN Name: Displays the name of the VLAN you are editing. Protocol: Displays the protocol assigned to the VLAN. Member: Determines which ports are part of the VLAN being created. -
Page 108: Monitor (Network Statistics)
LOCATION Main Menu Monitoring Intel® NetStructure™ 470T and 470F Switches User Guide Monitor (Network Statistics) Description Switch overview: Displays an overview of all ports on the switch. Port traffic statistics: Displays port traffic and utilization statistics. Port error statistics: Displays port error statistics. -
Page 109: Switch Overview
Switch Overview Description This screen provides an overview of activity on the switch—the traffic sent and received for each port on the switch and the percent utilization for that port. Update interval: Selects the time period between updates (press z). -
Page 110: Port Traffic Statistics
LOCATION Main Menu Monitoring Port Traffic Statistics Intel® NetStructure™ 470T and 470F Switches User Guide Port Traffic Statistics Description Select port: Selects the range of ports to view. You can view statistics for four ports at a time. Press z to toggle between port numbers. The example shows ports 1–4. - Page 111 Total frames recv (received): Displays the total number of frames...
-
Page 112: Port Error Statistics
LOCATION Main Menu Monitoring Port Error Statistics Intel® NetStructure™ 470T and 470F Switches User Guide Port Error Statistics Description Select port: Selects the range of ports to view. You can view statistics for four ports at a time. Press z to toggle between port numbers. The example shows ports 1–4. - Page 113 Total errors: Displays the total number of errors detected since the last switch reboot. Total errors include everything listed in this error table. Collisions: Displays the number of times packets have collided on this port. A collision occurs when two devices try to transmit at the same time.
-
Page 114: Packet Analysis
LOCATION Main Menu Monitoring Packet Analysis Intel® NetStructure™ 470T and 470F Switches User Guide Packet Analysis Description Use this screen to view a breakdown of the traffic received on a port by size and type of frame. Select port: Selects the port to view. You can view statistics for one port at a time. -
Page 115: Igmp Snooping Status
IGMP Snooping Status Description Use this screen to view the active multicast groups detected by the switch. LOCATION The switch uses these groups for filtering when you enable IGMP Main Menu snooping. Monitoring VLAN: Displays the name of VLANs with IGMP snooping enabled. The... -
Page 116: Browse Address Table
LOCATION Main Menu Monitoring Browse Address Table Intel® NetStructure™ 470T and 470F Switches User Guide Browse Address Table Description Use this screen to sort through the switch’s MAC address table and view the addresses the switch has learned. The switch uses this table when making forwarding decisions to avoid broadcasting traffic to every port. - Page 117 Static MAC Addresses screen. Learned: Displays how the switch learned the particular MAC address. Dynamic means the switch learned the address by sending out a query. Static means the address was entered manually through the Static MAC...
-
Page 118: Vlan And Gvrp Status
LOCATION Main Menu Monitoring VLAN/GVRP Status Intel® NetStructure™ 470T and 470F Switches User Guide VLAN and GVRP Status Description This screen is available only if there are active tag-based (IEEE 802.1Q) VLANs on the switch. The screen shows information about one VLAN at a time. -
Page 119: Tools
Using Local Management Tools Description View switch traps and events (log): Displays events contained in the switch’s internal log. Ping a device: Pings another device on the network to test connectivity. Upload configuration image file: Uploads a named configuration image... -
Page 120: Switch Event Log
Switch Event Log Description Use this screen to view and navigate the switch’s log. The log is similar to a trap and event receiver but it only captures traps/events generated by the switch itself. For example, the log includes events such as a port being disabled, an unauthorized user attempting to access a management interface, and the switch rebooting. -
Page 121: Ping A Device
Using Local Management Ping a Device Description Target IP address: Type the IP address of the device you want the switch to ping. Repetitions: Type the number of times you want the switch to send a ping to the specified device. The default is 1. -
Page 122: Upload Configuration Image File
LOCATION Main Menu Tools Upload Configuration... Intel® NetStructure™ 470T and 470F Switches User Guide Upload Configuration Image File Description Uploads a configuration image file to a TFTP server. Server IP Address: The IP address of the TFTP server you want to place the configuration file onto. -
Page 123: Save Settings
LOCATION Main Menu Save Settings Using Local Management Save Settings Description To permanently save modified IP Settings, you must save switch settings and then reboot the switch. To save settings, choose Save Settings from the Main Menu. - Page 124 Intel® NetStructure™ 470T and 470F Switches User Guide...
-
Page 125: Appendix A: Technical Information
About the Configuration File A configuration file is an ASCII text file that contains initialization information and configuration settings for the Intel and 470F Switches specified by the network administrator. The switch’s configuration file (.CFG) can be up to 10KB in size and is stored on a central server where it is downloaded onto the switch using TFTP. - Page 126 Load Configuration File 1 From the main menu, select Configure device, then select IP Settings. 2 Type the IP address for the switch to which you want to load the file. Press SUBMIT. 3 From the main menu select Configure management, then select Update firmware and configuration files.
-
Page 127: Sample Configuration File
Technical Information Sample Configuration File The following is an example of a configuration file. For more explanation and keyword support, visit the Intel support.intel.com/support ® ###### Intel NetStructure™ 470T Switch Configuration File ############## # Lines beginning with a "#" character are comment lines. - Page 128 Intel® NetStructure™ 470T and 470F Switches User Guide ###### Port Level Configuration ############################################# # Static_fdb_list={(MAC address, port #)} # Port_nway_enabled_list={port#, port#, . . } # Port_flow_ctrl_enabled_list= {port#, port#, . .} # Port_backpressure_enabled_list= {port#, port#, .} # Port_priority_list= { H (high), L (low), . .} # Port_stp_enabled_list= {port#, port #, .
- Page 129 # Proto=Name of Protocol (IP, IPX, NETBUI) # MemberPort=Number of member port(s) proto_vlan_List{“IPVLAN”,”IP”,1,3,5,7)(“IPXVLAN”,”IPX”,2,4)} ###### Create 802.1Q VLAN on the Switch (Static Entries) ################################### # 802_1q_static_list={(VID, “VLANstring”, M/N U/T,...) (VID, “VLANstring”, M/N U/T,...)} M=member port (on ingress) N=non-member port (on ingress)
-
Page 130: Boot Menu
Menu. You can access the BOOT Menu by connecting to the switch’s serial port. To access the BOOT Menu, press c + C while the switch is starting up. The menu shown above appears. Most of the options available from the BOOT Menu are simplified versions of Local Management, and navigating the screens works the same. - Page 131 10 Type the filename of the new configuration file in the Config file name field and select REBOOT TO START UPDATE. Press Enter. Note: Do not interrupt or power off the switch during the upgrade process. Verify Boot PROM update is sucessful Once the update process is complete, the switch displays the login screen.
-
Page 132: Update Firmware
Intel® NetStructure™ 470T and 470F Switches User Guide Update Firmware The firmware can be updated after the Boot PROM has been successfully updated. Before beginning this procedure, ensure that the TFTP server is still running and that the files are accessible by the TFTP server. -
Page 133: List Of Factory Defaults
List of Factory Defaults • Software upgrade mode: Network • TFTP Server Address: 0.0.0.0 • Load configuration file: Disabled • Console baud rate: 9600 • Console port data bits: 8 • Console port stop bit: 1 • IGMP Snooping: Disabled •... - Page 134 Intel® NetStructure™ 470T and 470F Switches User Guide Troubleshooting/FAQs How can I set the speed or duplex on individual ports? Normally the switch handles all connections automatically, but you can force speed or duplex on the 470T in order to accommodate devices that don’t support autonegotiation.
-
Page 135: Locating Mib Files
PVID. Ensure that the NIC is enabled for tagging. Locating MIB files If you use a MIB browser, you can configure or view statistics for the switch. You can find these switch MIB files at the Intel Support Web site at http://support.intel.com/support • intel.mib • intel_gen.mib •... -
Page 136: Regulatory Information
CAUTION If you make any modification to the equipment not expressly approved by Intel, you could void your authority to operate the equipment. Canada Compliance Statement (Industry Canada) Cet appareil numérique respecte les limites bruits radioélectriques applicables aux appareils numériques de Classe A prescrites dans la... - Page 137 AVERTISSEMENT Le système a été conçu pour fonctionner dans un cadre de travail normal. L’emplacement choisi doit être: · Propre et dépourvu de poussière en suspension (sauf la poussière normale). · Bien aéré et loin des sources de chaleur, y compris du soleil direct.
-
Page 138: Wichtige Sicherheitshinweise
Betriebssicherheit des Gerätes sicher. 18. Zum Netzanscluß dieses Gerätes ist eine geprüfte Leitung zu verwenden, Für einen Nennstrom bis 6A und einem Gerätegewicht größer 3kg ist eine Leitung nicht leichter als H05VV-F, 3G, 0.75mm2 einzusetzen. Intel® NetStructure™ 470T and 470F Switches User Guide... -
Page 139: Limited Hardware Warranty
(RMA) number either to the company from whom you purchased it or to Intel (North America only). If you ship the product, you must assume the risk of damage or loss in transit. You must use the original container (or the equivalent) and pay the shipping charge. - Page 140 This warranty does not cover replacement of products damaged by abuse, accident, misuse, neglect, alteration, repair, disaster, improper installation or improper testing. If the product is found to be otherwise defective, Intel, at its option, will replace or repair the product at no charge except as set forth below, provided that you deliver the product along with a return material authorization (RMA) number either to (a) the company from whom you purchased it or (b) to Intel, North America only (if purchased in Europe you must deliver the product to “(a)”.
- Page 141 à l’exception des cas énumérés ci-après, à condition que le produit soit renvoyé avec un numéro d’autorisation de retour du matériel (ARM) à (a) la société auprès de laquelle il a été acheté ou (b) à Intel, en Amérique du Nord seulement (si l’achat a eu lieu en Europe vous devez le renvoyer à...
- Page 142 “(a)”). Se il prodotto viene inviato, il mittente si assume la responsabilità in caso di danni o di perdita durante il tragitto. È necessario utilizzare l’imballaggio originale del prodotto (o un suo equivalente) e pagare le spese di spedizione. Intel sostituirà o riparerà il prodotto (o la parte) con uno nuovo o uno rifabbricato, e il prodotto restituito diventerà...
- Page 143 übernehmen. Intel ersetzt die Hardware entweder durch ein neues oder ein neuwertiges Produkt. Das zurückgegebene Hardwareprodukt wird Eigentum von Intel. Intel garantiert, daß das reparierte oder ersetzte Hardwareprodukt für einen Zeitraum von: (i) neunzig (90) Tagen ab Rückgabedatum oder (ii) für die verbleibende Zeit der ursprünglichen Garantie von drei (3) Jahren frei von Material- und Herstellungsfehlern ist.
- Page 144 (RMA), a (a) la empresa a la que se adquirió o (b) a Intel, sólo en América del Norte (si lo adquirió en Europa, debe entregar el producto a “(a)”. Si envía el producto, debe asumir el riesgo de daños o pérdida en el transporte.
-
Page 145: Index
51 BOOT Menu screen 124 Boot PROM, version 59 BOOTP Service, starting 54 broadcast frames, received 108 Intel Intel Intel® ® ® ® ® NetStructure Intel Intel NetStructure NetStructure NetStructure NetStructure 470T and 470F Switches User Guide... - Page 146 24 icons 23 losing contact with a device 24 refreshing 24 DHCP 54 disabling module ports 57 Intel Intel® ® ® ® ® NetStructure Intel Intel Intel NetStructure NetStructure NetStructure NetStructure 470T and 470F Switches User Guide...
- Page 147 97 ingress filtering 38, 39, 91, 94 Intel Device View installing 20 installing a new switch 25 overview 19 starting 21 Intel Intel® ® ® ® ® NetStructure Intel Intel Intel NetStructure NetStructure NetStructure NetStructure 470T and 470F Switches User Guide...
- Page 148 Web Device Manager 28 NetBEUI VLAN 99 NetBEUI VLANs 40 null modem cable, using 49 out-of-band connection through SLIP 82 oversize frames 106 overstrike mode 51 Intel Intel® ® ® ® ® NetStructure Intel Intel Intel NetStructure NetStructure NetStructure NetStructure...
- Page 149 PVID 39, 95 receiving stations, sending traps to 44, 75 refreshing the Device Tree 24 Reset 82 RMON information viewing in Intel Device View 25 saving switch settings 52 security assigning MAC address 67 configuring for ports 67 disabling for port 67...
- Page 150 VLANs IEEE 802.1Q. See VLANs: tag-based port-based 14, 36, 84 adding ports 36, 85, 87 protocol-based 16 adding 98 supported types 13 Intel Intel® ® ® ® ® NetStructure Intel Intel Intel NetStructure NetStructure NetStructure NetStructure 470T and 470F Switches User Guide...
- Page 151 Intel Intel Intel® ® ® ® ® NetStructure Intel Intel NetStructure NetStructure NetStructure NetStructure 470T and 470F Switches User Guide 470T and 470F Switches User Guide 470T and 470F Switches User Guide 470T and 470F Switches User Guide 470T and 470F Switches User Guide...
-
Page 152: Intel Customer Support
470T and 470F Switches User Guide Intel Customer Support Intel offers a range of support services for your new product. You can learn about the options available for your area by visiting the Intel support web site at http://www.intel.com/network/services and choosing your geography. - Page 153 2 Use phones allowing international access 3 May not be available from every phone 4 Public phones require local phone payment through the call duration 5 Not available from public phones Intel Intel® ® ® ® ® NetStructure Intel Intel Intel NetStructure...
- Page 154 Intel Intel® ® ® ® ® NetStructure Intel Intel Intel NetStructure NetStructure NetStructure NetStructure 470T and 470F Switches User Guide 470T and 470F Switches User Guide 470T and 470F Switches User Guide 470T and 470F Switches User Guide 470T and 470F Switches User Guide...
- Page 155 A18558-002...