Table of Contents
Advertisement
Advertisement
Table of Contents
Troubleshooting

Related Manuals for Panduit PANTHER LS8E


Summary of Contents for Panduit PANTHER LS8E
- Page 1 ™ LS8E HERMAL RANSFER RINTER Operator’s Manual Panduit Corp. Identification Products Division 1819 Atlanta Highway Cumming, GA 30040 Technical Support: 1-866-871-4571 Customer Service: 1-800-777-3300 www.panduit.com LS8E-MAN-A REV. 0 – 03/27/07...
-
Page 2: Table Of Contents
Section 1: Getting Started ............3 Introduction and Safe Operation ..........4-6 General Description ..............7-8 Loading Batteries and Label Cassette ..........9 Keyboard Functions ..............10-11 Section 2: Working with the P ™ LS8E......12 Using the P ™ LS8E ............13 Creating Labels Creating Text ...............14-15 Creating Serializations ..........16-18... -
Page 3: Section 1: Getting Started
SECTION 1 GETTING STARTED... -
Page 4: Introduction And Safe Operation
™ LS8E Hand-held Thermal Transfer Printer. If troubleshooting of the P you have problems not covered herein, contact your local Panduit Sales Representative, call Panduit Technical Support at 866-871-4571, or call Panduit Customer Service at 800-777-3300. More information is also available on the web at www.panduit.com. - Page 5 Because of the danger of introducing additional hazards, do not install substitute parts or perform an unauthorized modification to the printer or its accessories. The proper components for service and repair may be obtained from Panduit Corp. WARNING: When the printer has been in use for an extended period of time, the printer motor may become hot.
-
Page 6: Introduction And Safe Operation
Should you misplace the quick reference card, you may download another copy from the web at www.panduit.com. All of the detailed product ordering information is included in the comprehensive LS8E Product Bulletin. The bulletin is available from Panduit Customer Service (800-777-3300) or online at www.panduit.com. -
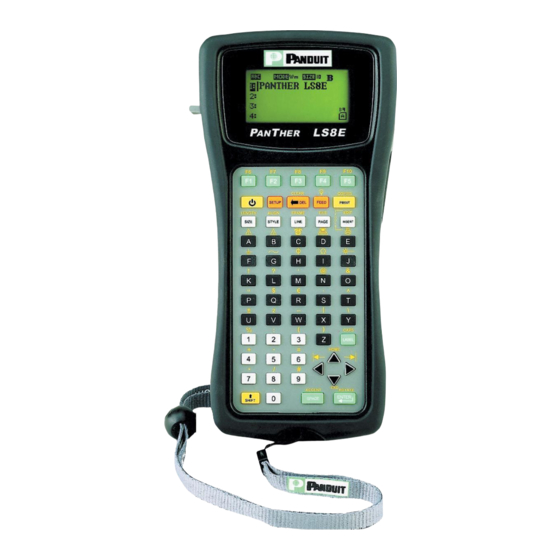
Page 7: General Description
GENERAL DESCRIPTION ™ LS8E Hand-Held Thermal Transfer Printer Cutter button with partial cut adjustment Large, graphic display with backlight 59 button keypad Print head latch Adjustable wrist/neck strap P1™ Label Cassette System Ribbon included Integrated memory device Durable plastic housing Die-cut or continuous labels... -
Page 8: General Description
The PC KIT includes a CD-ROM with PanTherLink™ software and a USB cable. ™ The PC KIT is used to communicate between a computer and the P LS8E printer. This provides the ability to import data, upgrade the printer operating system, and print labels from Panduit Easy-Mark Labeling Software. -
Page 9: Loading Batteries And Label Cassette
LOADING BATTERIES AND LABEL CASSETTE Loading the Batteries ™ LS8E printer. If the Remove the battery door from the back of the P impact bumper is installed on the printer, you will have to move it away from the battery door first. Install the 6 AA batteries according to the molded indicators within the battery compartment. -
Page 10: Keyboard Functions
KEYBOARD FUNCTIONS Delete/Clear Setup Feed/Backlight Power Print Size/Length Insert or Edit Tools Letters Label Mode/Caps Lock Numbers Directional Arrows Shift Enter/Rotate Space/Accent... - Page 11 KEYBOARD FUNCTIONS Basic Keyboard Functions • POWER – Turn printer on or off • SETUP – Access the Set Up menu • F1 – Display function key menu • DELETE – Erase characters and tools • CLEAR – Clear the entire screen •...
-
Page 12: Section 2: Working With The Pan Ther ™ Ls8E
SECTION 2 WORKING WITH THE ™ LS8E... -
Page 13: Using The Pan Ther ™ Ls8E
USING THE P ™ LS8E The Home Screen The home screen is where you enter and edits text or place label items known as tools. The home screen is also where you print labels. The home screen has several different indicators, including: INDICATOR ICON DESCRIPTION... -
Page 14: Creating Text
CREATING TEXT Creating Text ™ LS8E, the home screen will appear. The home After turning on the P screen is also the text editor. . To create text on the home screen, simply begin pressing the alphabetic or numeric keys on the keypad. Text will be entered at the position of the cursor. The cursor is indicated by a vertical line. -
Page 15: Creating Text
CREATING TEXT Text Style ™ LS8E has four different text styles: Normal, Bold, Normal + The P Underline, and Bold + Underline. To change the text style, press the STYLE key. The new text style can be applied to all characters on a label or just to characters inserted after the change. -
Page 16: Creating Serializations
CREATING SERIALIZATIONS The Serialization Tool The serialization tool is used to automatically number labels in a sequence. The sequence can be either numeric (1 to 999) or alphabetic (A to ZZZ). serialization is defined by a start value, an end value, and a step value. To correctly define a serialization, the end value must be larger than the start value and the start and end values must be both numeric or both alphabetic. - Page 17 CREATING SERIALIZATIONS More Serialization Parameters The serialization tool includes more parameters on a second screen following the first screen. The second screen includes Copies and Collate. To access the second screen press the down directional arrow twice after Increment. The Copies parameter determines the number of copies to print for the serialization.
-
Page 18: Creating Serializations
CREATING SERIALIZATIONS Press the right directional arrow key to select Yes or No. Press the key to accept the changes and to return to the home screen. Advanced Serialization Options The serialization tool includes several advanced options for customizing labels. The advanced serialization options are Print As and Place On. -
Page 19: Creating Symbols
CREATING SYMBOLS The Symbol Tool The Symbol Tool is used for creating electrical, network, and safety or facility identification labels. Creating a Symbol The symbol tool should be accessed from the home screen. To access the symbol tool: Press the INSERT key to enter the tools menu. Press the directional arrows to highlight the symbol tool. - Page 20 CREATING SYMBOLS Currently available symbols and their assigned library numbers are listed below. Additional symbols may be added to the P ™ LS8E firmware in the future.
- Page 21 CREATING SYMBOLS...
-
Page 22: Creating Data Lists
CREATING DATA LISTS The Data Tool The data tool is used to create printable data lists in the P ™ LS8E. The data tool is very useful for customizing labels because it allows up to one hundred unique labels to be created from a list of data. With the data tool, users can input, store, or transfer custom lists of data. -
Page 23: Creating Bar Codes
CREATING BAR CODES The Bar Code Tool The bar code tool can be used for bin labeling, component identification, or asset management and can be used in combination with other tools. The bar code tool can be printed with or without a checksum digit or human readable text. The bar code symbology available in the P ™... -
Page 24: Creating Bar Codes
CREATING BAR CODES Bar Code Settings The default bar code settings can be changed in the setup menu. To change the default settings, access the printer settings in the setup menu. Readable: Indicates whether the bar code text is human readable or not. If activated (bar code text is human readable) the setting will display Yes. -
Page 25: Creating A Date Or Time Stamp
CREATING A DATE OR TIME STAMP The Date Tool The Date Tool allows the user to print a date stamp on a label. The date printed on the label is defined by the internal clock of the P ™ LS8E. Creating a Date Tool The date tool should be accessed from the home screen. -
Page 26: Creating Lines
CREATING LINES Lines Lines allows custom placement of vertical and horizontal lines on a label. Lines are especially useful for creating patch panel, faceplate, or terminal block labels. There are seven unique line settings available: Center Horizontal, Center Vertical, Top, Bottom, Left, Right, and @ Pages. Each of these settings may be turned on or off independently. - Page 27 CREATING LINES The Right setting places a line at the far right side of the label. The @ Pages setting places lines between each page of a continuous label that has multiple pages defined. The @ Pages setting is used for patch panel, outlet, and terminal block labeling.
-
Page 28: Creating Frames
CREATING FRAMES Frames Frames are useful for customizing a label. There are three unique frame settings available: Box, Reverse, and Box Off. The Box setting places a box outline around the perimeter of the entire label area. WARNING The Reverse setting places a dark background with light text characters on a label. -
Page 29: Using Pages
USING PAGES The Page Function The P ™ LS8E provides 9 separate pages for each label. Label items, including text and tools may be placed on each of the 9 pages. The pages function is particularly useful for creating non-standard serializations that do not follow a common increment. -
Page 30: Using Special Functions
USING SPECIAL FUNCTIONS Special Functions The P ™ LS8E has several special functions that may be accessed by pressing the F keys at the top of the keypad. The special functions are listed in a menu that appears when pressing F1. The entire list of special functions includes: •... -
Page 31: Setting Up The Panther Ls8E And Using File Manager
Also use the setup menu to access the PC interface mode in order to import data from a computer, upgrade your printer’s operating system, or print directly from Panduit Easy-Mark™ Labeling Software. The available language options in the setup menu are English, French, German, Italian, Portuguese, Castillian Spanish, and Latin American Spanish Within the setup menu, scroll up or down using the directional arrows. - Page 32 SETTING UP THE PANTHER LS8E AND USING FILE MANAGER Label Modes To edit the label mode, press the LABEL key. Use the up or down directional arrows to select the desired mode and then press Available Modes include: MODE DESCRIPTION...
-
Page 33: Setting Up The P An T Her ™ Ls8E And Using File Manager
SETTING UP THE PANTHER LS8E AND USING FILE MANAGER The P ™ LS8E has the ability to store and recall label files. Label files are stored and recalled within File Manager. Label files are designated with a .LS8 ending. To access the File Manager, press the SHIFT key and then press the PAGE key: Use the right or left directional arrow keys to select the desired file. -
Page 34: Pantherlink
PANTHERLINK ™ Installing P ™ CD to install P ™ software onto a personal Use the P ™ CD is available with the purchase of LS8E-KIT or computer. The P LS8-PCKIT. Insert the CD into a personal computer. The installation program will begin automatically. - Page 35 PANTHERLINK ™ icon will appear on Upon completion of the installation process the P the computer desktop. ™ desktop icon...
- Page 36 PANTHERLINK To use the file transfer or firmware upgrade functions, you must first install the corresponding drivers on your computer. When using one of the PC interface functions on the LS8E for the first time, the computer will automatically detect the LS8E and begin the new hardware installation wizards.
- Page 37 PANTHERLINK Installing the PanTherLink File Transfer Driver After PanTherLink is installed, connect the USB cable provided in the LS8- PCKIT to the LS8E printer and to your computer. Power the LS8E printer on. Press the SETUP key. Select PC Interface. Select Files/Printing.
- Page 38 The file transfer driver installation screens are the same as those for the firmware upgrade driver above. Installing the LS8 Printer Driver The LS8 printer driver is used for printing from Panduit Easy-Mark™ Labeling Software. PanTherLink software must be installed on your computer.
- Page 39 PANTHERLINK 23. The LS8 printer driver is now installed. LS8 Printer Driver Installation Screens...
- Page 40 PANTHERLINK...
- Page 41 PANTHERLINK ™ Using P ™ software with the P To use P ™ LS8E printer: Connect the USB cable (included with LS8E-KIT and LS8-PCKIT) to a personal computer. Connect the USB cable to the P ™ LS8E at the USB port. Turn ON the P ™...
- Page 42 PANTHERLINK Select Next. In the Printer Information field, select Thermal. Click Update. Create your labels. Power the LS8E printer on. Press the SETUP button. Select PC Interface. Select Files/Printing. 10. The LS8E printer is now ready to print from Easy-Mark™. 11.
- Page 43 PANTHERLINK Using the PanTher™ LS8E Hand-Held Thermal Transfer Printer with Microsoft Excel^ Create the Excel .CSV File Start a new spreadsheet in Excel Enter the legend data within the first 8 columns and 100 rows. NOTE: Each column (up to 8) of the spreadsheet will be treated as a line within the label.
- Page 44 PANTHERLINK Convert Excel .CSV File to .DAT File Open PanTherLink software. Select FILE, then "Convert CSV to DAT..." In the Select CSV window, browse to the CSV file created by Excel. Select OPEN. The file name will disappear so that you can rename and save the file as a .DAT file.
- Page 45 PANTHERLINK Transfer .DAT File to LS8E Printer Power LS8E printer on Press the SETUP button. Select PC Interface. Select Files/Printing. The LS8E printer is now ready to send or receive files. Open PanTherLink software on a computer. Select Send a data file to the LS8E printer from the toolbar. The icon shows “DAT”...
- Page 46 PANTHERLINK .DAT File Transfer Screens...
- Page 47 PANTHERLINK Upgrading the PanTher™ LS8E Hand-Held Thermal Transfer Printer Firmware Save the LS8E printer firmware upgrade file to your computer. Choose a location that will be easy to find. Open PanTherLink software. Select Upgrades the LS8 firmware from the toolbar. The icon shows “BIN” with an arrow pointing away from a computer.
-
Page 48: Pantherlink
PANTHERLINK... -
Page 49: Labeling Exercises
LABELING EXERCISES Exercise 1 Create basic text on a self-laminating wire/cable label • Step 1: Insert a self-laminating label cassette such as S100X150VAC • Step 2: When prompted, select New Blank File. Save previous label if necessary. • Step 3: Type 1234 •... - Page 50 LABELING EXERCISES Exercise 3 Create basic text on continuous tape • Step 1: Insert a continuous tape label cassette such as T100X000VUC- • Step 2: When prompted, select New Blank File. Save previous label if necessary. • Step 3: Type 220 VOLTS •...
- Page 51 LABELING EXERCISES Exercise 4 Create serialized wire markers with heat shrink tubing • Step 1: Insert a heat shrink tubing label cassette such as H000X044F1C • Step 2: When prompted, select New Blank File. Save previous label if necessary. • Step 3: Type WIRE •...
- Page 52 LABELING EXERCISES Exercise 5 Create a symbol label on continuous tape • Step 1: Insert a continuous tape label cassette, such as T100X000VXC- • Step 2: When prompted, select New Blank File. Save previous label if necessary. • Step 3: Press SHIFT key and let go •...
- Page 53 LABELING EXERCISES Press the INSERT key, select serial Enter start, end, and increment values Scroll down or up to Place On… Select Place On… Labels (this allows more than 9 terminals in a serialization …or create a data list… Press the INSERT key, select data Select Create/Edit to start a new list or…...
- Page 54 LABELING EXERCISES Exercise 7 Create DIN terminal block labels NOTE: DIN terminal block labeling is based on European standards and is primarily used in European countries. The unit of measure for length in DIN Mode is millimeters (mm). • Step 1: Insert a continuous tape cassette, such as T050X000VPC-BK •...
- Page 55 LABELING EXERCISES Exercise 9 Create a wire marker using the Application Based Label Wizard. • Step 1: Turn printer on. (A label cassette does not need to be loaded in the LS8E printer in order to begin this exercise.) • Step 2: If prompted, select New Blank File.
-
Page 56: Application Based Label Wizard
APPLICATION BASED LABEL WIZARD APPLICATION BASED LABEL WIZARD SELECTIONS Markets: OEM: Original Equipment Manufacturers (Control Panel Builders and Manufacturing Operations) ECM: Electrical Construction and Maintenance (Maintenance and Repair Organizations (MRO), Contractors, and Installers) NET: Network and Data Communications (Installers and Data Centers) OEM/ECM Applications: WIRE:... - Page 57 APPLICATION BASED LABEL WIZARD Using the Table Entry Tool in the Label Wizard From within the Label Wizard, select TABLE. Use the right and left arrow keys to scroll between the table parameters. Press ENTER to select a parameter. An on-screen window will appear. Type the value for the selected parameter in the on-screen window.
-
Page 58: Application Based Label Wizard
APPLICATION BASED LABEL WIZARD Using the TIA/EIA-606-A Compliance Tool in the Label Wizard From within the Label Wizard, select TIA for TIA/EIA-606-A. Use the right and left arrow keys to select the required class (class 1, class 2, class 3, or class 4). Press ENTER. -
Page 59: Printer Cleaning Instructions
PRINTER CLEANING INSTRUCTIONS Cleaning the Print head and Drive Roller The LS8E printer is cleaned using the LS8-CLN cleaning kit. The print head should be cleaned regularly, and more often in harsh environments. The print head should be cleaned whenever any irregular printing results occur. - Page 60 PRINTER CLEANING INSTRUCTIONS Cleaning the Cutter Blade The cutter blade should be cleaned when the quality of the cut indicates that the blade may be dirty. Turn OFF power to printer. Remove the cassette door. Unlock the print head latch. Remove the label cassette from the printer Push the cutter button in so that the cutter blade is exposed through the media opening (see images below).
-
Page 61: Printer Troubleshooting
PRINTER TROUBLESHOOTING This section helps identify printer conditions and problems that can often be solved by the user. If you are unable to correct the problem contact Panduit Technical Support at 866-871-4571 or Panduit Customer Service at 800-777- 3300. SYMPTOM... -
Page 62: Printer Troubleshooting
PRINTER TROUBLESHOOTING SYMPTOM ACTION • Printed image is full, Print head heat setting is too high. Reduce heat but grayish or setting. The heat setting is accessible in the Setup “translucent”. menu. Press the SETUP key, scroll down to heat and Press ENTER. -
Page 63: Frequently Asked Questions
FREQUENTLY ASKED QUESTIONS Question: How do you cut the labels? Answer: Fully press and then release the cutter button. The cutter button is located on the top of the LS8E printer adjacent to the label exit. Question: What is the partial cut function and how is it adjusted? Answer: Partial cutting enhances productivity and organization by keeping a strand of labels together for pulling apart at a job... -
Page 64: Frequently Asked Questions
The cutter blade should be cleaned periodically or whenever adhesive build-up appears. If the cutter blade breaks for any reason, it should be returned to Panduit for repair. 12. Question: Can I save an Easy-Mark label file to my LS8E printer? Answer: No, an Easy-Mark file cannot be saved to an LS8E printer. -
Page 65: Warranty Information
6 months (for product) or 90 days (for printers) from the date of delivery. Printer warranty is void if Panduit printers are modified, altered or misused in any way. Use of Panduit printers with any product other than the specified Panduit products for which the printer was designed, constitutes misuse. -
Page 66: General Specifications
Display: 4 line x 14 graphic LCD with backlight LCD Contrast Control: Adjustable via keypad Operating System: Panduit proprietary – user upgradeable Power Supply: 6 AA alkaline batteries AC Adapter: Universal Input (100 - 240 VAC, 50/60 Hz) Oper. Temp/Hum: 41-104°...