Table of Contents
Advertisement
Quick Links
Download this manual
See also:
User Manual
Rainbow Pool Products
PO Box 2388, Mansfield Qld 4122
Telephone STD 61-7-3849 5385
Facsimile STD 61-7-3849 5384
Email: info@rainbowpoolproducts.com.au
Web: www.rainbowpoolproducts.com.au
IMPORTANT SAFETY INSTRUCTIONS
READ AND FOLLOW ALL INSTRUCTIONS
SAVE THESE INSTRUCTIONS
Automatic Pool Cleaner
Installation and
User's Guide
Advertisement
Table of Contents

Related Manuals for Pentair Pool Products Great White


Summary of Contents for Pentair Pool Products Great White
- Page 1 Automatic Pool Cleaner Installation and Rainbow Pool Products PO Box 2388, Mansfield Qld 4122 User’s Guide Telephone STD 61-7-3849 5385 Facsimile STD 61-7-3849 5384 Email: info@rainbowpoolproducts.com.au Web: www.rainbowpoolproducts.com.au IMPORTANT SAFETY INSTRUCTIONS READ AND FOLLOW ALL INSTRUCTIONS SAVE THESE INSTRUCTIONS...
-
Page 2: Table Of Contents
Skimmer vac plate vacuum control adjusters ........13 Section 4: User Maintenance ................15 Hose Storage ....................15 Disassembly ....................16 Reassembly ....................17 Illustrated Parts List ..................18 Section 5: Troubleshooting ................19 Great White Installation and User’s Guide... -
Page 3: Important Safety Precautions
Repair loose tiles and tighten any loose light rings. Before installing the cleaner, clean your filter system: Make sure you have cleaned the filter, including backwashing, rinsing, and emptying all baskets. A clean system is necessary for proper cleaner operation and coverage. Great White Installation and User’s Guide... - Page 4 (“vac port”) for vacuuming or for an automatic pool cleaner, it must be covered when not in use. A spring loaded safety cover is included with your cleaner. Install it on the suction port to prevent entrapment and injury. Great White Installation and User’s Guide...
-
Page 5: Section 1: Overview
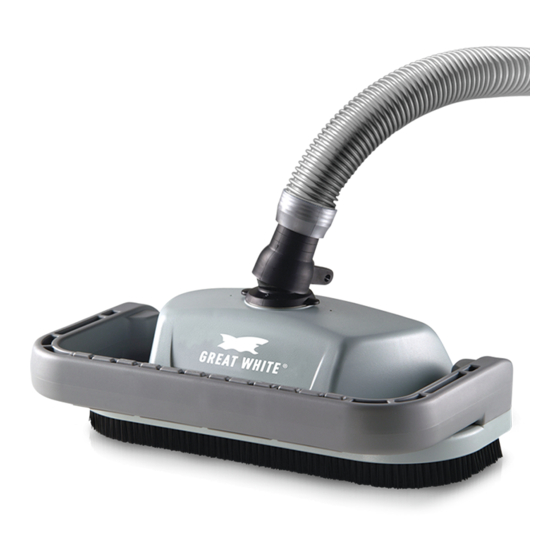
Congratulations on your purchase of the world’s best pool cleaner! Nothing quite compares to the Great White’s ability to make dirt disappear. With its 15” cleaning path and unique bristle drive, your Great White automatic, inground pool cleaner will deliver fast, complete coverage of your pool. -
Page 6: Preparation Of Your Pool
• Clean the filter and pump strainer basket (Figure 1) Cleaner assembly 1. Check parts Figure 1 Remove Great White and all of its parts from the box and check to make sure that all components were included (Figure 2). Cleaner Cleaner... -
Page 7: Hose Assembly
If additional hose is needed, use only hoses from your Pentair Water Pool and Spa dealer (order replacement part No. 41200-0131). Use of another manufacturer’s hose will hinder cleaner coverage. -
Page 8: Section 2: Installation
Section 2 Installation This section describes how to install the Great White pool cleaner. Great White is designed to work in a wide variety of swimming pools. Both the standard in-skimmer installation and optional vac port installation are covered below. If your pool configuration is unlike any of the examples, contact your Pentair Water Pool and Spa dealer for assistance, or call our toll-free Customer Helpline at 1-800-831-7133. - Page 9 Figure 11: Vacuum regulator installed in the skimmer with the hose attached Make sure the vacuum regulator is submerged at all times. If not, the pump will suck air through the vacuum regulator and lose prime. This could damage the pump. Great White Installation and User’s Guide...
- Page 10 7. Turn the pool pump on After completing the installation, turn the pool pump on and allow it to run for a couple of minutes to ensure that all air cycles out of the system. Great White Installation and User’s Guide...
-
Page 11: Optional Installation
Optional Installation Vac Port Installation with Vacuum Regulator in Skimmer If your pool has a vac port (Figure 15), you can install Great White using the Optional Installation Vac Port Figure 15 1. Turn the pool pump off 2. Adjust valves for vacuuming Adjust the pump valves (if your system has valves) to direct all suction to the dedicated vacuum line and the skimmer. - Page 12 (Figure 18). Attach the end of the hose to the vac port fitting installed in the dedicated vacuum line (Figure 17). Skimmer Regulator Cap Vacuum Regulator Reducer Cone To Pump Figure 18: Vacuum regulator installed in the skimmer with the regulator cap attached Great White Installation and User’s Guide...
- Page 13 8. Turn the pool pump on After completing the installation, turn the pool pump on and allow it to run for a couple of minutes to ensure that all air cycles out of the system. Great White Installation and User’s Guide...
-
Page 14: Section 3: Operation
Section 3 Operation This section contains information describing the movement and operation of your Great White Cleaner, as well as tips for “fine-tuning” your pool’s valves and connections to optimize Great White’s cleaning ability. Cleaner Operation and Movement Clicking sound This is the sound of the oscillator moving back and forth in the oscillator chamber. -
Page 15: Fine-Tuning Valves And Connections
Frequent loss of prime will damage the pump. To correct this, adjust the regulator by turning the adjustment knob counterclockwise. This will decrease the suction. If the cleaner still climbs out and sucks air, open the main drain valve slightly. Great White Installation and User’s Guide... -
Page 16: Not Enough Vacuum
The adjuster could be a screw-type, a spring loaded apparatus, or a dial design. For those vac plates with adjusters, it is important to adjust them when fine tuning the vacuum for the cleaner. Great White Installation and User’s Guide... -
Page 17: Section 4: User Maintenance
Section 4 User Maintenance This section describes the service and maintenance of the Great White cleaner. WARNING! Hazardous suction. Stop pump before attempting to clean pool cleaner. • Keep skimmer basket and pump strainer basket clean and free of debris. -
Page 18: Disassembly
10. If you need to replace the bumper, turn the shroud and bumper assembly upside down and remove the two screws holding the bumper to the shroud. 1885 0795 1884 0795 Figure 26 Figure 27 Great White Installation and User’s Guide... -
Page 19: Reassembly
Location Location 'Outside' will show (facing out) when Rubber skirt is correctly installed. I D E vacuum skirt 1891 0795 #10-16x1" Screws 1893 0795 Figure 31 Figure 33 Bottom View of Cleaner Great White Installation and User’s Guide... -
Page 20: Illustrated Parts List
Unidapt Handle GW9019 • Vac Port Fitting GW9530 • Flow gauge 41200-0210 • Not Illustrated 1896 0795 Includes Key Nos. 6, 11A, 13, 15, 16, two idler gears and 2-arm cam Not available separately Great White Installation and User’s Guide... -
Page 21: Section 5: Troubleshooting
In hot water, the hose may kink. The hose, when old, may have developed leaks (cracks or holes) or may get brittle. Purchase a new hose. NOTE: It must be a Great White hose for proper operation. Cleaner climbs past water Oscillator is running too fast.