
Related Manuals for Pentair Pool Products Jet-Vac


Summary of Contents for Pentair Pool Products Jet-Vac
- Page 1 A U T O M A T I C P O O L C L E A N E R INSTALLATION MANUAL ® www.pentairpool.com REV. A 2-9-04 P/N YYJVI...
- Page 2 ® JETVAC® INSTALLATION MANUAL...
-
Page 3: Table Of Contents
A U T O M A T I C P O O L C L E A N E R INDEX INTRODUCTION.................4 INSTALLATION PROCEDURES............5 FEEDER HOSE ASSEMBLY..............6 PRESSURE ADJUSTMENTS...............8 ASSEMBLE AND INSTALL JET-VAC HEAD UNIT.........9 TROUBLE SHOOTING...............10 PARTS LIST AND DIAGRAM..............11 JETVAC® INSTALLATION MANUAL... -
Page 4: Introduction
The JET-VAC has a patented, built-in backup system that will move the unit out of corners and away from other obstacles that tend to trap other pool cleaners. The unit... -
Page 5: Installation Procedures
(if applicable). Booster Pump details are packaged in Booster Pump Box. Please note: a booster pump is required for the JET-VAC to work. If you do not have an existing booster pump, you should have purchased a JET-VAC unit complete with pump. If you do not have a booster pump, please contact your dealer immediatly or call Customer Care at 1-800-831-7133. -
Page 6: Feeder Hose Assembly
ED15 ED15 The JET-VAC feed lines are formulated with a special material for maximum performance. These feed lines cannot be kinked at any time, either during operation or when being removed from the pool. Kinking feed lines will result in bursting and will not be covered. - Page 7 ® 1. Turn off booster pump, filter pump and time clocks. 2. Attach the wall fitting to the pool wall. 3. Attach the "Sweep Hose" end of the feed hose to the wall fitting. (Hereafter, attached refers to attached to the wall fitting).
-
Page 8: Pressure Adjustments
6. ALWAYS store all parts of the JET-VAC and hose assemblies away from excessive heat or cold and direct sunlight, when not in use. 6. The JET-VAC is not designed to clean up after new pool construction. Large amounts of grit or sand will damage wheel bearings. Please manually vacuum the pool before installing the JET-VAC. -
Page 9: Assemble And Install Jet-Vac Head Unit
6. ALWAYS store all parts of the JET-VAC and hose assemblies away from excessive heat or cold and direct sunlight, when not in use. 6. The JET-VAC is not designed to clean up after new pool construction. Large amounts of grit or sand will damage wheel bearings. Please manually vacuum the pool before installing the JET-VAC. -
Page 10: Trouble Shooting
Set unit on deck. Stainless steel wheel should be 1/2 inch from deck. c. Place Jet-Vac into pool. Your problem or question isn't mentioned here? a. See your local pool dealer, or b. Contact Pentair Pool Products, Inc., weekdays at 1-800-831-7133 JETVAC® INSTALLATION MANUAL... -
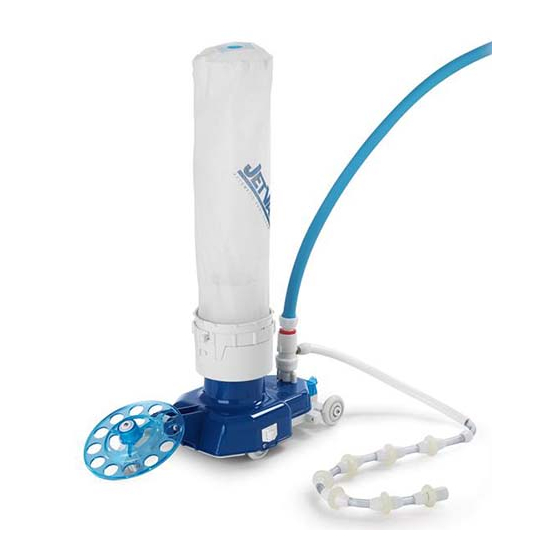
Page 11: Parts List And Diagram
® JET-VAC PARTS LIST QTY. PART# DESCRIPTION JV2C Venturi Shell (Blue) Opt. JV2CBK Venturi Shell (Black) JV2B Deflector Assembly Connector EFO7 O-Ring for JV3 Shell Float JV4B Adjustment Bushing for Shell Float Cover Gear Plate JV5C Gear Plate with Gears... - Page 12 ® Pentair Pool Products, Inc. 800-831-7133 02?04 P/N YYJVI Printed in USA Pentair Pool Products, Inc.