D-Link AirPlus G DWL-G700AP Manual
2.4ghz wireless access point
Hide thumbs
Also See for AirPlus G DWL-G700AP:
- Manual (46 pages) ,
- Quick installation manual (12 pages) ,
- Specification sheet (2 pages)
Table of Contents

Related Manuals for D-Link AirPlus G DWL-G700AP


Summary of Contents for D-Link AirPlus G DWL-G700AP
- Page 1 D-Link AirPlus G DWL-G700AP 2.4GHz Wireless Access Point Manual Version 2.20...
-
Page 2: Table Of Contents
Contents Package Contents ................3 System Requirements ................3 Introduction ................... 4 Features and Benefits ................5 Hardware Overview (LEDs) ..............5 Wireless Basics ..................6 Getting Started ..................8 Using the Configuration Utility .............. 9 Logging into Utility ................9 Wireless Settings ................ -
Page 3: Package Contents
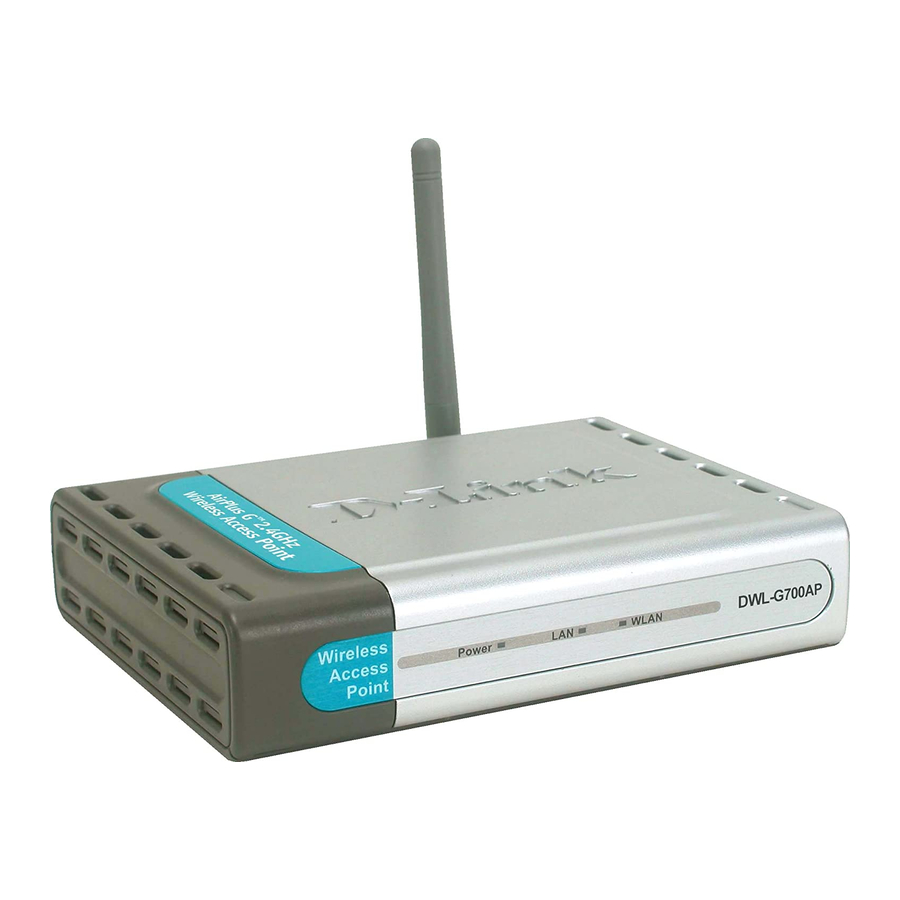
Package Contents Contents of Package: D-Link AirPlus G DWL-G700AP 2.4GHz Wireless Access Point Power Supply Manual on CD Quick Installation Guide Ethernet Cable If any of the above items are missing, please contact your reseller. -
Page 4: Introduction
802.11g compatible wireless client devices. The G700AP is also backwards compatible to 802.11b. The D-Link DWL-G700AP Access Point has been verified and successfully passed through the Intel Centrino™ Verification Program, which tests the compatibility of various access point devices and wireless service providers with common configuration of notebooks built on Intel Centrino™... -
Page 5: Features And Benefits
Features and Benefits Up to 5X Faster with AirPlus G Products - high-speed wireless data transfer rates up to 54Mbps*. With increased data rate and capacity, the DWL-G700AP delivers media rich content such as digital images, videos, and MP3 files much faster than standard 802.11b networks. -
Page 6: Wireless Basics
D-Link wireless products will allow you access to the data you want, when and where you want it. You will be able to enjoy the freedom that wireless networking brings. -
Page 7: Installation Considerations
Wireless Basics (continued) Installation Considerations Keep in mind, that the number, thickness and location of walls, ceilings, or other objects that the wireless signals must pass through, may limit the range. Typical ranges vary depending on the types of materials and background RF (radio frequency) noise in your home or business. -
Page 8: Getting Started
(See the Quick Installation Guide included with the DWL-G700AP.) If you are connecting a desktop computer in your network, you can install the D-Link AirPlus G DWL-G510 wireless PCI adapter into an available PCI slot on your desktop computer. (See the Quick Installation Guide included with the DWL-G510.) Install the drivers for the wireless Cardbus adapter into a laptop computer. -
Page 9: Using The Configuration Utility
Using the Configuration Utility If you wish to change the default settings or optimize the performance of the DWL-G700AP, D-Link has included a configuration utility for this purpose. After you have completed the initial installation and the Setup Wizard (as illustrated in... -
Page 10: Wireless Settings
Using the Configuration Utility (continued) Home > Wireless Mode: Select Access Point mode, AP Client mode or Repeater mode SSID: (Service Set Identifier) Default is the default setting. The SSID is a unique name that identifies a network. All devices on a network must share the same SSID name in order to communicate on the network. -
Page 11: Wep Encryption
Using the Configuration Utility (continued) Home > Wireless > WEP WEP:Select Enable or Disable Authentication: Select Open System to communicate the key across the network. Select Shared Key to limit communication only to those devices that share the same WEP settings. WEP Encryption: Select 64-bit or 128-bit WEP encryption. -
Page 12: Wpa Authentication
Using the Configuration Utility (continued) Home > Wireless > WPA/WPA2 Authentication: Select WPA or WPA2. RADIUS Server 1 IP: Enter the IP address of the RADIUS server. Port: Enter the RADIUS port (1812 is default). Shared Secret: Enter the RADIUS passphrase or key. RADIUS Server 2 IP: (Optional) Enter the IP address of a 2 RADIUS... -
Page 13: Wpa-Psk/Wpa2-Psk Encryption
Using the Configuration Utility (continued) Home > Wireless > WPA-PSK/WPA2-PSK Authentication: Select WPA-PSK or WPA2-PSK. Passphrase: Enter your passphrase. The passphrase can be between 8 and 63 characters. Confirm Passphrase: Enter the passphrase again. Apply: Click Apply to apply the changes. -
Page 14: Lan Settings
Using the Configuration Utility (continued) Home > LAN Dynamic IP Address: Select this option if you would like to have an IP Address automatically assigned to the DWL-G700AP by a DHCP server in your network. DHCP stands for Dynamic Host Configuration Protocol. It is a protocol for assigning dynamic IP addresses “automatically.”... -
Page 15: Dhcp Configuration
Using the Configuration Utility (continued) Home > DHCP DHCP Server: Select Enabled or Disabled. Disabled is the default setting. If you want to use the DWL-G700AP as a DHCP server, to automatically assign dynamic IP addresses on the network, you will select Enabled. Starting IP Address: If you have enabled the DHCP server function, enter the starting point of the IP address range for your network. -
Page 16: Performance Settings
Using the Configuration Utility (continued) Advanced > Performance Beacon Interval: Beacons are packets sent by an access point to synchronize a wireless network. Specify a beacon interval value. Default (100) is recommended. RTS Threshold: This value should remain at its default setting of 2,432. -
Page 17: Mac Address Filtering
Using the Configuration Utility (continued) Advanced > Filters DWL-G700AP MAC Filters to allow or deny wireless clients, by their MAC addresses, from accessing the DWL-G700AP. You can manually add a MAC address or select the MAC address from the list of clients that are currently connected to the router (Connected PCs). -
Page 18: Change Password
Using the Configuration Utility (continued) Tools > Admin New Password: Enter the new password. Confirm Password: Re-enter the password to confirm it. Tools > System Save Settings: The current system settings can be saved as a file onto the local hard drive. -
Page 19: Firmware Upgrade
Using the Configuration Utility (continued) Tools > Firmware You can upgrade the firmware of the DWL-G700AP at this page. When you click Click here to check... in this window you will be connnected to D - L i n k ’s w e b s i t e , w h e r e y o u c a n download the latest firmware update. -
Page 20: System Log
Using the Configuration Utility (continued) Status > Log View Log The DWL-G700AP keeps a running log of events and activities occurring on the AP. If the device is rebooted, the logs are automatically cleared. You may save the log files under Log Setting. -
Page 21: Traffic And Wireless Statistics
Using the Configuration Utility (continued) Status> Stats Traffic Statistics The DWL-G700AP keeps statistics of traffic that passes through it. You are able to view the amount DWL-700AP of packets that pass through the Ethernet and wireless portions of the network. The traffic counter will reset if the device is rebooted. -
Page 22: Networking Basics
Networking Basics Using the Network Setup Wizard in Windows XP In this section you will learn how to establish a network at home or work, using Microsoft Windows XP. Note: Please refer to websites such as http://www.homenethelp.com http://www. microsoft.com/windows2000 for information about networking computers using Windows 2000. - Page 23 Networking Basics (continued) Please follow all the instructions in this window: Click Next. In the following window, select the best description of your computer. If your computer connects to the internet through a gateway/router, select the second option as shown. Click Next.
- Page 24 Networking Basics (continued) Enter a Computer description and a Computer name (optional.) Click Next. Enter a Workgroup name. All computers on your network should have the same Workgroup name. Click Next.
- Page 25 Networking Basics (continued) Please wait while the Network Setup Wizard applies the changes. When the changes are complete, click Next. Please wait while the Network Setup Wizard configures the computer. This may take a few minutes.
- Page 26 Networking Basics (continued) In the window below, select the option that fits your needs. In this example, Create a Network Setup Disk has been selected. You will run this disk on each of the computers on your network. Click Next. Insert a disk into the Floppy Disk Drive, in this case drive A.
- Page 27 Networking Basics (continued) Please read the information under Here’s how in the screen below. After you complete the Network Setup Wizard you will use the Network Setup Disk to run the Network Setup Wizard once on each of the computers on your network. To continue click Next.
- Page 28 Networking Basics (continued) Please read the information on this screen, then click Finish to complete the Network Setup Wizard. The new settings will take effect when you restart the computer. Click Yes to restart the computer. You have completed configuring this computer. Next, you will need to run the Network Setup Disk on all the other computers on your network.
- Page 29 Networking Basics (continued) Naming your Computer To name your computer in Windows XP, please follow these directions: Click Start (in the lower left corner of the screen). Right-click on My Computer. Select Properties and click. Select the Computer Name ...
- Page 30 Networking Basics (continued) Naming your Computer In this window, enter the Computer name. Select Workgroup and e n t e r t h e n a m e o f t h e Workgroup. A l l c o m p u t e r s o n y o u r ...
- Page 31 Networking Basics (continued) Checking the IP Address in Windows XP This window will appear. Click the Support tab. Click Close. Assigning a Static IP Address in Windows XP/2000 Note: Residential Gateways/Broadband Routers will automatically assign IP Addresses to the computers on the network, using DHCP (Dynamic Host Configuration Protocol) technology.
- Page 32 Networking Basics (continued) Assigning a Static IP Address in Windows XP/2000 Double-click on Network Connections. Right-click on Local Area Connections. Double-click on Properties.
- Page 33 IP Address: e.g., 192.168.0.2 Subnet Mask: 255.255.255.0 Default Gateway: Enter the LAN IP address of the wireless router. (D-Link wireless routers have a LAN IP address of 192.168.0.1) Select Use the following DNS server address. Enter the LAN IP address of the wireless router.
- Page 34 Networking Basics (continued) Checking the Wireless Connection by Pinging in Windows XP/2000 Go to Start > Run > type cmd. A window similar to this one will appear. Type ping xxx.xxx.xxx. xxx, where xxx is the IP address of the wireless router or access point.
-
Page 35: Troubleshooting
Troubleshooting This chapter provides solutions to problems that can occur during the installation and operation of the DWL-G700AP. We cover various aspects of the network including network adapters. (The examples below are illustrated in Windows XP. If you have another operating system, these solutions will still apply, although the appearance on your computer screen may differ.) Note: It is recommended that you use an Ethernet connection to configure the DWL-G700AP Access Point. - Page 36 Troubleshooting (continued) 2. The wireless client cannot access the Internet in the Infrastructure mode. Make sure the wireless client is associated and joined with the correct access point (DWL-G700AP). To check this connection: Right-click on the Local Area Connection icon in the taskbar> select View Available Wireless Networks. The Connect to Wireless Network screen will appear.
- Page 37 Troubleshooting (continued) 3. Check that the drivers for the network adapters are installed properly. You may be using different network adapters than those illustrated here, but this procedure will remain the same, regardless of the type of network adapters you are using.
- Page 38 Troubleshooting (continued) Double-click on Network Adapters Right-click on D-Link Air DWL-650 Wireless Cardbus Adapter (or whatever network adapter you are using) Select Properties to check that the drivers are installed properly Look under Device Status to check that the device is working properly.
- Page 39 After you have tried other methods for troubleshooting your network, you may choose to Reset the DWL-G700AP to the factory default settings. Remember that D-Link AirPlus G products network together, out of the box, at the factory default settings. To hard-reset the D-Link AirPlus G DWL-G700AP to Factory Default Settings,...