
Related Manuals for Life Fitness OST


Summary of Contents for Life Fitness OST
- Page 1 ACTIVATE CARDIO SERIES OST, OSX, OSC, & OSR OPERATION MANUAL M051-00K90-0016 REV B...
- Page 2 9:00 - 17:00 (BRT) (Monday-Friday) Life Fitness IBERIA China and Hong Kong Store Operating Hours: C/Frederic Mompou 5,1º1ª Life Fitness Asia Pacific LTD 9:00 - 20:00 (BRT) (Monday-Friday) 08960 Sant Just Desvern Barcelona Room 2610, Miramar Tower 10:00 - 16:00 (BRT) (Saturday)
-
Page 3: Table Of Contents
Warranty Information (OST, OSX, OSC, OSR) ........ - Page 4 Before using this product, it is essential to read this ENTIRE operation manual and ALL assembly instructions. It describes equipment setup and instructs members on how to use it correctly and safely. Avant d'utiliser ce produit, il est indispensable de lire ce manuel d'utilisation dans son INTÉGRALITÉ, ainsi que TOUTES les instructions d'installations.
- Page 5 Statements of Purpose: • The Life Fitness Treadmill is an exercise machine that enables users to walk or run, in place, on a moving surface. • The Life Fitness Cross-Trainer is an exercise machine that combines low-impact elliptical pedaling with push/pull arm motion to provide an efficient, effective total body workout.
-
Page 6: Getting Started
To disconnect, turn power OFF at the ON/OFF switch, then remove plug from electrical outlet. • Never operate a Life Fitness product if it has a damaged power cord or electrical plug, or if it has been dropped, damaged, or even partially immersed in water. Contact Life Fitness Customer Support Services. - Page 7 Allow a distance of 16 in. (41 cm) between the widest part of the bike and other objects on either ARNING side. Provide at least 3 ft. (0.9 m) between the front or rear of the Life Fitness bike to any other objects. •...
- Page 8 électrique. • Ne jamais faire fonctionner un produit Life Fitness dont la fiche ou le cordon d'alimentation est endommagé, ni aucun appareil qui serait tombé ou aurait été endommagé ou même partiellement plongé dans l'eau. Appeler le service clientèle de Life Fitness.
- Page 9 Laisser une distance de 41 cm (16 in.) entre la partie la plus large du vélo et les autres objets VERTISSEMENT de chaque côté. Établir une distance d’au moins 0,9 m (3 ft) entre l’avant ou l’arrière du vélo de Life Fitness et d’autres objets.
-
Page 10: Setup
Read the Operation Manual before setting up the Life Fitness product. Follow all safety instructions in Section 1.1 and place the product where it will be used before beginning the setup procedure. READMILLS LECTRICAL OWER EQUIREMENTS The Life Fitness Treadmill requires a dedicated* line with isolated neutral according to the electrical configurations listed in the chart below. - Page 11 OW TO OSITION AND TABILIZE THE ITNESS READMILL Follow all safety instructions in Section 1.1 and move the treadmill to the location in which it will be used. AFETY LEARANCES The following information is supplied as regional reference data regarding safety clearances around the exterior of the treadmill.
- Page 12 Connect the power cord to the power receptacle (C) in the front of the treadmill. The power cord can be routed left or right depending on installation / site needs. CAUTION: Make sure that there is 6.5 ft. (2 m) of clearance behind the treadmill. Contact Life Fitness Customer Support Services for an optional longer power cord if necessary.
- Page 13 OLTS A 5/16-inch Allen wrench is required for this task. The Life Fitness Treadmill has access holes in the rear roller guards which allow access to the tensioning bolts. These tensioning bolts make it possible to adjust the tracking and centering of the striding belt (A) without removing the guards.
- Page 14 ENSIONING AN XISTING TRIDING 1. Enter the MANUAL workout and operate the treadmill for five minutes at 5.0 mph (8.0 kph). Note: DO NOT RUN OR WALK ON BELT. 2. Reduce the speed to 2.0 mph (3.2 kph). Walk on the treadmill. Tightly grip the handrails and apply force with feet on the striding belt near the motor cover against the moving belt direction.
-
Page 15: Cross-Trainers
ITNESS ROSS RAINER Allow 1 ft. (0.3 m) of clearance in front of the Life Fitness Cross-Trainer to allow for movement of the pedal levers. It should be easy to mount the Life Fitness Cross-Trainer from the side. OW TO... -
Page 16: Upright & Recumbent Lifecycle® Exercise Bikes
® PRIGHT AND ECUMBENT IFECYCLE XERCISE IKES HERE TO LACE THE IFECYCLE XERCISE Allow a distance of 16 in. (41 cm) between the widest part of the bike and other objects on either side. Allow a distance of 3 ft. (0.9 m) between the front or rear of the bike to any other objects. OW TO TABILIZE THE IFECYCLE... - Page 17 OW TO DJUST THE EAT ON A ECUMBENT IFECYCLE XERCISE A properly adjusted seat is extremely important in any bike activ- ity and the Recumbent Lifecycle Exercise Bike is no exception. If the seat is too close, excessive strain will be placed on the knees and quadriceps muscles;...
- Page 18 Enabling the Power Assist option requires a an optional kit. Contact Life Fitness Customer Support Services to order the kit.
-
Page 19: Console Overlays
ONSOLE VERLAYS ONSOLE VERLAYS VERVIEW The computerized display console on these products allow the user to tailor a workout to personal fitness abilities and goals and to monitor progress. With these easy-to-use consoles, the user can track fitness improvement from one workout to the next. - Page 20 Cross-Trainer Lifecycles...
-
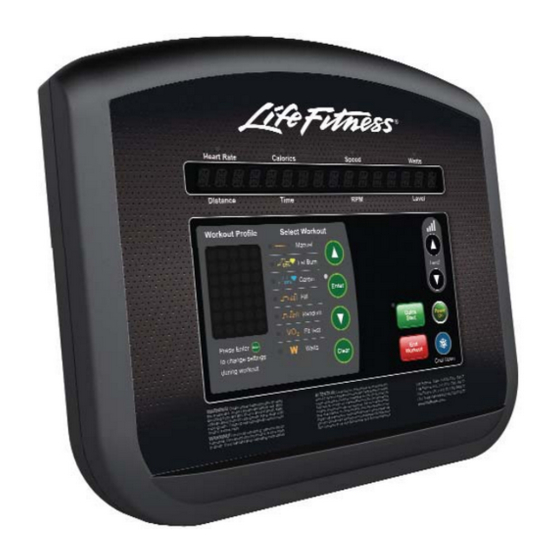
Page 21: Console Overlays Description
ONSOLE VERLAYS ESCRIPTION A. WORKOUT PROFILE WINDOW: During a workout, interval hills and valleys appear in this window as rows of light stacked in columns. The number of lit rows within a column corresponds to resistance levels/inclines. B. MESSAGE CENTER: This window displays workout information as well as step-by-step instructions for setting up a workout. -
Page 22: Heart Rate Zone Training
Research shows that maintaining a specific heart rate while exercising is the optimal way to monitor the intensity of a workout and to achieve maximum results. That is the idea behind the Life Fitness Heart Rate Zone Training® approach to exercise. -
Page 23: Heart Rate Monitoring
These electrodes are attached to a Polar telemetry heart rate chest strap that the user wears during the workout. The Polar telemetry heart rate chest strap is optional. Contact Life Fitness Customer Support Services to order. - Page 25 VO max scores achieved will be 10-15% lower on stationary exercise bikes than those achieved on other Life Fitness cardio- vascular equipment. Stationary cycling has a higher rate of isolated muscle fatigue of the quadriceps when compared to walking/running on a treadmill or utilizing a bike.
- Page 26 <22 <20 Life Fitness developed this rating scale based on VO max percentile distributions referenced in American College of Sports Medicine's Guidelines for Exercise Testing and Prescription (8th E. 2010). It is designed to provide a qualitative description of a user's VO...
-
Page 27: The Workouts
UBMAX ROTOCOL TREADMILLS ONLY The Life Fitness Treadmill features an additional fitness test based upon specific predefined protocols. • WFI Submax Protocol: Submaximal VO The WFI Submax Protocol is a graded submax assessment used to predict a fire fighter’s aerobic capacity. This test automatically increases speed and incline until a target heart rate is reached. -
Page 28: Service Menu
UP/DOWN arrow keys to interact with the currently navigated to utility. Press the CLEAR key to exit the current diagnostic utility. Press the CLEAR key repeatedly to exit the Diagnostics Menu. Note: These tests should only be used by (or with the express instruction of) a trained Life Fitness service technician. Information (Code Ver. X.XX on Bikes and Cross-Trainers) The Information submenu will display system information such as the software version numbers and their associated part numbers as well as the version numbers of other installed software components. -
Page 29: Manager's Configuration (Optional Settings)
’ ANAGER ONFIGURATION PTIONAL ETTINGS Setting Default Value Description Treadmills, Bikes, and Cross-Trainers This feature allows the setting of maximum workout Maximum Workout Duration 60 Minutes duration limits. 1 Minute (treadmills) This sets the maximum time during which a workout can 5 Minutes (bikes and Pause Timeout remain in pause mode. - Page 30 ’ ANAGER ONFIGURATION PTIONAL ETTINGS Setting Default Value Description Treadmills ONLY 12.0 mph This option allows for setting the fastest speed at which Maximum Speed the treadmill can operate. (International: 20 kph) 0.5 mph This option allows for setting the slowest speed at which Minimum Speed the treadmill can operate.
-
Page 31: Service And Technical Data
REVENTIVE AINTENANCE Life Fitness products are backed by the engineering excellence and reliability of Life Fitness and are one of the most rugged and trouble-free pieces of exercise equipment on the market today. Commercial Life Fitness equipment are among the most popular of aerobic trainers in health clubs, colleges and military facilities worldwide. -
Page 32: Preventive Maintenance Schedule
RAINERS When the Life Fitness product is about to be discarded at the end of its useful life, the rechargeable battery must first be re- moved and recycled. If an optional external power supply is present, it must be disconnected before the battery is removed. -
Page 33: Troubleshooting
ROUBLESHOOTING READMILLS ONLY Malfunction Probable Cause Corrective Action ON / OFF switch is not in proper Turn the switch to the ON position. position. Plug treadmill into a dedicated 20 amp circuit. Power source is insufficient. Using a voltmeter, verify power at outlet. - Page 34 ROUBLESHOOTING CONTINUED READMILLS ONLY Malfunction Probable Cause Corrective Action Check levelers and level treadmill. Striding belt slips off-center. Floor surface is uneven. Check striding belt & re-tension as necessary. Refer to Section 2.1. User is pushing striding belt. This occurs when the runner is running faster than the striding belt will travel, with the result of the striding belt being pushed with the runner’s feet.
- Page 35 Towel or other item may be making contact Move all possible obstructions off with stop switch while user is running. display console and handlebar. Intermittent keypad closure. Contact Life Fitness Customer Support Services. Main wire harness is pinched. Ground path is open.
- Page 36 ® ROUBLESHOOTING THE PTIONAL OLAR ELEMETRY EART HEST TRAP RODUCTS Malfunction Probable Cause Corrective Action Use of personal electronic devices, such as cell phones and portable MP3 players, causes external noise interference. Heart rate reading is initially Remove the source of noise detected and functioning or reposition the exercise Equipment is in close proximity...
- Page 37 Belt transmitter is not within 3 ft. within 3 ft. (0.9 m) of the heart rate re- (0.9 m) of the heart rate receiver. ceiver. Contact Life Fitness Customer Support Polar telemetry heart rate chest Services for instructions on how to have strap battery is depleted.
-
Page 38: How To Obtain Product Service / Serial Number Location
2. Locate and write down the serial number of the unit. Treadmill: located under the left rear endcap. Bikes: located on the front stabilizer. Cross-Trainers: located on the rear stabilizer. 3. Contact Life Fitness Customer Support Services. -
Page 39: Activate Cardio Series Specifications
CTIVATE ARDIO ERIES PECIFICATIONS TREADMILLS, LIFECYCLES, & CROSS-TRAINERS Designed use: Heavy / Commercial Maximum user weight: 400 lbs. / 181 kg Display type: Segmented Alpha-numeric, LED Message Center or Complex Character, LCD Message Center Ports (1): Type RJ45, interchangeable Network ready connection and Fitness Entertainment port (power compliant with FitLinxx CSAFE specification dated August 4, 2004: 4.75VDC to 10VDC;... - Page 40 LIFECYCLES CROSS-TRAINERS Pedal speed range: 30 - 100 rpm 2.2 - 12.7 mph (3.5 -20.4 kph) Pedal size: 5 in. x 5.5 in. (127 mm x 140 mm) 15.8 in. x 8 in. (401 mm x 203 mm) Drive type: Belt / Alternator Resistance level: Quick Start, Manual, Fat Burn, Cardio, Hill, Random, Fit Test...
-
Page 41: Warranty Information (Ost, Osx, Osc, Osr)
If the Product or any covered part must be returned to a service facility Refer to page one of this manual for your local service contact informa- for repairs, We, Life Fitness, will pay all transportation and insurance tion. Reference your name, address and the serial number of your Prod- charges for the first year. - Page 42 ARRANTY OVERAGE OST Treadmill Electrical Mechanical Labor Cosmetic Overlays Frame Lifesprings Motor 6 months 1 year 2 years 7 years OSX Cross-Trainer & OSC / OSR Lifecycles 6 months 1 year 2 years Activate Console 6 months 1 year 2 years...