Table of Contents
Advertisement
Advertisement
Table of Contents

Related Manuals for Honeywell ScanPal 5100


Summary of Contents for Honeywell ScanPal 5100
- Page 1 ScanPal™ 5100 ® with Windows CE 5.0 Core User’s Guide...
- Page 2 Disclaimer Honeywell International Inc. (“HII”) reserves the right to make changes in specifications and other infor- mation contained in this document without prior notice, and the reader should in all cases consult HII to determine whether any such changes have been made. The information in this publication does not rep- resent a commitment on the part of HII.
-
Page 3: Table Of Contents
ScanPal 5100 USB Communication Cable ................3-9 Soft Reset (Warm Boot) ....................3-12 Hard Reset (Cold Boot)....................3-12 Suspend Mode ........................3-13 Changing the Memory Allocation ..................3-13 Care and Cleaning of the ScanPal 5100 Terminal.............3-13 Chapter 4 - Using the Keypad Overview ..........................4-1 Navigation Keys ........................4-1 Basic Keys ...........................4-1 Alpha/Numeric/Mouse Pointer Modes .................4-2... - Page 4 Available Laser Engines ...................... 5-1 Depth of Field ........................ 5-1 Supported Bar Code Symbologies ................5-1 Chapter 6 - Using the Image Engine Overview..........................6-1 Available Image Engines ..................... 6-1 Depth of Field ........................ 6-1 Decoding ..........................6-3 Chapter 7 - Communication Communication Options ......................
-
Page 5: Chapter 1 - Agency Approvals
Agency Approvals Label Locations ScanPal 5100 mobile computers meet or exceed the requirements of all applicable standards organizations for safe operation. However, as with any electrical equipment, the best way to ensure safe operation is to operate them according to the agency guidelines that follow. Read these guidelines carefully before using your mobile computer. -
Page 6: Safety & Rf Approvals By Country
Safety & RF Approvals by Country: Country Safety EMC, Radio, & SAR U.S.A UL60950-1 FCC Part 15, Sub part B, Sub part C Canada C-UL CSA C22.2 No. 60950-1-07 ICES-003, RSS 210 Europe IEC 60825-1 EN55022 (CISPR 22) Class B IEC 62471 EN55024 IEC 60950-1... - Page 7 Waste Electrical and Electronic Equipment Information Honeywell complies with Directive 2002/96/EC OF THE EUROPEAN PARLIAMENT AND OF THE COUNCIL of 27 January 2003 on waste electrical and electronic equipment (WEEE). This product has required the extraction and use of natural resources for its production. It may contain hazardous substances that could impact health and the environment, if not properly disposed.
- Page 8 You may also contact your supplier for more information on the environmental performances of this product. 1 - 4...
-
Page 9: Chapter 2 - Getting Started
• Localized plug adapters • Quick Start Guide • Belt Clip • Lanyard Note: Be sure to keep the original packaging in case you need to return the ScanPal 5100 terminal for service; see Product Service and Repair on page 11-1. - Page 10 4. Replace the door with a hinging motion and turn the screw counter-clockwise to lock the door. Note: The battery door must be installed prior to booting the unit. We recommend use of Honeywell Li-Ion battery packs. Use of any non-Honeywell battery may result in damage not covered by the warranty.
-
Page 11: Led Indicators
Battery is full or fully charged Green LED On We recommend use of Honeywell peripherals, power cables, and power adapters. Use of any non- Honeywell peripherals, cables, or power adapters may cause damage not covered by the warranty. Ensure all components are dry prior to mating terminals/batteries with peripheral devices. Mating wet components may cause damage not covered by the warranty. -
Page 12: Desktop
Desktop Note: You can access the Desktop any time by selecting the Change Views icon in the command bar and selecting Desktop on the popup menu. Select to change views Command Bar Icons The command bar, located at the bottom of application screens, provides access to many system functions and programs. - Page 13 Icon Meaning Indicates whether the keypad is standard alpha (upper and lower case), all caps alpha, in numeric mode, or in mouse pointer mode. Press the ALPHA button on the keypad to switch modes. The up arrow allows you to turn the Wireless LAN and Bluetooth connection on or off. It also allows you to toggle between the Keypad and Transcriber.
-
Page 14: Selecting Programs
Selecting Programs Select Start -> Programs. To open a program, select the icon on the menu. Pop-Up Menus You can quickly choose an action for an item using the pop-up menus. 1. Select and hold the stylus on the item name. The pop-up menu appears. 2. -
Page 15: Chapter 3 - Terminal Hardware Overview
Terminal Hardware Overview ScanPal 5100 terminals include a number of standard terminal configurations as well as charging and communication peripherals and accessories to maximize the efficiency of your application. Standard Terminal Configurations ScanPal 5100 • Microsoft Windows CE 5.0 Core •... -
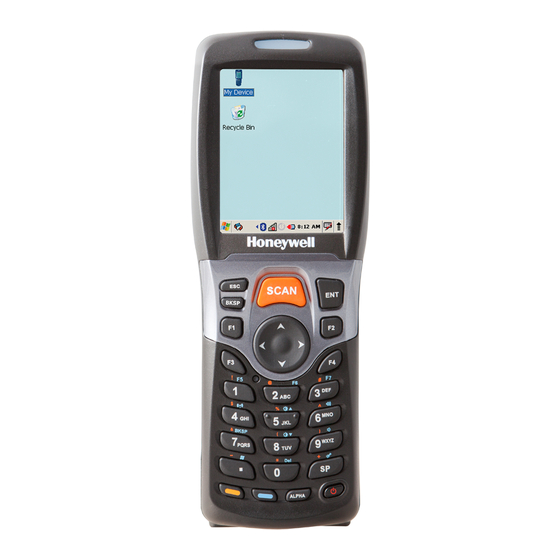
Page 16: Front Panel Features
Front Panel Features Display (screen protector installed at the factory) Scan key Navigation Keypad keys (28-key numeric) Software Reset key Power key Scan/Decode LED The LED is user-programmable. Scanned bar code is not decoded Main battery is charging Green Scanned bar code is successfully decoded Main battery charging has completed Blue or Red Soft or hard reset... -
Page 17: Display Backlight
Using Screen Protectors Honeywell defines proper use of the terminal touch panel as using a screen protector and proper stylus. Screen protectors maintain the ongoing integrity (i.e., prevent scratching) of the touch panel, which is why their use is recommended for applications that... - Page 18 Honeywell. Please contact a Honeywell sales associate for details. Honeywell also mandates use of a proper stylus, which is one that has a stylus tip radius of no less than 0.8 mm. Use of the Honeywell stylus included with the terminal is recommended at all times.
- Page 19 11. Press the Power key to wake the terminal again. 12. For maximum performance, recalibrate the screen. Select Start -> Settings -> Control Panel -> select Stylus -> Calibration tab. 13. Select Recalibrate and follow the instructions on the screen. 3 - 5...
-
Page 20: Back Panel Features
Installed Battery Lanyard The ScanPal 5100 comes with a lanyard. The lanyard is inserted in a loop on the device. Finger Saddle This is a slightly depressed and angled area of the back housing that is designed to cradle or “saddle”... -
Page 21: Top Panel Features
To install an SD card 1. Press the Power key to put the terminal in Suspend Mode; see Suspend Mode on page 3-13. 2. Remove the battery. 3. Insert the SD card with the label facing upward. Note: To remove an installed SD card while the battery door cover is open, tap on the edge lightly to unlock the card; the card will pop out just enough for you to grab its edge and pull it out. -
Page 22: Bottom Panel Features
DC Power Jack DC Power Jack The DC power jack receives external power from the ScanPal 5100 power cable that is included with the terminal. When connected to the ScanPal 5100 power cable, the terminal is powered and the main battery pack is charging. -
Page 23: Scanpal 5100 Usb Communication Cable
Both batteries must be charged to full capacity before using the ScanPal 5100 for the first time! Charge the main battery pack with the ScanPal 5100 charging cable for a minimum of 4 or 6 hours depending on your battery before initial use. -
Page 24: Managing Main Battery Power
When you remove a battery pack, insert another charged battery pack in the ScanPal 5100. If the main battery pack is low, insert the terminal into a charging peripheral to power the terminal and begin recharging the battery. - Page 25 • Although your battery can be recharged many times, it will eventually be depleted. Replace it after the battery is unable to hold an adequate charge. • If you are not sure the battery or charger is working properly, send it to Honeywell or an authorized service center for inspection.
-
Page 26: Soft Reset (Warm Boot)
The internal backup battery charges off the main battery pack and requires 2 hours charge time to backup RAM data for 30 minutes. You can begin using the ScanPal 5100 terminal after charging the main battery for four or six hours (depending upon your battery); however, the internal backup battery will continue to charge off the main battery. -
Page 27: Suspend Mode
2. Move the slider to adjust the memory allocation and select OK. The changes take effect immediately. Care and Cleaning of the ScanPal 5100 Terminal When needed, clean the engine window and the LCD display with a clean, non-abrasive, lint-free cloth. - Page 28 Processor Marvell PXA 300 624MHz Memory 64MB RAM X 128MB Flash Storage Expansion User accessible Micro SD Card slot Display 2.4 in. transmissive active matrix 65K color LCD with backlight, QVGA (240 x 320) Engine Laser: 4813 Laser Engine Imager: 5300SR VGA Area Imager with High-Vis bracket aimer Keypad 28-key shifted alpha numeric with backlit keys Audio...
- Page 29 Environmental Independently certified to meet IP54 standards for moisture and particle resistance Dimensions 157 mm long x 57 mm wide x 41 mm deep (6.18” x 2.24” x 1.61”) Weight 232 g (8.18 oz) including standard battery pack with 4813 Laser Engine 228 g (8.04 oz) including standard battery pack with 5300SR Imager Engine Scanner / Decode 4813: 1D Laser Engine.
- Page 30 3 - 16...
-
Page 31: Chapter 4 - Using The Keypad
Using the Keypad Overview Navigation keys Power key Navigation Keys Located in the center of the keypad for easy access with either hand, the navigation keys enable you to move the cursor up and down lines and from character to character. Basic Keys Name Function... -
Page 32: Alpha/Numeric/Mouse Pointer Modes
Alpha/Numeric/Mouse Pointer Modes The keypad defaults to numeric mode. Use the ALPHA key to toggle between numeric, alpha, and mouse pointer modes. Pressing the ALPHA key once locks the keypad in numeric mode, alpha mode (lowercase), alpha mode (uppercase), or mouse pointer mode. The command bar on the screen displays an icon that indicates the alpha/numeric status of the keypad. -
Page 33: Function Key Combinations
Function Key Combinations The Function key (FUNC) modifies the next key pressed to perform specific functions. Key Combination Function FUNC + 1 FUNC + 2 FUNC + 3 FUNC + 4 Toggle the wireless radio on and off FUNC + 5 Increase screen brightness FUNC + 6 Increase volume... -
Page 34: Program Buttons
CTRL Key Combinations The Control key (CTRL) modifies the next key pressed to type specific characters. Key Combination Function CTRL + 1 CTRL + 2 CTRL + 3 CTRL + 4 CTRL + 5 CTRL + 6 CTRL + 7 &... -
Page 35: Chapter 5 - Using The Laser Engine
Using the Laser Engine Overview If your terminal is equipped with a laser engine, you will be able to read all popular 1D bar codes. Available Laser Engines ScanPal 5100s are equipped with 4813 1D laser engines. Depth of Field 4813 Standard Range 5.2 mil 7.5 mil... -
Page 36: Activating The Engine
When a scanning application is open, press the Scan key to activate the laser engine. Using Demos ScanPal 5100 Demos are software utilities loaded on all ScanPal 5100 terminals that demonstrate the advanced features of the terminal. To access the demo, select Start -> Programs -> Demos -> Scan Demo. -
Page 37: Chapter 6 - Using The Image Engine
Using the Image Engine Overview ™ If your terminal is equipped with a image engine, it houses a compact image engine using Adaptus Imaging Technology that instantly reads all popular 1D and 2D bar codes and supports omni-directional aiming and decoding. The image engine can also capture digital images, such as signatures and pictures. Available Image Engines ScanPal 5100s are equipped with 5300 Standard Range (5300SR) image engines. -
Page 38: Supported Bar Code Symbologies
Supported Bar Code Symbologies Symbology Type Symbology Name 1D Symbologies Codabar Interleaved 2 or 5 Code 3 of 9 Matrix 2 of 5 Code 11 Plessey Code 32 Pharmaceutical (PARAF) PosiCode Code 93 Straight 2 of 5 IATA Code 128 Straight 2 of 5 Industrial EAN with Add-On Telepen... -
Page 39: Decoding
When a scanning application is open, press the Scan key to activate the image engine. Using Demos ScanPal 5100 Demos are software utilities loaded on all ScanPal 5100 terminals that demonstrate the advanced features of the terminal. There are two Demos that feature the image engine: Image Demo and Scan Demo. - Page 40 Omni-Directional Scanning Positions The high-vis aiming pattern frames the bar code to provide you with the best scanning performance. Note: To achieve the best read, the aiming beam should be centered horizontally across the bar code. The aiming pattern is smaller when the terminal is held closer to the code and larger when the terminal is held farther from the code.
-
Page 41: Capturing Images
This is normal; the captured image has a higher resolution. File Formats The ScanPal 5100 terminal is capable of saving images in a BMP file format. File Size Digital images have a maximum image size of 752 x 480 pixels and may have up to a 256 grayscale image definition. - Page 42 6 - 6...
-
Page 43: Chapter 7 - Communication
7-5. Installing Additional Software ScanPal 5100 terminals ship with the operating system, radio drivers, and custom Honeywell software already installed. These are the default programs that install when your terminal first boots up. You can install additional software programs on the terminal provided that the following parameters are met: •... -
Page 44: Connecting And Synchronizing The Terminal And Workstation
To facilitate USB communication between the ScanPal 5100 terminal and the host workstation, you may connect your unit to a host by using either the optional ScanPal 5100 USB Communication Cable or HomeBase. If you use the Communication Cable, insert the cable into the bottom of the terminal lining up the terminal’s I/O connector with the cable unit’s connector. - Page 45 The USB cable and hardware peripherals allow the ScanPal 5100 terminal to communicate with a workstation through a USB port or to a network through a USB hub. The ScanPal 5100 terminal supports full-speed USB communication (USB 1.1); maximum data transfer rate is 12 Mbps. The ScanPal 5100 terminal defaults to USB communication out of the box.
- Page 46 2. Click Explore. This opens the Mobile Device folder for the terminal in Windows Explorer. 3. The ScanPal 5100 terminal is now treated as a mass storage device, and transferring files is as simple as dragging and dropping or copying and pasting.
-
Page 47: Wireless Radios
2. Read any installation instructions, Read Me files, or documentation that comes with the program. Many programs provide special installation instructions. 3. Connect the terminal to the workstation via an ScanPal 5100 communication peripheral. If the File is an Installer An installer program is one that installs to the workstation and the terminal simultaneously;... -
Page 48: Connecting The Terminal To A Wireless Network
2. Bluetooth (WPAN configuration): see Bluetooth Handler on page 8-1. Connecting the Terminal to a Wireless Network You connect the terminal to a wireless network through the on-board radio (802.11b/g and/or Bluetooth). Each radio has its own configuration program and requires specific information about the wireless network to connect. -
Page 49: Chapter 8 - Bluetooth Handler
Connecting Bluetooth devices usually requires that they be paired; the same passkey must be entered for each device. If you want to connect the ScanPal 5100 to a device without any input method (e.g., printers, headsets), refer to the user documentation that accompanied the device for pairing information. - Page 50 Wait until all Bluetooth devices in range have been scanned and the Scan Dialog window appears. 6. Scroll through the list until your Bluetooth printer device is found. You may select any device in the list to display its MAC address. 7.
-
Page 51: Chapter 9 - Homebase Device
If the battery voltage drops below the charge threshold, the charger turns on again to maintain the battery at full capacity. As a result, ScanPal 5100 terminals may be stored in the base indefinitely without damage to the terminals, battery packs, or peripherals. For... -
Page 52: Back Panel
Rubber Feet The bottom panel has four rubber feet to stabilize the unit on a flat surface. You can set the base on a dry, stable surface, such as a desktop or workbench near an electrical outlet. Back Panel Serial Port USB Port DC Power Jack DC Power Jack... - Page 53 ActiveSync (see Connecting and Synchronizing the Terminal and Workstation page 7-2). Honeywell recommends that you leave the base connected to its power source at all times, so that it is always ready to use. 9 - 3...
-
Page 54: Charging The Main Battery
Charging the Main Battery The base powers the terminal and fully charges its main battery pack in 4 or 6 hours depending on the battery. As battery packs charge, the charging circuitry follows the two- step charging process (CC-CV) that is recommended for Li-Ion batteries. -
Page 55: Checking Battery Power
Charging a Spare Battery The base can also charge a second battery while the terminal is positioned in the base. The second battery can be inserted in the battery charging well in back of the terminal connection. Angle the battery as shown. -
Page 56: Technical Specifications
90% relative humidity (non-condensing) Power Supply Input (Universal) 100–240 Volts, 0.3 A 50–60Hz (from the power source) Included with ScanPal 5100 terminal Output (to the base) 5 Volts DC, 2.0 A Charging Standard Charge Standard Capacity: 2200mAh - four hours... -
Page 57: Chapter 10 - Quadcharger Device
We recommend use of Honeywell Li-Ion battery packs. Use of any non-Honeywell battery may result in damage not covered by the warranty. DO NOT attempt to charge damp/wet mobile computers or batteries. All components must be dry before connecting to an external power source. -
Page 58: Battery Charging
Battery Charging Charging Process This charger charges 5100 standard capacity Li-ion 2200mAh battery packs in four hours and extended capacity 3300mAh packs in six hours. Each charging slot works independently of the other three. As battery packs charge, the charging circuitry follows the two-step charging process (CC-CV) that is recommended for Li-Ion batteries. -
Page 59: Troubleshooting
Recommendations for Storing Batteries To maintain top performance from batteries, follow these storage guidelines: • Avoid storing batteries outside of the specified temperature range of -4 to 122° F (-20 to 50°C) or in extremely high humidity. • For prolonged storage, do not keep batteries stored in a charger that is connected to a power source. Troubleshooting If you encounter problems with the charger, refer to chart below for possible solutions. -
Page 60: Technical Specifications
Technical Specifications Structural Dimensions 7.3 in. long X 3.7 in. wide X 2.4 in. high (18.5 cm. X 9.4 cm. X 6.1 cm.) Weight 11.5 oz. (325g) Material Case: Polycarbonate Color: Black Capacity Supports up to four Li-ion battery packs Environmental Operating Temperature 14°... -
Page 61: Chapter 11 - Customer Support
For our latest contact information, please check our website at the link above. Product Service and Repair Honeywell International Inc. provides service for all of its products through service centers throughout the world. To obtain warranty or non-warranty service, please visit www.honeywellaidc.com... -
Page 62: Limited Warranty Duration
• The duration of the limited warranty for batteries is one year. Use of any battery from a source other than Honeywell may result in damage not covered by the warranty. Batteries returned to Honeywell International Inc. in a reduced state may or may not be replaced under this warranty. - Page 64 Honeywell Scanning & Mobility 9680 Old Bailes Road Fort Mill, SC 29707 www.honeywellaidc.com ™ 5100-UG Rev B 10/12...