HP xp8010 series Reference Manual
Hewlett-packard projector reference guide
Hide thumbs
Also See for xp8010 series:
- Reference (18 pages) ,
- Quick setup manual (9 pages) ,
- Installation manual (2 pages)
Table of Contents
Advertisement
Quick Links
Advertisement
Table of Contents

Related Manuals for HP xp8010 series


Summary of Contents for HP xp8010 series
- Page 1 guide...
- Page 2 Notice The information contained herein is subject to change without notice. The only warranties for HP products and services are set forth in the express warranty statements accompanying such products and services. Nothing herein should be construed as constituting an additional warranty. HP shall not be liable for technical or editorial errors or omissions contained herein.
-
Page 3: Table Of Contents
Projector buttons and lights........ - Page 4 To set basic projector properties ........
- Page 5 To run the projector diagnostics ........
- Page 6 Contents Regulatory Information ........... . . 92 U.S.A.
-
Page 7: Installation And Setup
The chapter explains how to install and set up the HP digital projector. If you are a presenter who is setting up the projector for short-term use, see Chapter 3, “Presentations.” This chapter covers: ■ “Identifying Common Features” on page 9. -
Page 8: What's In The Box
Installation and Setup What’s in the Box? Before setting up your projector, be sure your shipping box includes the following items. If the shipping box does not contain any of the following items, contact HP. Identifying the contents of the box Symbol... -
Page 9: Identifying Common Features
Identifying Common Features This section identifies common features and functions of the projector. The section covers: ■ “Projector at a glance” on page 10. ■ “Projector buttons and lights” on page 11. ■ “Back panel” on page 12. ■ “Remote control” on page 14. -
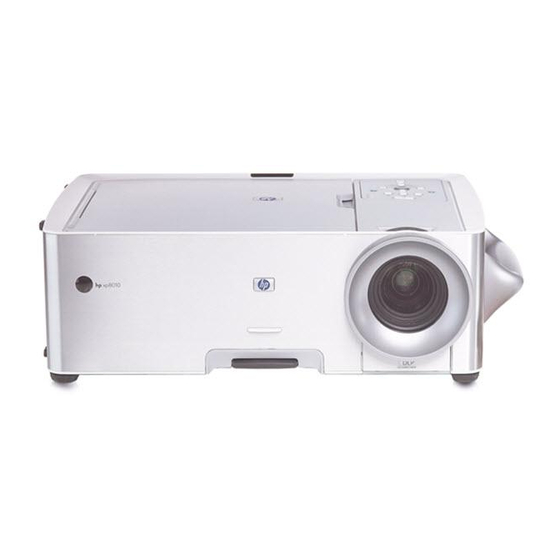
Page 10: Projector At A Glance
Installation and Setup Projector at a glance Identifying the projector Symbol Item Infrared receiver Cover latch Control panel Zoom ring Focus ring Lens cover Height adjustment Function Receive signals from the remote control. Releases cover for replacing lamp module and connectivity module. -
Page 11: Projector Buttons And Lights
Installation and Setup Function Optimizes the picture for data input. Maximizes brightness (grayscale picture). Turns the projector on or off. Blinks during warm-up and cool-down. Optimizes the picture for video input. Turns on when lamp fails. Turns on when the internal temperature is too high. -
Page 12: Back Panel
Function Connects desktop or notebook computers or pocket PCs. Connects control equipment. Also used for firmware upgrades. Connects to a monitor or second projector. Connects to amplified speakers or audio equipment. Receives infrared signals from the remote control. Connects the projector to a network. - Page 13 See the L1581A manual for information about using this module. Reference Guide (continued) Function Provides stereo sound. Secures the projector using a cable lock. Controls a motorized screen or similar device. Connects various equipment with RGB, RGBS, RGBHV, and YPbPr output. Connects various equipment with analog- and digital-video output.
-
Page 14: Remote Control
Performs left-click and right-click functions for a connected computer. Hides the display. Switches to the next input source. Powers on and off the projector. Turns on the laser pointer. Moves the mouse pointer on a connected computer. Reference Guide... - Page 15 Theatre video button Menu buttons Auto sync Business graphics button Reference Guide Installation and Setup Function Optimizes the picture for video input. Change projector settings using the on-screen menu. Resynchronizes the projector to the input signal. Optimizes the picture for data input.
-
Page 16: Accessories
Installation and Setup Accessories The following list displays some of the accessories you can buy for the HP projector: ■ Advanced connectivity module (add an optional 802.11b card for wireless computer connections and more) ■ Add-on lens ❏ Short-throw ❏... -
Page 17: Selecting A Location
Selecting a Location This section describes how to set up and plan for installing the projector: ■ “To install on a table” on page 18 ■ “To install on the ceiling” on page 18 ■ “To install the cable shroud” on page 22 ■... -
Page 18: To Install On A Table
See “To install an add-on lens” on page 57. To install on a table 1. Place the projector on a stable platform located 1.5 to 14 m (5 to 46 ft) in front of the screen. 2. Connect all necessary cables to the projector. - Page 19 1. Align the end of the ceiling-mount bracket lower-mount bracket 2. Align the three holes on the projector with the lower-mount bracket and firmly secure with three screws. Reference Guide with the center hole in the , and firmly secure it with a washer...
- Page 20 > Projector position. Then select Front Ceiling from the drop-down list. 5. (Optional) Install the cable shroud to hide the cables. See “To install the cable shroud” on page 22. If you secure the projector with a Kensington lock, the lock also secures the shroud. Reference Guide...
-
Page 21: To Install For Rear Projection
If you do not use an HP ceiling mount, mount the projector according to the following dimensions: ■ X = 176 mm (6.93 in.) ■ Y = 188 mm 7.40 in.) ■ Z = 86 mm (3.39 in.) ■ Thread size = M6 To install for rear projection 1. -
Page 22: To Install The Cable Shroud
To install the cable shroud You can install the cable shroud to hide cable connections from view. ■ Insert the plastic hooks into the upper slots in the projector case, then push the bottom tabs into the lower slots. Reference Guide... -
Page 23: Turning On And Off
“To operate the remote control” on page 25 ■ “To reset the projector” on page 26 To connect power 1. Connect one end of the power cord to the back of the projector end to an electrical outlet 2. Turn on the main disconnect switch ✎... -
Page 24: To Turn The Projector On
3. Press the power button remote control. The power button blinks while the projector warms up. When the lamp turns on, the power button stays on, and the projector searches for a signal. 4. Connect and power on the source, such as computer, handheld organizer, or DVD player. -
Page 25: To Turn The Projector Off
To turn the projector off ■ Press the power button on the projector or remote control to turn off the projector. The power button blinks until the cool-down cycle completes. Å WARNING: Do not unplug the power cord or turn off the main disconnect switch until the cool-down cycles completes and the power button turns off. -
Page 26: To Reset The Projector
If the projector becomes completely unresponsive, you can reset all circuits by disconnecting power. 1. Press the power button on the projector or remote control to turn off the projector, then wait until the cool-down period ends and the power button stops blinking. If the projector does not turn off, continue to the next step. -
Page 27: Making Initial Connections
Making Initial Connections If you are a presenter who is setting up the projector for short-term use, see Chapter 3, “Presentations.” The section explains how to connect different types of equipment to the projector: ■ “To connect input sources” on page 27 ■... - Page 28 Installation and Setup Computer with M1-to-VGA cable connection ■ M1-to-VGA/USB cable (available from HP) ■ Stereo mini-phone audio cable Computer with M1-to-DVI cable connection ■ M1-to-DVI/USB cable (available from HP) ■ Stereo mini-phone audio cable Reference Guide...
- Page 29 VCR with composite video cable connection ■ Video-RCA cable ■ Stereo-audio RCA cable S-video equipment connection ■ S-video cable ■ Stereo-audio RCA cable Reference Guide Installation and Setup...
- Page 30 Installation and Setup DVD or HDTV with component-video cable connection ■ YPbPr RCA cable ■ Stereo-audio RCA cable SCART-device connection ■ M1-to-SCART adapter cable (available from HP) ■ SCART cable ■ Stereo mini-phone audio cable Reference Guide...
- Page 31 RGB-equipment connection ■ RGB-video BNC cable ■ Stereo-audio RCA cable RGBS-equipment connection ■ RGBS-video BNC cable ■ Stereo-audio RCA cable Reference Guide Installation and Setup...
-
Page 32: To Connect Output Devices
Installation and Setup RGBHV-equipment connection ■ RGBHV-video BNC cable ■ Stereo-audio RCA cable To connect output devices ■ VGA cable ■ Stereo-audio RCA cable The speakers must be amplified. Reference Guide... -
Page 33: To Connect Control Equipment
2.5-mm (3/32-in) to 3.5-mm (1/8-in) stereo mini-phone cable ■ 3.5 × 1.3-mm DC power cable In some installations, the projector might not be visible to the remote control, such as for rear projection. Use one of these solutions to enable the remote control to work: ■... -
Page 34: Configuring The Projector
Configuring the Projector To change settings using the on-screen menu You can change the on-screen menu settings with either the buttons on the projector or the remote control buttons. 1. Press enter on the projector or the remote control to open the on-screen menu. -
Page 35: To Set Up Network Access
1. Plug a CAT5 network cable into the RJ-45 network port on the back of the projector. If the projector has power, the left indicator light on the network port turns on showing a 10- or 100-Mb/s connection. The light on the right shows network activity. -
Page 36: Securing The Projector
Installation and Setup Securing the Projector The projector includes a built-in slot to secure the projector with a cable and a lock (such as the Kensington MicroSaver lock system, available at many computer stores). 1. Wrap the cable around a secure object, such as a table leg. Loop the cable to create a slip knot around the stationary object, and be sure it cannot slip off. -
Page 37: Adjustments
This chapter describes how to make adjustments to the projector. The chapter covers: ■ “Making Basic Adjustments” on page 37. ■ “Adjusting the Picture” on page 40. Making Basic Adjustments This section provides the following instructions: ■ “To aim the projector” on page 38 ■... -
Page 38: To Aim The Projector
■ To lower the projected picture, raise and hold the height adjustment lever while pressing down on the front of the projector, then release the lever to lock the foot. ■ To level the projected picture, turn the two back feet to screw in or out. All four feet are adjustable in this way. -
Page 39: To Adjust The Focus And Zoom
To get descriptions for all available audio adjustments, see “Using the On-Screen Menu” on page 61. Reference Guide until the image becomes clear. The projector can focus at to adjust the picture size from 100 to 120%. Adjustments... -
Page 40: Adjusting The Picture
■ “To make adjustments from the web” on page 41 To adjust the image according to type of picture Use the picture mode buttons on the projector or the remote control to optimize the image. ■ To optimize the picture for data presentations, press the business graphics button. -
Page 41: To Make Adjustments From The Web
Netscape Navigator 7.0 and above. 1. On a networked computer, open an internet browser, enter the IP address of the projector into the URL bar, and press the Enter key. See “To find the IP address” on page 53 for more information. - Page 42 Adjustments Reference Guide...
-
Page 43: Presentations
The chapter explains how to temporarily connect computers and other devices to the projector. This chapter covers: ■ “Connecting and Preparing” on page 43. ■ “Showing Presentations” on page 49. ■ “Disconnecting” on page 51. Connecting and Preparing The section provides the following instructions: ■... -
Page 44: To Connect A Computer Using A Vga Cable
✎ For a desktop computer, you can plug the desktop monitor into the VGA-out port on the projector, so the picture is visible on the projector screen and the desktop monitor. and the computer and the... -
Page 45: To Connect A Handheld Organizer
Not all handhelds come with VGA-out ports. For example, the iPAQ Pocket PC requires a VGA-out PC Card with 15-pin connector. 2. Connect a standard VGA cable between the VGA #1 port on the projector connect the other end to the VGA-out PC Card... -
Page 46: To Connect A Computer Using Other Types Of Cables
To connect a computer using other types of cables M1 to VGA/USB connection 1. Connect an M1-to-VGA/USB cable (available from HP) between the M1 port on the projector 2. (Optional) To allow the remote control to function as the computer mouse,... - Page 47 M1 to DVI/USB connection 1. Connect an M1-to-DVI/USB cable (available from HP) between the M1 port on the projector 2. (Optional) To allow the remote control to function as the computer mouse, connect the USB plug of the M1-to-DVI/USB cable into the USB port on the computer 3.
-
Page 48: To Connect Other Video Sources
2. (Optional) To get audio, connect an RCA cable between the stereo-audio ports on and the composite-audio ports on the projector coding of the connectors. . Observe the color coding of the connectors. and the YPbPr audio ports on the projector to the . Observe . Observe the color... -
Page 49: Showing Presentations
1. Be sure the computer is connected to the projector. See “Connecting and Preparing” on page 43 for more information. 2. Be sure the computer and the projector are on. See “To turn the projector on” on page 24 for more information. -
Page 50: To Change The Source
Presentations To change the source ■ Press the source button on the projector or remote control, or ■ Open the on-screen menu, select input, and select the port to which the input source is connected. To hide or show the display You can easily hide the display from your audience temporarily. -
Page 51: Disconnecting
Then turn off the main disconnect switch on the back of the projector and unplug the power cord. If you try to turn on the projector again during the cool-down period, it does not turn on. Wait until the cool-down period ends and the power button stops blinking. - Page 52 Presentations Reference Guide...
-
Page 53: System Management
This chapter explains how you can manage one or more projectors. If the projector is connected to a network, you can work from a central location by accessing the projector’s embedded web server, rather than being in the same room as the projector. -
Page 54: To Set Basic Projector Properties
To set basic projector properties 1. On a networked computer, open an internet browser, enter the IP address of the projector in the URL bar, and press Enter. See “To find the IP address” on page 53 for more information. -
Page 55: To Set Up Email For Notifications
1. On a networked computer, open an internet browser, enter the IP address of the projector into the URL bar, and press Enter. See “To find the IP address” on page 53 for more information. 2. Click the Management tab, and on the left side of the screen, click Alerts. -
Page 56: Upgrading The Projector
URL bar, and press the Enter key. See “To find the IP address” on page 53 for more information. 2. If the projector is turned on, press the power button to turn it off. Or you can do this in the browser by clicking the Projector tab, then clicking the Power button. -
Page 57: To Install An Add-On Lens
To install an add-on lens If the projector distance and image size are not compatible with the room configuration, an add-on lens might provide a solution. Use the following table to coordinate distance to the screen, width of the screen, and lens size. - Page 58 3. Press and hold the release latch on the focus ring counterclockwise until it stops, and pull off the ring 4. Line up the marks on the lens and projector. Insert the add-on lens on the main lens, then turn the lens place.
-
Page 59: To Change The Connectivity Module
4. Loosen the two screws on the faceplate of the connectivity module at the back of the projector. 5. Use the screws to pull the module out of the projector Reverse the procedure to install the connectivity module. Reference Guide... - Page 60 System Management Reference Guide...
-
Page 61: Maintenance
This chapter explains how to maintain the projector. The chapter covers: ■ “Using the On-Screen Menu” on page 61. ■ “Performing Routine Maintenance” on page 68. Using the On-Screen Menu The following tables describe all the functions available in the on-screen menu for the firmware version at publication. -
Page 62: Quick Choice Menu
Maintenance Quick Choice menu This menu provides quick access to commonly used functions from other menus. The menu in your projector may differ from the menu shown below. quick choice Brightness Contrast Keystone correction Reset keystone correction Hide Input menu This menu was named the Connect menu in earlier firmware versions. - Page 63 VGA and SCART devices and digital DVI (Digital Video Interface) devices. This connection is considered graphics or video input, depending on the device. Sets whether the projector automatically searches for input signals and displays the next one found. Maintenance...
-
Page 64: Adjust Picture Menu
Adjusts the color palette according to the type of picture. You can optimize the picture for computer presentations, video output, or super-bright grayscale output. The remote control and projector have buttons to change the picture mode. Sets the brightness of white areas. - Page 65 Shifts the image up or down within the projection area. Shifts the image left or right within the projection area. Adjusts the timing of the projector relative to a computer graphics card. Synchronizes the projector to a computer graphics card.
-
Page 66: Audio Menu
Selects the language for the menus. Sets a lower light output for longer lamp life. Adjusts the image to match the orientation of the projector: upright or upside-down, in front of or behind the screen. Inverts or reverses the image accordingly. -
Page 67: Help Menu
Sets up the TCP/IP network parameters. Check with the network administrator. Sets whether a DHCP server is used to assign an IP address to the projector. Do not use DHCP if you want the projector to have a fixed IP address every time power is connected. -
Page 68: Performing Routine Maintenance
“To replace the battery in the remote control” on page 70 To get the projector status ■ Open the on-screen menu and select help > About this projector. This screen shows information and status for the projector. To clean the projector lens ■... -
Page 69: To Replace The Lamp Module
For a ceiling installation, wear goggles and gloves when removing the lamp module. If the lamp is broken, contact HP about repairs that might be required. ■ Wait 30 minutes before opening the lamp cover and removing the lamp module because the lamp assembly operates at a very high temperature. -
Page 70: To Replace The Battery In The Remote Control
Maintenance 6. Close the lid. 7. Turn on the projector. If the lamp does not turn on after the warm-up period, try reinstalling the lamp again. 8. Open the on-screen menu and select setup > Reset lamp hours. Å WARNING: The lamp contains a small amount of mercury. If the lamp breaks, adequately ventilate the area where the breakage occurred. -
Page 71: Troubleshooting
To use this section, find the problem statement that is closest to your problem, then try each bulleted item one at a time until your problem is fixed. If the suggestions do not solve your problem, contact HP. See the Support Guide included with the projector. This section covers: ■... -
Page 72: Start-Up Problems
❏ If nothing is projected, but the projector seems to start up: ❏ ❏ ❏ If the projector makes a “ticking” sound, if the projector lamp does not turn on, and if warning lamp light is on: ❏ ❏ ❏... -
Page 73: Picture Problems
Picture problems If the image is not displayed on the screen, but the HP startup screen is displayed: ❏ ❏ ❏ ❏ ❏ ❏ If the wrong input source is displayed: ❏ ❏ ❏ ❏ If the image is out of focus: ❏... - Page 74 > Projector position, and choose the correct setting Adjust the zoom ring on top of the projector. Ensure the projector is 1.5 to 14 m (5 to 46 ft) from the projection screen. Open the on-screen menu and select adjust picture > Aspect ratio.
- Page 75 For a desktop computer, you can connect your monitor to the projector’s VGA output port. If the business graphics button on the projector is lit, try pressing the theatre video button on the projector or remote control. Open the on-screen menu and select adjust picture > Advanced picture.
- Page 76 Reset the picture settings to the factory-default settings. See the following problem. Reset the projection settings to the factory-default settings. To do this, hold down these three buttons on the projector for 5 seconds: back + up-arrow + auto sync. (This does not reset network settings.) Certain high-definition digital sources incorporate HDCP (High-bandwidth Digital-Content Protection) content protection.
-
Page 77: Sound Problems
If no sound is coming out of the projector: ❏ ❏ ❏ If the projector speakers interfere with an external audio system: ❏ Reference Guide Be sure you have an audio cable securely connected between the projector and the input device. -
Page 78: Interruption Problems
When the lamp reaches its end of life, it might burn out and make a popping sound. If this happens, the projector will not turn back on until the lamp module has been replaced. If the lamp breaks, contact HP about repairs that might be required. Reference Guide... -
Page 79: Remote Control Problems
Be sure nothing is blocking the infrared receivers on the front and back of the projector. Move to within 9 m (30 ft) of the projector. Open the on-screen menu and select help > Diagnostics. Run remote control tests. - Page 80 Troubleshooting If you forget the projector’s web administrator password: ❏ If you can access the projector via the web, but only the home page: ❏ If the network configuration is completely wrong and you cannot fix it: ❏ set for the projector—contact the network administrator for a valid TCP/IP network configuration, then set up the projector accordingly.
-
Page 81: Testing The Projector
Testing the Projector The on-screen menu contains diagnostic tests you can use to verify the proper operation of the projector and the remote control. To run the projector diagnostics 1. Open the on-screen menu and select help > Diagnostics. 2. Select a test to perform. - Page 82 Troubleshooting Reference Guide...
-
Page 83: Reference
“Safety Information” on page 90. ■ “Regulatory Information” on page 92. Specifications Because HP continually improves its products, the following specifications are subject to change. For the latest specifications, visit the HP website at http://www.hp.com. Identifying the projector specifications Luminance Resolution Technology... - Page 84 Reference Identifying the projector specifications Video connectors Audio connectors I/O connectors Connectivity module connectors IR receivers Cable shroud Size Weight (continued) M1-DA graphics (optional M1-DA cables for VGA, DVI, and SCART) VGA #1 input VGA #2 input VGA output S-video input...
- Page 85 1.2:1 Up to ±40° vertical Up to ±17° horizontal 5-W peak stereo with sealed, resonating sound chambers xp8010: 250-W P-VIP lamp, 1.3-mm arc xp8020: 300-W P-VIP lamp, 1.3-mm arc 2000 hours rated life Lamp-saver mode reduces lamp power by 20% Replacement lamp: L1582A (xp8010), L1583A (xp8020) 0.7 12°...
- Page 86 Noise level Environment Analog Video Mode Compatibility Compatibility SVGA (continued) xp8010: 32±2 dBA xp8020: 36±2 dBA Operating: Temperature: 10 to 35°C (50 to 95°F) Humidity: 80% RH max, non-condensing Altitude: up to 3,000 m (10,000 ft), up to 25°C (77°F) Storage: Temperature: -20 to 55°C (-4 to 131°F)
- Page 87 Analog Video Mode Compatibility Compatibility SXGA SXGA+ UXGA UXGA MAC LC 13 MAC II 13 MAC 16 MAC 19 MAC G4 MAC G4 MAC G4 i Mac DV i Mac DV i Mac DV i Mac DV Reference Guide Resolution V-Sync (Hz) 800 x 600 1024 x 768...
- Page 88 Reference Analog Video Mode Compatibility Compatibility i Mac DV i Mac DV Digital Video Mode Compatibility Compatibility SVGA SXGA Resolution V-Sync (Hz) 1280 x 960 1280 x 1024 Resolution V-Sync [Hz] 640 x 350 640 x 350 640 x 400 640 x 480 640 x 480 640 x 480...
- Page 89 Digital Video Mode Compatibility Compatibility SXGA+ UXGA Reference Guide Resolution V-Sync [Hz] 1280 x 1024 1400 x 1050 1600 x 1200 Reference H-Sync [kHz] 79.98 63.98...
-
Page 90: Safety Information
■ Ensure proper use by reading and following the instructions carefully. ■ If the unit requires service, contact an authorized HP service center. ■ Do not attempt to make any adjustment to the unit. ■ Avoid direct exposure to the laser beam. -
Page 91: Led Safety
Class 1 LED devices according to International Standard IEC 825-1 (EN60825-1). This device is not considered harmful, but the following precautions are recommended: ■ If the unit requires service, contact an authorized HP service center. ■ Do not attempt to make any adjustment to the unit. ■... -
Page 92: Regulatory Information
This section presents information that shows how your digital projector complies with regulations in certain regions. Any modifications to your digital projector not expressly approved by HP could void the authority to operate the digital projector in these regions. U.S.A. -
Page 93: Japan
Reference Japan Korea Reference Guide... -
Page 94: International
DECLARATION OF CONFORMITY According to ISO/IEC Guide 22 and EN 45014 Hewlett Packard Company Hewlett Packard Company Digital Projection & Imaging 1000 NE Circle Blvd. Corvallis, OR 97330-4239 Digital Projector xp8010 and xp8020 CRVSB-03CA and CRVSB-04CA Steve Brown, General Manager Reference Guide... - Page 95 16 see Reference Guide add-on lens installing 57 range 57 adjustments from the web 41 admin. account see configuration aiming the projector raising and lowering 38 alerts see email analog video mode compatibility 86 audio adjusting 39 connecting 27...
- Page 96 59 removing 59 contents in the box 8 digital video mode compatibility 88 disconnecting projector 51 distance see also lens setting up with respect to image 17 email setting notifications 55 embedded web server 53 events see email...
- Page 97 Japan 93 Korea 93 U.S.A. 92 remote control battery replacement 70 extension 33 identifying with doors closed 14 identifying with doors open 15 using 25 remote control extension 33 resetting network settings 80 projection settings 76 projector 26 Index Index 97...
- Page 98 Reference Guide SMTP see email sound see audio source changing 50 connecting 27 specifications of the projector 83 see Reference Guide status on-screen menu viewing 68 web viewing 54 super-bright mode see picture mode table installation setting up 18...