LevelOne WBR-6003 User Manual
150mbps n wireless router
Hide thumbs
Also See for WBR-6003:
- Setup & user manual (12 pages) ,
- Quick installation manual (98 pages) ,
- User manual (70 pages)
Table of Contents
Advertisement
Quick Links
Advertisement
Table of Contents

Related Manuals for LevelOne WBR-6003


Summary of Contents for LevelOne WBR-6003
-
Page 1: User Manual
LevelOne User Manual WBR-6003 150Mbps N Wireless Router Ver. 2.0... - Page 2 Member States relating to electromagnetic compatibility. CE Marking Warning Hereby, Digital Data Communications, declares that this product (Model-no. WBR-6003) is in compliance with the essential requirements and other relevant provisions of Directive 1999/5/EC. The CE-Declaration of Conformity can be downloaded at: http://www.levelone.eu/support.php...
-
Page 3: General Public License
General Public License This product incorporates open source code into the software and therefore falls under the guidelines governed by the General Public License (GPL) agreement. Adhering to the GPL requirements, the open source code and open source license for the source code are available for free download at http://global.level1.com. -
Page 4: Table Of Contents
Table of Content TABLE OF CONTENT ................................4 INTRODUCTION ................................5 ................................. 5 ANUAL VERVIEW UNPACKING AND SETUP ..............................6 ....................................6 EATURES .................................. 6 ACKAGE ONTENTS HARDWARE INSTALLATION ............................7 ....................................7 RONT ....................................8 ............................... 9 ARDWARE INSTALLATION STEPS CHECK YOUR NETWORK SETTINGS ........................ -
Page 5: Introduction
1. Introduction Congratulations on your purchase of LevelOne WBR-6003 150Mbps N Wireless Router. This product is specifically designed for Small Office and Home Office needs. It provides a complete SOHO solution for Internet surfing, and is easy to configure and operate even for non-technical users. -
Page 6: Unpacking And Setup
Quick Setup Wizard provides alternative way to manage device Package Contents Open the box of the 150Mbps N Wireless Router and carefully unpack it. The box should contain the following items: WBR-6003 150Mbps N Wireless Router Power Adapter RJ-45 Cable CD Manual / Utility Quick Installation Guide If any item is found missing or damaged, please contact your local reseller for replacement. -
Page 7: Hardware Installation
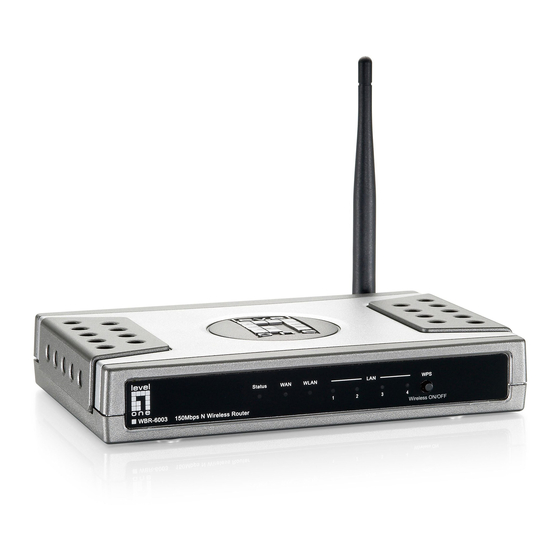
3. Hardware Installation Front View 1) Status • A steady blinking light indicates the device is ready 2) WAN • A solid light indicates the WAN port is connected. 3) WLAN • A solid light indicates the Wireless LAN is turned on and ready for use. •... -
Page 8: Rear View
Rear View 1) Antenna 3dBi fix antenna allows users to have a wider range signal coverage. 2) LAN Ports (1~4) Connect Ethernet devices such as computers, switches or hubs. 3) WAN Port The WAN port is the connection for the Ethernet cable to the Cable or DSL Modem. 4) Reset Button It allows user can reset device to Factory Default setting... -
Page 9: Hardware Installation Steps
Wired LAN connection: Connect an Ethernet cable from your computer’s Ethernet port to one of the LAN ports of the Wireless Router. Wireless LAN connection: Locate the WBR-6003 at a proper position to gain the best transmit performance. 3. Setup WAN connection Prepare an Ethernet cable for connecting this product to your cable/xDSL modem or Ethernet backbone. -
Page 10: Check Your Network Settings
4. Check Your Network Settings Please make sure your PC can get IP address automatically so the WBR-6003 can communicate with your PC during configuration. • Select “Control Panel” > “Network Connections”. • Right click the “Local Area Connection” and choose “Properties”. -
Page 11: Getting Start
5. Getting Start Setup your CD Easy Setup Insert the CD into CD-Rom on your PC. The program, AutoRun, will be executed automatically. And then you can click the Easy setup Icon for this utility. Configure the settings by the following steps. Select Language then click “Next”... - Page 12 3. Advanced mode Setup Check the PC, Router or Internet icons for the Status of PC, Router or Internet. Quick Wizard Install mode Setup Make sure the router is powered on. Make sure your network adapter is connected to the LAN port of the router Make sure your network adapter has an IP address.
- Page 13 6. Auto Detect WAN Service Click “Next” for continue. Click the button, “Let me select WAN service by myself”, to disable this function. Note: The Item supports to detect the Dynamic and PPPoE WAN Services only Example, the Dynamic WAN type is detected.
- Page 14 9. Apply the Settings or Modify. Click “Next” for continue. 10. Test the Internet connection. Test WAN Networking service. Click “Next” for continue. You can ignore the by select the “Ignore Test”. 11. Setup Completed. The Easy Setup is finish. You can open the default web browser to configure advanced settings of the Router.
-
Page 15: Configuration Wizard
Open a web browser (Internet Explorer/Firefox/Safari) and type in the IP Address http://192.168.1.1 Note: If you have changed the default IP Address assigned to the WBR-6003, ensure you enter the correct IP Address. Type in “admin” (without quotes) in the Password box, Then click Login Note: admin is the default login password for the unit. - Page 16 Setup Wizard will guide you through a basic configuration procedure step by step. Press Next to begin. Step 1: your system password. Press “Next”...
- Page 17 Step 2: Select Wan Type. Auto Detecting or Setup Manually. Press “Next” Step 3: Setup WAN Type of your internet, then press “Next” Setup the LAN IP, Host Name information WAN Mac address, then press “Next”...
- Page 18 Step 4: If you choose WAN type of PPP over Ethernet, please fill PPPoE service information which is provided by your ISP. After setup, press “Next” Step 5: your Wireless settings, Enable/Disable wireless, setup SSID information, configure wireless channel in this page. After setup, press “Next”...
- Page 19 Step 6: Check settings correct, then click “Apply Setting” button. device will automatically reboot make the settings effect. Once the user finishes those steps and the router screen displayed as below. It means that the Internet connection is now established.
-
Page 20: System Status
System Status This option provides the function for observing this product’s working status: WAN Port Status: If the WAN port is assigned a dynamic IP, there may appear a “Renew” or “Release” button on the sidenote column. You can click this button to renew or release IP manually. Wireless Status: You can check your Wireless settings in this column. -
Page 21: Advanced Setup
6. Advanced Setup To access the Advanced Setup, click on Advanced Setup at the top of the page. Or, for first time installation, choose Advanced Setup and click Enter. Once in the Advanced Setup, you will be presented with the following menu. -
Page 22: Basic Setting
Basic Setting These are the basic settings of the unit. Click on the menu on the left to access the respective settings page. -
Page 23: Primary Setup
Primary Setup This page lets you change the LAN (Local Area Network) settings on your WBR-6003 150Mbps N Wireless Router and WAN (Wide Area Network) connection. 1. LAN IP Address: The local IP address of this device. The computers on your network must use the LAN IP address of your product as their Default Gateway. -
Page 24: Static Ip Address
This option is primary to enable this product to work properly. The setting items and the web appearance depend on the WAN type. Choose correct WAN type before you start. Static IP Address: ISP assigns you a static IP address. Dynamic IP Address: Obtain an IP address from ISP automatically. -
Page 25: Dynamic Ip Address With Road Runner Session Management
Dynamic IP Address 1. Host Name: Optional. Required by some ISPs, for example: @Home. 2. Renew IP Forever: This feature enables this product to renew your IP address automatically when the lease time is expiring-- even when the system is idle. Dynamic IP Address with Road Runner Session Management 1. - Page 26 PPP over Ethernet 1. PPPoE Account and Password: the account and password your ISP assigned to you. For security, this field appears blank. If you don't want to change the password, leave it empty. 2. PPPoE Service Name: Optional. Input the service name if your ISP requires it. Otherwise, leave it blank.
-
Page 27: Pptp
PPTP First, please check your ISP assigned and Select Static IP Address or Dynamic IP Address. 1. My IP Address and My Subnet Mask: The private IP address and subnet mask your ISP assigned to you. 2. Server IP Address: The IP address of the PPTP server. 3. -
Page 28: L2Tp
L2TP First, please check your ISP assigned and Select Static IP Address or Dynamic IP Address. For example: Use Static 1. My IP Address and My Subnet Mask: The private IP address and subnet mask your ISP assigned to you. 2. -
Page 29: Virtual Computers (Only For Static And Dynamic Ip Address Wan Type)
Virtual Computers (Only for Static and dynamic IP address WAN type) Used when WAN is set as DHCP or Static IP, the user can assign a global IP address to a LAN IP Address. Virtual Computer enables you to use the original NAT feature, and allows you to setup the one-to-one mapping of multiple global IP address and local IP address. -
Page 30: Dhcp Server
DHCP Server This page allows you to configure the DHCP server on the 150Mbps N Wireless Router For more settings click on More. DHCP Server: To either Disable or Enable DHCP Server. Lease Time: DHCP lease time to the DHCP client IP Pool Starting/Ending Address: The pool of IP’s that can be allocated to clients Domain Name: To assign a Domain Name (optional) Primary DNS/Secondary DNS: To assign DNS Servers (optional) -
Page 31: Wireless Settings
Channel: The radio channel number. The permissible channels depend on the Regulatory Domain. The default is AUTO which means the WBR-6003 will find the least used channel to avoid interference. - Page 32 Please ensure you have wireless security set up on the WBR-6003 before initializing WPS functions. Set PIN number of WBR-6003 Click the “Generate New PIN” button to randomly create a new PIN number for the WBR-6003. Set your wireless adapter as Registrar and enter this PIN number to initiate the WPS function.
- Page 33 Enter PIN number of Wireless Adapter It is also possible to use the PIN number you have set on the wireless adapter. Set the adapter as Enrollee and enter the PIN you want. Enter the enrollee’s (computer’s wireless adapter) PIN number and then click the “Trigger” button to initiate WPS.
- Page 34 Push Button Method Select the “Software Button” mode and click the “Trigger” button. An alternative is to press the WPS button at the front of the router for 1 second, until the WLAN light starts flashing. This indicates that WPS is activated. Then press and hold the WPS button on your wireless client for 1 second.
- Page 35 WDS - Bridge: Create a WDS Bridge between multiple Access Points, and bridge to only wired connections. In this mode, the WBR-6003 will not provide service to any wireless clients. WDS - Bridge + AP: A combination of the AP and Bridge modes can create a WDS Bridge between multiple Access Points, and also accept wireless and wired clients.
- Page 36 / WPA2-PSK and WPA1 / WPA2. LevelOne recommends WPA2-PSK (AES) for simple and secure wireless encryption. After configuring the wireless security settings on the WBR-6003, you will also need to configure the same settings on your wireless adapter before you attempt a wireless connection.
- Page 37 802.1X To use this security feature, you will need to have a RADIUS server on your network to authenticate access. Please type in the details for your RADIUS server. RADIUS Server IP Address, or the RADIUS server’s domain-name. RADIUS Shared Key Key value shared by the RADIUS server and this router.
- Page 38 WPA-PSK This security is more secure compared to WEP. Select which type of encryption to use (either TKIP or AES) and then enter the key in the Passphrase field. The field needs to be between 8 and 63 characters long and can be any combination of letters and numbers if ASCII setting is used.
- Page 39 WPA, WPA2(AES) WPA1/WPA2 Similar to 802.1X security but with TKIP or AES Encryption. You will need a RADIUS server for authentication. Please enter the details of your RADIUS server. RADIUS Server • IP address or the RADIUS server’s domain-name. • Port number of the RADIUS Server •...
- Page 40 Please enter the key in the Passphrase field. The field can be between 8 and 63 characters long and can be any combination of letters and numbers under ASCII format. Wireless Client List: You can use this function to see the devices connected to the WBR-6003 through the wireless network.
-
Page 41: Change Password
Change Password This page allows you to change the WBR-6003 Web Configuration password. Please type in the old password (factory default password is admin) and then type in the new password. If you change the password, make sure you use the new password next time you log into the web configuration. -
Page 42: Forwarding Rules
Forwarding Rules This page allows you to configure the port forwarding management of the WBR-6003. Use the menu on the left to access the setting pages. The port forwarding feature is required because the Wireless Router’s NAT (Network Address Translation) will block incoming traffic from the Internet to the LAN if the specific port mapping is not set up in the NAT table. -
Page 43: Virtual Server
Virtual Server A virtual server is defined as a Service Port, and all requests to this port will be redirected to the computer specified by the Server IP. Virtual Server can work with Scheduling Rules, and give user more flexibility on Access control. For Detail, please refer to Scheduling Rule (Advanced Setting > Schedule Rule). -
Page 44: Special Ap
Some applications require multiple connections, like Internet games, Video conferencing, Internet telephony, etc. Because of the firewall function, these applications cannot work with the WBR-6003. The Special Applications feature allows some of these applications to work with this product. If this fails to make an application work, try setting that computer as the DMZ host instead. -
Page 45: Miscellaneous
This setting will be lost after rebooting. UPnP Setting The WBR-6003 supports Universal Plug and Play. If the OS supports this function enable it likes Windows XP. When the user gets IP address from Device, it will show icon as below: Xbox Support The Xbox is a video game console produced by Microsoft Corporation. - Page 46 Security Settings This section allows you to configure the security management of the unit. Click on the menu on the left to access the respective setting page.
-
Page 47: Packet Filter
Packet Filter Packet Filters allows you to control what packets are allowed to pass through the WBR-6003. The Outbound Filter applies to all outbound packets and the Inbound Filter only applies to packets that are destined to Virtual Servers or the DMZ Host only. - Page 48 For source or destination IP address, you can define a single IP address (192.168.1.1) or a range of IP addresses (192.168.1.100 – 192.168.1.200). An empty implies all IP addresses. For source or destination port, you can define a single port (80) or a range of ports (1000-1999). You also need to add prefix "T"...
- Page 49 Example 2 1.2.3.100-1.2.3.199) Remote hosts can do everything except read net news (port 199) and transfer files via FTP (port 21) behind Router Server. Others are all allowed. After Inbound Packet Filter setting is configured, click the save button.
- Page 50 Outbound Filter To enable Outbound Packet Filter click the check box next to Enable in the Outbound Packet Filter field. Example 1: Router LAN IP is 192.168.1.1 (192.168.1.100-192.168.1.149) Located hosts are only allowed to send mail (port 25), receive mail (port 110), and browse Internet (port 80);...
- Page 51 Example 2: Router LAN IP is 192.168.1.254 (192.168.1.100 and 192.168.1.119) Located Hosts can do everything except read net news (port 119) and transfer files via FTP (port 21) Others are allowed. After Outbound Packet Filter setting is configured, click the save button.
-
Page 52: Domain Filter
• Domain Suffix: A suffix of URL to be restricted; For example, ".com", "xxx.com". • Action: When someone is accessing the URL that meets the domain suffix, what kind of action you want the WBR-6003 to take. Tick on Drop to block the access and/or tick on Log to log the access. -
Page 53: Url Blocking
URL Blocking URL Blocking will block LAN computers from connecting to a pre-defined Web Site. The major difference between Domain Filter and URL Blocking is that Domain Filter requires the user to input suffixes (etc: xxx.com, ttt.net) while URL Blocking only requires user to input a keyword. In other words, Domain filter can block specific website, while URL Blocking can block hundreds of websites by simply a keyword. -
Page 54: Mac Address Control
WBR-6003. Choose “allow” or “deny” to allow or deny the clients with MAC addresses that are not in the list to associate to the wireless network. - Page 55 MAC Address MAC address indicates a specific client. Expected IP address of the corresponding client. Keep it empty if you IP Address don't care its IP address. When "Connection control" is checked, check "C" will allow the corresponding client to connect to this device. When "Association control"...
-
Page 56: Miscellaneous
Miscellaneous This page allows you to change various miscellaneous security settings. Remote Administrator Host/Port: In general, only intranet user can browse the built-in web configuration pages to perform administration task. This feature enables you to perform administration task from the Internet. If this feature is enabled, only the specified IP address can perform remote administration. - Page 57 Advanced Settings These pages allow you to configure the more advanced settings on the unit.
-
Page 58: System Time
This page allows you to set the time settings of the WBR-6003. There are three ways to set up the System Time of the WBR-6003. 1. Get Date and Time by NTP Protocol: Selected if you want to get the Date and Time from an NTP server. -
Page 59: System Log
System Log The WBR-6003 supports both Syslog (using UDP packets) and E-Mail alert. It support two methods to export system logs to specific destination by means of syslog (UDP) and SMTP(TCP). The items you have to setup including: Syslog setting: For Syslog, you will need to enter the IP address of the host computer that will be receiving the syslog messages and tick on Enable. -
Page 60: Dynamic Dns
Dynamic DNS Dynamic DNS is a feature that allows users to set up a static domain name even when they have a dynamic internet IP address. So even if your IP address changes every time you connect to your ISP, the IP address can be mapped to a host name so that anyone who wants to connect to the WBR- 6003, or any services behind the router from the internet can just use the Dynamic DNS hostname instead of the IP address which might change. -
Page 61: Snmp Setting
SNMP Setting SNMP (Simple Network Management Protocol) is designed to give users the ability to remotely manage a computer or network device. To enable SNMP, please set the following: • Enable SNMP: You must check either Local or Remote or both to enable SNMP function. If Local is checked, this unit will respond to requests from LAN. -
Page 62: Routing
Routing When you have more than one WBR-6003, or router with different subnets on the network, you will need to enable this function to allow the different subnets to communicate with each other. There are two types of routing supported by the WBR-6003. - Page 63 Destination Subnet Mask Gateway Enabled 192.168.1.0 255.255.255.0 192.168.123.216 192.168.0.0 255.255.255.0 192.168.123.103 So if, for example, Client3 wants to send an IP data packet to 192.168.0.2, it would use the above table to determine that it had to go via 192.168.123.103 (Router 2) And if it sends Packets to 192.168.1.11 will go via 192.168.123.216 (Router 1) Each rule can be enabled or disabled individually.
-
Page 64: Schedule Rule
Schedule Rule This feature allows you to define the time schedule of Virtual Server and Packet Filter rules. To enable Scheduling, tick Enable and click Save. Then create new rules by pressing the Add New Rule button. Enter the Rule’s Name and set the Start and End Times for each day. Then click Save to save the new rule. - Page 65 When you set up the schedule rule, it will have rules in rule table as following: Schedule Enable Selected if you want to Enable the Schedule. Edit To edit the schedule rule. Delete To delete the schedule rule, and the rule# of the rules behind the deleted one will decrease one automatically.
-
Page 66: Toolbox
Toolbox This section has some basic tools to maintain the WBR-6003’s systems. -
Page 67: View Log
View Log You can View system log by clicking the View Log button. -
Page 68: Firmware Upgrade
To use, click Browse and locate the firmware image file, then click Upgrade. Note: Please connect to the WBR-6003 using a wired LAN connection as if the connection breaks during the update, it will render the unit unworkable. Also disable any anti-virus or firewall program before beginning the update. -
Page 69: Miscellaneous
Miscellaneous MAC Address for Wake-on-LAN Wake-on-LAN is a technology that enables you to power up a networked device remotely. In order to enjoy this feature, the target device must be Wake-on-LAN enabled and you have to know the MAC address of this device, say 00-11-22-33-44-55. Clicking "Wake up" button will make the router to send the wake-up frame to the target device immediately. - Page 70 Appendix A 802.1x Setting Figure 1: Testing Environment (Use Windows 2000 Radius Server) Equipment Details PC1: Microsoft Windows XP Professional without Service Pack 1 and LevelOne Wireless PCI Card PC2: Microsoft Windows XP Professional with Service Pack 1a or later and LevelOne Wireless PCI Card.
- Page 71 DUT and Windows 2000 Radius Server Setup Setup Windows 2000 RADIUS Server We have to change authentication method to MD5_Challenge or using smart card or other certificate on RADIUS server according to the test condition. Setup DUT 1. Enable the 802.1X (check the “Enable checkbox“). 2.
- Page 72 Windows 2000 RADIUS server Authentication testing: DUT authenticate PC1 using certificate. (PC2 follows the same test procedures.) 1. Download and install the certificate on PC1. (Fig 4) 2. PC1 chooses the SSID of DUT as the Access Point. 3. Set authentication type of wireless client and RADIUS server both to EAP_TLS. 4.
- Page 73 Figure 6: Authentication success DUT authenticate PC2 using PEAP-TLS. 1. PC2 chooses the SSID of DUT as the Access Point. 2. Set authentication type of wireless client and RADIUS server both to PEAP_TLS. 3. Disable the wireless connection and enable again. 4.
-
Page 74: Appendix B Faq And Troubleshooting
Appendix B FAQ and Troubleshooting What can I do when I have some trouble at the first time? 1. Why can’t I configure the router even if the cable is plugged in the ports of Router and the LED is also lit? A: First, make sure that which port is plugged. - Page 75 2. Why can’t I connect the router even if the cable is plugged in LAN port and the LED is light? A: First, please check Status LED. If the device is normal, the LED will blink once per second. If not, please check the blinking Status LED as shown: Status LED stays constantly on or off: The system is frozen.
- Page 76 5. When I use Static IP Address to connect to the Internet, I can access or ping global IP addresses such as 202.93.91.218. However, I cannot access the a website by using its domain name, for example http://espn.com A: Please check the DNS configuration of Static IP Address. Please refer to the information of ISP and assign one or two DNS servers.
- Page 77 How do I connect router by using wireless? 1. How to start to use wireless? A: First, make sure that you already installed wireless client device in your computer. Then check the configuration of wireless router. The default is below: About wireless client, you will see wireless icon:...
- Page 78 Then click and will see the AP list that wireless client can be accessed: If the client cannot find your wireless router, please refresh network list again. Choose the one that you will want to connect and connect: If successfully, the computer will show something similar. User will also retrieve IP from router, for example:...
- Page 79 2. How can I use AES encryption of WPA-PSK to connect? A: First, you must check if the driver of wireless client supports AES encryption. Please refer to the below: If SSID is default and click “Properties” to check if the driver of wireless client supports AES encryption.
-
Page 80: Technical Specifications
Technical Specifications General Model WBR-6003 150Mbps N Wireless Router Data Transfer Rate 1, 2, 5.5, 6, 9, 11, 12, 18, 24, 36, 48, 54Mbps Max physical rate up to 150 Mbps in 802.11n mode 802.11b: 17±2dBm Transmit Power 802.11g: 15±2dBm 802.11n: 14±2dBm...