Table of Contents
Advertisement
instruction Manual
orion
®
skyView
Pro 8 EQ
™
#9738
Equatorial Reflecting Telescope
customer support (800)‑676‑1343
E‑mail: support@telescope.com
corporate offices (831)‑763‑7000
89 Hangar Way, Watsonville, ca 95076
oriontelescopes.com
Providing Exceptional Consumer Optical Products Since 1975
IN 175 Rev. C 04/09
Advertisement
Table of Contents

Related Manuals for Orion skyView Pro 8 EQ9738


Summary of Contents for Orion skyView Pro 8 EQ9738
- Page 1 Manual orion ® skyView Pro 8 EQ ™ #9738 Equatorial Reflecting Telescope customer support (800)‑676‑1343 E‑mail: support@telescope.com corporate offices (831)‑763‑7000 89 Hangar Way, Watsonville, ca 95076 oriontelescopes.com Providing Exceptional Consumer Optical Products Since 1975 IN 175 Rev. C 04/09...
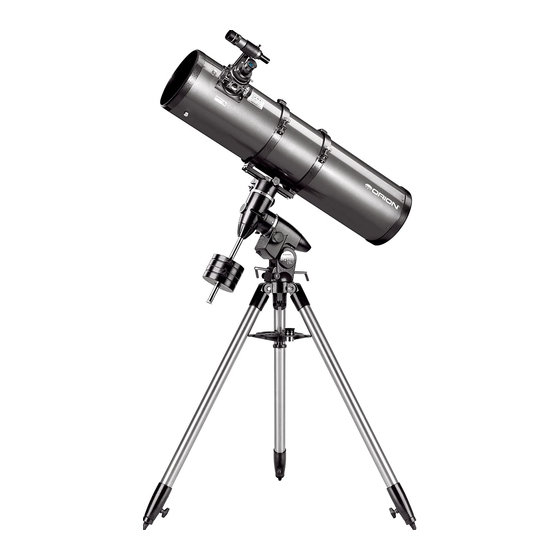
- Page 2 Finder scope Finder scope bracket Eyepiece Declination lock lever Tube rings (not shown) Right ascension lock Optical tube lever (not shown) Declination slow-motion control Mirror cell knob Safety thumbscrew Mounting plate securing knob Right ascension slow-motion Counterweight shaft control knob Counterweights Latitude scale Counterweight lock knobs...
-
Page 3: Table Of Contents
In the event that the tele- scope needs to be shipped to another location, or returned to Camera adapter Orion for warranty repair, having the proper boxes and pack- Dust cover aging will help ensure that your mount will survive the journey intact. - Page 4 of the central support shaft until the three tray arms are of the mounting plate and rethread into the tube rings. Note that the side of the mounting plate with the central “groove” touching the legs of the tripod. The flat side of the acces- sory tray should be facing up.
-
Page 5: Balancing The Telescope
4. Balancing the telescope To ensure smooth movement of the telescope on both axes of the equatorial mount, it is imperative that the optical tube is properly balanced. We will first balance the telescope with respect to the right ascension (R.A.) axis, then the declination (Dec.) axis. -
Page 6: Using Your Telescope
5. using Your telescope nification and the 40 indicates a 40mm diameter front lens. The finder scope makes it easier to locate the subject you want to observe in the telescope, because the finder scope has a much Focusing the telescope wider field-of-view. -
Page 7: Setting Up And Using The Equatorial Mount
using 2" eyepieces The SkyView Pro 8 EQ has a focal length of 1000mm, which when used with the supplied 25mm eyepiece yields: The SkyView Pro 8 EQ’s focuser is capable of accepting optional 2" eyepieces. To use 2" eyepieces you must remove 1000mm = 40x the 1.25"... - Page 8 directly from your observing site, consult a compass and rotate the tripod so the telescope points north. There is a label bearing a large “N” at the base of the equatorial Little Dipper mount (Figure 9). It should be facing north. (in Ursa Minor) The equatorial mount is now polar aligned for casual observ- N.C.P.
- Page 9 The reticle of the polar axis finder scope has a tiny star map of the reticle). Rotate the reticle so the constellations depict- ed match their current orientation in they sky when viewed printed on it that makes precise polar alignment quick and easy.
- Page 10 Now that both setting circles are calibrated, look up in a star So, the coordinates for the Orion Nebula listed in a star atlas atlas the coordinates of an object you wish to view.
-
Page 11: Collimation (Aligning The Mirrors)
Figure 13. This illustration show the telescope pointed in the the four cardinal directions (a) north, (b) south, (c) east, (d) west. Note that the tripod and moutn have ot been moved; only the telescope tube has been moved on the R.A. and Dec. axes. Most setting circles are not accurate enough to put an object What if you need to aim the telescope directly north, but at dead-center in the telescope’s eyepiece, but they should... -
Page 12: Aligning The Secondary Mirror
It may not be perfectly centered, but that is OK. Now other collimating devices, such as Orion’s LaserMate Laser Collimator, obviating the need to remove the primary mirror tighten the three small alignment screws equally to secure the and mark it yourself. - Page 13 adjusting the Primary Mirror focuser and see if the secondary mirror reflection has moved closer to the center of the primary. You can tell this easily with The final adjustment is made to the primary mirror. It will need the collimation cap and mirror center mark by simply watching adjustment if, as in Figure 14d, the secondary mirror is cen- to see if the “dot”...
-
Page 14: Astronomical Observing
8. astronomical observing For many users, the SkyView Pro 8 EQ telescope will be a major leap into the world of amateur astronomy. This section is intended to get you ready for your voyages through the night sky. site selection Pick a location away from street lights and bright yard lighting. - Page 15 A. The Moon used to achieve higher or lower powers. It is quite common for an observer to own five or more eyepieces to access a wide With is rocky and cratered surface, the moon is one of the range of magnifications. This allows the observer to choose most interesting and easy subjects for your scope.
- Page 16 Because it is so close to the Sun, it never wanders too Determine in which constellation the object lies. Now, find the constellation in the sky. If you do not recognize the constella- far from the morning or evening horizon. No surface markings can be seen on Venus, which is always shrouded tions on sight, consult a planisphere.
-
Page 17: Astrophotography
9. astrophotography must be inserted and locked into the body of the universal camera adapter. Start by using a medium-low power eye- piece (about 25mm); you can increase the magnification later When coupled to a 35mm single-lens reflex camera, the with a high-power eyepiece. -
Page 18: Care And Maintenance
cleaning lenses Aim the telescope at a deep-sky object. It should be a fairly large deep-sky object, as the camera lens will likely have a Any quality optical lens cleaning tissue and optical lens clean- wide field of view. Check to make sure that the object is also ing fluid specifically designed for multi-coated optics can be centered in the camera’s viewfinder. -
Page 19: Specifications
under a stream of lukewarm water. Any particles on the sur- face can be swabbed gently with a series of cotton balls, each used just one time. Dry the mirror in a stream of air (a “blower bulb” works great), or remove any stray drops of water with the corner of a paper towel. - Page 20 Warranty This Orion SkyView Pro 8 EQ is warranted against defects in materials or workmanship for a period of one year from the date of purchase. This warranty is for the benefit of the original retail purchaser only.