Alienware M17x Mobile Manual
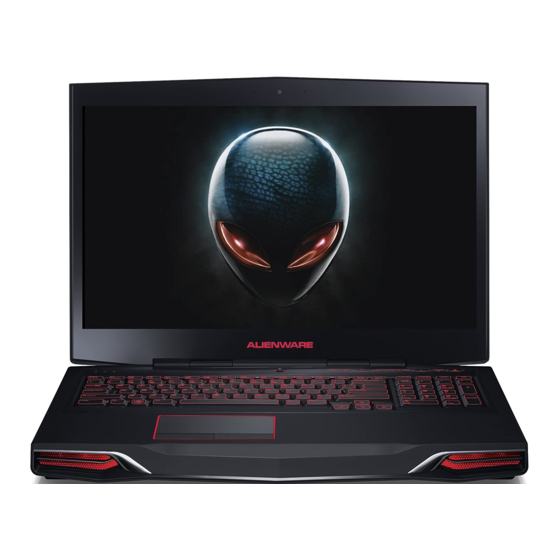
Alienware m17x
Hide thumbs
Also See for Alienware M17x:
- Mobile manual (128 pages) ,
- Specifications (8 pages) ,
- Service manual (104 pages)
Table of Contents
Advertisement
Quick Links
Advertisement
Table of Contents

Related Manuals for Alienware Alienware M17x


Summary of Contents for Alienware Alienware M17x
- Page 1 ALIENWARE M17x ® MOBILE MANUAL...
- Page 2 Other trademarks and trade names may be used in this manual to refer to either the entities claiming the marks and names or their products. Dell Inc. disclaims any proprietary interest in trademarks and trade names other than its own.
-
Page 3: Table Of Contents
CONTENTS INTRODUCTION ............5 CHAPTER 3: USING YOUR LAPTOP. - Page 4 Dell DataSafe Local Backup . . . . . . . . . . . . . . . . . .
-
Page 5: Introduction
Dear Valued Alienware Customer, Welcome to the Alienware family. We are thrilled to include you among the growing number of savvy high-performance computer users. The Alienware technicians who have crafted your computer have made certain that your high-performance computer is properly optimized and performs to its fullest potential. - Page 6 INTRODUCTION...
-
Page 7: Chapter 1: Setting Up Your Laptop
CHAPTER 1: SETTING UP YOUR LAPTOP CHAPTER 1: SETTING UP YOUR LAPTOP CHAPTER 1: SETTING UP YOUR LAPTOP... -
Page 8: Before Setting Up Your Laptop
Before Setting Up Your Laptop Product Documentation and Media The documentation that ships with your Alienware laptop is designed to provide ® Congratulations on the purchase of your Alienware ® M17x! answers to many of the questions that may arise as you explore your new laptop’ s Read all safety and setup instructions before connecting your new laptop. -
Page 9: Connect The Ac Adapter
Connect the AC Adapter Press the Power Button WARNING: The AC adapter works with electrical outlets worldwide. However, power connectors and power strips vary among countries. Using an incompatible cable or improperly connecting the cable to a power strip or electrical outlet may cause fire or equipment damage. NOTE: The AC adapter should be be connected to the laptop for maximum gaming performance. -
Page 10: Set Up Microsoft Windows
NOTE: For optimal performance of your computer, it is recommended that Ensure that wireless is enabled on your computer. you download and install the latest BIOS and drivers for your computer Save and close any open files, and exit any open programs. available at support.dell.com. Click Start Control Panel Network and Sharing Center →... - Page 11 Setting Up Your Internet Connection ISPs and ISP offerings vary by country. Contact your ISP for offerings available in your country. If you cannot connect to the Internet but have successfully connected in the past, the Internet Service Provider (ISP) might have a service outage. Contact your ISP to check the service status, or try connecting again later.
- Page 12 CHAPTER 1: SETTING UP YOUR LAPTOP...
-
Page 13: Chapter 2: Getting To Know Your Laptop
CHAPTER 2: GETTING TO KNOW YOUR LAPTOP This chapter provides information about your new laptop to familiarize you with its various features, and get you up and running quickly. CHAPTER 2: GETTING TO KNOW YOUR LAPTOP CHAPTER 2: GETTING TO KNOW YOUR LAPTOP... -
Page 14: Front View Features
Front View Features Back View Features Left speaker — Combines with the right speaker to provide high quality AC adapter connector — Connects to the AC adapter to power the stereo sound. computer and charge the battery. Consumer IR port —... -
Page 15: Left View Features
Left View Features DisplayPort connector Connects your computer to external — monitors and projectors with DisplayPort. Network connector Connects your computer to a network or — broadband device. USB connectors (2) Connect to USB devices, such as a mouse, — keyboard, printer, external drive, or MP3 player. -
Page 16: Right View Features
Right View Features USB connectors (2) Connect to USB devices, such as a mouse, — keyboard, printer, external drive, or MP3 player. Audio out/Headphone connector — Connects to front L/R speakers or headphones. Audio out/Headphone connector — Connects to a center speaker/ subwoofer or headphones. -
Page 17: Display Features
Display Features Left digital-array microphone — Combines with the right digital-array microphone to provide high quality sound for video chatting and voice recording. Camera — Built-in camera for video capture, conferencing, and chat. Camera activity indicator — Indicates if the camera is on or off. Right digital-array microphone —... -
Page 18: Computer Base And Keyboard Features
Computer Base and Keyboard Features Status lights (3) — Indicate if the Scroll Lock, Caps Lock, or Number Lock lights are turned on or off. Keyboard — The backlit keyboard provides visibility in dark environments by illuminating all symbols on the keys. Touch pad —... -
Page 19: Status Lights
Status Lights Touch Controls The three status lights are located at the top-left side of the keyboard. For the The touch controls are located at the top of the keyboard. For the exact location, exact location, see “Computer Base and Keyboard Features” on page 18. see “Computer Base and Keyboard Features”... -
Page 20: Power Button
Power Button On AC adapter: Blue or custom AC-color The battery is fully charged. You can program this button to perform actions like shutting down the operating system or entering the standby mode. For details on how to program this button, Blue or custom AC-color fading The battery is charging. -
Page 21: Function Keys
Function Keys F6 – Extend Desktop Press <Fn><F6> to switch between the various external display NOTE: Depending on the configuration of the laptop you purchased, some options available either simultaneously or separately. of the function keys may have no associated tasks. F7 –... - Page 22 CHAPTER 2: GETTING TO KNOW YOUR LAPTOP...
-
Page 23: Chapter 3: Using Your Laptop
CHAPTER 3: USING YOUR LAPTOP CHAPTER 3: USING YOUR LAPTOP CHAPTER 3: USING YOUR LAPTOP... -
Page 24: Connecting External Displays
Connecting External Displays Turn off your laptop. Turn off the display and disconnect it from the power supply. If you want to enjoy your computing environment on a bigger scale visually, Connect one end of the display cable to the DisplayPort, HDMI, or VGA or extend your desktop area, you can connect an external display such as a connector on your Alienware laptop. -
Page 25: Using Removable Media And Cards
Using Removable Media and Cards Using the Optical Drive Observe the safety measures below: Your laptop has a slot load optical drive. Depending on the configuration ordered, your laptop may have one of the following drive types. These logos are used to When no ExpressCard or Media Card (SD/MMC/MS cards) is inserted into the indicate each drive’... -
Page 26: Using The Integrated Camera
Using the Integrated Camera The battery meter lights on the battery pack indicate the charge level of the battery. When you press the battery meter once, the charge level lights illuminate. Each of the five lights represent approximately 20% of the total battery charge. For example, if four lights turn on, there is 80% of battery charge remaining and if Turning the Camera On and Off no lights turn on, there is no charge remaining in the battery. -
Page 27: Alienware Command Center
Alienware Command Center Customizing Your Power Settings: Click Start → Control Panel. The Alienware ® Command Center gives you access to Alienware’ s exclusive software and is a continuously upgradable control panel. As Alienware releases Click All Control Panel Items. new programs, they download directly into the Command Center allowing you Double-click the Power Options icon. -
Page 28: Free Fall Sensor
Free Fall Sensor Entering System Setup Turn on (or restart) your laptop. Free fall sensor protects your computer hard drive from possible damage, by detecting a free fall state caused by accidentally dropping the computer. When a While the laptop is booting, press <F2> immediately before the operating free fall state is detected, the hard drive is placed in a safe state to protect against system logo appears to access the BIOS Setup Utility. - Page 29 Displays the memory size installed in memory bank 0. Memory Bank 1 NOTE: For the updated system setup information, see the Service Manual Displays the memory size installed in memory bank 1. at support.dell.com/manuals. Advanced Menu Main Menu Wired Network...
- Page 30 Advanced Menu Advanced Menu High SATA Allows you to enable or disable the internal high definition Allows you to configure the operating mode of the Definition Operation audio device. integrated SATA hard drive controller. Sound • Disabled: The internal audio device is disabled and is •...
- Page 31 Performance Options Sub-Menu Security Menu CPU Speed System Displays the speed of the processor. Displays the status of the system password. The system Password password is also known as the Master/Supervisor Memory Displays the frequency of the memory. Status password. Frequency •...
- Page 32 Power Menu Exit Menu A/C Adapter Exit Saving Displays the AC adapter rating. Allows you to exit System Setup and save your changes to Rating Changes CMOS. A/C Adapter Exit Allows you to choose if the computer should display Allows you to exit utility without saving System Setup data Warnings Discarding warning messages when you use certain power adapters.
-
Page 33: Chapter 4: Installing Additional Or Replacement Components
CHAPTER 4: INSTALLING ADDITIONAL www.alienware.com. OR REPLACEMENT COMPONENTS NOTE: See the Service Manual at support.dell.com/manuals for installation instructions of all serviceable components. Parts purchased from Dell and Alienware will ship with specific replacement instructions. CHAPTER 4: INSTALLING ADDITIONAL OR REPLACEMENT COMPONENTS... -
Page 34: Before You Begin
Before You Begin Turning Off Your Computer CAUTION: To avoid losing data, save and close all open files and exit all This section provides procedures for removing and installing the components in open programs before you turn off your laptop. your laptop. - Page 35 Card slot. CAUTION: Only a certified service technician should perform repairs on Disconnect your computer and all attached devices from their electrical your computer. Damage due to servicing that is not authorized by Dell is outlets. not covered by your warranty.
-
Page 36: Replacing The Battery Pack
CAUTION: To avoid damage to the laptop, use only the battery designed for this particular Alienware laptop. Do not use batteries designed for other Alienware or Dell laptops. To remove the battery pack: Follow the instructions in “Before You Begin” on page Shut down the laptop. -
Page 37: Upgrading Or Replacing Memory
Upgrading or Replacing Memory Your laptop is equipped with a configurable memory unit. The industry standard JEDEC DDR3 SODIMM memory module connectors are available for memory upgrade. The table below illustrates all the possible ways system memory can be configured. Memory connector #1 Memory connector #2 Total Memory... - Page 38 Loosen the captive screw that secures the memory-module door to the computer base. Slide the memory-module door to release the tabs and lift the memory-module door out of the computer base. memory module notch spring locks (2) memory-module connector To replace the memory modules, perform the removal steps in reverse order. While inserting the memory module into the memory-module connector, align the notch on the memory module to the tab on the memory-module connector.
-
Page 39: Upgrading Or Replacing The Hard Drive(S)
Upgrading or Replacing the Hard Drive(s) Your laptop is equipped with two hard drive sockets. Removing the Hard Drive(s) Follow the instructions in “Before You Begin” on page Remove the battery pack (see “Replacing the Battery Pack“ on page 36). Loosen the two captive screws that secure the compartment door to the computer base. - Page 40 Loosen the four captive screws on the primary hard drive (HDD0). Loosen the four captive screws on the secondary hard drive (HDD1). Slide the primary hard drive (HDD0) towards the back using the pull tab and Using the pull tab, lift the secondary hard drive (HDD1) out of the computer lift the primary hard drive out of the computer base.
- Page 41 Remove the four screws that secure the hard drive to the hard-drive bracket. Remove the interposer from the hard drive. Lift the hard drive out of the hard-drive bracket. interposer hard drive hard drive screws (4) hard-drive bracket To replace the hard drive(s), perform the removal steps in reverse order. CHAPTER 4: INSTALLING ADDITIONAL OR REPLACEMENT COMPONENTS...
- Page 42 CHAPTER 4: INSTALLING ADDITIONAL OR REPLACEMENT COMPONENTS...
-
Page 43: Chapter 5: Troubleshooting
CHAPTER 5: TROUBLESHOOTING CHAPTER 5: TROUBLESHOOTING CHAPTER 5: TROUBLESHOOTING... -
Page 44: Basic Hints And Tips
Basic Hints and Tips Backup and General Maintenance • Computer does not power on: Is your AC adapter cable securely connected • Always backup your important data on a regular basis and keep copies of to a working electrical outlet? If connected to a power strip, ensure that the your operating system and software safe. -
Page 45: Software Diagnostic Tools
Software Diagnostic Tools When troubleshooting your computer, remember the following safety guidelines: Pre-Boot System Assessment (PSA) • Before touching any of the computer’ s internal components, touch an unpainted portion of the chassis. Doing so will safely discharge any static electricity, which could damage your computer. - Page 46 NOTE: The next steps change the boot sequence for one time only. On the also download the latest drivers and software for your computer from next start-up, the computer boots according to the devices specified in support.dell.com. the system setup program. Review your laptop’ s configuration information, and ensure that the device that...
-
Page 47: Answers To Common Problems
Answers to Common Problems A program stops responding or crashes repeatedly End the program: System Press <Ctrl><Shift><Esc> simultaneously. The computer fails the POST Applications tab and select the program that is no longer Click the responding. The POST (Power On Self Test) tests the computer, ensuring that it meets the End Task. - Page 48 Other software problems • Verify that the device drivers do not conflict with the program. • If necessary, uninstall and then reinstall the program. Back up your files immediately Hard Drive Problems Use a virus-scanning program to check the hard drive, or CDs Allow the computer to cool before turning it on Save and close any open files or programs and shut down your computer through the Start menu...
- Page 49 Memory Power When you press the power button, the computer does not turn on Memory errors detected on startup • Check memory modules for correct seating and orientation. Reseat the • If the AC adapter cable is connected to a surge protector or UPS, ensure that memory modules if applicable (see “Upgrading or Replacing Memory”...
- Page 50 CHAPTER 5: TROUBLESHOOTING...
-
Page 51: Chapter 6: System Recovery
CHAPTER 6: SYSTEM RECOVERY • Operating System disc — Contains operating system installation media. • Resource disc — Contains drivers for your computer. You can also download the latest drivers and software for your computer from support.dell.com. CHAPTER 6: SYSTEM RECOVERY... -
Page 52: Dell Datasafe Local Backup
When the Alienware logo appears, press <F8> several times to access the Advanced Boot Options window. Dell DataSafe Local Backup is a backup and recovery application that can restore your computer if you lose data due to a virus attack, accidentally delete critical NOTE: If you wait too long and the operating system logo appears, continue files or folders, or if the hard drive crashes. -
Page 53: Chapter 7: Basic Specifications
CHAPTER 7: BASIC SPECIFICATIONS This chapter provides the basic specifications of your computer. For more detailed specifications, see the Comprehensive Specifications at CHAPTER 7: BASIC SPECIFICATIONS support.dell.com/manuals. CHAPTER 7: BASIC SPECIFICATIONS... - Page 54 Computer Model Memory Alienware M17x-R2 Connectors two internally-accessible SODIMM sockets Capacities 2 GB and 4 GB memory modules Dimensions Memory types DDR3 1067 MHz, 1333 MHz Height 51.31 mm to 53.59 mm (2.02 inches to 2.11 inches) (dual-channel configurations) (Front to Back)
- Page 55 Ports and Connectors Drives/Cards Supported Optical drive SATA-compliant Blu-ray Disc™ writer, Blu-ray Disc ExpressCard one ExpressCard/54 connector combo, or DVD+/-RW 8-in-1 Media Card Reader one combo connector Hard drives two 2.5-inch drive bays supporting: Infrared one RC6 Consumer IR port •...
- Page 56 Display Battery Type • 17.0 inch, dual-CCFL, WXGA+ (1440 x 900) Operating time Battery operating time varies depending on operating conditions and can be significantly • 17.0 inch, RGBLED, WUXGA (1920 x 1200) reduced under certain power-intensive conditions. Keyboard (Backlit) Life span (approximate) 300 discharge/charge cycles Layouts...
-
Page 57: Appendix A: General And Electrical Safety Precautions
APPENDIX A: GENERAL AND ELECTRICAL Computer Use • Route the power cable and all cables away from where people might walk or SAFETY PRECAUTIONS trip over them. Do not allow anything to rest on the power cable. • Do not spill anything on or into your computer. Computer Setup •... - Page 58 General Safety Precautions • Mechanical Shock: Your computer should never be subjected to severe mechanical shocks. Careless handling of your computer may cause damage. Mechanical Shock is not covered by the warranty. • Electrical Shock: If you do not open up your computer, there is nothing to worry about.
-
Page 59: Appendix B: Contacting Alienware
Websites You can learn about Alienware products and services on the following websites: NOTE: If you do not have an active Internet connection, you can find contact information on your purchase invoice, packing slip, bill, or Dell • www.dell.com product catalog. -
Page 60: Appendix C: Macrovision Product Notice
APPENDIX C: MACROVISION PRODUCT NOTICE This product incorporates copyright protection technology that is protected by method claims of certain U.S. patents and other intellectual property rights owned by Macrovision Corporation and other rights owners. Use of this copyright protection technology must be authorized by Macrovision Corporation, and is intended for home and other limited viewing uses only unless otherwise authorized by Macrovision Corporation. - Page 61 Printed in China. 0W3D7VA00...