Table of Contents
Advertisement
Advertisement
Table of Contents

Related Manuals for HP 640 series


Summary of Contents for HP 640 series
- Page 1 HP 640 Fax series User Guide Part number: CB782-90001 Second edition: 05/2007...
- Page 2 HP Fax. this document and program material which it describes.
-
Page 3: Table Of Contents
2 HP Fax basics........ - Page 4 Distinctive ring (DRPD) ..........27 Step 1—Teach the HP Fax the ring pattern....... 27 Step 2—Set up distinctive ring (DRPD) answer mode .
- Page 5 Maintain the print cartridge ......... . . 47 Clean the print cartridge nozzles .
- Page 6 iv Contents...
-
Page 7: Quick Start
BASIC FAX menu. For more information, see Paper Size on page 11. The HP Fax is designed to work with a variety of plain papers (cotton bond 75–90 g/m (20–24 lb.)) in A4, Letter, and Legal sizes. -
Page 8: Load Documents To Fax Or Copy
Load documents to fax or copy 3 Fan, neatly stack, then insert up to 50 sheets of paper with the print side facing you. 4 Push the Paper Tray Cover back into place. Load documents to fax or copy You can load up to 10 pages in the document feeder. Load the documents face down (printed side toward the machine). -
Page 9: Receive A Fax
Receive a fax Receive a fax How faxes are received depends on how the Answer Mode/Receive Mode is set. For more information, see Set rings to answer on page 23. FAX or TAM answer mode The fax machine will answer the telephone, automatically detect fax tones, and receive a fax. -
Page 10: Make A Telephone Call
Make a telephone call 7. Press to select Reverse if you want the last page printed first. Printing the copies in reverse order will cause the first page to be on top when the copy is complete. 8. Pressing either Copy or OK will start copying. Make a telephone call Use one of the following methods: •... -
Page 11: Hp Fax Basics
HP Fax basics This chapter lists the basic features of your new HP Fax and introduces you to the machine. The HP Fax features The HP Fax offers the following features: 50 page fax memory • 50 page paper tray •... -
Page 12: The Hp 640 Fax
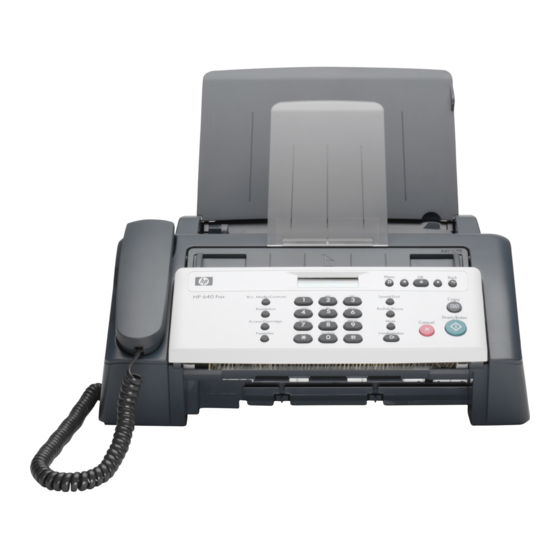
The HP 640 Fax The HP 640 Fax Parts of the HP Fax Front view Figure 2-1 Document support Paper tray Paper tray cover Document guide Document feeder Handset Paper guide Paper support Rear view Figure 2-2 Power cord socket... - Page 13 The HP 640 Fax Bottom view Figure 2-3 Connect handset to the HANDSET port. Connect telephone line to the LINE port. Connect answering machine or extension phone to the EXT. port. HP Fax basics 7...
-
Page 14: Control Panel Of Hp Fax
The HP 640 Fax Control Panel of HP Fax Control panel of HP Fax Figure 2-4 Label Name and Description Rcv.Mode/Contrast: • When no document is loaded, pressing this button changes the Receive Mode. See Answer/receive mode on page 28. - Page 15 The HP 640 Fax Label Name and Description Menu: Displays the options available for your HP Fax. Scroll/Volume: • When you are entering numbers or text, moves the cursor to the digit or character to be edited. • When Menu has been pressed, displays the next and previous menu options.
-
Page 16: The Menus
The menus The menus 10 HP Fax basics... -
Page 17: Overview Of Menu Options
TAM mode), we suggest you set the ring count to at least 4 to give you time to answer. The number of rings can be 2 to 7. Note that TAM mode can only be used with a separate answering machine. HP Fax basics 11... - Page 18 The settings are On and Off. For more information, see Image TCR on page 26. Set the dialing mode to the type of the exchange to which you are connected: Dial Mode Tone or Pulse. 12 HP Fax basics...
-
Page 19: Advanced Fax Menu
Loudspeaker button and enter the numbers. When your party answers, pick up the handset to talk to them. This feature is especially useful for checking voicemail messages. Your HP Fax does not have speakerphone capabilities. The loudspeaker enables NOTE: you to hear calls but you must speak using the handset. -
Page 20: Navigate The Menus
Navigate the menus Navigate the menus Ready mode Whenever the HP Fax is ready for faxing and copying (called Ready mode), it will display the date, time, and answer mode. For example, OCT-05 14:23 FAX. Menu buttons Use the Menu buttons to navigate the menu items. -
Page 21: Enter Dates, Times, Text, And Telephone Numbers
Use these buttons when menu items ask you to enter dates, time or text. If the date format seems unfamiliar, check that you selected the correct one for your • country when setting up your HP Fax (see on page 37). Set the date and time Some items on the display will show up with the blinking cursor under the item to •... -
Page 22: Fax Header Telephone Number
38), you can enter some punctuation in the number. information To punctuate the telephone number in the fax header, use these keys. Keys to punctuate the fax header telephone number Table 2-2 Produces “space” 16 HP Fax basics... -
Page 23: Speed Dialing
‘7890’ will display. ‘ Speed dialing Your HP Fax has a built-in phone book that allows you to enter up to 50 names and numbers for faxing or telephone use. Once entered, you can dial the number by any of these methods. -
Page 24: Print The Phone Book
Dial from the phone book Dialing works the same for both faxes and telephone calls. If a document is loaded in the document feeder, the HP Fax sends the fax. One-touch dialing Press and hold the number (0 through 9) on the phone pad. -
Page 25: Paper Types And Sizes
Paper types and sizes Paper types and sizes The HP Fax is designed to work optimally with plain paper (cotton bond: 20 lb., 75 g/m ) in the following sizes: A4, Letter, and Legal. Some papers have a side that’s been conditioned for printing. The print side is TIP: usually indicated on the paper’s packaging. -
Page 26: Document Types And Sizes
• too small or short (such as a label, voucher, etc.) • made of cloth or metal • To send these documents, use an office copier to make a photocopy first, and then send the copy. 20 HP Fax basics... -
Page 27: Set Document Resolution And Contrast For A Single Copy
Press Rcv.Mode/Contrast repeatedly to select the option you want: • NORMAL is used for normal handwritten, typed, or printed documents. • LIGHTEN is used with very dark print. • DARKEN is used with light print or faint pencil markings. HP Fax basics 21... -
Page 28: Adjust Volume
Or, press Cancel to stop redialing and the machine returns to Ready mode. Receiving via an extension telephone If you have an extension phone on the same line as your HP Fax you can remotely start receiving a fax. Answer the call on the extension phone. -
Page 29: Additional Features
This chapter contains information on additional features you may want to set or change for your HP Fax. • Rings to answer: Sets the number of rings before the HP Fax answers the phone. • Caller ID: If you subscribe to Caller ID through your local phone company, you can use it with your HP Fax. -
Page 30: Use Caller Id
Use Caller ID Use Caller ID Many countries have the Caller ID system that enables the receiver to view the numbers or names of callers. Once you have subscribed to Caller ID services through your local phone company, your machine can display caller information. Turn Caller ID on 1. -
Page 31: Delete A Number
Favorites Delete a number 1. Press Menu repeatedly until BASIC FAX appears and press OK. 2. Press until Set Junk Fax No. displays and press OK. 3. Press until Delete displays and press OK. The machine shows the first junk number. 4. -
Page 32: Print A Document
Image TCR Print a document 1. Press Favorites repeatedly until Print appears and press OK. 2. Press to select to print one or all documents and when the correct document ID is displayed, press OK. Image TCR Image TCR (Transmission Confirmation Report) is a valuable tool for keeping records of faxes you send. -
Page 33: Distinctive Ring (Drpd)
Your HP Fax works with distinctive ring service. Use Distinctive Ring to set your HP Fax to answer one of your phone numbers as a fax only line. The phone number (ring pattern) that you teach the HP Fax will be answered as if the machine is in FAX mode. -
Page 34: Answer/Receive Mode
How the product receives faxes depends on the answer/receive mode you chose when you set up the product. You can send faxes in any answer/receive mode. The answer/ receive mode setting determines how the device answers the incoming call. How are you going to use your HP Fax? Read about... •... - Page 35 Answer/receive mode • You must have an answering machine attached to the EXT line socket mode located on the bottom of your HP Fax. • In Ready mode, TAM appears in the right hand corner of the display. • When a call comes in, the answering machine answers and listens.
- Page 36 Answer/receive mode 30 Additional features...
-
Page 37: Advanced Faxing
Broadcasting With Broadcasting you can have your HP Fax send your fax to up to 5 fax numbers at once. The documents are automatically erased from memory when Broadcasting is finished. 1. Turn the document face down and feed it into the machine. -
Page 38: Delayed Fax
Delayed fax Delayed fax You can set your machine to send a fax any time in the next 24 hours. For example, it is usually cheaper to send a fax at night because telephone rates are lower than they are during the day. -
Page 39: Polling
You can program your fax machine to send a document when it is requested by a remote fax machine. NOTE: Your HP Fax allows you to set one poll job at a time and it can be retrieved once. 1. Turn the document face down and feed it into the machine. -
Page 40: Polling Another Fax To Receive
4. Enter the other fax’s Poll Code to retrieve the document, and press OK. NOTE: If the other fax machine does not have a poll code, enter 0000. The HP Fax receives and prints the polled document. NOTE: Not all fax machines have polling capability, and polling incompatibility sometimes occurs between fax machines made by different manufacturers. -
Page 41: Forward Faxes
Forward faxes Forward faxes While you are away from your home or office, you do not have to miss important faxes. Your machine can forward any faxes it receives to a fax machine at your current location, and if you choose, it can print a copy for you to review when you get back as well. - Page 42 Forward faxes 36 Advanced faxing...
-
Page 43: Feature Reference
Set the date and time Feature reference This chapter contains instructions for other features of the HP Fax that you may want to use from time to time. 1 The “arrow buttons” located at the left and right of OK button on the control... -
Page 44: Alarm Sounds
3. Select On or Off and press OK. Silent mode You can turn the sounds of the HP Fax (including ringing) on and off using the control panel button. You can also set all sounds to turn off on a daily schedule; for example, turn all the sounds off between 8 pm and 8 am. -
Page 45: Print Reports
Print reports 5. Press OK when the display shows Fax Name. 6. Enter the fax name (up to 40 characters) by using the number keypad. • You can include special characters (space, plus sign, etc.). For more information, on page 15. Enter dates, times, text, and telephone numbers 7. -
Page 46: Reprinting Faxes
Send Polling along with the fax number, starting time and type of scheduled event. System Data This report shows the current settings of your HP Fax. After you have changed any setting, print this report to check your changes. -
Page 47: Clearing Memory
Loudspeaker button and enter the numbers. When your party answers, pick up the handset to talk to them. This feature is especially useful for checking voicemail messages. NOTE: Your HP Fax does not have speakerphone capabilities. The loudspeaker enables you to hear calls but you must speak using the handset. -
Page 48: Redial A Number In Memory
Redial a number in memory Redial a number in memory These steps allow you to dial one of the last 10 numbers called that is in memory. 1. Hold Redial/Pause for about two seconds. 2 Press until Recent Numbers displays and press OK. 3 Press to find the number you want to dial. -
Page 49: Care And Maintenance
8/8 means that a new cartridge is installed. NOTE: If the HP Fax is low on ink (ink level is 1/8), new faxes that come in will not be printed. They will be stored in memory. You must manually print the faxes from memory (see Reprinting faxes on page 40) until you replace the ink cartridge (see Replace the print cartridge on page 44). -
Page 50: Print The Self Test
When you notice that the print becomes light or ink low or when install new ink cartridge appears in the display, replace the print cartridge. The part number for replacement cartridges is HP 701. 1. Take out a cartridge from its packaging and carefully remove the tape covering the printhead. - Page 51 Replace the print cartridge 3. Open the control panel and cartridge compartment cover (it will click and remain open). 1 Control panel 2 Cartridge compartment cover 4. Push the cartridge down and remove it. 5. To load the cartridge insert the cartridge as shown below. When the cartridge is pushed to the back of the cartridge carrier, push the top of the cartridge until it clicks into place.
-
Page 52: Clear Jammed Documents And Paper
Clear jammed documents and paper 6. Close the cartridge compartment cover and control panel. 7. Press Start/Enter. 8. Press 1 for new cartridge, or 2 for the old one. • When you put in a new cartridge, you must choose 1:New •... -
Page 53: If The Paper Is Jammed In The Paper Feed Area
Maintain the print cartridge If the paper is jammed in the paper feed area 1. Remove the jammed paper as shown. If the paper tears when it is being removed check to ensure that no small pieces have been left inside the machine. 2. -
Page 54: Clean The Cartridge Carrier Contacts
Maintain the print cartridge 4. Reinstall the cartridge and close the cover and panel. If you spend a long time cleaning the cartridge, the cartridge carrier may have moved back to the original position. If so, press Access Cartridge again to move the carrier to the install position. -
Page 55: Clean The Document Scanner Area
Clean the document scanner area Clean the document scanner area To keep your machine working properly, occasionally clean the white roller, document feeder rubber piece, and the scanning glass. If they are dirty, documents sent to another fax machine will not be clear. CAUTION: When you turn the power off to clean the scanner, documents stored in memory will be lost. - Page 56 Clean the document scanner area 4. Clean the document feeder rubber piece at the back of the control panel. 5. Carefully wipe the scanning glass with a soft, dry, lint free cloth. • If the glass is very dirty, first wipe it with a slightly dampened cloth, then with a dry one.
-
Page 57: Adjust The Scanner
Adjust the scanner Adjust the scanner The scanner is adjusted at the factory. If, however, you drop your machine while moving it, we recommend you adjust scanner. 1. Press Menu repeatedly until TOOLS appears and press OK. 2. Scroll to Adjust Scanner by pressing and press OK. - Page 58 LCD error messages Display Status/Solution You attempted to cancel a scheduled job but no jobs are Job Not Assigned scheduled. You attempted to delete, print or send the Favorites document when there is no document stored. You attempted to delete a junk fax number when there is no Junk Fax Empty junk fax number.
- Page 59 LCD error messages Display Status/Solution Number Not Assigned There is no number assigned to this One-Touch or two-digit Speed number. The remote user entered the wrong poll code. Poll Code Error You have already programmed a polling send. Cancel Poll job exists scheduled job and try again.
-
Page 60: Troubleshooting
For problems you cannot resolve here, see Use Hewlett-Packard support services on page 65. TIP: You can test your HP Fax to make sure it is set up properly for faxing. Place a document in the document feeder, dial 1-888 HP FAX ME (1-888-473-2963) and press . - Page 61 Troubleshooting Problem Solution The machine does not send anything. Check that the document is loaded face down.Send should appear in the display after it dials. Check if the machine to which you are sending can receive your fax. You cannot poll another machine. The fax machine you are polling may be using a poll code (password).
-
Page 62: Print Quality Problems
Troubleshooting Print quality problems Problem Solution View ink level Light or blurred characters. Check ink level as described in on page 43. To Replace the print cartridge install a new print cartridge, see on page 44. Make sure the print cartridge is installed correctly. To clean the Maintain the print cartridge print cartridge, see on page 47. -
Page 63: Specifications And Regulatory Information
This chapter contains product and supplies specifications, ordering information, and regulatory statements. Paper types and sizes The HP Fax is designed to work optimally with plain cotton bond paper. The following paper sizes and weight can be used with your machine: Paper size... -
Page 64: Print Cartridge
Print cartridge Print cartridge The HP Fax uses the following print cartridge. HP 701 black inkjet print cartridge CC635A Product specifications The specifications are subject to change without notice. Item Specification Type of unit Inkjet Desktop Facsimile Transceiver Communication System... - Page 65 Super Fine: 400 x 200 dpi Speed dials ECM mode Grey scale 64 levels User memory capacity 640 Kbyte (capable of 50 pages at ITU#1 test chart (2.5% coverage on A4) Ink Cartridge Part Number HP 701 (17ml) (CC635A) Specifications and regulatory information 59...
-
Page 66: A Sample Of Itu #1 Test Chart (Reduced To 60.5%)
A sample of ITU #1 test chart (reduced to 60.5%) A sample of ITU #1 test chart (reduced to 60.5%) 60 Specifications and regulatory information... -
Page 67: Environmental Product Stewardship Program
Customers without Internet access should contact their local HP Customer Care Center. Recycling program HP offers an increasing number of product return and recycling programs in many countries, as well as partnering with some of the largest electronic recycling centers throughout the world. HP also conserves resources by refurbishing and reselling some of its most popular products. -
Page 68: Regulatory Notices
Regulatory notices Regulatory notices The HP Fax meets product requirements from regulatory agencies in your country/region. Regulatory model identification number For regulatory identification purposes, your product is assigned a Regulatory Model Number. The Regulatory Model Number for your product is SNPRG-0701. This regulatory number should not be confused with the marketing name (HP 640 Fax series) or product number (CB780 series). - Page 69 Regulatory notices against harmful interference in a residential installation. This equipment generates, uses, and can radiate radio frequency energy, and, if not installed and used in accordance with the instructions, may cause harmful interference to radio communications. However, there is no guarantee that interference will not occur in a particular installation.
-
Page 70: Declaration Of Conformity
Singapore 119936. declares, that the product Regulatory Model Num ber : SNPRG-0701 Product Na me: HP 640 Fax (CB782A) series Model Num ber(s): CB782A, CB787A, CB788A conforms to the follo wing Product Specifications: Safet y : UL1950/CSA22.2 No.950, 3 Ed.:19 95... -
Page 71: Use Hewlett-Packard Support Services
• Remove the print cartridge and place it in an airtight bag so it will not dry out. Do not send the print cartridge with the unit unless asked to do so. • If you do not have the original packing material, you can request a replacement package set from HP Customer Support. Shipping damage caused by improper packaging is not covered under the warranty. -
Page 72: Hewlett-Packard Limited Warranty Statement
HP does not warrant that the operation of any product shall be uninterrupted or error free. HP's limited warranty covers only those defects which arise as a result of normal use of the product, and does not cover any other problems, including those which arise as a result of (a) Improper maintenance or modification, (b) Software, accessories, media, or supplies not provided or supported by HP, (c) Operation outside the product’s specifications, or (d) Unauthorized modification or misuse. - Page 73 Hewlett-Packard LIMITED WARRANTY STATEMENT Local law This Warranty Statement gives the customer specific legal rights. The customer may also have other rights which vary from state to state in the United States, from province to province in Canada, and from country to country elsewhere in the world.
- Page 74 Hewlett-Packard LIMITED WARRANTY STATEMENT 68 Specifications and regulatory information...
- Page 75 Caller ID menu 12 Index Cancel button 9 cancel schedule menu 13 cancelling a scheduled job 34 cartridge Access Cartridge cleaning 47 button 44 maintenance 43 alarm sounds 38 part number 59 align cartridge replacing 44 menu 13 changing language 11 answer ring pattern detection 27 clean cartridge answer/receive mode 28...
- Page 76 65 clearing 41 menu BASIC FAX, options 11 HANDSET port 7 button 9 help 65 picture 10 help list 39 using 14 HP Fax menu setting parts of 6 language 11 HP support 65 messages displayed 51...
- Page 77 mute button 8 rcv.mode/contrast button 8 ready mode 14 number keypad 8 rear view 6 received journal 39 receiving faxes 28 redial/pause button 9 button 8 one-touch redialing dialling 18 automatic fax redial 22 out of ink 13 redial a number in memory 42 out of paper.
- Page 78 sending confirm 40 troubleshooting image TCR 12 fax problems 54 menu 11 messages 51 sent journal 39 paper feeding 56 set broadcasting print quality 56 menu 13 set delayed fax menu 13 unwanted faxes 12 set fax forward menu 13 set junk fax no view ink level menu 12...