Iomega StorCenter px2-300d User Manual
Hide thumbs
Also See for StorCenter px2-300d:
- Quick start manual (45 pages) ,
- Quick start manual (16 pages)
Table of Contents
Advertisement
Advertisement
Table of Contents

Related Manuals for Iomega StorCenter px2-300d


Summary of Contents for Iomega StorCenter px2-300d
- Page 1 Iomega StorCenter px2-300d User Guide D31621200...
-
Page 3: Table Of Contents
Bonding NICs ......................8 VLAN Settings ......................9 Naming Your Iomega StorCenter px2-300d ............... 10 Configuring Your Iomega StorCenter px2-300d to Use Active Directory ........11 Enabling Active Directory Trusted Domains ..............11 Obtaining Alerts About Your Iomega StorCenter px2-300d ............ 12 Using Your Iomega StorCenter px2-300d in Various Time Zones .......... - Page 4 Sharing Content Using Social Media: Overview ..............38 Managing Your Content ....................39 Transferring Content to and from Your Iomega StorCenter px2-300d with Copy Jobs ....40 Copy Jobs Limitations ..................... 40 Getting Content from a USB External Storage Device ............41 Safely removing external storage ................
- Page 5 Table of Contents iSCSI: Creating IP-Based Storage Area Networks (SAN) ............43 iSCSI Overview ......................43 Adding iSCSI Drives ....................44 Enabling iSCSI Drives ....................44 Connecting to iSCSI Drives ..................44 Managing iSCSI Drives ....................46 Creating iSCSI Drives and Adding Them to Volumes ............46 Changing Access Permissions ..................
- Page 6 Iomega StorCenter px2-300d User Guide Changing RAID Protection Types ................... 58 Adding New Drives to Your Iomega StorCenter px2-300d ............59 Drive Management ...................... 61 Managing Drives ....................... 61 Setting Write Caching ..................... 61 Applying Global Drive Management Settings ..............61 Setting Write Caching .....................
- Page 7 Deleting Active Directory Users and Groups ..............98 Personal Cloud: Accessing Your Device From Anywhere in the World ......... 99 What Is an Iomega Personal Cloud ? ................99 Iomega Personal Cloud Key Terms ................99 Is My Content Secure? ....................100 Iomega Personal Cloud Setup Overview .................
- Page 8 Iomega StorCenter px2-300d User Guide Inviting People onto Your Iomega Personal Cloud ............. 107 Joining a Trusted Device to an Iomega Personal Cloud ............108 Managing Trusted Devices on a Personal Cloud ..............109 Disconnecting Trusted Devices ................. 109 Deleting Trusted Devices ..................109 Using Copy Jobs with an Iomega Personal Cloud ...............
- Page 9 Table of Contents Photos ......................... 127 Photos Overview ....................127 Streaming Pictures ....................128 Creating a Slideshow on the Device Home Page ............129 Automatically Resizing Your Photos ................130 Getting Pictures from Your Camera ................131 Music ........................132 Music Overview ....................
- Page 10 Iomega StorCenter px2-300d User Guide Recovering Your Device Configuration ................147 Copying Your Iomega StorCenter px2-300d Settings to Other Devices ........147 Backing up Device Configuration ................147 Restoring a Configuration Backup ................147 Hardware Management ....................149 About the Iomega StorCenter px2-300d Components ............149 Front Panel ......................
- Page 11 Table of Contents Regulatory Information ..................... 162 FCC (United States) ....................162 Canadian Verification .................... 162 CE (European Community) ..................162 Manufacturer/Responsible Party ................162 EU Representative ....................162 Safety Information ....................164 Limited Warranty ....................165 Drives and Media ....................165 Coverage ......................
-
Page 13: Setting Up Your Device
Setting up Your Device Setup Overview Setup with your Iomega StorCenter px2-300d is easy. Remove it from the box, connect it to your network or computer, and power it up. Then, launch a web browser, and enter the setup URL identified in the Quick Install Guide. -
Page 14: Set Up My Iomega Storcenter If It's Not Discovered
Iomega StorCenter px2-300d User Guide Set up My Iomega StorCenter If It's Not Discovered If, after you enter the setup URL identified in the Quick Install Guide, your Iomega device is not discovered, you have two ways of discovering it. -
Page 15: Setup Page
Setting up Your Device Setup Page The Setup page opens when you first access the Iomega StorCenter px2-300d from the Home Page or the Iomega Storage Manager. On this page, you can configure some basic device features by clicking the appropriate link. The current setting of the feature displays above the link. You can also... -
Page 16: Network Connection
Iomega StorCenter px2-300d User Guide Network Connection Connecting the Iomega StorCenter px2-300d to Your Network First, check the package contents. Verify that the box contains the following items: 1. px2-300d (models may vary) 2. Power Adapter and Cord 3. Quick Start Guide... - Page 17 5. OPTIONAL: if desired, install the Iomega Storage Manager, QuikProtect, and Media Aggregation software. If you install Iomega Storage Manager, its icon will appear in the System Tray (Windows) or Menu Bar (Mac). The Iomega Storage Manager will automatically scan your network and connect to available Shares.
-
Page 18: Network Settings
Iomega StorCenter px2-300d User Guide Network Settings The Network page of your px2-300d is where you make changes to set up network connectivity. The Network page displays your current network settings and enables those settings to be modified. On this page, you can identify your DNS servers and WINS servers and how your system's IP address is determined. -
Page 19: Manually Configuring The Network
Setting up Your Device Manually Configuring the Network There are various settings in the network setup that you can manually configure. 1. Click Modify network settings. 2. Uncheck Automatically configure DNS, WINS, and all IP addresses (DHCP). 3. DNS Servers — enter the IP addresses of the DNS (Domain Name System) servers. DNS is used for translating the domain name to IP addresses. -
Page 20: Bonding Nics
Iomega StorCenter px2-300d User Guide Bonding NICs Bonding network interface cards (NICs) is a way to provide redundancy for your px2-300d on the network. If one NIC should fail, your px2-300d will remain accessible on the network if that NIC is bonded to others. -
Page 21: Vlan Settings
The smaller networks that VLANs create do not require any additional physical resources, such as additional cabling. Your Iomega StorCenter px2-300d can be configured to support VLANs. VLAN is configured for each NIC, but it is not supported on bonded NICs. If a NIC is bonded, you must unbind it first to configure it for a VLAN. -
Page 22: Naming Your Iomega Storcenter Px2-300D
Change any of these by editing the text fields. Click Apply to save your changes. Device Name Enter a name for the Iomega device. Use a name that will help you identify it on your network. Device Descriptive Name Enter a descriptive name for the Iomega device device. This name can provide additional detail that identifies the device. -
Page 23: Configuring Your Iomega Storcenter Px2-300D To Use Active Directory
Setting up Your Device Configuring Your Iomega StorCenter px2-300d to Use Active Directory If you have an existing Active Directory user organization, you can incorporate it into the Iomega StorCenter px2-300d Console. Note: When you configure Active Directory, you enable security on your px2-300d. -
Page 24: Obtaining Alerts About Your Iomega Storcenter Px2-300D
Iomega StorCenter px2-300d User Guide Obtaining Alerts About Your Iomega StorCenter px2-300d You can configure your px2-300d to send email alerts when problems are detected. This is done through the email notification feature. Email notification provides a destination for emails sent by the px2-300d when problems are detected. -
Page 25: Using Your Iomega Storcenter Px2-300D In Various Time Zones
Setting up Your Device Using Your Iomega StorCenter px2-300d in Various Time Zones You can set the date and time used on your px2-300d , so that it can appear to be in one time zone, when it actually may be in a different one. This can help your users have the correct date and time if they live and work in a location different from your px2-300d . -
Page 26: Setting The Display Language For Your Iomega Storcenter Px2-300D
The Languages page allows you to change the language used in email notification messages and on the display screen. The language used by the Iomega StorCenter px2-300d Console is based on the preferences configured in your browser. You can change the language used in this program by modifying your browser's preferred language settings. -
Page 27: Printing Documents
Setting up Your Device Printing Documents Printing documents from your Iomega StorCenter px2-300d is simple after you have attached a compatible printer to the px2-300d. The Printers page displays a table of printers that are attached to the px2-300d. The table contains for each printer the name, model, status, and number of documents waiting. -
Page 28: Setting Up Personal Cloud, Security, And File Sharing
Iomega Personal Cloud, security, or file sharing. You can set up a Personal Cloud to allow invited users access to content on your Iomega StorCenter. This content can be in private Shares that are exclusive to the users who join the Personal Cloud, which adds an additional layer of security to your content. -
Page 29: Sharing Files
Iomega StorCenter Console. The Home Page displays any public Shares. It can also display secured Shares accessible only to users who log in to the Iomega device. You can access the Home page of your Iomega device by entering the device name or IP address directly in your browser. If... -
Page 30: Shares
All Shares on an px2-300d are displayed on the Shares page. The Shares page displays a table that contains folders, connected drives, and any cloud storage to which your Iomega StorCenter px2-300d Console is connected. The Properties column displays the features that are enabled for each Share. -
Page 31: Adding Shares
Sharing Files Adding Shares 1. From the Iomega StorCenter Console, click Shares. 2. To add a new Share, click Add a Share. Type a name for the Share. All Shares must have a name. Names cannot exceed 32 characters. The following are not valid Share names: global, homes, printers. -
Page 32: Managing Shares
2. Check Allow users to change file level security to allow file and folder permissions to be set through other programs, such as Windows Explorer, independent of the Iomega device. Setting this option allows users to put additional access restrictions on individual files and folders. - Page 33 Sharing Files address and netmask pair as address/netmask where the netmask can be in dotted-decimal format, or as a contiguous mask length. For example, either /255.255.252.0 or /22 will result in identical local networks. 4. When the rule is added, read access is automatically set to the Share. Select Write to allow users to write to that Share.
- Page 34 Iomega StorCenter px2-300d User Guide 2. Enter a new size for the volume. 3. Click OK. 4. In the Information section, click Apply to save your changes. How do I ... add a Share delete a Share share content with social media...
-
Page 35: Deleting Shares
Sharing Files Deleting Shares To delete a Share: 1. From the Iomega StorCenter px2-300d Console, click Shares. 2. To delete an existing Share, click to expand the Share. 3. In the Information section, click Delete to delete the Share. 4. In the Delete Share confirmation pop-up window, click Yes. -
Page 36: Using Protocols To Share Files
Using Protocols to Share Files What Are Protocols and How Do I Use Them to Share Files? Your Iomega StorCenter px2-300d uses communication protocols to mount file systems and allow files to be transferred between client computers and the Iomega StorCenter. -
Page 37: Afp File Sharing For Macs
Sharing Files AFP File Sharing for Macs The Apple Filing Protocol (AFP) enables Apple file sharing, which is the preferred method for Mac users to access Shares. AFP is on by default. To enable AFP, click the switch on. -
Page 38: Bluetooth File Sharing
Iomega StorCenter px2-300d User Guide Bluetooth File Sharing Once a Bluetooth adapter is detected, files can be uploaded to a configurable destination Share on the px2-300d from a Bluetooth device. Configuring Bluetooth settings 1. To enable Bluetooth, click the switch on. -
Page 39: Ftp File Sharing
Sharing Files FTP File Sharing On the Protocols page, click the switch to turn on FTP (File Transfer Protocol) and allow access to your Iomega StorCenter px2-300d. Click to select either FTP or secure FTP (SFTP) or both. You must enable security to apply SFTP. -
Page 40: Nfs File Sharing
Iomega StorCenter px2-300d User Guide NFS File Sharing On the Protocols page, click the switch to turn on NFS (Network File System) to allow remote hosts to mount file systems over a network and interact with them as though they were mounted locally to your Iomega StorCenter px2-300d. -
Page 41: Rsync: Synchronizing Files With Another Storage Device Or Other Computers
Synchronizing Files with Another Storage Device or Other Computers When you turn on this protocol, you can enable the Iomega StorCenter px2-300d as an rsync server. When the px2-300d is an rsync server, it can be used as a source and/or destination device for rsync Copy Jobs. -
Page 42: Tftp
Iomega StorCenter px2-300d User Guide TFTP On the Protocols page, click the switch to turn on TFTP (Trivial File Transfer Protocol) and allow access to your Iomega StorCenter. When you turn TFTP on, you can send files to your Iomega device using FTP. -
Page 43: Monitoring Your Device With An Snmp Management Tool
Sharing Files Monitoring Your Device with an SNMP Management Tool SNMP (Simple Network Management Protocol) provides information about the state of the Iomega StorCenter px2-300d to various management tools. SNMP should be disabled unless you are specifically providing information to a management system that requires this information. -
Page 44: Webdav: Managing Files Using Http Or Https
WebDAV (Web-based Distributed Authoring and Versioning) is a protocol that provides web-based access to Shares on the Iomega StorCenter px2-300d. With WebDAV enabled on the px2-300d, you can view, add, or delete files through your WebDAV client using either HTTP for unencrypted access or HTTPS for encrypted access. -
Page 45: Windows Dfs: Creating A Distributed Windows File System
Sharing Files Windows DFS: Creating a Distributed Windows File System Windows DFS (Distributed File System) organizes Shares and files on a network, such that they appear to be all in one directory tree on a single px2-300d, even if the Shares reside on many devices. -
Page 46: Windows File Sharing
Iomega StorCenter px2-300d User Guide Windows File Sharing Windows File Sharing allows you to work in Workgroup mode, using Iomega StorCenter px2-300d Console to create users and manage access. To enable Windows File Sharing, click the switch on. -
Page 47: Sharing Content Through The Home Page
Sharing Content through the Home Page Sharing Your Content with the World When you set up the Home Page of your Iomega StorCenter px2-300d, you are presenting public content to anyone who accesses your px2-300d. That public content includes a slideshow and public Shares. -
Page 48: Adding A Custom Home Page
Iomega StorCenter px2-300d User Guide Adding a Custom Home Page You can customize the look of the home page of your Iomega StorCenter px2-300d to include html pages and client-side scripting, such as Javascript. This customized home page replaces the default home page on the px2-300d. -
Page 49: Automatically Sending Content To Multiple People At Once
To configure a Share as an Email Active Folder, access Shares from the Iomega StorCenter px2-300d Console, select or create a Share, and expand the Active Folders section to enable and configure email distribution. -
Page 50: Sharing Content Using Social Media: Overview
If you have an account with social media services such as Facebook, Flickr, or YouTube, you can share content on your Iomega StorCenter px2-300d with your friends and family using one or more of these social media sites. To share your content using social media sites, create Shares called Active Folders, and connect each Active Folder with a social media account. -
Page 51: Managing Your Content
Sharing Files Managing Your Content You manage content on your Iomega StorCenter px2-300d using the Content Viewer. The Content Viewer is a graphical file browser that lets you view and manage content in the Shares on your px2- 300d. The Content Viewer is divided into two panes. The left pane lists the Shares on the px2-300d and allows you to delete or add a Share. -
Page 52: Transferring Content To And From Your Iomega Storcenter Px2-300D With Copy Jobs
Any NAS device automatically discovered on the same subnet as your px2-300d Any NAS device that you manually add to the subnet using the Iomega Storage Manager Any external storage device, such as a USB device, connected to your px2-300d ... -
Page 53: Getting Content From A Usb External Storage Device
Sharing Files Getting Content from a USB External Storage Device You can transfer content to your Iomega StorCenter px2-300d from external USB storage devices. The External Storage page displays a list of externally connected storage devices. You can connect supported external storage to your px2-300d using one of the provided USB ports. When you connect external storage to your px2-300d, that device content is accessible from the Shares page. -
Page 54: One-Touch Transferring Of Content From A Usb Device
Share for any automatically created QuikTransfer Copy Jobs. QuikTransfer automatically copies all files from any USB external storage device plugged into your Iomega StorCenter px2-300d to the destination Share when the QuikTransfer button is pressed. Setting QuikTransfer 1. -
Page 55: Iscsi: Creating Ip-Based Storage Area Networks (San)
Creating IP-Based Storage Area Networks (SAN) iSCSI Overview The iSCSI page allows you to create iSCSI drives on your Iomega StorCenter px2-300d and allows the Iomega Storage Manager to communicate with those drives over a network. An iSCSI drive provides a single place for all your storage, which you can divide as needed to support all computers in your enterprise business. -
Page 56: Adding Iscsi Drives
3. If your Iomega device has multiple Storage Pools, select the desired Storage Pool from the drop-down menu. 4. Enter a name for the iSCSI drive. How you name your iSCSI drive will depend on your Iomega StorCenter meeting one of the following conditions: ... - Page 57 Creating IP-Based Storage Area Networks (SAN) You can connect iSCSI drives on your Iomega StorCenter to your computer using Iomega Storage Manager or the Microsoft software initiator. If you are using another type of software or hardware initiator, you must use the native tools provided with your initiator to connect your iSCSI drives.
-
Page 58: Managing Iscsi Drives
Iomega StorCenter px2-300d User Guide Managing iSCSI Drives The page describes how to: Assign iSCSI Drives to Volumes Change Access Permissions Creating iSCSI Drives and Adding Them to Volumes Every iSCSI drive that you create is added to a volume. In most cases, an iSCSI drive is automatically added to a volume when you create the iSCSI drive. -
Page 59: Deleting Iscsi Drives
Deleting iSCSI Drives To delete an iSCSI drive: 1. From the Iomega StorCenter px2-300d Console, click iSCSI. 2. Click the iSCSI name to expand the iSCSI drive. 3. In the iSCSI Information section, click Delete to delete the iSCSI drive. -
Page 61: Storage Pool Management
A Storage Pool is a grouping of drives with a certain storage size and an assigned data protection. A Storage Pool has a minimum of one drive. By default, your Iomega device has one Storage Pool. Storage Pool Data Protection For each Storage Pool, you can select its type of protection. -
Page 62: Adding And Managing Storage Pools
Adding and Managing Storage Pools A Storage Pool is a grouping of drives with a certain storage size and an assigned data protection. A Storage Pool has a minimum of one drive. By default, your Iomega StorCenter px2-300d has one Storage Pool. -
Page 63: Managing Drives
The Drive Management page provides settings for managing storage and lets you apply global settings The Drive Management page provides settings for managing storage and lets you apply global settings for drives on your Iomega StorCenter px2-300d . Setting Write Caching Select a value for disk write caching. -
Page 64: Drive Status
Iomega StorCenter px2-300d User Guide 2. Check Add drives to storage system to add a newly installed drive. You see this option only if there is at least one unused drive on the px2-300d. 3. To change the protection, choose a value from the drop-down menu: Mirror (RAID 10) Uses half of the storage space for protection, leaving half for actual data. - Page 65 Storage Pool Management learn more about how content is stored...
-
Page 66: Modifying A Storage Pool
Iomega StorCenter px2-300d User Guide Modifying a Storage Pool 1. On the Drive Management page, expand the Information section of the Storage Pool you want to modify. 2. Enter a new name for the Storage Pool. 3. To change the protection, choose a value from the drop-down menu. You can change the... -
Page 67: Adding And Managing Volumes
Shares in Volumes All Shares on the Iomega StorCenter px2-300d are added to volumes, and the size of the Share is limited by the free space of the volume. When you create a Share, you can add it to a volume at the same time. - Page 68 Iomega StorCenter px2-300d User Guide 4. To allow the volume to increase in size as needed, check Grow automatically when needed and enter a maximum size in the Maximum Size text box. 5. Click Create to save your changes. 6. Click Cancel to discard any changes.
-
Page 69: Deleting A Storage Pool
Storage Pool Management Deleting a Storage Pool 1. On the Drive Management page, expand the Information section of the Storage Pool you want to delete. 2. Click Delete. The Delete Storage Pool window displays. 3. Select Check this box if you want to delete the Storage Pools. 4. -
Page 70: Changing Raid Protection Types
Iomega StorCenter px2-300d User Guide Changing RAID Protection Types You can change the RAID protection of existing Storage Pools. Before you can change RAID data protection of a Storage Pool, you must delete all data on the Storage Pool. If you are unfamiliar with RAID protection, it is recommended that you do not change this setting. -
Page 71: Adding New Drives To Your Iomega Storcenter Px2-300D
Note: You can add only one drive at a time on a px2-300d. One drive is required for booting up. If you are using an Iomega StorCenter ix2-dl, you can replace both drives. To install new hard drives in your px2-300d: 1. -
Page 73: Drive Management
The Drive Management page provides settings for managing storage and lets you apply global settings The Drive Management page provides settings for managing storage and lets you apply global settings for drives on your Iomega StorCenter px2-300d . Setting Write Caching Select a value for disk write caching. -
Page 74: Drive Status
Iomega StorCenter px2-300d User Guide 1. Click Settings. 2. Check Add drives to storage system to add a newly installed drive. You see this option only if there is at least one unused drive on the px2-300d. 3. To change the protection, choose a value from the drop-down menu: Mirror (RAID 10) Uses half of the storage space for protection, leaving half for actual data. - Page 75 Drive Management modify Storage Pools delete Storage Pools learn more about how content is stored...
-
Page 77: Backing Up And Restoring Your Content
Iomega Personal Cloud features Backup of Data through RAID Protection The drives in your Iomega device are protected using a built-in, pre-configured technology that redundantly stores data across the drives. This technology, known as RAID (Redundant Array of Independent Disks), enables a series of drives to act together as a single storage system. For more... -
Page 78: Backing Up To And Restoring From Your Device
Backing up Macs with Time Machine You can back up your Iomega StorCenter px2-300d to Time Machine. To set up Time Machine backups on an Iomega StorCenter px2-300d, run the Time Machine setup from the Mac you want to back up and follow these instructions: 1. -
Page 79: Copy Jobs Overview
USB drive, but you also want to maintain a backup of these pictures on your Iomega device. Using Copy Jobs, you can create a task that copies your photos on the USB drive to a Share on your Iomega device, and you can set that task to a schedule so the images automatically copy at a specific time. -
Page 80: Backing Up Your Device
Any NAS device automatically discovered on the same subnet as your px2-300d Any NAS device that you manually add to the subnet using the Iomega Storage Manager Any external storage device, such as a USB device, connected to your px2-300d ... - Page 81 Backing up and Restoring Your Content Adding Copy Jobs The page describes how to: Add Copy Jobs Set From Information Set To Information Set a Schedule Adding Copy Jobs 1. On the Copy Jobs page, click .
- Page 82 Iomega StorCenter px2-300d User Guide 4. Enter a valid username and password, if applicable, for the device to provide access to its folders. 5. To select a specific folder, click to select a source location for the What to copy: section.
- Page 83 Backing up and Restoring Your Content 5. To select a specific folder, click to select a destination location for the Copy to here: section. In the Copy to here dialog, select a Share or a folder from a Share to copy your files. 6.
- Page 84 Iomega StorCenter px2-300d User Guide Managing Copy Jobs From the Copy Jobs page, you can add, start, stop, delete, or monitor Copy Jobs. After you have added Copy Jobs, the Copy Jobs page displays a list of Copy Jobs. The information section includes the name of each Copy Job, date and time it last ran, and its next scheduled time.
- Page 85 Backing up and Restoring Your Content Modifying Copy Jobs 1. In the list on the Copy Jobs page, find the Copy Job you want to modify, and click it to expand the Information section. 2. Refer to Adding a Copy Job for information about revising the Copy Job fields.
- Page 86 Iomega StorCenter px2-300d User Guide Deleting Copy Jobs 1. In the list on the Copy Jobs page, find the Copy Job you want to delete. 2. Click from the Actions column of the table to delete the Copy Job. The Delete Copy Job pop-up window opens.
- Page 87 Backing up and Restoring Your Content Restoring Files with Copy Jobs To restore files with Copy Jobs, create a new Copy Job that reverses the back-up Copy Job. Modify the From and To settings to copy files from the backup location to the original source location, specify what to restore, set overwrite settings, and choose the protocol for the Copy Job.
-
Page 88: Backing Up With Mozy Backup
Backing up with Mozy Backup The Mozy online backup service allows you to create a Mozy account, connect your Iomega StorCenter px2-300d to the account, and back up Shares and folders to the Mozy cloud service. Enabling Mozy Account Information 1. -
Page 89: Restoring Files With Mozy Backup
Backing up and Restoring Your Content Restoring Files with Mozy Backup To restore folders and files with Mozy Backup: 1. Click the link to restore any files and folders you back up to your Mozy account. 2. Select the desired backup from the Backup Date: drop-down menu, either the latest backup or a previous one. -
Page 90: Registering With Avamar For Backup And Restore
Avamar is backup and recovery server software that uses deduplication to eliminate redundant copies of data, reducing the required storage space. For example, your Iomega StorCenter px2-300d might have 100 email messages with the same 1 MB attachment. If all those emails are backed up, that same attachment is backed up 100 times, requiring 100 MB of storage space. -
Page 91: Backing Up With Amazon S3
Backing up and Restoring Your Content Backing up with Amazon S3 The Amazon S3 online storage service allows you to back up your Iomega StorCenter px2-300d to the cloud. Enabling the Amazon S3 Feature 1. On the Amazon S3 page, click the switch on. -
Page 92: Restoring Files With Amazon S3
Iomega StorCenter px2-300d User Guide Restoring Files with Amazon S3 When you want to restore files from the Amazon S3 cloud service to your Iomega StorCenter px2- 300d, you can choose to restore all files or select individual files to restore. -
Page 93: Backing Up With Iomega Personal Cloud
Backing up and Restoring Your Content Backing up with Iomega Personal Cloud You can back up content on your Iomega StorCenter by creating a Copy Job from the Iomega Personal Cloud on it to another Iomega device that is a member of the cloud. -
Page 94: Restoring Files With Personal Cloud
Iomega StorCenter px2-300d User Guide Restoring Files with Personal Cloud You can restore content on your Iomega device by creating a Copy Job from the Iomega Personal Cloud on it to another Iomega device that is a member of the Personal Cloud. -
Page 95: Securing Your Device And Contents
What Is Security and Do I Need It? Security is an optional feature you can enable on your Iomega StorCenter px2-300d to secure Shares, create users, and allow some features to be enabled. When you create users, you limit access to your px2-300d to specific people, and when you secure Shares, you limit data access to specific users. -
Page 96: Enabling Security And Creating An Administrator User
Iomega StorCenter px2-300d User Guide Enabling Security and Creating an Administrator User With security turned on, only administrator users can view or change settings on the px2-300d, including creating or deleting users and Shares. When you create users, you limit access to your px2- 300d to specific people, and when you secure Shares, you limit data access to specific users. -
Page 97: Limiting Access To Your Content By Creating Users
Iomega StorCenter Console. Administrator users can change various settings on the Iomega device, including adding and deleting Shares. If you create groups, you can also limit access to your Iomega device by group so you don’t have to specify access for each individual user. -
Page 98: Users
Iomega StorCenter px2-300d User Guide Users Users Overview When security is enabled, the Users page displays all users on the Iomega StorCenter px2-300d and enables administrators to add and modify users. Non-administrator users can be added to limit access to Share content. Additional administrator users can be added allow specific users to configure the px2-300d. -
Page 99: Adding Users
2. Before you can create or modify users, you must have security enabled on your Iomega StorCenter Iomega device. If security is already enabled, you are ready to add users. If not, a pop-up window appears for enabling security and create an administrator user to manage your secured Iomega device. -
Page 100: Managing Users
Personal Cloud. A trusted device is a machine, either a computer or another px2-300d, that belongs to an added user. Only trusted devices that belong to users that have been added to the px2-300d can join the Iomega Personal Cloud. You see this option only if a... - Page 101 Securing Your Device and Contents 2. To give this user access to a specific set of Shares, click Add access permissions. 3. In the Add Access Permissions pop-up window, select which Shares this user can access, and click Apply. 4. Uncheck Read or both Read and Write to limit or deny access permission to each Share for this user.
-
Page 102: Deleting Users
Iomega StorCenter px2-300d User Guide Deleting Users To delete a user: 1. From the Iomega StorCenter px2-300d Console, click Users. 2. To delete an existing user, click the username to expand the user. 3. In the User Information section, click Delete. -
Page 103: Groups
Groups consist of one or more users, and administrators can grant each group rights to Shares on the Iomega StorCenter px2-300d. Users can belong to more than one group. The Groups page enables administrators to create one or more groups, and grant each group rights to Shares on the px2-300d. -
Page 104: Adding Groups
Iomega StorCenter px2-300d User Guide Adding Groups 1. On the Groups page, click Add a group. The Information section opens. 2. From the Information section, give the new group a name. 3. To add users to the group, click Add users. Select a user or users to include in the group. -
Page 105: Managing Groups
9. If NFS is enabled, the GID field is visible. The GID value must be the same on both the Linux client and the Iomega StorCenter px2-300d for the client to access files. To modify the GID, type a new GID value. -
Page 106: Deleting Groups
Iomega StorCenter px2-300d User Guide Deleting Groups To delete a group: 1. From the Iomega StorCenter px2-300d Console, click Groups. 2. To delete an existing group, click to expand the group. 3. In the Information section, click Delete to delete the group. -
Page 107: Using Active Directory Domain To Manage Users And Groups
On the Users and Groups page, administrator users can import users and groups from an Active Directory server and grant them access rights to Shares on the Iomega StorCenter px2-300d. The Users and Groups page is visible when you enable Active Directory on the px2-300d. For more... -
Page 108: Managing Users And Groups With Active Directory
3. Select the checkbox next to a user or group to import that user or group to your Iomega StorCenter px2-300d from your Active Directory domain. Select the checkbox in the title bar to select all the users and groups in your Active Directory domain. - Page 109 Securing Your Device and Contents 6. Uncheck Read to remove all access to a Share and remove the Share from the table. If iSCSI is enabled, uncheck Read to remove all access to an iSCSI drive and remove the iSCSI drive from the table.
-
Page 110: Deleting Active Directory Users And Groups
Deleting Active Directory Users and Groups To delete a user or a group: 1. From the Iomega StorCenter px2-300d Console, click Users and Groups. 2. To delete an existing user or group, click to expand that user or group. 3. In the Information section, click Delete. Deleting a user or group does not delete any Shares to which the user or group has access. -
Page 111: Personal Cloud: Accessing Your Device From Anywhere In The World
What Is an Iomega Personal Cloud ? An Iomega Personal Cloud turns an Iomega StorCenter px2-300d into a hub for sharing files and backing up data among computers anywhere in the world. A Personal Cloud can exist on your Iomega StorCenter px2-300d, or on another Iomega network device. -
Page 112: Is My Content Secure
Iomega StorCenter px2-300d User Guide Is My Content Secure? Your content is always secure using an Iomega Personal Cloud. If you create a Personal Cloud with security disabled, you are required to enter a password when accessing your Iomega device remotely. -
Page 113: Iomega Personal Cloud Setup Overview
Create the Iomega Personal Cloud through the Iomega StorCenter Console Creating an Iomega Personal Cloud starts with providing a name for your Personal Cloud and an email address associated with it. After creating the Personal Cloud, you can use the Personal Cloud... -
Page 114: Creating An Iomega Personal Cloud
Personal Cloud from the Iomega Storage Manager on their computer. If you have content on your Iomega device that you do not want to share with members of your Personal Cloud, you should put that content in secured Shares that are not accessible to anyone invited to your Personal Cloud. -
Page 115: Configuring Router Port Forwarding For Personal Cloud
Iomega device. Router Port Forwarding Some routers have a UPnP option. If you have a UPnP router, enabling this option allows the Iomega device software to automatically configure the correct forwarding ports. Otherwise, you must perform additional steps by manually enabling port forwarding on your home network router. Port forwarding allows invited users to connect remote computers or other Iomega device devices outside of your local area network (LAN) as trusted devices to the Personal Cloud on your network. - Page 116 Iomega StorCenter px2-300d User Guide How do I ... create an Iomega Personal Cloud...
-
Page 117: Configuring Your Iomega Personal Cloud
Enabling Internet Access to the px2-300d You can grant internet users, including Iomega Link users, secure access to the web interface and unrestricted access to media content on your px2-300d. Iomega Link is an application that runs on mobile devices, and allows access to content on your px2-300d. Before enabling secure access, you... - Page 118 Iomega StorCenter px2-300d User Guide disable or delete my Personal Cloud enable security on px2-300d enable the Home Page...
-
Page 119: Inviting People Onto Your Iomega Personal Cloud
When you invite people to join your Iomega Personal Cloud, you are actually selecting from existing users on your Iomega device, or adding people as users on your Iomega device. In addition, you are optionally allowing them to add their computers or Iomega storage devices as trusted devices your Personal Cloud. -
Page 120: Joining A Trusted Device To An Iomega Personal Cloud
Iomega StorCenter px2-300d User Guide Joining a Trusted Device to an Iomega Personal Cloud You can join your Iomega StorCenter px2-300d to the Personal Cloud as a trusted device if you have been given permission by the person administering the Personal Cloud. -
Page 121: Managing Trusted Devices On A Personal Cloud
Personal Cloud: Accessing Your Device From Anywhere in the World Managing Trusted Devices on a Personal Cloud As an Iomega Personal Cloud administrator, you can manage trusted devices on your Personal Cloud. Trusted devices can be disconnected, or you can completely delete a trusted device from the Personal Cloud. -
Page 122: Using Copy Jobs With An Iomega Personal Cloud
Clicking the Copy Jobs button opens the Copy Jobs page to help you configure a Copy Job between the Iomega StorCenter px2-300d that is hosting the Personal Cloud and a trusted device. For more information on setting up Copy Jobs, refer to... -
Page 123: Disabling Or Deleting Your Iomega Personal Cloud
Personal Cloud: Accessing Your Device From Anywhere in the World Disabling or Deleting Your Iomega Personal Cloud When you disable your Personal Cloud, you are eliminating access to your Personal Cloud without deleting the account information you created when you set up the Personal Cloud. Later, if you want to reenable your Personal Cloud, you can without reentering all the account information. -
Page 124: Accessing Content Using Your Iomega Personal Cloud
Iomega StorCenter px2-300d User Guide Accessing Content Using Your Iomega Personal Cloud You can share content by inviting users to your Personal Cloud. The data in Shares can be made accessible to all users of the Cloud, or access can be restricted to a specific set of users by setting access permissions to Shares. -
Page 125: Informing Users What To Do With Iomega Personal Cloud
Personal Cloud: Accessing Your Device From Anywhere in the World Informing Users What to Do with Iomega Personal Cloud Personal Cloud enables users to access your Iomega device from the web. They can enter myCloudName.Myiomegacloud.com in a web browser, and when prompted, enter a valid username and password for your Iomega device. -
Page 127: Sharing Content Using Social Media
If you have an account with social media services such as Facebook, Flickr, or YouTube, you can share content on your Iomega StorCenter px2-300d with your friends and family using one or more of these social media sites. To share your content using social media sites, create Shares called Active Folders, and connect each Active Folder with a social media account. -
Page 128: Facebook
Note: If you do not have a Facebook account, go to the Facebook website to open an account. Configuring a Facebook Active Folder 1. From the Iomega StorCenter px2-300d Console, click Shares. 2. Select a Share to use as a Facebook Active Folder, and click to expand the Active Folder section. -
Page 129: Flickr
Note: If you do not have a Flickr account, go to the Flickr website to open an account. Configuring a Flickr Active Folder 1. From the Iomega StorCenter px2-300d Console, click Shares. 2. Select a Share to use as a Flickr Active Folder, and click to expand the Active Folder section. -
Page 130: Youtube
Note: If you do not have a YouTube account, go to the YouTube website to open an account. Configuring a YouTube Active Folder 1. From the Iomega StorCenter px2-300d Console, click Shares. 2. Select a Share to use as a YouTube Active Folder, and click to expand the Active Folder section. -
Page 131: Share Content Through Iomega Personal Cloud
Sharing Content Using Social Media Share Content through Iomega Personal Cloud You can share your multimedia content with friends and family through an Iomega Personal Cloud. Refer to the Iomega Personal Cloud section for more information. How do I ... -
Page 133: Media Management
Media Management Media Management Overview The px2-300d has a built-in media server that, when turned on, scans for media content in specific Shares that have media sharing enabled. Any media content contained in these specific Shares are accessible to any user on your network with a media player, even if the Share is secured. For information on enabling a folder as a media folder, refer to Managing Shares. -
Page 134: Media Services Capabilities And Limitations
When media sharing is enabled, internet users, including those users on mobile devices running the Iomega Link, can access media content on your px2-300d. Note: When you enable internet access to your media content, all media content is available to any user on the internet, regardless of any security you may have applied to a media file. -
Page 135: Sharing Media Content Over The Internet
"x" is the IP value for your network. When a user enters this IP address, the Twonky Server page on the Iomega device displays. Refer to the Support section of the Twonky Server page for information on using the server. Iomega Link users can access media content directly from the Iomega device. -
Page 136: Media Aggregation
If you have multiple Digital Living Network Alliance (DLNA) servers in your network that have media content, you can combine all media content into one view by enabling aggregation on your Iomega device. When you enable aggregation, all media content on DLNA servers is available for playback using a DLNA player, such as Playstation®3, Windows Media Player®, or Xbox 360®. -
Page 137: Social Media Sharing
Media Management Social Media Sharing You can share media content, such as movies and pictures, using social media sites like Facebook, Flickr, or YouTube. Refer to the Sharing Content Using Social Media section for more information. How do I ... share content through Facebook share content through Flickr share content through YouTube... -
Page 138: Streaming Music, Movies, And Pictures
1. Locate the source directory of your iTunes media content. 2. Drag, or copy, your existing media content to a Share that has media sharing enabled. 3. When you open the iTunes Library, iTunes will display all of the media content from the Iomega device. -
Page 139: Photos
Media Management Photos Photos Overview Your Iomega device has multiple ways to manage your pictures. Your Iomega device can: Stream pictures that are in Shares with media sharing enabled Display pictures on the Home Page in a slideshow ... -
Page 140: Streaming Pictures
Iomega StorCenter px2-300d User Guide Streaming Pictures The Iomega StorCenter has a built-in media server that, when turned on, can scan for pictures in specific folders that have media sharing enabled. Any pictures contained in these specific folders will then be accessible to any user on your network with a media player. For information on enabling... -
Page 141: Creating A Slideshow On The Device Home Page
Media Management Creating a Slideshow on the Device Home Page Your px2-300d can display a slideshow on its home page. On the Home Page Settings feature page, check Display slideshows to display picture slideshows from folders on the px2-300d. Click Manage slideshows to configure any slideshows you want to display. -
Page 142: Automatically Resizing Your Photos
Share named by the photo size you choose, such as 800x600. To configure a Share as a Photo Resize Active Folder, access Shares from the Iomega StorCenter px2-300d Console, select a Share, and expand the Active Folders section to enable and configure it. -
Page 143: Getting Pictures From Your Camera
2. Optionally, if you want to automatically delete the pictures from your camera once they have been safely copied to your Iomega StorCenter, check Remove Copied Pictures From Camera to automatically delete the pictures from your camera once they have been safely copied to your px2-300d. -
Page 144: Music
Iomega StorCenter px2-300d User Guide Music Music Overview If you have music files in media-sharing enabled folders on your Iomega device, those music files can be streamed by a DLNA player running on a computer on the network. How do I ... -
Page 145: Streaming Music
Media Management Streaming Music The Iomega StorCenter has a built-in media server that, when turned on, scans for music in specific folders that have media sharing enabled. Any music contained in these specific folders is then accessible to any user on your network with a media player. For information on enabling a folder as... -
Page 146: Torrents
Torrent downloads allow you to share files using a peer-to-peer file sharing protocol. With torrent download enabled, you can download files using the torrent protocol to your Iomega StorCenter and then those files can be uploaded by other torrent users. -
Page 147: Enabling Torrent Downloads
Media Management Enabling Torrent Downloads 1. On the Torrent Download page, click the switch on. 2. Click Settings to modify the torrent download and upload settings. 3. In the Torrent Download Settings dialog box, enter a value for Maximum Download Speed. This sets the rate at which files are downloaded to your device. -
Page 148: Deleting Torrent Jobs
Iomega StorCenter px2-300d User Guide Deleting torrent jobs 1. On the Torrent Download page, select a torrent you want to delete. 2. Click the under the Action column to delete the torrent. 3. Click Yes to delete the torrent. -
Page 149: Configuring Your Router For Torrent Downloads
Media Management Configuring Your Router for Torrent Downloads You must manually configure your router to forward a specific port to your px2-300d. Most routers refer to this as port forwarding or application access, and it is recommended that you refer to your router's documentation to learn how to set these values. -
Page 150: Torrent Active Folders
Shares and Active Folders. Configuring a Torrent Active Folder 1. From the Iomega StorCenter px2-300d Console, click Shares. 2. Select a Share to use as a Torrent Active Folder, and click to expand the Active Folder section. - Page 151 Media Management Adding Torrent Files to Your px2-300d 1. Open the Shares page. 2. Expand the Share that is enabled as a Torrent Active Folder. Any Share can be enabled as a Torrent Active Folder. For information on enabling a Torrent Active Folder, refer to Torrent Active Folders.
-
Page 152: Videos
Iomega StorCenter px2-300d User Guide Videos Video Capabilities Overview Your Iomega StorCenter has multiple ways to manage your videos. Your Iomega device can: Stream movies that are in Shares with media sharing enabled Upload videos that are added to Shares associated with social media sites How do I ... -
Page 153: Streaming Movies
Media Management Streaming Movies The Iomega StorCenter has a built-in media server that, when turned on, scans for movies in specific folders that have media sharing enabled. Any movies contained in these specific folders are accessible to any user on your network with a media player. For information on enabling a folder as... -
Page 155: Adding Applications To Your Device
Adding Applications to Your Device Application Overview You can install supported applications on your px2-300d using the Application Manager page. For each application installed you may have the option to uninstall, start, and stop the application. How do I... install an application... -
Page 156: Application Manager
This page shows the applications which came preinstalled with your px2-300d, as well as applications that you have manually installed. Note: Only valid applications built using the Iomega StorCenter SDK can be installed on your px2- 300d. -
Page 157: Upgrading Your Device
Upgrading Your Device Software Updates The Software Updates page identifies the px2-300d software status and provides the ability to update the software for the px2-300d. This software is protected by RSA BSAFE technology. 1. In the table listing the current software installed on your px2-300d, click in the Action column to check for updates. - Page 158 Iomega StorCenter px2-300d User Guide 6. Click Apply all pending updates to apply the update or updates. The software updates will be applied to your px2-300d. If you want to remove the update without applying changes, click in the Action column.
-
Page 159: Recovering Your Device Configuration
You can also apply the configuration backup to other Iomega StorCenter devices of the same model, effectively using the configuration as a template. Note: Configuration Backup and Restore does not back up or restore any data files on your px2-300d. -
Page 161: Hardware Management
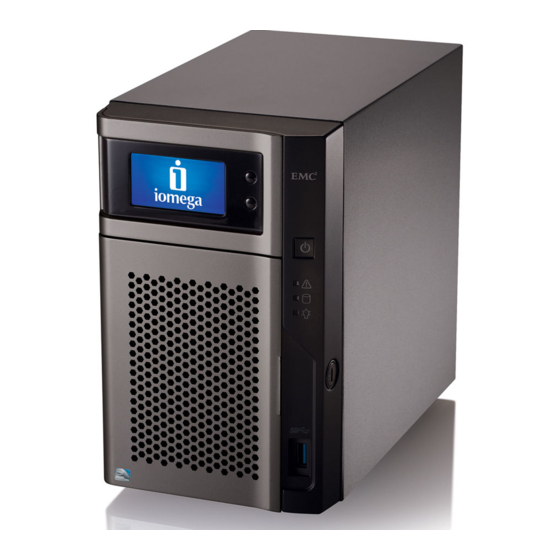
Hardware Management About the Iomega StorCenter px2-300d Components This topic describes the front and rear panel components of the px2-300d. Front Panel Status Indicators, Buttons and Ports 1. LCD display — Scroll through the display screen to view the device name, free disk space, IP address, and date and time. -
Page 162: Drive Bay Access
2. Drive bays — The px2-300d has two user-serviceable drive bays. Pull out a drive tray to install or replace a hard disk drive. Refer to the list of qualified hard disks on the Iomega support site at www.iomega.com/support before adding new drives. Add one drive at a time to ensure correct recognition on the device. -
Page 163: Rear Panel
6. Security Lock — Connect security cable to protect your StorCenter px2-300d from theft. Default Settings: IP Address — If not DHCP server is found on your network, the StorCenter px2-300d will get a self-assigned IP address in the 169.254.x.x range. ... -
Page 164: Energy Saving
Iomega StorCenter px2-300d User Guide Energy Saving The Energy Saving page provides power settings for the px2-300d. Power Down Drives Click the Power Down Drives drop-down menu to select how much idle time should be allowed to elapse before the px2-300d powers down the drives. Drives automatically power back up when the px2-300d accesses them. -
Page 165: Factory Reset
4. In the pop-up confirmation, click Yes to perform the factory reset. After the factory reset completes, the px2-300d powers down or restarts depending on your selection. Warning: When you quickly delete or securely delete all data on your Iomega StorCenter, any installed applications, as listed on the Application Manager page, are also deleted. -
Page 166: Ups Management
Iomega StorCenter px2-300d User Guide UPS Management The Iomega StorCenter UPS Management page allows you to monitor the status of an attached Uninterruptible Power Supply. If your px2-300d is connected to a UPS battery backup unit, it is listed on this page. The battery status of the backup unit is also indicated, displaying how much of a charge is left in the battery. -
Page 167: Adding New Drives To Your Iomega Storcenter Px2-300D
Note: You can add only one drive at a time on a px2-300d. One drive is required for booting up. If you are using an Iomega StorCenter ix2-dl, you can replace both drives. To install new hard drives in your px2-300d: 1. -
Page 168: Troubleshooting Routers
Iomega StorCenter px2-300d User Guide Troubleshooting Routers If you encounter a problem while connecting or using your px2-300d, check the topics listed below for possible solutions. If you have properly set port forwarding on your router and remote access still does not work, you may have multiple routers on your network. -
Page 169: Configuring Port Forwarding On Double Nat Networks
Hardware Management Configuring Port Forwarding on Double NAT Networks If for some reason the network configuration cannot be changed and your setup requires the double NAT, you must perform the port forwarding steps twice. On the primary router, set the port forwarding to the cascaded router's external IP address. - Page 170 Iomega StorCenter px2-300d User Guide Make sure you are assigning the px2-300d an IP address that is not in use by another device. 5. Enter a subnet mask. The subnet mask describes the size of your network. For most networks this is 255.255.255.0 which allows for 256 network devices. If you are on a larger network or are using the self-assigned APIPA range (169.254.x.x), you must use a...
-
Page 171: Additional Support
Iomega product, visit the Iomega website. Please select your region carefully. Here's just some of what is available on Iomega's award-winning web support site 24 hours a day, 7 days a week: ... -
Page 172: Support
Iomega StorCenter px2-300d User Guide Support The Support feature opens the Iomega web site where you can get more information about your Iomega StorCenter px2-300d. The Support page provides access to content for learning more about using and supporting your px2-300d. -
Page 173: Legal
Legal px2-300d Trademark Page Iomega, the stylized logo, and StorCenter are either registered trademarks or trademarks of Iomega Corporation in the United States and other countries. Microsoft and Windows are either registered trademarks or trademarks of Microsoft Corporation in the United States and/or other countries. Mac, Macintosh, and AppleTalk are registered trademarks or trademarks of Apple Computer Inc. -
Page 174: Regulatory Information
Equipment Regulations (ICES-003, Class B). CE (European Community) Iomega declares that this Iomega product conforms to all applicable European Directives and Standards, including by way of example, 2004/108/ EC, 2009/125/ EC, and 2006/95/ EC. The Declaration of Conformity can be obtained by contacting Iomega or is available at www.iomega.com/support/ce. - Page 175 Legal 3821 BM Amersfoort NL - The Netherlands Waste Electrical and Electronic Equipment (WEEE) In accordance with European Directive 2002/96/EC on Waste Electrical and Electronic Equipment (WEEE), the presence of the above symbol on the product or on its packaging indicates that this item must not be disposed of in the normal unsorted municipal waste stream.
-
Page 176: Safety Information
Iomega StorCenter px2-300d User Guide Safety Information Observe the following guidelines when using your Iomega StorCenter px2-300d: 1. Follow all instructions marked on the px2-300d and in the documentation. 2. Use only the power supply provided with the px2-300d. 3. Unplug the px2-300d before cleaning. Do not use liquid or aerosol cleaners. Use a damp cloth for cleaning. -
Page 177: Limited Warranty
Iomega's sole option and expense (shipping may be charged), and Iomega may use new or refurbished parts or products to do so. If Iomega is unable to repair or replace a defective product, your alternate exclusive remedy shall be a refund of the original purchase price. -
Page 178: Obtaining Warranty Service
LOSS OF DATA, USE, OR PROFITS EVEN IF IOMEGA HAS BEEN ADVISED OF THE POSSIBILITY OF SUCH DAMAGES. In no event shall Iomega 's liability exceed the original purchase price of the drive or the media disk. Some jurisdictions do not allow the exclusion or limitation of incidental or consequential damages, so the above limitation or exclusion may not apply to you. -
Page 179: Open Source
Support and Download site at www.iomega.com/support. To locate the download page for open source code, select your Iomega product and your operating system. Scroll down the page to the search field and enter “open source”. In addition, you can also obtain a copy of the applicable open source code on CD by sending a money order or check for $10 (USD) to: Iomega Corporation •...