Advertisement
Available languages
Available languages
Advertisement
Table of Contents

Related Manuals for Hobart 2812 ML-104618


Summary of Contents for Hobart 2812 ML-104618
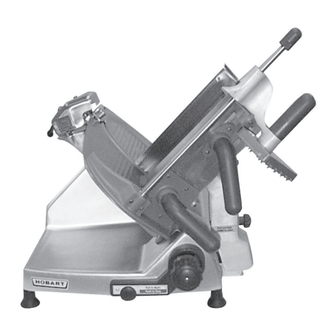
- Page 1 MODEL 2812 & 2912 SLICERS MODELS 2812 ML-104959 2912 ML-104964 Previous models covered by this manual: 2812 ML-104618 ML-104826 2912 ML-104761 ML-104821 F33251 (801) [F34454.200] 190 Railside Road North York, Ontario M3A 1B1 2812 SLICER PRINTED IN THE U.S.A.
- Page 2 (0.37 W) motor and are available for single-phase electrical service. The slicer features the exclusive Hobart Stay-Sharp contoured cast solid stainless steel knife. The slicer is furnished with a cord and plug as standard equipment. Other features and options include: The Power Interrupt feature, standard, requires the slicer to be manually re-started after a power interruption.
-
Page 3: Installation
UNPACKING Immediately after unpacking the slicer, check for possible shipping damage. If the slicer is found to be damaged, save the packaging material and contact the carrier within 15 days of delivery. Prior to installing the slicer, test the electrical service to assure it agrees with the specifications on the machine data plate. -
Page 4: Operation
SAFETY SAFETY DEVICES INCORPORATED IN THIS SLICER MUST BE IN THEIR CORRECT OPERATING POSITIONS ANYTIME THE SLICER IS IN USE. The T must be in position and secured with the L NIFE OVER not removable. The D EFLECTOR The M (Fig. - Page 5 SLICING — MODEL 2912 With the Gauge Plate fully closed, pull the Carriage all the way toward you until it reaches its stop. With the Meat Grip out of the way, place the product to be sliced on the Carriage Tray. Adjust the fence by loosening the thumb screw and sliding the fence so that it is close to the product but not pushing against it.
- Page 6 CLEANING This machine must be thoroughly cleaned and sanitized after each day’s operation or after being idle for an extended period of time. WARNING: THE SLICER KNIFE IS VERY SHARP. EXERCISE EXTREME CAUTION WHEN WORKING NEAR THE KNIFE. WARNING: UNPLUG MACHINE POWER CORD AND TURN THE INDEX KNOB FULLY CLOCKWISE BEFORE CLEANING THE SLICER.
- Page 7 DO NOT immerse slicer base or motor in water. If using a chlorinated sanitizing solution, dilute per manufacturer’s guidelines. Rinse with fresh water. NOTE: Failure to follow use, care, and maintenance instructions may void your Hobart warranty. Maximum LOCK LEVER...
-
Page 8: Knife Sharpening
KNIFE SHARPENING The Hobart cast stainless steel knife will provide long service in normal food retail or commercial kitchen use. However, in high volume applications where it is a practice to sharpen the knife frequently or even daily, the knife will be expended in a shorter time. - Page 9 TRANCHEURS 2812 ET 2912 CONVIENT AUX MODÈLES SUIVANTS : MODÈLES 2812 ML-104959 2912 ML-104964 CONVIENT AUSSI AUX ANCIENS MODÈLES : 2812 ML-104618 ML-104826 2912 ML-104761 ML-104821 F33251 (801) [F34454.200] 190 Railside Road North York (Ontario) M3A 1B1 TRANCHEUR 2812 ’ E IMPRIMÉ...
- Page 10 L’équipement standard comprend un couteau profilé en acier inoxydable massif Stay-Sharp exclusif à Hobart, un cordon et une fiche d’alimentation. Autres caractéristiques standard et en option : Interrupteur de sécurité (standard) : suite à une coupure de courant, l’utilisateur doit remettre l’appareil en marche manuellement.
- Page 11 DÉBALLAGE Immédiatement après avoir déballé le trancheur, vérifier s’il n’a pas été endommagé lors du transport. En cas de dommages, conserver le matériel d’emballage et communiquer avec le transporteur dans les 15 jours suivant la date de réception. Avant d’installer le trancheur, s’assurer que l’alimentation électrique de l’immeuble correspond aux spécifications de la plaque signalétique sur le côté...
-
Page 12: Dispositifs De Sécurité
DISPOSITIFS DE SÉCURITÉ S’ASSURER QUE LES DISPOSITIFS DE SÉCURITÉ DU TRANCHEUR SONT À LA POSITION APPROPRIÉE AVANT CHAQUE USAGE. La PLAQUE PROTECTRICE DU COUTEAU doit être maintenue en position par le BOUTON DE VERROUILLAGE (Fig. 2). La BAGUE DE PROTECTION est fixée en permanence. Le DÉFLECTEUR fixé... - Page 13 TRANCHAGE - MODÈLE 2912 Fermer complètement la plaque de coupe et tirer le chariot vers soi jusqu’au bout de sa course. Éloigner le pousse-talon et mettre le produit sur le chariot. Régler la cloison en desserrant la vis à serrage manuel et la glisser de façon qu’elle soit près du produit sans toutefois appliquer de pression sur celui-ci.
- Page 14 NETTOYAGE Nettoyer et désinfecter l’appareil à fond après chaque journée d’utilisation et toute période d’inactivité prolongée. AVERTISSEMENT : LE COUTEAU EST TRÈS TRANCHANT. EXERCER UNE EXTRÊME PRUDENCE EN MANOEUVRANT PRÈS DE CELUI-CI. AVERTISSEMENT : DÉBRANCHER L’APPAREIL ET TOURNER LE BOUTON DE RÉGLAGE D’UN TOUR COMPLET DANS LE SENS DES AIGUILLES D’UNE MONTRE AVANT DE PROCÉDER AU NETTOYAGE.
- Page 15 Si une solution désinfectante chlorée est utilisée pour le nettoyage, diluer selon les directives du fabricant. Rincer à l’eau fraîche. NOTA : À défaut de suivre les directives d’utilisation, de nettoyage et d’entretien, la garantie Hobart sera annulée. LEVIER DE VERROUILLAGE...
-
Page 16: Entretien
Appuyer sur le bouton de réenclenchement en dessous du trancheur, près du pied avant droit, en cas de surcharge du moteur du chariot. SERVICE DE L’ENTRETIEN Communiquer avec le service de l’entretien Hobart le plus près pour toute réparation ou tout réglage de cet appareil. F33251 (801) [F34454.200] ENTRETIEN AFFÛTAGE :...